一、什么是单元测试
单元测试的基本思想是:以尽可能小的区块测试代码,并且尽可能地和其他的代码模块以及运行时的依赖(如数据库和网络)相隔离。如果应用程序能通过测试验证每个单元本身都能够正常地工作,那么在出了问题时将可以更加容易地找出根本原因。
ChannelHandler 是 Netty 应用程序的关键元素,所以彻底地测试它们应该是开发过程的一个标准部分。最佳实践要求你的测试不仅要能够证明实现是正确的,而且还要能够很容易地隔离那些因修改代码而突然出现的问题。这种类型的测试叫作单元测试。
二、EmbeddedChannel 概述
EmbeddedChannel是一种特殊的Channel实现,它是 Netty 专门为改进针对 ChannelHandler的单元测试而提供的。
我们前头说过,可以将 ChannelPipeline 中的 ChannelHandler 实现链接在一起,以构建应用程序的业务逻辑。
这种设计支持将任何潜在的复杂处理过程分解为小的可重用的组件,每个组件都将处理一个明确定义的任务或者步骤。
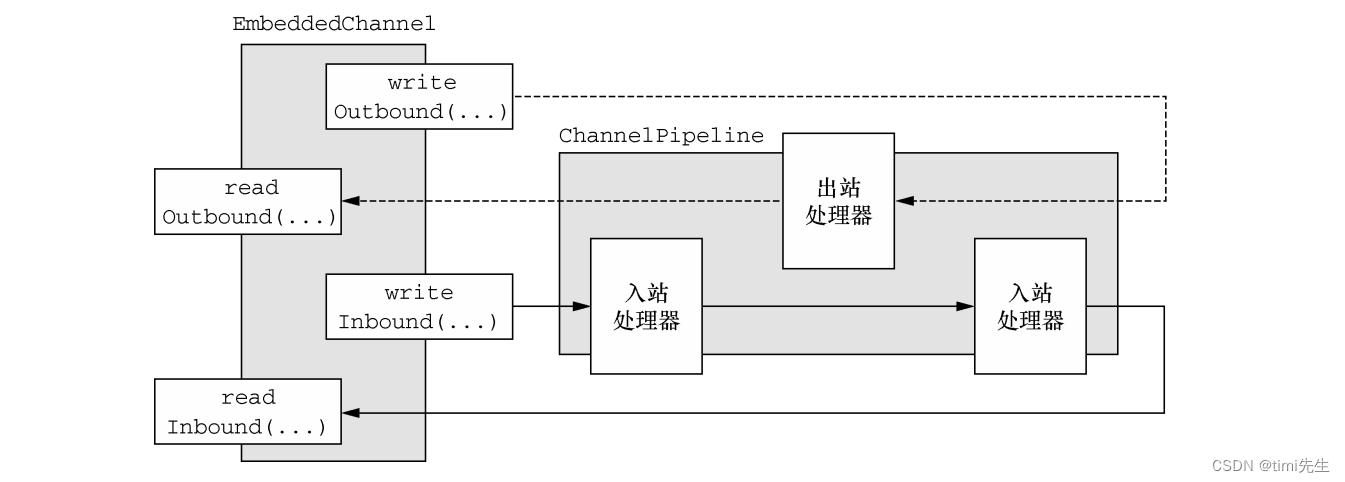
Netty 提供了它的 Embedded 传输,用于测试 ChannelHandler。这个传输是一种特殊的Channel 实现,这个实现提供了通过 ChannelPipeline传播事件的简便方法。
这个想法是直截了当的:将入站数据或者出站数据写入到EmbeddedChannel 中,然后检查是否有任何东西到达了 ChannelPipeline 的尾端。以这种方式,便可以确定消息是否已经被编码或者被解码过了,以及是否触发了任何的ChannelHandler 动作。
下面是一些有关EmbeddedChannel 的方法,可以作为参考:
| 名 称 | 描 述 |
|---|---|
| writeInbound(Object… msgs) | 将入站消息写到 EmbeddedChannel 中。如果可以通过readInbound()方法从 EmbeddedChannel 中读取数据,则返回 true |
| readInbound() | 从 EmbeddedChannel 中读取一个入站消息。任何返回的东西都穿越了整个 ChannelPipeline。如果没有任何可供读取的,则返回 null |
| writeOutbound(Object… msgs) | 将出站消息写到EmbeddedChannel中。如果现在可以通过readOutbound()方法从 EmbeddedChannel 中读取到什么东西,则返回 true |
| readOutbound() | 从 EmbeddedChannel 中读取一个出站消息。任何返回的东西都穿越了整个 ChannelPipeline。如果没有任何可供读取的,则返回 null |
| finish() | 将 EmbeddedChannel 标记为完成,并且如果有可被读取的入站数据或者出站数据,则返回 true。这个方法还将会调用 EmbeddedChannel 上的close()方法 |
入站数据由 ChannelInboundHandler 处理,代表从远程节点读取的数据。出站数据由ChannelOutboundHandler 处理,代表将要写到远程节点的数据。根据要测试的 ChannelHandler,将使用Inbound()或者Outbound()方法,或者兼而有之。
下面图展示了使用 EmbeddedChannel 的方法,数据是如何流经 ChannelPipeline 的。我们可以使用 writeOutbound()方法将消息写到 Channel 中,并通过 ChannelPipeline 沿着出站的方向传递。随后,可以使用 readOutbound()方法来读取已被处理过的消息,以确定结果是否和预期一样。类似地,对于入站数据,需要使用writeInbound()和readInbound()方法。
在每种情况下,消息都将会传递过ChannelPipeline,并且被相关的 ChannelInboundHandler 或者ChannelOutboundHandler 处理。如果消息没有被消费,那么可以使用readInbound()或者readOutbound()方法来在处理过了这些消息之后,酌情把它们从Channel中读出来。
三、 使用 EmbeddedChannel 测试 ChannelHandler
3.1 测试入站消息
我们先写一个简单的 ByteToMessageDecoder 实现,再对它进行测试。
下图展示了一个简单的 ByteToMessageDecoder 实现。给定足够的数据,这个实现将产生固定大小的帧。如果没有足够的数据可供读取,它将等待下一个数据块的到来,并将再次检查是否能够产生一个新的帧。

我们可以用代码实现这一过程:
public class FixedLengthFrameDecoder extends ByteToMessageDecoder {

    //扩展 ByteToMessageDecoder 以处理入站字节,并将它们解码为消息
//指定要生成的帧的长度
private final int frameLength;
public FixedLengthFrameDecoder(int frameLength) {


if (frameLength <= 0) {


throw new IllegalArgumentException(
"frameLength must be a positive integer: " + frameLength);
}
this.frameLength = frameLength;
}
@Override
protected void decode(ChannelHandlerContext ctx, ByteBuf in,List<Object> out) throws Exception {


//检查是否有足够的字节可以被读取,以生成下一个帧
while (in.readableBytes() >= frameLength) {


//从 ByteBuf 中读取一个新帧
ByteBuf buf = in.readBytes(frameLength);
//将该帧添加到已被解码的消息列表中
out.add(buf);
}
}
}
ok,下来我们对它进行测试。再此之前,先了解一下JUnit 断言。
JUnit 断言
org.junit.Assert 类提供了很多用于测试的静态方法。失败的断言将导致一个异常被抛出,并将终止当前正在执行中的测试。导入这些断言的最高效的方式是通过一个 import static 语句来实现:
import static org.junit.Assert.*;
一旦这样做了,就可以直接调用 Assert 方法了:
assertEquals(buf.readSlice(3), read);
好了,我们开始写测试代码:
    public class FixedLengthFrameDecoderTest {


        //使用了注解@Test 标注,因此JUnit 将会执行该方法
        @Test
        public void testFramesDecoded() {

    //第一个测试方法:testFramesDecoded()
           //创建一个ByteBuf,并保存9个字节
            ByteBuf buf = Unpooled.buffer();
            for (int i = 0; i < 9; i++) {


                buf.writeByte(i);
            }
            ByteBuf input = buf.duplicate();
            //创建一个EmbeddedChannel,并添加一个FixedLengthFrameDecoder,其将以 3 字节的帧长度被测试
            EmbeddedChannel channel = new EmbeddedChannel(new FixedLengthFrameDecoder(3));
            // 将数据写入EmbeddedChannel
            assertTrue(channel.writeInbound(input.retain()));
            //标记 Channel为已完成状态
            assertTrue(channel.finish());
            // 读取所生成的消息,并且验证是否有 3 帧(切片),其中每帧(切片)都为 3 字节
            ByteBuf read = (ByteBuf) channel.readInbound();
            assertEquals(buf.readSlice(3), read);
            read.release();
            read = (ByteBuf) channel.readInbound();
            assertEquals(buf.readSlice(3), read);
            read.release();
            read = (ByteBuf) channel.readInbound();
            assertEquals(buf.readSlice(3), read);
            read.release();
            assertNull(channel.readInbound());
            buf.release();
        }

        @Test
        public void testFramesDecoded2() {

    //第二个测试方法:testFramesDecoded2()
            ByteBuf buf = Unpooled.buffer();
            for (int i = 0; i < 9; i++) {


                buf.writeByte(i);
            }
            ByteBuf input = buf.duplicate();
            EmbeddedChannel channel = new EmbeddedChannel(
                    new FixedLengthFrameDecoder(3));
           //返回 false,因为没有一个完整的可供读取的帧
            assertFalse(channel.writeInbound(input.readBytes(2)));
            assertTrue(channel.writeInbound(input.readBytes(7)));
            assertTrue(channel.finish());
            ByteBuf read = (ByteBuf) channel.readInbound();
            assertEquals(buf.readSlice(3), read);
            read.release();
            read = (ByteBuf) channel.readInbound();
            assertEquals(buf.readSlice(3), read);
            read.release();
            read = (ByteBuf) channel.readInbound();
            assertEquals(buf.readSlice(3), read);
            read.release();
            assertNull(channel.readInbound());
            buf.release();
        }
    }
这个代码做了什么呢?
其中 testFramesDecoded()方法验证了:一个包含 9 个可读字节的 ByteBuf 被解码为3个ByteBuf,每个都包含了 3 字节。需要注意的是,仅通过一次对 writeInbound()方法的调用,ByteBuf 是如何被填充了 9 个可读字节的。在此之后,通过执行 finish()方法,将
EmbeddedChannel 标记为了已完成状态。最后,通过调用 readInbound()方法,从 EmbeddedChannel 中正好读取了 3 个帧和一个 null。
testFramesDecoded2()方法入站 ByteBuf 是通过两个步骤写入的,当 writeInbound(input.readBytes(2))被调用时,返回了 false。
3.2 测试出站消息
测试出站消息的处理过程和测试入站的类似。我们会使用EmbeddedChannel 来测试一个编码器形式的 ChannelOutboundHandler。
编码器是一种将一种消息格式转换为另一种的组件,下一篇我们会重点去说它,很有意思可以很多事~
出站的基本逻辑大概会是这样:
- 持有 AbsIntegerEncoder 的 EmbeddedChannel 将会以 4 字节的负整数的形式写出
站数据; - 编码器将从传入的 ByteBuf 中读取每个负整数,并将会调用 Math.abs()方法来获取
其绝对值; - 编码器将会把每个负整数的绝对值写到 ChannelPipeline 中。
public class AbsIntegerEncoder extends MessageToMessageEncoder<ByteBuf> {

    //扩展 MessageToMessageEncoder 以将一个消息编码为另外一种格式
@Override
protected void encode(ChannelHandlerContext channelHandlerContext,ByteBuf in, List<Object> out) throws Exception {


//检查是否有足够的字节用来编码
while (in.readableBytes() >= 4) {


//从输入的 ByteBuf中读取下一个整数,并且计算其绝对值
int value = Math.abs(in.readInt());
//将该整数写入到编码消息的 List 中
out.add(value);
}
}
}
它的测试代码如下:
public class AbsIntegerEncoderTest {


@Test
public void testEncoded() {


//创建一个 ByteBuf,并且写入 9 个负整数
ByteBuf buf = Unpooled.buffer();
for (int i = 1; i < 10; i++) {


buf.writeInt(i * -1);
}
//创建一个EmbeddedChannel,并安装一个要测试的AbsIntegerEncoder
EmbeddedChannel channel = new EmbeddedChannel(new AbsIntegerEncoder());
//写入 ByteBuf,并断言调用 readOutbound()方法将会产生数据
assertTrue(channel.writeOutbound(buf));
//将该Channel标记为已完成状态
assertTrue(channel.finish());
// 读取所产生的消息,并断言它们包含了对应的绝对值
for (int i = 1; i < 10; i++) {


assertEquals(i, channel.readOutbound());
}
assertNull(channel.readOutbound());
}
}