概述
目前,开发期本都采用了前后端完全分离的模式,即后端只提供数据接口,前端通过AJAX请求获取数据,这种模式完全不需要模板引擎。
前后端分离这种模式不利于SEO,因为SEO本质是一个服务器向另一个服务器发起请求,解析请求内容。一般,搜索引擎不执行请求到的js文件。如果一个html页面,在服务器端不渲染数据,而在浏览器端才渲染出数据,那么搜索引擎请求到的这个html页面就是没有渲染数据的。 这就不利于内容被搜索引擎搜索到。 所以,服务端在将页面发送给浏览器前就渲染好部分或全部数据,保证页面上是有数据的,才有利于SEO。
另外,前后端分离模式在性能上也会稍微差一点。在一些场景里,使用模板引擎会更方便如邮件模板。
常见的模板引擎:
- Thymeleaf
- Freemaker
- JSP
模板引擎的工作原理:
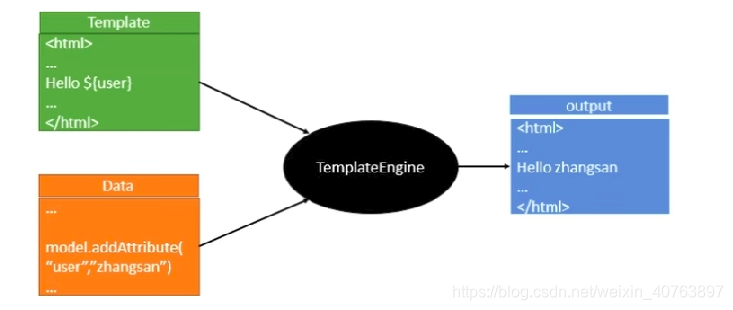
将模板与数据都交给模板引擎,它就会帮我们将数据渲染到模板上,形成一个输出,然后发给浏览器。
Thymeleaf
Thymeleaf是一个用于web和独立环境的现代服务器端Java模板引擎。Thymeleaf的目标是将优雅的自然模板引入到开发工作流中。这个自然模板就是HTML,它既可以在浏览器中正确显示,也可以作为静态原型,允许在开发团队中进行更强大的协作。Thymeleaf是现代HTML5 JVM web开发的理想之选。
Thymeleaf在有网络和无网络的环境下都可以运行。美工在浏览页面查看静态效果,也可以让程序员在服务器查看带数据的动态页面效果。Thymeleaf支持HTML原型,然后在HTML标签里增加额外的属性来达到模板+数据的展示方式。浏览器解释 html 时会忽略未定义的标签属性,所以 Thymeleaf 的模板可以静态地运行;当有数据返回到页面时,Thymeleaf 标签会动态地替换掉静态内容,使页面动态显示。THymeleaf是一个HTML页面。
.
第一步:集成Thymeleaf,在项目的pom.xml添加依赖
<properties>
 		<!--使用最新的版本-->
        <thymeleaf.version>3.0.11.RELEASE</thymeleaf.version>
        <thymeleaf-layout-dialect.version>2.4.1</thymeleaf-layout-dialect.version>
</properties>
<dependencies>
<dependency>
	<groupId>org.springframework.boot</groupId>
    <artifactId>spring-boot-starter-thymeleaf</artifactId>
</dependency>
</dependencies>
第二步:在application.yml文件配置Thymeleaf
spring:
        thymeleaf:
                prefix: classpath:/templates/
                check-template-location: true
                cache: false
                suffix: .html
                encoding: UTF-8
                content-type: text/html
                mode: HTML5
- prefix:指定模板所在的目录
- check-tempate-location: 检查模板路径是否存在
- cache: 是否缓存,开发模式下设置为false,避免改了模板还要重启服务器,线上设置为true,可以提高性能。
- encoding&content-type:设置编码与内容类型
- mode:thymeleaf 3.0.11版本支持处理HTML( HTML5, HTML 4 , XHTML)、XML、TEXT、JAVASCRIPT、CSS、RAW六种类型的模板
第三步:编写thymeleaf模板文件
在SpringBootProject/src/main/resources/templates目录创建thymeleaf模板article.html:
注意:必须加上命名空间xmlns:th="http://www.thymeleaf.org/,否则Thymeleaf的自定义标签没有提示!
<!DOCTYPE HTML>
<html xmlns="http://www.w3.org/1999/xhtml" xmlns:th="http://www.thymeleaf.org">
<html>
<head>
    <meta content="text/html;charset=UTF-8"/>
</head>
<body>
<table border="1" bgcolor="#f0ffff">
    <thead>
    <tr>
        <th>序号</th>
        <th>标题</th>
        <th>摘要</th>
        <th>创建时间</th>
    </tr>
    </thead>
    <!-- 使用th:each遍历 -->
    <tbody th:each="article : ${list}">
    <tr>
        <!-- 使用th:text属性输出 -->
        <td th:text="${article.id}"></td>
        <td th:text="${article.title}"></td>
        <td th:text="${article.summary}"></td>
        <td th:text="${article.createTime}"></td>
    </tr>
    </tbody>
</table>
</body>
</html>
第四步:编写controller
// 注解是@Controller,而不是@RestController,因为@RestController会自动将返回结果转为字符串
@Controller
@RequestMapping("/article")
public class ArticlePageController {

    private final Logger logger = LoggerFactory.getLogger(ArticlePageController.class);
    @GetMapping("/articleList")
    // 参数的名称就是前台要用的传参名称
    public String getArticle(Model model,@RequestParam(defaultValue = "奋斗的历史") String title){
        // title是由前台传到后台来的,如果没有值的时候,就用默认值

        ArticleBean articleBean = new ArticleBean();
        articleBean.setId(1);
        articleBean.setTitle(title);
        articleBean.setSummary(10);
        articleBean.setCreateTime(new Date());
        List<ArticleBean> list = new ArrayList<>();
        list.add(articleBean);
        // 这里的key一定是list,因为模板里用的就是list,这样模板引擎才能将其对应上
        model.addAttribute("list",list);
        // 返回值是classpath:/templates/下的模板路径,路径的最后是模板名称,不用加后缀。
        return "article";
    }
}
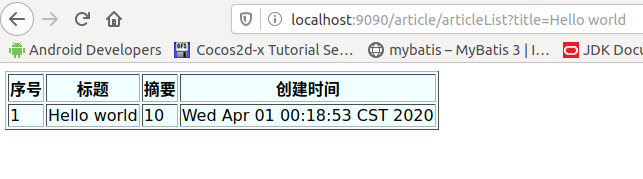
第五步:启动服务,测试
启动服务:
~/Desktop/SpringBootProject$ mvn spring-boot:run
为什么thymeleaf页面放在templates文件夹里面,并且后缀要是.html呢?
SpringBoot框架会将内置支持的功能组件放在spring-boot-autoconfigure-2.2.6.RELEASE.jar
包下,而 Thymeleaf 框架就是内置支持的。所以在这个包里面可以找对应的自动配置代码,即ThymeleafProperties.java类,如图:
 当然上述默认值是可以通过application.yml或application.properties文件来修改的。
谢谢阅读!
