第一部分、SpringBoot 添加junit单元测试
SpringBoot使用junit非常简单,我们来看一下,首先说明,这里使用的是springboot2.0.4的版本
一.pom.xml文件开启springboot测试包
<dependency>
    <groupId>org.springframework.boot</groupId>
    <artifactId>spring-boot-starter-test</artifactId>
    <scope>test</scope>
</dependency>
二.创建一个测试类
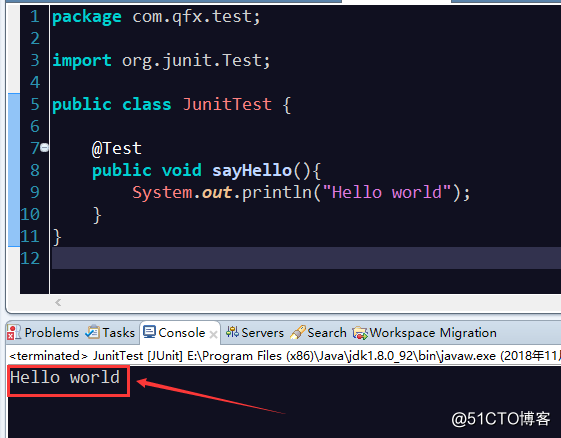
1.单文件测试,直接添加@Test注解即可,如图:
2.MVC形式调用
测试类,需要加上两个注解
 @RunWith(SpringRunner.class)
 @SpringBootTest(classes={App.class})
其中App.class是主程序入口类,即springboot的启动类
package com.qfx.test;
import org.junit.Test;
import org.junit.runner.RunWith;
import org.springframework.beans.factory.annotation.Autowired;
import org.springframework.boot.test.context.SpringBootTest;
import org.springframework.test.context.junit4.SpringRunner;
import com.qfx.system.App;
import com.qfx.system.service.SysUserService;
(SpringRunner.class)
(classes={App.class})
public class JunitTest {
<span class="hljs-meta">@Autowired</span>
SysUserService sysUserService;

<span class="hljs-meta">@Test</span>
<span class="hljs-function"><span class="hljs-keyword">public</span> <span class="hljs-keyword">void</span> <span class="hljs-title">printSysUserInfo</span><span class="hljs-params">()</span></span>{
    String userStr = sysUserService.getSysUserAll();
    System.out.println(userStr);
}
}
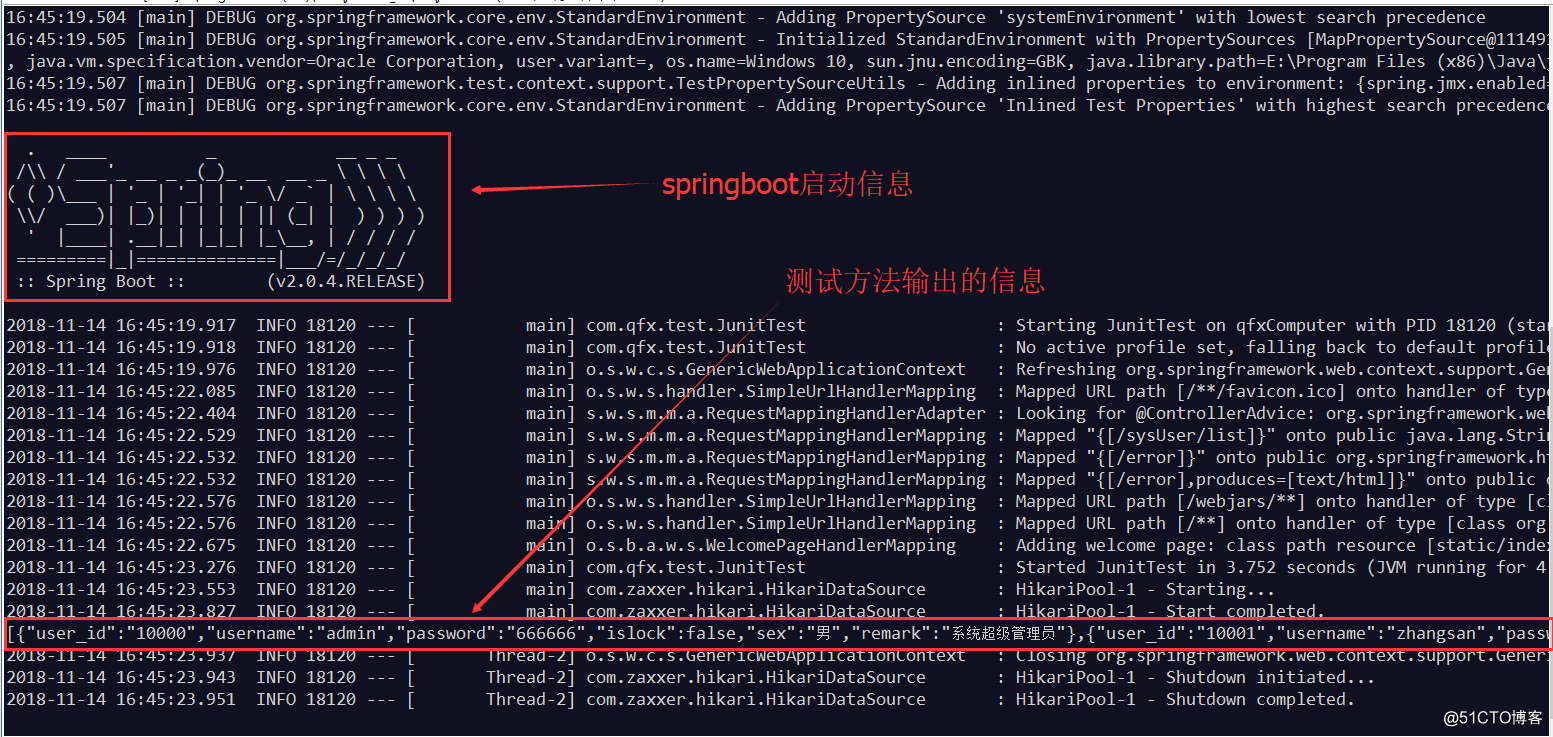
进行测试的时候会通过App.class来启动springboot,我们来看一下效果,如图:
至于对Controller的测试可以直接启动项目,通过浏览器来发送请求测试了,如果实在想使用junit来测试的话,可以使用来MockMvc进行
第二部分、Spring Boot 的测试类库
Spring Boot 提供了许多实用工具和注解来帮助测试应用程序,主要包括以下两个模块。
-
spring-boot-test:支持测试的核心内容。
-
spring-boot-test-autoconfigure:支持测试的自动化配置。
开发进行只要使用 spring-boot-starter-test 启动器就能引入这些 Spring Boot 测试模块,还能引入一些像 JUnit, AssertJ, Hamcrest 及其他一些有用的类库,具体如下所示。
- JUnit:Java 应用程序单元测试标准类库。
- Spring Test & Spring Boot Test:Spring Boot 应用程序功能集成化测试支持。
- AssertJ:一个轻量级的断言类库。
- Hamcrest:一个对象匹配器类库。
- Mockito:一个Java Mock测试框架,默认支付 1.x,可以修改为 2.x。
- JSONassert:一个用于JSON的断言库。
- JsonPath:一个JSON操作类库。
下面是 Maven 的依赖关系图。

以上这些都是 Spring Boot 提供的一些比较常用的测试类库,如果上面的还不能满足你的需要,你也可以随意添加其他的以上没有的类库。
测试 Spring Boot 应用程序
添加 Maven 依赖
<dependency>
    <groupId>org.springframework.boot</groupId>
    <artifactId>spring-boot-starter-test</artifactId>
    <version>1.5.10.RELEASE</version>
    <scope>test</scope>
</dependency>
1、 要让一个普通类变成一个单元测试类只需要在类名上加入 @SpringBootTest 和 @RunWith(SpringRunner.class) 两个注释即可。
2、 在测试方法上加上 @Test 注释。
如果测试需要做 REST 调用,可以 @Autowire 一个 TestRestTemplate。
@RunWith(SpringRunner.class)
@SpringBootTest
public class BBTestAA {
@Autowired
private TestRestTemplate testRestTemplate;
@Test
public void testDemo() {
…
}
}
GET请求测试
@Test
public void get() throws Exception {
    Map<String,String> multiValueMap = new HashMap<>();
    multiValueMap.put("username","Java技术栈");
    ActResult result = testRestTemplate.getForObject("/test/getUser?username={username}",ActResult.class,multiValueMap);
    Assert.assertEquals(result.getCode(),0);
}
POST请求测试
@Test
public void post() throws Exception {
    MultiValueMap multiValueMap = new LinkedMultiValueMap();
    multiValueMap.add("username","Java技术栈");
    ActResult result = testRestTemplate.postForObject("/test/post",multiValueMap,ActResult.class);
    Assert.assertEquals(result.getCode(),0);
}
文件上传测试
@Test
public void upload() throws Exception {
    Resource resource = new FileSystemResource("/home/javastack/test.jar");
    MultiValueMap multiValueMap = new LinkedMultiValueMap();
    multiValueMap.add("username","Java技术栈");
    multiValueMap.add("files",resource);
    ActResult result = testRestTemplate.postForObject("/test/upload",multiValueMap,ActResult.class);
    Assert.assertEquals(result.getCode(),0);
}
文件下载测试
@Test
public void download() throws Exception {
    HttpHeaders headers = new HttpHeaders();
    headers.set("token","javastack");
    HttpEntity formEntity = new HttpEntity(headers);
    String[] urlVariables = new String[]{"admin"};
    ResponseEntity<byte[]> response = testRestTemplate.exchange("/test/download?username={1}",HttpMethod.GET,formEntity,byte[].class,urlVariables);
    if (response.getStatusCode() == HttpStatus.OK) {
        Files.write(response.getBody(),new File("/home/javastack/test.jar"));
    }
}
