版权声明: https://blog.csdn.net/RAVEEE/article/details/85225238
本文将介绍springboot项目整合junit单元测试,请看以下步骤
一 导入pom文件
        <dependency>
			<groupId>org.springframework.boot</groupId>
			<artifactId>spring-boot-starter-test</artifactId>
			<version>2.1.1.RELEASE</version>
			<scope>test</scope>
		</dependency>
二 创建test启动类
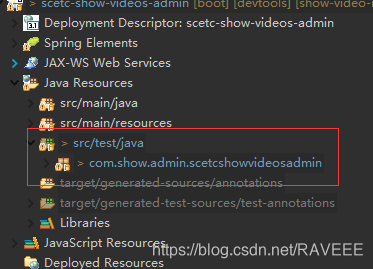
springboot项目创建之后会在src目录下创建test文件,如果没有该文件以及测试类,可以手动创建
三 相关注解讲解*
@RunWith:
当一个类被注释为
@Run.或扩展一个被注释的类
使用@RunWith,JUnit将调用它引用的类来运行 在该类中进行测试
@SpringBootTest
配置文件属性的读取 可以在运行Spring引导测试的测试类上指定的注释。在常规Spring
TestContext框架之上和之上提供以下特性:
当定义没有特定的@ContextConfiguration(loader=…)时,使用SpringBootContextLoader作为默认的ContextLoader。
当不使用嵌套@Configuration时,自动搜索@SpringBootConfiguration,并且没有指定显式的类。
允许使用properties属性定义自定义环境属性。
为不同的webEnvironment模式提供支持,包括启动一个完全运行的web服务器,监听一个已定义的或随机的端口。
四创建测试类
@RunWith(SpringRunner.class)
@SpringBootTest(classes = ScetcShowVideosAdminApplication.class)
@WebAppConfiguration
public class ScetcShowVideosAdminApplicationTests {
private TestRestTemplate template = new TestRestTemplate();
/**
* 测试方法执行前执行
*/
@Before
public void init() {
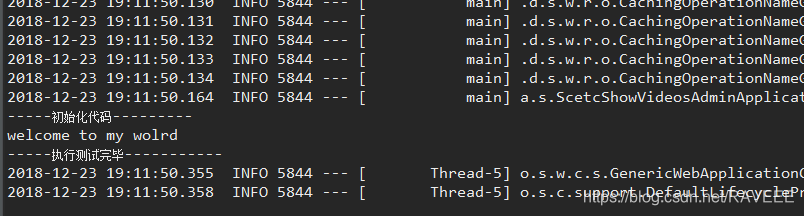
System.out.println("-----初始化代码---------");
}
@Test
public void test1() {
Map<String, Object> map = new HashMap();
String url = "http://localhost:8082/welcome";//修改为自己想要测试的api
String a= template.patchForObject(url, null, String.class);//可自己指定返回的数据类型
System.out.println(a.toString());
}
/**
* 测试方法执行后执行
*/
@After
public void after() {
System.out.println("-----执行测试完毕-----------");
}
}
五 运行结果