创建第一个Spring Boot项目
这里我考虑的是使用前后端分离的方式编写项目,前后端的数据通过交互JSON数据格式实现,下面演示如何一步一步搭建整个项目。
开发环境
-
IDEA
-
JDK 1.8+
-
Maven 3.5+
-
FastJSON
创建项目
浏览器打开https://start.spring.io/,这里提供了自动初始化一个项目的工具,根据需求进行配置即可。
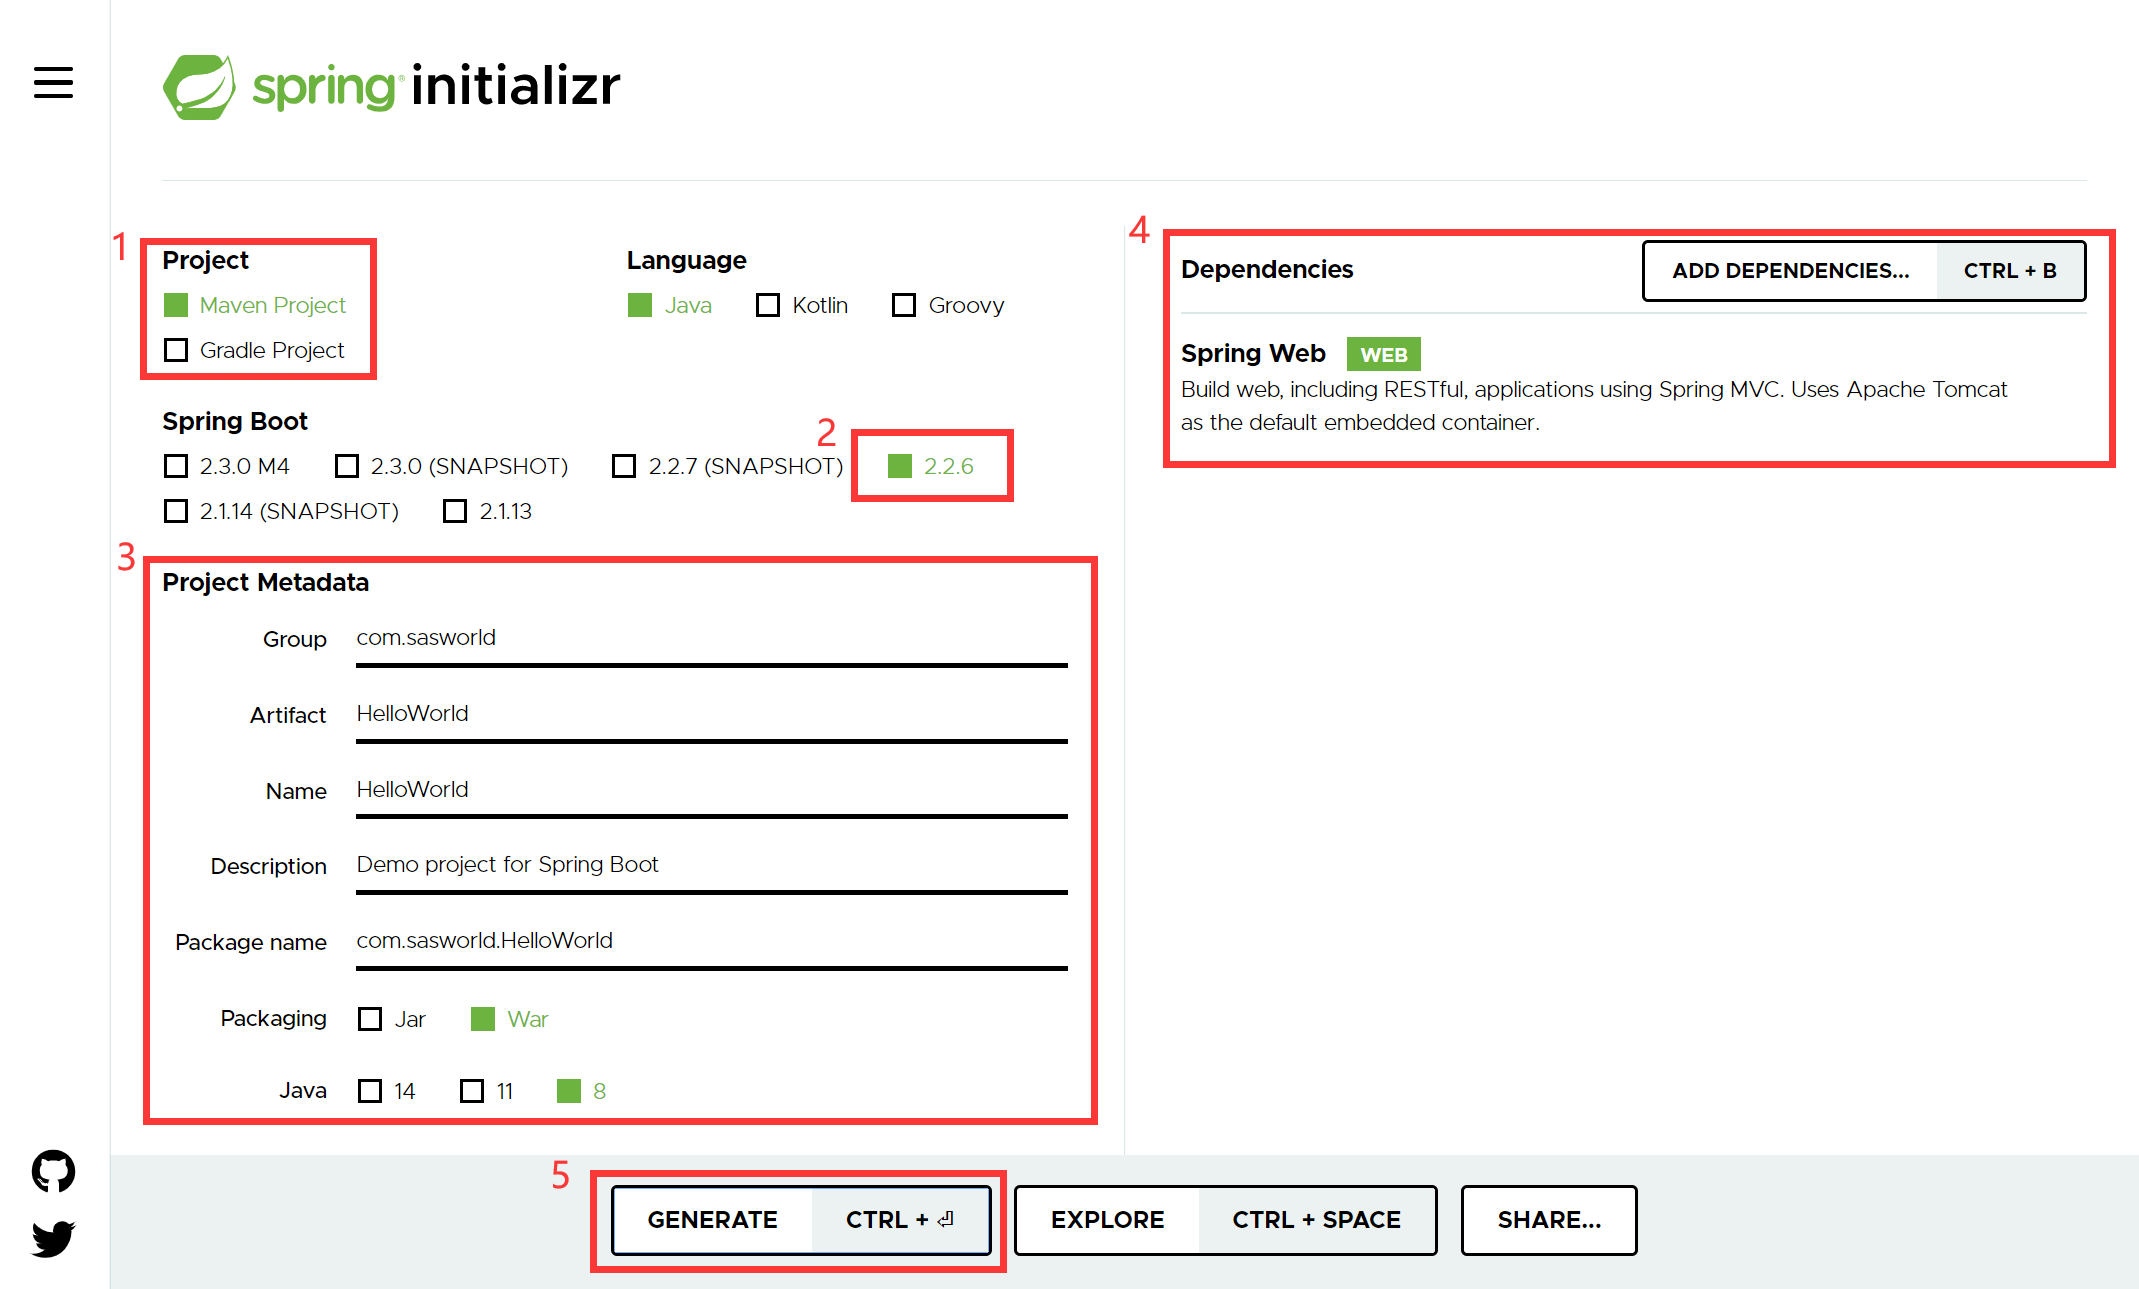
- 1 选择项目构建工具
- 2 选择Spring Boot版本
- 3 设置项目结构信息以及Java版本
- 4 添加项目依赖,点击搜索选择Spring Web
- 5 点击生成项目zip包
导入项目
将下载的zip包解压,使用IDEA导入项目,等待项目构建完成
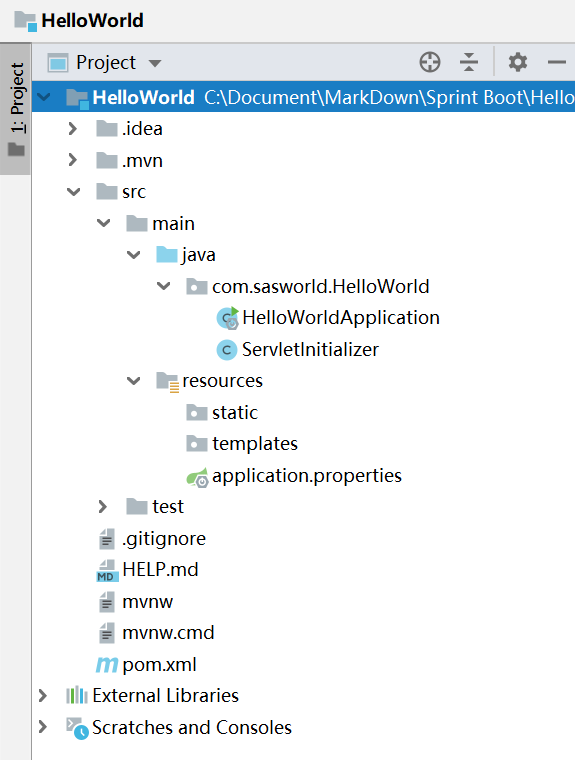
构建完成后目录结构如上图所示,HelloWorldApplicaption是项目的默认应用。。。。
resources目录中用于存放静态文件js、css、img以及html模板等,applicaption.properties文件用于配置项目属性
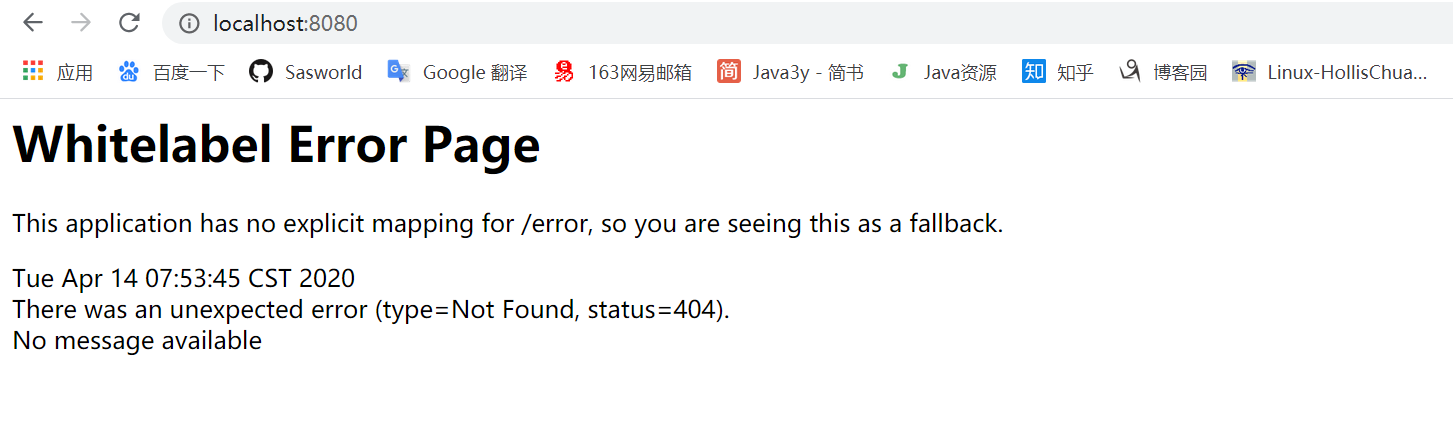
项目构建完成后可以启动项目,在浏览器中打开http://localhost:8080,可以看到如下界面,表示项目已经启动,由于目前项目中没有添加任何映射,因此提示找不到页面
访问第一个页面
首先打开pom.xml文件添加thymeleaf依赖,以便查找templates目录下的html页面
<!--引入模板引擎方便跳转html-->
<dependency>
<groupId>org.springframework.boot</groupId>
<artifactId>spring-boot-starter-thymeleaf</artifactId>
</dependency>
在templates目录下新建home.html文件,在文件中输出HelloWorld!
<!DOCTYPE html>
<html lang="en">
<head>
    <meta charset="UTF-8">
    <title>Title</title>
</head>
<body>
Hello world!
</body>
</html>
在项目中添加com.sasworld.helloworld.controller包,并新建MainController.java文件编写控制器,程序内容如下:
package com.sasworld.helloworld.controller;

import org.springframework.stereotype.Controller;
import org.springframework.web.bind.annotation.GetMapping;
import org.springframework.web.bind.annotation.RequestMapping;

@Controller
@RequestMapping(value = "/")  // 映射根目录,接收访问根目录的请求
public class MainController {

    @GetMapping  // 不设置值,默认访问根目录
    public String home() {
        return "home";
    }
}
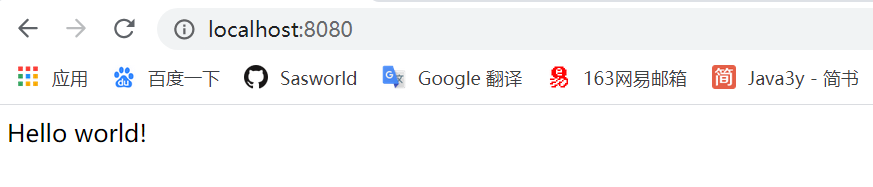
重新启动项目,再次访问http://localhost:8080,将会跳转至home.html,页面显示Hello world!表明控制器跳转页面成功。
验证从前端表单提交数据到后台程序
1.在项目中添加com.sasworld.helloworld.dao包,并创建实体类Car.java,具体属性如下
package com.sasworld.helloworld.dao;


public class Car {
    private Long id;   // 汽车编号
    private String brand;  // 汽车品牌
    private int price;  // 汽车价格

    protected Car(){}  // 无参构造函数,

    public Car(Long id, String brand, int price) {
        this.id = id;
        this.brand = brand;
        this.price = price;
    }

    public Long getId() {
        return id;
    }

    public void setId(Long id) {
        this.id = id;
    }

    public String getBrand() {
        return brand;
    }

    public void setBrand(String brand) {
        this.brand = brand;
    }

    public int getPrice() {
        return price;
    }

    public void setPrice(int price) {
        this.price = price;
    }

    public String toString() {
        return String.format("Car[id=%d, brand='%s', price='%d']", id, brand, price);
    }
}
2.新建add.html文件用于添加新的Car
<!DOCTYPE html>
<html lang="en">
<head>
    <meta charset="UTF-8">
    <title>Title</title>
</head>
<body>
<form action="/insert" method="POST">
    id:<input type="text" name="qID" value="">
    品牌:<input type="text" name="qDescription" value="">
    价格:<input type="text" name="qSelectItems" value="">
    <input type="submit" value="添加">
</form>
</body>
</html>
3.在MainController.java文件添加新的映射
@GetMapping("/add")  // 响应页面跳转请求
    public String add() {
    return "add";
}

@PostMapping("/insert")  // 响应POST请求
    public String addCar(Car car) {
    System.out.println(car.toString());  // 打印前端提交的数据
    return "redirect:/add";  // 重定向回添加页面
}
4.浏览器打开http://localhost:8080/add,输入数据点击添加提交表单

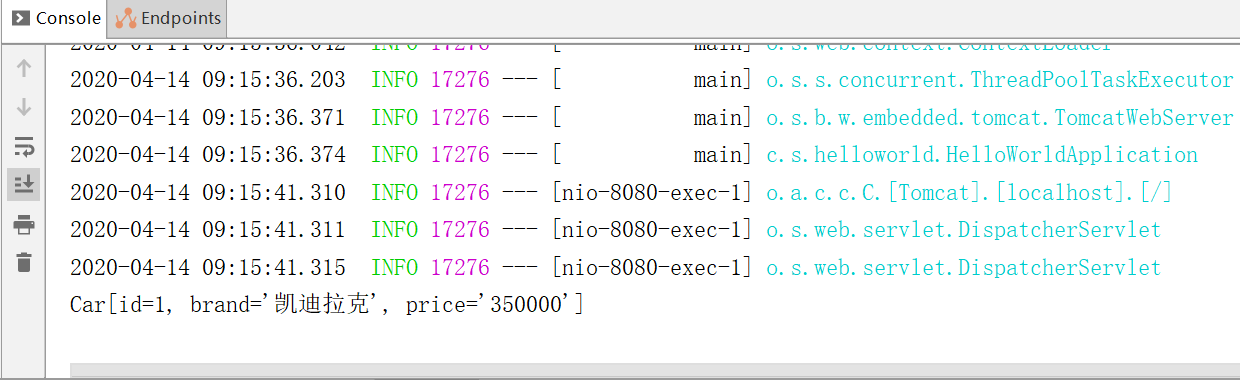
5.在IDEA控制台中可以看到前台提交的数据打印信息,表明数据成功从前天提交到后台
验证从后台传JSON数据到前台
1.添加FastJSON相关依赖
<!--引入fastjson依赖-->
<dependency>
    <groupId>com.alibaba</groupId>
    <artifactId>fastjson</artifactId>
    <version>1.2.62</version>
</dependency>
2.修改home.html文件
<!DOCTYPE html>
<html lang="en">
<head>
    <meta charset="UTF-8">
    <title>Title</title>
    <script src="/static/js/jquery-3.3.1.min.js"></script>
</head>
<body>
Hello world!
<input type="button" value="汽车列表" onclick="getCars()">
</body>
</html>
<script type="text/javascript">
    function getCars() {
        $.ajax({
            type: "GET",
            url: "/carlist" ,
            data: {datas:""},
            dataType: "json",
            contentType: "application/x-www-form-urlencoded; charset=utf-8",//设置字符集
            success: function(data) {
                console.log(data);
            }
        });
    }
</script>
3.在项目中添加com.sasworld.helloworld.configuration包,并创建实体类MyConfiguration.java配置FastJSON
package com.sasworld.helloworld.configuration;

import com.alibaba.fastjson.serializer.SerializerFeature;
import com.alibaba.fastjson.support.spring.FastJsonHttpMessageConverter;
import org.springframework.context.annotation.Configuration;
import org.springframework.http.MediaType;
import org.springframework.http.converter.HttpMessageConverter;
import org.springframework.web.servlet.config.annotation.WebMvcConfigurer;
import java.nio.charset.Charset;
import java.util.ArrayList;
import java.util.List;

@Configuration
public class MyConfiguration implements WebMvcConfigurer {
    @Override
    public void configureMessageConverters(List<HttpMessageConverter<?>> converters) {
        FastJsonHttpMessageConverter converter = new FastJsonHttpMessageConverter();
        com.alibaba.fastjson.support.config.FastJsonConfig config = new com.alibaba.fastjson.support.config.FastJsonConfig();
        //手动配置MediaType,否则会报错
        List<MediaType> supportedMediaTypes = new ArrayList<>();
        supportedMediaTypes.add(MediaType.APPLICATION_JSON);
        supportedMediaTypes.add(MediaType.APPLICATION_JSON_UTF8);
        supportedMediaTypes.add(MediaType.APPLICATION_ATOM_XML);
        supportedMediaTypes.add(MediaType.APPLICATION_FORM_URLENCODED);
        supportedMediaTypes.add(MediaType.APPLICATION_OCTET_STREAM);
        supportedMediaTypes.add(MediaType.APPLICATION_PDF);
        supportedMediaTypes.add(MediaType.APPLICATION_RSS_XML);
        supportedMediaTypes.add(MediaType.APPLICATION_XHTML_XML);
        supportedMediaTypes.add(MediaType.APPLICATION_XML);
        supportedMediaTypes.add(MediaType.IMAGE_GIF);
        supportedMediaTypes.add(MediaType.IMAGE_JPEG);
        supportedMediaTypes.add(MediaType.IMAGE_PNG);
        supportedMediaTypes.add(MediaType.TEXT_EVENT_STREAM);
        supportedMediaTypes.add(MediaType.TEXT_HTML);
        supportedMediaTypes.add(MediaType.TEXT_MARKDOWN);
        supportedMediaTypes.add(MediaType.TEXT_PLAIN);
        supportedMediaTypes.add(MediaType.TEXT_XML);
        converter.setSupportedMediaTypes(supportedMediaTypes);

        config.setDateFormat("yyyy-MM-dd");
        config.setCharset(Charset.forName("UTF-8"));
        config.setSerializerFeatures(
                //json格式化
                SerializerFeature.PrettyFormat,
                //输出value为null的数据
                SerializerFeature.WriteMapNullValue
        );
        converter.setFastJsonConfig(config);
        //将converter加入到converters
        converters.add(converter);
    }
}
4.添加控制器CarController.java
package com.sasworld.helloworld.controller;

import com.sasworld.helloworld.dao.Car;
import org.springframework.web.bind.annotation.GetMapping;
import org.springframework.web.bind.annotation.RequestMapping;
import org.springframework.web.bind.annotation.ResponseBody;
import org.springframework.web.bind.annotation.RestController;

@RestController
@RequestMapping("/carlist")
public class CarController {
    @GetMapping
    @ResponseBody
    public Car getCarList() {
        Car car = new Car(3L, "特斯拉", 330000);
        return car;
    }
}
5.在浏览器中打开首页,点击汽车列表按钮,在浏览器控制台中可以看到后台传来的数据信息

至此我们已经完成了前后端数据的交互过程,接下来考虑数据的持久化问题
数据持久化
1.使用MySQL数据库存储数据,在pom.xml文件中添加相关依赖
<!-- MYSQL -->
<dependency>
    <groupId>mysql</groupId>
    <artifactId>mysql-connector-java</artifactId>
</dependency>
<dependency>
    <groupId>mysql</groupId>
    <artifactId>mysql-connector-java</artifactId>
    <scope>runtime</scope>
</dependency>
<!-- Spring Boot JDBC -->
<dependency>
    <groupId>org.springframework.boot</groupId>
    <artifactId>spring-boot-starter-jdbc</artifactId>
</dependency>

<!-- https://mvnrepository.com/artifact/org.springframework.boot/spring-boot-starter-data-jpa -->
<dependency>
<groupId>org.springframework.boot</groupId>
    <artifactId>spring-boot-starter-data-jpa</artifactId>
    <version>2.2.4.RELEASE</version>
</dependency>
2.在项目中添加com.sasworld.helloworld.repository包,并创建接口CarRepository.java继承JpaRepository
package com.sasworld.helloworld.repository;

import com.sasworld.helloworld.dao.Car;
import org.springframework.data.jpa.repository.JpaRepository;

public interface CarRepository extends JpaRepository<Car, Long> {}
3.在项目中添加com.sasworld.helloworld.service包,并创建接口CarService.java,这里只编写两个方法作为demo
package com.sasworld.helloworld.Service;

import com.sasworld.helloworld.dao.Car;
import java.util.List;

public interface CarService {

    /**
     *  保存或者更新car
     * @param car
     * @return
     */
    Car saveOrUpdateCar(Car car);

    /**
     *  查询所有的car
     * @return
     */
    List<Car> listCars();
}
4.新建CarService的实现类CarServiceImpl
package com.sasworld.helloworld.Service;

import com.sasworld.helloworld.dao.Car;
import com.sasworld.helloworld.repository.CarRepository;
import org.springframework.beans.factory.annotation.Autowired;
import org.springframework.stereotype.Service;
import java.util.List;

@Service
public class CarServiceImpl implements CarService{
    @Autowired
    private CarRepository carRepository;

    @Override
    public Car saveOrUpdateCar(Car car) {
        return carRepository.save(car);
    }

    @Override
    public List<Car> listCars() {
        return carRepository.findAll();
    }
}
5.修改CarController.java
package com.sasworld.helloworld.controller;

import com.sasworld.helloworld.Service.CarService;
import com.sasworld.helloworld.dao.Car;
import org.springframework.beans.factory.annotation.Autowired;
import org.springframework.web.bind.annotation.GetMapping;
import org.springframework.web.bind.annotation.RequestMapping;
import org.springframework.web.bind.annotation.ResponseBody;
import org.springframework.web.bind.annotation.RestController;

import java.util.List;

@RestController
@RequestMapping("/carlist")
public class CarController {
    @Autowired
    private CarService carService;
    @GetMapping
    @ResponseBody  // 将controller的方法返回的对象通过适当的转换器转换为JSON格式之后写入到response对象的body区
    public List<Car> getCarList() {
        List<Car> carList = carService.listCars();
        return carList;
    }
}
6.修改MainController.java
package com.sasworld.helloworld.controller;

import com.sasworld.helloworld.Service.CarService;
import com.sasworld.helloworld.dao.Car;
import org.springframework.beans.factory.annotation.Autowired;
import org.springframework.stereotype.Controller;
import org.springframework.web.bind.annotation.GetMapping;
import org.springframework.web.bind.annotation.PostMapping;
import org.springframework.web.bind.annotation.RequestMapping;

@Controller
@RequestMapping(value = "/")
public class MainController {

    @Autowired
    private CarService carService;

    @GetMapping
    public String home() {
        return "home";
    }

    @GetMapping("/add")  // 响应页面跳转请求
    public String add() {
        return "add";
    }

    @GetMapping("/list")  // 响应页面跳转请求
    public String list() {
        return "list";
    }

    @PostMapping("/insert")  // 响应POST请求
    public String addCar(Car car) {
        carService.saveOrUpdateCar(car);  // 打印前端提交的数据
        return "redirect:/list";  // 重定向回添加页面
    }
}
7.新建list.html
<!DOCTYPE html>
<html lang="en">
<head>
    <meta charset="UTF-8">
    <title>汽车列表</title>
    <script src="/static/js/jquery-3.3.1.min.js"></script>
    <script src="https://cdn.staticfile.org/twitter-bootstrap/3.3.7/js/bootstrap.min.js"></script>
    <script src="/static/js/home.js"></script>
    <link rel="stylesheet" href="https://cdn.staticfile.org/twitter-bootstrap/3.3.7/css/bootstrap.min.css"/>
</head>
<body>
<div class="row" >
    <div class="col-md-10 col-md-offset-1">
        <table class="table table-striped table-hover" id="table_car_list">
            <thead>
            <tr>
                <th>编号</th>
                <th>品牌</th>
                <th>价格</th>
            </tr>
            </thead>
            <tbody>
            </tbody>
        </table>
    </div>
</div>
</body>
</html>
<script type="text/javascript">
    getCarList()
    function getCarList() {
        $.ajax({
            type: "GET",
            url: "/carlist" ,
            data: {datas:""},
            dataType: "json",
            contentType: "application/x-www-form-urlencoded; charset=utf-8",//设置字符集
            success: function(data) {
                for(var i = 0;i < data.length;i++){
                    // console.log(data[i].qDescription);
                    json_obj = data[i];
                    var row = "<tr><td>"+json_obj.id+"</td><td>"+json_obj.brand+"</td>                                 <td>"+json_obj.price+"</td></tr>";
                    $("#table_car_list").append(row);
                }
            }
        });
    }
</script>
8.修改Car.java
package com.sasworld.helloworld.dao;

import javax.persistence.Entity;
import javax.persistence.GeneratedValue;
import javax.persistence.GenerationType;
import javax.persistence.Id;

@Entity
public class Car {
    @Id
    @GeneratedValue(strategy = GenerationType.IDENTITY)
    private Long id;   // 汽车编号
    private String brand;  // 汽车品牌
    private int price;  // 汽车价格

    protected Car(){}  // 无参构造函数,

    public Car(Long id, String brand, int price) {
        this.id = id;
        this.brand = brand;
        this.price = price;
    }

    public Long getId() {
        return id;
    }

    public void setId(Long id) {
        this.id = id;
    }

    public String getBrand() {
        return brand;
    }

    public void setBrand(String brand) {
        this.brand = brand;
    }

    public int getPrice() {
        return price;
    }

    public void setPrice(int price) {
        this.price = price;
    }

    public String toString() {
        return String.format("Car[id=%d, brand='%s', price='%d']", id, brand, price);
    }
}
9.配置application.properties文件
#mysql
spring.datasource.url=jdbc:mysql://localhost:3306/cars?useUnicode=true&characterEncoding=UTF-8&serverTimezone=UTC
spring.datasource.username=root
spring.datasource.password=root
spring.datasource.driver-class-name=com.mysql.jdbc.Driver

#JPA
spring.jpa.show-sql = true
spring.jpa.hibernate.ddl-auto = create-drop
10.在MySQL中创建数据库cars,启动项目在浏览器中打开http://localhost:8080/add,添加数据后在list页面可看到添加的数据
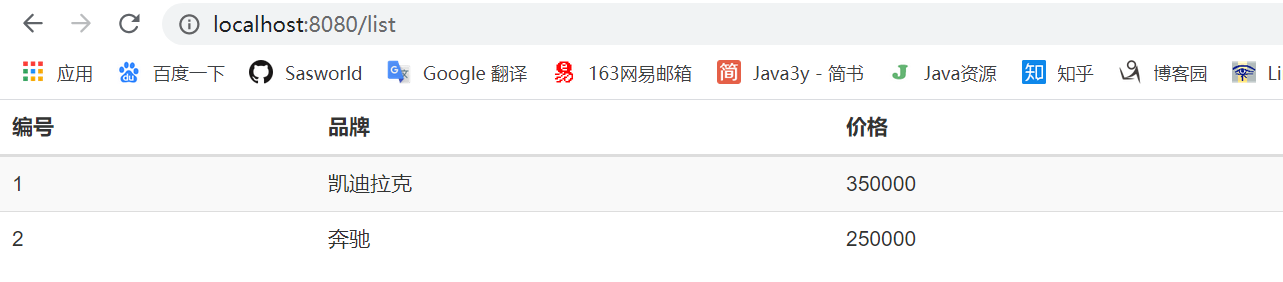
同样在数据库中可以看到添加的数据
