介绍
在博客:Spring Boot入门(4)提交表单并存入MySQL数据库中,我们利用提交表单往MySQL中插入记录,这无疑是很方便的。但是,我们没有对网页中的表单进行验证,而表单验证是网页表单必不可少的部分。有以下两种方式对Spring Boot项目中的方法进行验证:
- 利用JavaScript或者其他JavaScript库,如jQuery进行表单验证
- 利用Spring Boot原生方法进行表单验证
前者需要用到JavaScript方面的知识,对于熟悉JS的读者来说,这并不是困难的事情,但是表单验证处理起来比较麻烦,也容易遗漏掉需要验证的条件。采用Spring Boot原生方法进行表单验证比较方便,但是需要熟悉Spring Boot方面的知识。
本次分享将利用Spring Boot原生方法进行表单验证,我们在博客:Spring Boot入门(4)提交表单并存入MySQL数据库中的Spring Boot项目上加入表单验证。
介绍程序
我们在原有的Spring Boot项目上进行修改,该Spring Boot项目就是博客:Spring Boot入门(4)提交表单并存入MySQL数据库中的Spring Boot项目,也可以参看其Github地址: https://github.com/percent4/formIntoMySQL 。该项目的完整结构如下图:
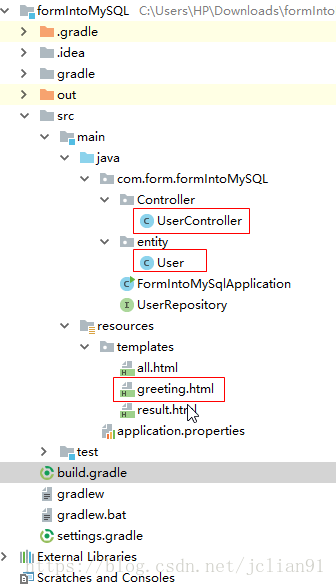
加入表单验证需要修改以上三个红线框内的文件。
首先是User.java,在代码中加入表单验证的限制条件,其代码如下:
import javax.persistence.Entity;
import javax.persistence.GeneratedValue;
import javax.persistence.GenerationType;
import javax.persistence.Id;

import javax.validation.constraints.*;

@Entity // This tells Hibernate to make a table out of this class
public class User {

    @Id
    @GeneratedValue(strategy=GenerationType.AUTO)
    private Integer id;

    @NotEmpty
    @Size(min=2, max=30)
    private String name;

    @NotNull
    @Min(1)
    @Max(200)
    private Integer age;

    @Pattern(regexp = "[MFmf]")
    private String gender;

    @NotEmpty
    @Email
    private String email;

    @NotEmpty
    private String city;

    public Integer getId() {
        return id;
    }

    public void setId(Integer id) {
        this.id = id;
    }

    public String getName() {
        return name;
    }

    public void setName(String name) {
        this.name = name;
    }

    public Integer getAge() {
        return age;
    }

    public void setAge(Integer age) {
        this.age = age;
    }

    public String getGender() {
        return gender;
    }

    public void setGender(String gender) {
        this.gender = gender;
    }

    public String getEmail() {
        return email;
    }

    public void setEmail(String email) {
        this.email = email;
    }

    public String getCity() {
        return city;
    }

    public void setCity(String city) {
        this.city = city;
    }

}
在上述代码中,@NotEmpty限制字符串不能为空,@Size(min=2, max=30)限制字符串的长度为2到30,@NotNull限制输入不能为null,@Min(1), @Max(200)限制输入的数字不能小于1或者大于200,@Pattern(regexp = “[MFmf]”)限制输入的字符串必须符合正则表达式[MFmf],@Email限制输入的email地址必须是正确的email地址。
接着我们需要对控制器UserController.java进行修改,因为表单验证的提示信息需要展示。其具体代码如下:
package com.form.formIntoMySQL.Controller;


import com.form.formIntoMySQL.entity.User;
import com.form.formIntoMySQL.UserRepository;

import org.springframework.stereotype.Controller;
import org.springframework.ui.Model;
import org.springframework.web.bind.annotation.*;

import org.springframework.validation.BindingResult;
import org.springframework.web.servlet.config.annotation.ViewControllerRegistry;
import org.springframework.web.servlet.config.annotation.WebMvcConfigurer;

import org.springframework.beans.factory.annotation.Autowired;

import javax.validation.Valid;

@Controller
public class UserController implements WebMvcConfigurer{
    @Autowired // This means to get the bean called userRepository
    // Which is auto-generated by Spring, we will use it to handle the data
    private UserRepository userRepository;

    @Override
    public void addViewControllers(ViewControllerRegistry registry) {
        registry.addViewController("/result").setViewName("result");
    }

    @GetMapping("/greeting")
    public String greetingForm(Model model) {
        model.addAttribute("user", new User());
        return "greeting";
    }

    @PostMapping("/greeting")
    public String greetingSubmit(@Valid @ModelAttribute User user, BindingResult bindingResult) {

        if (bindingResult.hasErrors()) {
            return "greeting";
        }
        else {
            User newUser = new User();

            newUser.setName(user.getName());
            newUser.setAge(user.getAge());
            newUser.setGender(user.getGender());
            newUser.setEmail(user.getEmail());
            newUser.setCity(user.getCity());
            userRepository.save(user);

            return "result";
        }

    }

    @GetMapping("/all")
    public String getMessage(Model model) {

        Iterable<User> users = userRepository.findAll();

        model.addAttribute("users", users);
        return "all";
    }

}
在greetingSubmit()方法中我们加入了表单验证@Valid,如果出现表单验证错误,则返回greeting.html页面,并显示错误信息,如果表单验证成功,则返回result.html页面。
最后需要对展示验证表单错误信息的网页greeting.html进行修改,其代码如下:
<!DOCTYPE HTML>

<html xmlns:th="http://www.thymeleaf.org">

<head>
    <title>Form Submission</title>
    <meta http-equiv="Content-Type" content="text/html; charset=UTF-8" />
    <link href="https://cdn.bootcss.com/bootstrap/3.3.7/css/bootstrap.min.css" rel="stylesheet">
</head>

<body>
    <center>
        <br><br>
    <h2 style="color:green">Form</h2>
        <br><br>

        <form class="form-horizontal" role="form" action="#" th:action="@{/greeting}" th:object="${user}" method="post">

            <div class="form-group" style="width:300px">
                <label for="name" class="col-sm-2 control-label">Name</label>
                <div class="col-sm-10">
                    <input type="text"  th:field="*{name}" class="form-control" id="name" placeholder="Enter name">
                </div>
                <label style="color:red" th:if="${#fields.hasErrors('name')}" th:errors="*{name}">Name Error</label>
            </div>

            <div class="form-group" style="width:300px">
                <label for="age" class="col-sm-2 control-label">Age</label>
                <div class="col-sm-10">
                    <input type="text" th:field="*{age}" class="form-control" id="age" placeholder="Enter age">
                </div>
                <label style="color:red" th:if="${#fields.hasErrors('age')}" th:errors="*{age}">Age Error</label>
            </div>

            <div class="form-group" style="width:300px">
                <label for="gender" class="col-sm-2 control-label">Gender</label>
                <div class="col-sm-10">
                    <input type="text" th:field="*{gender}" class="form-control" id="gender" placeholder="Enter gender(M or F)">
                </div>
                <label style="color:red" th:if="${#fields.hasErrors('gender')}" th:errors="*{gender}">Gender Error</label>
            </div>

            <div class="form-group" style="width:300px">
                <label for="email" class="col-sm-2 control-label">Email</label>
                <div class="col-sm-10">
                    <input type="text" th:field="*{email}" class="form-control" id="email" placeholder="Enter email">
                </div>
                <label style="color:red" th:if="${#fields.hasErrors('email')}" th:errors="*{email}">Email Error</label>
            </div>

            <div class="form-group" style="width:300px">
                <label for="city" class="col-sm-2 control-label">City</label>
                <div class="col-sm-10">
                    <input type="text" th:field="*{city}" class="form-control" id="city" placeholder="Enter city">
                </div>
                <label style="color:red" th:if="${#fields.hasErrors('city')}" th:errors="*{city}">City Error</label>
            </div>

            <div class="form-group">
                <div>
                    <button type="submit" class="btn btn-primary" id="btn">Submit</button>
                    <input type="reset" class="btn btn-warning" value="Reset" />
                </div>
            </div>
        </form>

    </center>

</body>

</html>
至此,程序以修改完毕。
运行
我们需要对上述程序进行测试,重点在于表单验证功能。在浏览器中输入:http://localhost:8080/greeting ,什么都不输入,直接点击Submit按钮,显示如下:
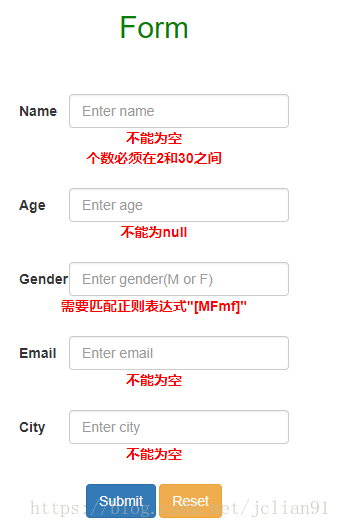
再分别验证其他表单限制条件,如下图所示:

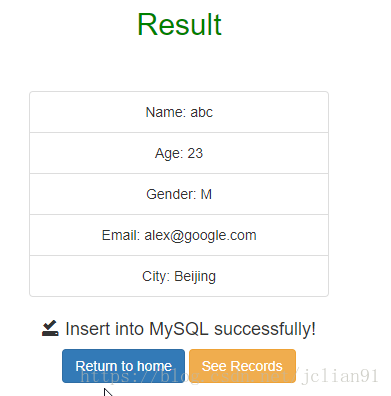
当表单验证通过后,我们就能进行result.html结果显示页面,如下图:
结束语
本次分享主要在上篇博客的基础上,加入了表单验证功能,主要的想法是不难的,对于项目结构不熟悉的读者,可以参考博客:Spring Boot入门(4)提交表单并存入MySQL数据库或者该项目的Github地址: https://github.com/percent4/formIntoMySQL .
本次分享主要参考了Spring Boot官网给出的表单验证的例子: https://spring.io/guides/gs/validating-form-input/ .
本次程序的Github地址为: https://github.com/percent4/FormValidation .
本次分享到此结束,欢迎大家交流~~