在平时开发中,前端一般都会做参数的正确化校验,但是单单前端做校验是不够保险的,所以后端也需要加上相关的参数校验,防止有人绕过前端直接调用接口。
而spring boot就提供有这样的验证框架,默认实现用的是Hibernate validator。我们只需要将@Validated注解标注在方法参数上,spring boot就可以对参数进行校验,同时把校验结果放在BindingResult对象里。
spring boot验证框架提供的一系列常用注解
- @Null:验证对象是否为空
- @NotNull:验证对象是否不为空
- @NotEmpty:验证对象不为空,或者集合不为空
- @NotBlank:验证字符串不为空,或者不是空字符串("“或者” ")
- @Size(min=,max=):验证对象的长度,字符串或集合都行
- @Length:字符串的长度
- @Max:验证数字是否小于等于指定的值
- @Min:验证数字是否大于等于指定的值
- @Digits:验证数字是否符合指定格式
- @Range:验证数字是否在指定范围内
- @Email:验证邮件格式是否正确,值为null的话,不做校验
- @Pattern:验证String对象是否符合正则表达式
怎么使用spring boot验证框架
新建一个普通的spring boot+swagger2项目,有一个Employee员工对象来做测试,每个字段都加了一个常用校验注解:
public class Employee {
    @ApiModelProperty(value = "id")
    @NotNull(message = "主键id必须不为空")
    private String id;
    @ApiModelProperty(value = "姓名")
    @NotBlank(message = "姓名不能为空")
    private String name;
    @ApiModelProperty(value = "年龄")
    @Min(value = 20, message = "年龄不能小于20岁")
    private int age;
}
新建一个EmployeeController测试,同时把校验结果BindingResult 打印出来:
@RestController
@RequestMapping("/employee")
@Api(value = "员工Controller")
public class EmployeeController {
    @PostMapping
    @ApiModelProperty(value = "员工操作")
    public String saveEmployee(@RequestBody @Validated Employee employee, BindingResult bindingResult) {
        if (bindingResult.hasErrors()) {
            List<ObjectError> errorList = bindingResult.getAllErrors();
            for (ObjectError objectError : errorList) {
                System.out.println(objectError.getObjectName() + "---" + objectError.getDefaultMessage());
            }
        }
        return "SUCCESS";
    }
通过swagger测试,输入以下参数:
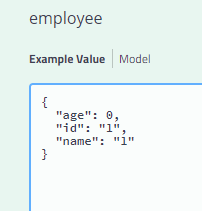
结果如下:

成功校验
数据新增时id不能要求必填,而修改时id要求必须有,怎么做?
要知道有时候针对不同的操作,校验规则是不能通用的,比如新增操作,就不需要传主键id,这时候我们要是加上了id不能为空,就会影响新增逻辑,可是不加这个校验,修改时的必填校验就又没法做了。
这时候我们可以为校验规则添加上组的概念。
public class Employee {
    /**
     * 添加组
     */
    public interface add {
    }

    /**
     * 更新组
     */
    public interface update {
    }

    @ApiModelProperty(value = "id")
    @NotNull(groups = update.class, message = "修改主键id必须不为空")
    @Null(groups = add.class, message = "新增主键id必须为空")
    private String id;
    @ApiModelProperty(value = "姓名")
    @NotBlank(groups = {add.class, update.class}, message = "姓名不能为空")
    private String name;
    @ApiModelProperty(value = "年龄")
    @Min(groups = {add.class, update.class}, value = 20, message = "年龄不能小于20岁")
    private int age;
}
可以看到Employee类里新增了添加组和更新组两个类,用于定义添加和更新两个不同操作应该持有怎么样的校验规则。这里定义了新增时id要为空,修改时id必填的对id这个字段的不同校验,而既然加入了group划分,那么其余字段也需要归组才能加入到校验里。
修改EmployeeController 类,在@Validated注解后添加Employee.add.class,表示这个校验是用哪个组的校验规则,这里用的是Add group:
@RestController
@RequestMapping("/employee")
@Api(value = "员工Controller")
public class EmployeeController {
    @PostMapping
    @ApiModelProperty(value = "员工操作")
    public String saveEmployee(@RequestBody @Validated(Employee.add.class) Employee employee, BindingResult bindingResult) {
        if (bindingResult.hasErrors()) {
            List<ObjectError> errorList = bindingResult.getAllErrors();
            for (ObjectError objectError : errorList) {
                System.out.println(objectError.getObjectName() + "---" + objectError.getDefaultMessage());
            }
        }
        return "SUCCESS";
    }
}
使用swagger测试,这里不传id:
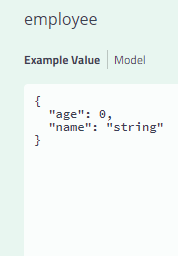
结果如下:
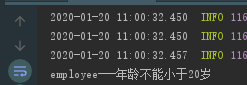
只报了年龄不能小于20岁校验错误
把Employee.add.class改成Employee.update.class,再重复以上测试,结果如下:

可以看到更新操作时,会对id做非空的校验,所以通过group,我们可以做到针对性的校验规则。
自定义校验注解
有时候框架提供的注解不符合业务需求,这时就需要用到自定义校验注解了
- 先定义一个校验注解,@Constraint(validatedBy = {OverTimeeValidator.class})定义了这个注解要使用到的校验类,很关键
@Documented
@Target({ElementType.FIELD, ElementType.ANNOTATION_TYPE})
@Retention(RetentionPolicy.RUNTIME)
@Constraint(validatedBy = {OverTimeeValidator.class})
public @interface OverTime {
    String message() default "加班时间大于{max}小时,瞎搞";
    //要校验的值
    int max() default 0;

    Class<?>[] groups() default {};

    Class<? extends Payload>[] payload() default {};
}
- 定义一个OverTimeeValidator类,它实现了ConstraintValidator类,同时重写了initialize()和isValid()方法,这个类定义了自定义注解OverTime 的校验逻辑
public class OverTimeeValidator implements ConstraintValidator<OverTime, Integer> {
    OverTime overTime;

    int max;

    @Override
    public void initialize(OverTime constraintAnnotation) {
        overTime = constraintAnnotation;
        max = constraintAnnotation.max();
    }

    @Override
    public boolean isValid(Integer integer, ConstraintValidatorContext constraintValidatorContext) {
        if (Objects.isNull(integer)) {
            return true;
        }
        return integer < max;
    }
}
修改Employee 类,加上加班时间字段overTime,同时加上自定义校验注解@OverTime:
public class Employee {
    public interface add {
    }


    public interface update {
    }


    @ApiModelProperty(value = "id")
    @NotNull(groups = update.class, message = "修改主键id必须不为空")
    @Null(groups = add.class, message = "新增主键id必须为空")
    private String id;
    @ApiModelProperty(value = "姓名")
    @NotBlank(groups = {add.class, update.class}, message = "姓名不能为空")
    private String name;
    @ApiModelProperty(value = "年龄")
    @Min(groups = {add.class, update.class}, value = 20, message = "年龄不能小于20岁")
    private int age;
    @ApiModelProperty(value = "加班时间")
    @OverTime(groups = {add.class, update.class}, max = 0)
    private int overTime;
}
用Employee.add.class组测试:
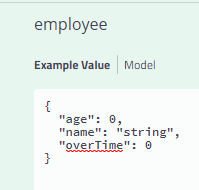
校验结果如下:
所以自定义校验注解成功
总结
通过以上学习,可以发现spring boot验证框架的使用很简单,学会使用group字段来针对区分校验以及自定义校验注解就能够灵活定制自己想要的校验规则了。
