一、复习
看下面一段代码,假如运行结果有问题,那么就需要在每一步计算时,打印一下结果
b = 1
c = 2
d = 3
a = b+c
print(a)
e = a + d
print(e)
执行输出:
3
6
但是线上的程序,是不允许随便print的,这个时候,就需要用到logging模块
import logging
logging.basicConfig(level=logging.DEBUG,filename = 'userinfo.log')
b = 1
c = 2
d = 3
a = b+c
logging.debug(a)
e = a + d
logging.warning(e)
执行程序,查看文件内容
DEBUG:root:3
WARNING:root:6
总结:
hashlib 摘要 md5 sha系列
文件的一致性校验
密文的认证
logging 记录日志
两种用法 basicConfig不常用 getLogger()常用
可以通过一个参数去控制全局的日志输出情况
可以帮助开发者同时向文件和屏幕输出信息
configparser
有分组section和有配置项option的配置文件,默认.ini结尾的文件
collections
在基础数据类型之外又额外增加了一些新的数据类型
继续昨天的collections模块内容
from collections import OrderedDict
d = OrderedDict()
d['a'] = 1
d['z'] = 2
d['a'] = 3
print(d)
执行输出:
OrderedDict([('a', 3), ('z', 2)])
修改值
from collections import OrderedDict
d = OrderedDict()
d['a'] = 1
d['z'] = 2
d['a'] = 3
d['z'] = 0  # 修改值
print(d)
执行输出:
OrderedDict([('a', 3), ('z', 0)])
二、defaultdict
kuriko有如下值集合 [11,22,33,44,55,66,77,88,99,90...],将所有大于 66 的值保存至字典的第一个key中,将小于 66 的值保存至第二个key的值中。
即: {'k1': 大于66 , 'k2': 小于66}
dic = {}
li = [11,22,33,44,55,66,77,88,99,90]
for i in li:
    if i > 66:
        if dic.get('k1'):
            dic['k1'].append(i)
        else:
            dic['k1'] = [i]
    else:
        if dic.get('k2'):
            dic['k2'].append(i)
        else:
            dic['k2'] = [i]
print(dic)
执行输出:
{'k1': [77, 88, 99, 90], 'k2': [11, 22, 33, 44, 55, 66]}
新的写法,使用defaultdict
from collections import defaultdict
li = [11,22,33,44,55,66,77,88,99,90]
d = defaultdict(list)  # callable() 接收一个可调用对象。给每一个即将要用key,设置一个默认值
for i in li:
    if i > 66:
        d['k1'].append(i)
    else:
        d['k2'].append(i)
print(d)
执行输出:
defaultdict(<class 'list'>, {'k2': [11, 22, 33, 44, 55, 66], 'k1': [77, 88, 99, 90]})
换成集合方式
from collections import defaultdict
li = [11,22,33,44,55,66,77,88,99,90]
d = defaultdict(set)
for i in li:
    if i > 66:
        d['k1'].add(i)
    else:
        d['k2'].add(i)
print(d)
执行输出:
defaultdict(<class 'set'>, {'k1': {88, 90, 99, 77}, 'k2': {33, 66, 11, 44, 22, 55}})
设置默认值
from collections import defaultdict
d = defaultdict(set)
print(d)
执行输出:
defaultdict(<class 'set'>, {})
给它一个值,它就不会用默认值了
from collections import defaultdict
d = defaultdict(set)
print(d['a'])
d['b'] = 10
print(d)
执行输出:
set()
defaultdict(<class 'set'>, {'a': set(), 'b': 10})
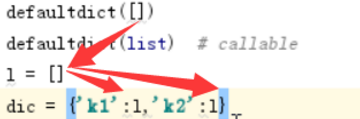
看下面的代码:
from collections import defaultdict
defaultdict([])
dic = {}
l = []
dic = {'k1':1,'k2':1}
执行报错:
TypeError: first argument must be callable or None
因为这3个列表,是同一个内存地址,这样是不对的
查看一个值,如果不存在,就添加
from collections import defaultdict
d = defaultdict(list)
print(d)
print(d[1])  # 值不存在
print(d)
执行输出:
defaultdict(<class 'list'>, {})
[]
defaultdict(<class 'list'>, {1: []})
defaultdict 只能接收可调用的对象,由于lambda 也是可调用的
它可以返回任何值
from collections import defaultdict
d = defaultdict(lambda : 5)
print(d[1])
执行输出: 5
总结:
默认字典最大的好处就是 永远不会在你使用key获取值的时候报错
默认字典 是给 字典中的value设置默认值
三、Counter
Counter类的目的是用来跟踪值出现的次数。它是一个无序的容器类型,以字典的键值对形式存储,其中元素作为key,其计数作为value。计数值可以是任意的Interger(包括0和负数)。Counter类和其他语言的bags或multisets很相似。
from collections import Counter
c = Counter('ab')
print(c)
执行输出: 5
Counter({'a': 1, 'b': 1})
from collections import Counter
c = Counter('which')
c.update('witch') # 使用另一个iterable对象更新
print(c['h'])  # 统计h出现了几次
执行输出:3
from collections import Counter
c = Counter('which')
d = Counter('watch')
c.update(d) # 使用另一个Counter对象更新
print(c['h'])  # 统计h出现了几次
执行输出:3
这个模块没有作用
在collections模块中,主要能用到的数据类型是namedtuple和defaultdict
四、时间模块
和时间有关系的我们就要用到时间模块。在使用模块之前,应该首先导入这个模块。
import time<br>#常用方法
1.time.sleep(secs)
(线程)推迟指定的时间运行。单位为秒。
2.time.time()
获取当前时间戳
时间
计算执行代码的时间 time.time()
让程序停在这里一段时间 sleep
记录时间的格式:
给人看的 格式化的时间
给机器看的 时间戳最接近计算机的时间
计算用户 元组 最接近 python
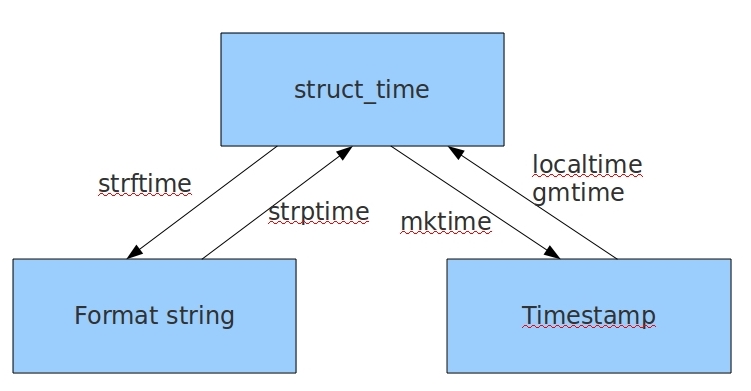
表示时间的三种方式
在Python中,通常有这三种方式来表示时间:时间戳、元组(struct_time)、格式化的时间字符串:
(1)时间戳(timestamp) :通常来说,时间戳表示的是从1970年1月1日00:00:00开始按秒计算的偏移量。我们运行“type(time.time())”,返回的是float类型。
(2)格式化的时间字符串(Format String): ‘1999-12-06’
python中时间日期格式化符号:
%y 两位数的年份表示(00-99)
%Y 四位数的年份表示(000-9999)
%m 月份(01-12)
%d 月内中的一天(0-31)
%H 24小时制小时数(0-23)
%I 12小时制小时数(01-12)
%M 分钟数(00=59)
%S 秒(00-59)
%a 本地简化星期名称
%A 本地完整星期名称
%b 本地简化的月份名称
%B 本地完整的月份名称
%c 本地相应的日期表示和时间表示
%j 年内的一天(001-366)
%p 本地A.M.或P.M.的等价符
%U 一年中的星期数(00-53)星期天为星期的开始
%w 星期(0-6),星期天为星期的开始
%W 一年中的星期数(00-53)星期一为星期的开始
%x 本地相应的日期表示
%X 本地相应的时间表示
%Z 当前时区的名称
%% %号本身
1970年1月1 是英国时间,
(3)元组(struct_time) :struct_time元组共有9个元素共九个元素:(年,月,日,时,分,秒,一年中第几周,一年中第几天等)
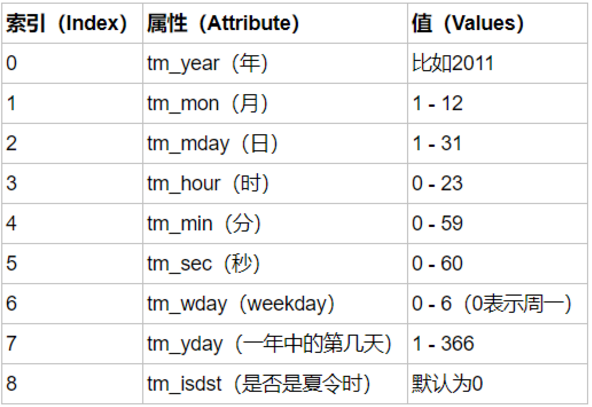
夏时令,又称“日光节约时制”和“夏令时间”,是一种为节约能源而人为规定地方时间的制度,在这一制度实行期间所采用的统一时间称为“夏令时间”。
在中国,1992年起,夏令时暂停实行
夏令时,默认为0
几种格式之间的转换
重点掌握
import time
print(time.time())  # 时间戳时间
print(time.strftime('%Y-%m-%d'))  # 字符串格式化时间
print(time.strftime('%m/%d/%Y'))  # 月/天/年
print(time.strftime('%H:%M:%S'))  # 时:分:秒
print(time.strftime('%Y-%m-%d %H:%M:%S'))  # 标准时间
print(time.strftime('%I:%M:%S'))  # 十二小时制
print(time.strftime('%x'))  # 本地相应的日期表示
print(time.strftime('%X'))  # 本地相应的时间表示
print(time.strftime('%x %X'))  # 本地日期和时间
print(time.strftime('%c'))  # 本地相应的日期表示和时间表示
print(time.localtime())  # 结构化时间
执行输出:
1524563384.8112636
2018-04-24
04/24/2018
17:49:44
2018-04-24 17:49:44
05:49:44
04/24/18
17:49:44
04/24/18 17:49:44
Tue Apr 24 17:49:44 2018
time.struct_time(tm_year=2018, tm_mon=4, tm_mday=24, tm_hour=17, tm_min=49, tm_sec=44, tm_wday=1, tm_yday=114, tm_isdst=0)
最后一个输出的结果,每一个值都有名字,和昨天学的namedtuple有点像
假如数据是这样的?
(2018,4,24,10,39,46,1,114,0)
数据就比较难理解了
下面几个要背下来
%Y %m %d %H %M %S
具体符号表示啥意思,请参考上面的《python中时间日期格式化符号:》
import time
print(time.gmtime())  # 英国的结构化时间
print(time.localtime())  # 本地结构化时间,时间戳时间转格式化时间的中间件
import time
p = time.strptime('2015-8-8','%Y-%m-%d')  # 时间字符串->结构化时间
print(p)
print(time.mktime(p))  # 结构化时间->时间戳

print(time.time() - time.mktime(p))  # 当前时间戳-上面的时间戳
执行输出:
time.struct_time(tm_year=2015, tm_mon=8, tm_mday=8, tm_hour=0, tm_min=0, tm_sec=0, tm_wday=5, tm_yday=220, tm_isdst=-1)
1438963200.0
85605561.47843862
ret = time.localtime(1500000000)  # 时间戳->结构化时间
print(ret)
print(time.strftime('%Y-%m-%d %H:%M:%S',ret))  # 结构化时间->时间字符串
执行输出:
time.struct_time(tm_year=2017, tm_mon=7, tm_mday=14, tm_hour=10, tm_min=40, tm_sec=0, tm_wday=4, tm_yday=195, tm_isdst=0)
2017-07-14 10:40:00
ret = time.localtime(1600000000)
print(ret)
print(time.strftime('%Y-%m-%d %H:%M:%S',ret))
执行输出:
time.struct_time(tm_year=2020, tm_mon=9, tm_mday=13, tm_hour=20, tm_min=26, tm_sec=40, tm_wday=6, tm_yday=257, tm_isdst=0)
2020-09-13 20:26:40
每隔3年,数字会变一次。
|
1
2
3
|
ret
=
time.localtime(
0
)
print
(ret)
print
(time.strftime(
'%Y-%m-%d %H:%M:%S'
,ret))
|
执行输出:
time.struct_time(tm_year=1970, tm_mon=1, tm_mday=1, tm_hour=8, tm_min=0, tm_sec=0, tm_wday=3, tm_yday=1, tm_isdst=0)
1970-01-01 08:00:00
0就表示1970年
以下内容,不必重点掌握
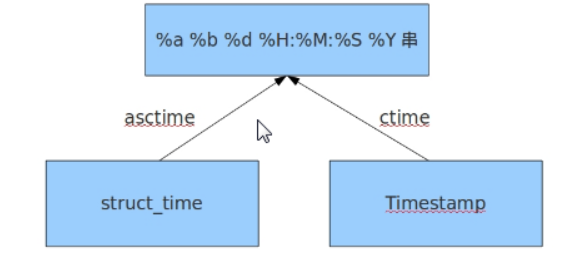
结构化时间 --> %a %b %d %H:%M:%S %Y串
time.asctime(结构化时间) 如果不传参数,直接返回当前时间的格式化串
import time<br>print(time.strftime('%c'))
print(time.ctime())
print(time.asctime())
执行输出:
Tue Apr 24 19:29:29 2018
Tue Apr 24 19:29:29 2018
Tue Apr 24 19:29:29 2018
时间戳 --> %a %d %d %H:%M:%S %Y串
time.ctime(时间戳) 如果不传参数,直接返回当前时间的格式化串
print(time.ctime(1500000000))
ret = time.localtime(2000000000)
print(ret)
print(time.asctime())
print(time.asctime(ret))
执行输出:
Fri Jul 14 10:40:00 2017
time.struct_time(tm_year=2033, tm_mon=5, tm_mday=18, tm_hour=11, tm_min=33, tm_sec=20, tm_wday=2, tm_yday=138, tm_isdst=0)
Tue Apr 24 19:31:37 2018
Wed May 18 11:33:20 2033
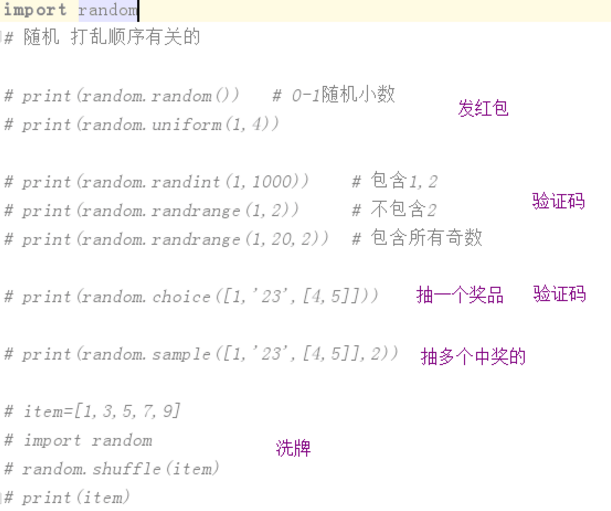
五、random模块
random() 方法返回随机生成的一个实数,默认它在[0,1)范围内。
主要有2个应用功能
打印顺序,比如洗牌
随机,比如彩票,验证码
import random
#随机小数
print(random.random())  # 大于0且小于1之间的小数
print(random.uniform(1,3))  #大于1小于3的小数,可以用来发红包
执行输出:
0.7056803343481585
1.4427911142943668
#随机整数
print(random.randint(1,5))  # 大于等于1且小于等于5之间的整数
print(random.randrange(1,10,2))  # 大于等于1且小于10之间的奇数
执行输出:
4
3
print(random.randint(1,5))  # 大于等于1且小于等于5之间的整数
print(random.randrange(1,10,2)) # 大于等于1且小于10之间的奇数
执行输出:
5
1
注意:randrange顾头不顾尾
取值几率是一样的,比如3个数,那么每个数的几率是1/3
print(random.choice([1,'23',[4,5]]))  # #1或者23或者[4,5]
print(random.sample([1,'23',[4,5]],2))  # #列表元素任意2个组合
执行输出:
[4, 5]
['23', [4, 5]]
sample,可以做抽奖。比如公司年终奖,三等奖10名,直接抽取10个就可以了。
#打乱列表顺序
item=[1,3,5,7,9]
random.shuffle(item) # 打乱次序
print(item)
print(random.shuffle(item))
print(item)
执行输出:
[9, 3, 7, 5, 1]
None
[1, 9, 5, 7, 3]
总结:
六、sys模块
sys模块是与python解释器交互的一个接口
很多人会把os模块和sys模块弄混,不知道该用哪一个?
说明一下作用:
os模块 操作系统打交道的
sys模块 python解释器打交道的
相关参数如下:
sys.argv 命令行参数List,第一个元素是程序本身路径
sys.exit(n) 退出程序,正常退出时exit(0),错误退出sys.exit(1)
sys.version 获取Python解释程序的版本信息
sys.path 返回模块的搜索路径,初始化时使用PYTHONPATH环境变量的值
sys.platform 返回操作系统平台名称
举例:
import sys
print('*'*6)
sys.exit()  # 下面的代码不会执行
print('-'*6)
执行输出:
******
获取Python解释程序的版本信息
import sys
print(sys.version)
执行输出:
3.5.4 (v3.5.4:3f56838, Aug 8 2017, 02:17:05) [MSC v.1900 64 bit (AMD64)]
返回操作系统平台名称
import sys
print(sys.platform)
执行输出:
win32
win32表示是Windows系统,linux2表示是linux平台
不管windows是64位还是32位,统一显示win32
sys.path
返回模块的搜索路径,初始化时使用PYTHONPATH环境变量的值
import sys
print(sys.path)
执行输出:
['E:\\python_script\\day26', 'E:\\python_script', 'C:\\Python35\\python35.zip', 'C:\\Python35\\DLLs', 'C:\\Python35\\lib', 'C:\\Python35', 'C:\\Python35\\lib\\site-packages', 'C:\\Program Files\\JetBrains\\PyCharm 2018.1.1\\helpers\\pycharm_matplotlib_backend']
为什么Import的时候,能找到对应的文件呢?
程序在运行起来的时候
启动解释器 加载一些基础的内容 内置函数 内置模块 -->内存里
sys.path 把系统的路径加进去了,所以import的时候,能搜索到
sys.argv
可以用sys.argv获取当前正在执行的命令行参数的参数列表(list)。
变量解释:
sys.argv[0]当前程序名
sys.argv[1]第一个参数
sys.argv[0]第二个参数
...
test.py内容如下:
import sys
print(sys.argv)
打开cmd窗口,执行python代码
python test.py
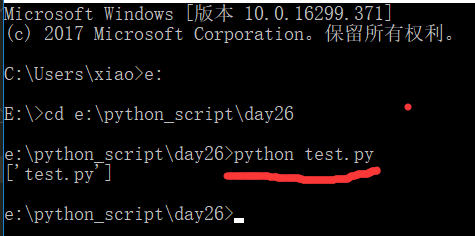
返回的结果是一个列表,第一个元素就是当前程序名
返回绝对路径

返回后面的参数

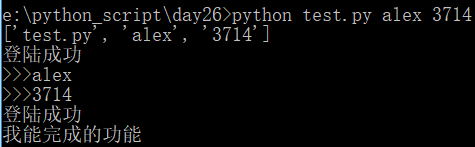
比如登录程序,可以通过传参的方式,验证。
test.py文件内容如下:
import sys
print(sys.argv)   # 列表 列表的第一项是当前文件所在的路径
if sys.argv[1] == 'alex' and sys.argv[2] == '3714':
    print('登陆成功')
else:
    sys.exit()
user = input('>>>')
pwd = input('>>>')
if user == 'alex' and pwd == '3714':
    print('登陆成功')
else:
    sys.exit()
print('我能完成的功能')
执行程序
python test.py alex 3714
典型用法:
执行一个程序
debug
直接执行
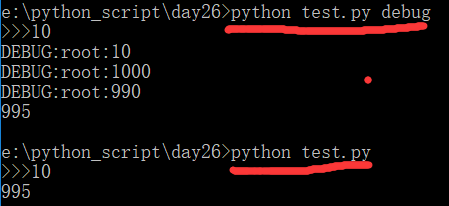
假如输入一个值,结果不是自己想要的
这个时候,就需要debug一下
test.py代码如下:
import logging
num = int(input('>>>'))
a = num * 100
b = a - 10
c = b + 5
print(c)
首先想到的就是用pycharm的debug功能
但是线上程序代码,不能使用Pycharm
每一句加print ? 这样是不行的,影响程序使用,用户会察觉的
使用logging,并使用level开关
import sys
import logging
inp = sys.argv[1].upper() if len(sys.argv)>1 else 'WARNING' # 日志级别
logging.basicConfig(level=getattr(logging,inp))  # DEBUG
num = int(input('>>>'))
logging.debug(num)
a = num * 100
logging.debug(a)
b = a - 10
logging.debug(b)
c = b + 5
print(c)
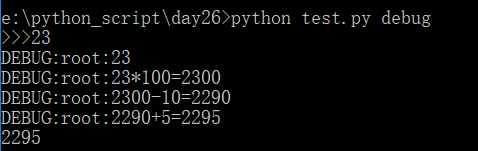
执行输出:
进阶版,格式化输出每一个步骤
import sys
import logging

lev = sys.argv[1].upper() if len(sys.argv) > 1 else 'WARNING'
logging.basicConfig(level=getattr(logging, lev))
num = int(input('>>>').strip())
logging.debug(num)
a = num * 100
logging.debug('{}*100={}'.format(num, a))
b = a - 10
logging.debug('{}-10={}'.format(a, b))
c = b + 5
logging.debug('{}+5={}'.format(b, c))
print(c)
执行输出:
sys模块中,重点要掌握的就是argv和path
今日作业:
1.要求 生成随机验证码
基础需求: 6位数字验证码 数字可以重复
进阶需求: 字母+数字 4位验证码 数字字母都可以重复

2.y-m-d h:M:S 比如2017-07-08 10:23:41
从当前时间开始 比起y-m-d h:M:S过去了多少年 多少月 多少天 多少小时,多少分,多少秒
答案:
1.1 数字,主要有0~9组成,使用random.randint生成
print(random.randint(0,9))
执行输出: 5
1.2 使用random模块取6个
import random
random_list = []
for i in range(6):  # 取6次
    random_num = random.randint(0,9)  #  大于等于0且小于等于9之间的整数
    random_list.append(random_num)  # 追加到列表

print(random_list)
执行输出:
[5, 9, 5, 0, 5, 4]
1.3 将列表转换为字符串,使用join。注意,使用join,必须保证列表中的每一个元素为字符串类型
import random
random_list = []
for i in range(6):  # 取6次
    random_num = random.randint(0,9)  #  大于等于0且小于等于9之间的整数
    random_list.append(str(random_num))  # 将元素转换为str并追加到列表

ret = ''.join(random_list)
print(ret)
执行输出:
615411
1.4进阶需求,如何输出所有的字母呢?需要用到ascci码
capital = [chr(i) for i in range(65,91)]  #所有大写字母
lowercase = [chr(i) for i in range(97,123)]  #所有小写字母

print(capital)
print(lowercase)
执行输出:
['A', 'B', 'C', 'D', 'E', 'F', 'G', 'H', 'I', 'J', 'K', 'L', 'M', 'N', 'O', 'P', 'Q', 'R', 'S', 'T', 'U', 'V', 'W', 'X', 'Y', 'Z']
['a', 'b', 'c', 'd', 'e', 'f', 'g', 'h', 'i', 'j', 'k', 'l', 'm', 'n', 'o', 'p', 'q', 'r', 's', 't', 'u', 'v', 'w', 'x', 'y', 'z']
1.6 将数字和字母组合,生成4位
import random
for i in range(4):  # 取4位
    lowercase = chr(random.randint(97,123))  #所有小写字母
    capital = chr(random.randint(65,91))  #所有大写字母
    number = str(random.randint(0,9))  # 所有数字
    print(lowercase,capital,number)
执行输出:
w J 8
z O 5
e T 6
u S 9
1.7 将随机数添加到列表中,并转化为字符串
import random
code = []
for i in range(4):  # 取4位
    lowercase = chr(random.randint(97,123))  #所有小写字母
    capital = chr(random.randint(65,91))  #所有大写字母
    number = str(random.randint(0,9))  # 所有数字
    code.append(random.choice([lowercase,capital,number]))  # 有3个元素,几率为1/3
ret = ''.join(code)  # 列表转换为字符串
print(ret)
执行输出:
7JmY
2.1既然是比较2个时间的差值,就需要转化为时间戳,再做减法
将字符串时间转换为时间戳
import time
before = time.strptime("2017-07-08 10:23:41",'%Y-%m-%d %H:%M:%S')
before_stamp = time.mktime(before)
print(before_stamp)
执行输出:
1499480621.0
2.2 将before_stamp 和当前时间戳相减
import time
before = time.strptime("2017-07-08 10:23:41",'%Y-%m-%d %H:%M:%S')
before_stamp = time.mktime(before)

diff_stamp = time.time() - before_stamp # 当前时间戳-指定时间戳
print(diff_stamp)
执行输出:
25095583.435019016
2.3 差值转换为英国的结构化时间
import time
before = time.strptime("2017-07-08 10:23:41",'%Y-%m-%d %H:%M:%S')
before_stamp = time.mktime(before)

diff_stamp = time.time() - before_stamp # 当前时间戳-指定时间戳
struct_time=time.gmtime(diff_stamp)  # 差值转换为英国的结构化时间
print(struct_time)
time.struct_time(tm_year=1970, tm_mon=10, tm_mday=18, tm_hour=11, tm_min=2, tm_sec=53, tm_wday=6, tm_yday=291, tm_isdst=0)
2.4 时间戳为0时,表示1970-01-01 0:00:00
将struct_time时间,分别取出年,月,日,时,分,秒 减去1970-01-01 08:00:00,就可以得到差值为多少年,月,日,时,分,秒
import time
before = time.strptime("2017-07-08 10:23:41",'%Y-%m-%d %H:%M:%S') # 之前的时间
before_stamp = time.mktime(before)  # 转换为时间戳

diff_stamp = time.time() - before_stamp # 当前时间戳-指定时间戳
struct_time=time.gmtime(diff_stamp)  # 差值转换为英国的结构化时间

#1970-01-01 0:00:00  # 英国时间
year = struct_time.tm_year - 1970
month = struct_time.tm_mon - 1
day = struct_time.tm_mday - 1
hour = struct_time.tm_hour
minute = struct_time.tm_min
second = struct_time.tm_sec

print('过去了{}年{}月{}日{}时{}分{}秒'.format(year,month,day,hour,minute,second))
执行输出:
过去了0年9月17日3时20分51秒