一、目录结构
首先来"一览众山小",看下整体的的目录结构。
|— benchmarks 基准测试,与其他竞品做比较
|— dist 打包之后文件所在位置,包括完整版本,运行时版本版本,主要关注下vue.js
|— examples 部分示例
|— flow 因为Vue使用flow来进行静态类型检查,这里定义了声明了一些静态类型
|— packages vue还可以分别生成其它的npm包
|— scripts
|— src 主要源码所在位置,需要重点关注
|— compiler 模板解析的相关文件
|—codegen 根据ast生成render函数
|—directives 通用生成render函数之前需要处理的指令
|—parser 模板解析
|— core 核心代码
|— components 全局的组件,这里只有keep-alive
|— global-api 全局方法相关,也就是添加在Vue对象上的方法,比如Vue.use,Vue.extend,Vue.mixin等
|— instance 初始化相关,包括实例方法,生命周期,事件等
|— observer 双向数据绑定相关文件
|— util 工具方法
|— vdom 虚拟dom相关
|—index.js,入口文件,源码从这看起
|— platforms 平台相关的内容
|— web web端独有文件
|— compiler 编译阶段需要处理的指令和模块
|— runtime 运行阶段需要处理的组件、指令和模块
|— server 服务端渲染相关
|— util 工具库
|— weex weex端独有文件
|— server 服务端渲染相关
|— sfc
|— shared 共享的工具方法
|— test 测试用例
对于这些文件,有个大概的了解即可,后面就重点学习src下的源码。
二、从入口文件开始
NPM 托管的项目都会有一个 package.json 文件,它是对项目的描述文件,它的内容实际上是一个标准的 JSON 对象。我们通过命名运行"npm run dev",开始构建。对应package.json的配置如下:
"dev": "rollup -w -c scripts/config.js --environment TARGET:web-full-dev",scripts/config.js中知道web-full-dev配置
'web-full-dev': {
    entry: resolve('web/entry-runtime-with-compiler.js'),
    dest: resolve('dist/vue.js'),
    format: 'umd',
    env: 'development',
    alias: { he: './entity-decoder' },
    banner
  }
其中,"web/entry-runtime-with-compiler.js"就是入口文件,那这个文件在什么位置呢。
const resolve = p => {
  const base = p.split('/')[0]
  if (aliases[base]) {
    return path.resolve(aliases[base], p.slice(base.length + 1))
  } else {
    return path.resolve(__dirname, '../', p)
  }
}
web: resolve('src/platforms/web'),通过resolve,以及alias的web配置,知道位置在“src/platforms/web/entry-runtime-with-compiler.js”。对Vue对象进行层层封装,结构如下:

接下来我们看下src/core/index。
三、src/core/index
我们看下源码。
//Vue的核心方法
import Vue from './instance/index'
//定义了全局API的相关方法
import { initGlobalAPI } from './global-api/index'
//初始化_isServer,判断是否ssr
import { isServerRendering } from 'core/util/env'
import { FunctionalRenderContext } from 'core/vdom/create-functional-component'
//初始化全局API,如Vue.util,Vue.set,Vue.use等
initGlobalAPI(Vue)
//原型属性定义'$isServer',并拦截监听
Object.defineProperty(Vue.prototype, '$isServer', {
get: isServerRendering
})
//原型属性定义'$ssrContext',并拦截
Object.defineProperty(Vue.prototype, '$ssrContext', {
get () {
/* istanbul ignore next */
return this.$vnode && this.$vnode.ssrContext
}
})
// expose FunctionalRenderContext for ssr runtime helper installation
Object.defineProperty(Vue, 'FunctionalRenderContext', {
value: FunctionalRenderContext
})
Vue.version = '__VERSION__'
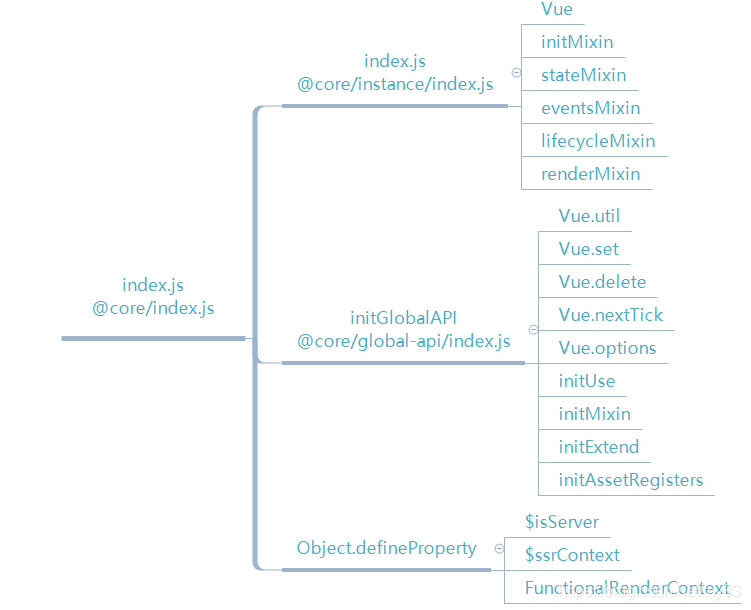
export default Vueindex.js中主要做了三件事:
1、引入vue核心文件src/core/instance/index,src/core/global-api/index
2、初始化全局API(定义在src/core/global-api/index.js文件中)
3、定义了一些原型属性,给ssr使用的全局变量$isServer 和 $ssrContext(与服务端渲染相关)
接下来我们重点介绍src/core/instance/index和src/core/global-api/index.js两个文件
三、src/core/instance/index
我们看下src/core/instance/index.js代码,代码不多。
import { initMixin } from './init'
import { stateMixin } from './state'
import { renderMixin } from './render'
import { eventsMixin } from './events'
import { lifecycleMixin } from './lifecycle'
import { warn } from '../util/index'

//定义Vue
function Vue (options) {

  if (process.env.NODE_ENV !== 'production' &&
    !(this instanceof Vue)
  ) {
    warn('Vue is a constructor and should be called with the `new` keyword')
  }
  //执行初始化方法
  this._init(options)
}


//定义了_init方法
initMixin(Vue)
stateMixin(Vue)
//vue相关事件定义,如on,emit
eventsMixin(Vue)
//生命周期定义
lifecycleMixin(Vue)
//render定义
renderMixin(Vue)

export default Vue
1、简明扼要的定义了Vue对象,调用_init方法进行初始化。下一篇我们重点介绍。
2、执行xxxMixin方法,初始化相关的功能定义,这里仅仅是定义函数,后面实际用到再分析。
3、导出了Vue功能类。
四、全局API初始化
进入global-api/index.js看下initGlobalAPI方法。这里主要定义Vue全局的属性和方法。
import config from '../config'
import { initUse } from './use'
import { initMixin } from './mixin'
import { initExtend } from './extend'
import { initAssetRegisters } from './assets'
import { set, del } from '../observer/index'
import { ASSET_TYPES } from 'shared/constants'
import builtInComponents from '../components/index'

import {
  warn,
  extend,
  nextTick,
  mergeOptions,
  defineReactive
} from '../util/index'

//定义了全局属性和方法
export function initGlobalAPI (Vue: GlobalAPI) {
  // 全局配置
  const configDef = {}
  configDef.get = () => config
  if (process.env.NODE_ENV !== 'production') {
    configDef.set = () => {
      warn(
        'Do not replace the Vue.config object, set individual fields instead.'
      )
    }
  }
  Object.defineProperty(Vue, 'config', configDef)

  // 这些工具方法不视作全局API的一部分,除非你已经意识到某些风险,否则不要去依赖他们
  Vue.util = {
    warn,
    extend,
    mergeOptions,
    defineReactive
  }

  //全局属性
  Vue.set = set
  Vue.delete = del
  Vue.nextTick = nextTick

  Vue.options = Object.create(null)
  ASSET_TYPES.forEach(type => {
    Vue.options[type + 's'] = Object.create(null)
  })
  Vue.options._base = Vue

  //扩展构建Vue.options.components
  extend(Vue.options.components, builtInComponents)

  //定义全局方法
  //Vue.use
  initUse(Vue)
  //Vue.Mixin
  initMixin(Vue)
  //Vue.Extend
  initExtend(Vue)
  initAssetRegisters(Vue)
}
与上面一样,这里仅定义了全局的属性和方法,还没有实际使用。其中Vue.options下个章节重点分析。我们和官网的比较下:
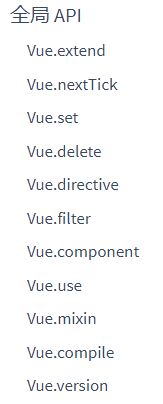
这些方法的功能我们放到后面介绍,感兴趣的可以先大概预览下,但不建议做深入了解。
五、总结
我们用导图来总结下:
至此Vue的准备工作做完,主要是定义了一系列的功能函数,为下一步初始化准备,接下来重点要介绍new Vue都干了啥
