文章目录
MySQL离线部署
CHD分为两块
- CM 不开源 主从架构 server + 多个agent 离线部署
- Parcel 包裹文件 :就是
	将Hadoop / Hive等压缩包完善之后压缩后 重命名parcel结尾
	用 tar -xzvf xxx.parcel 也可以解压
机器准备
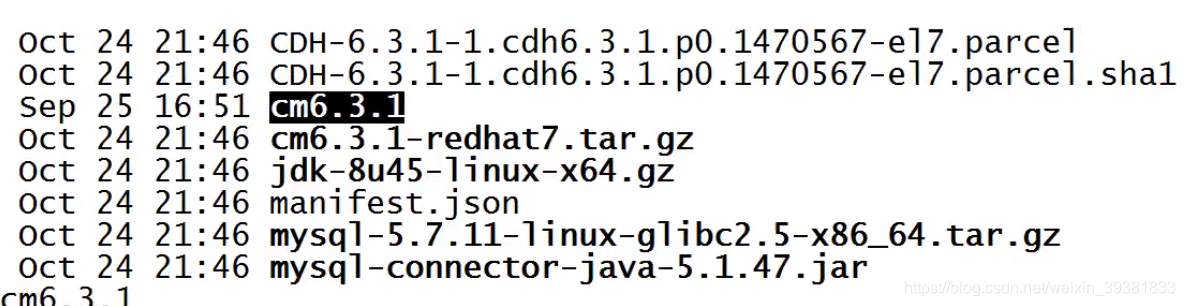
安装包准备
MySql离线部署
- mysql-5.7.11-linux-glibc2.5-x86_64.tat.gz
- mysql-connector-java-5.1.47.jar
CM
- cm-6.3.1-radhat7.tar.gz
Parcel文件
- CDH-6.3.1-1.cdh6.3.1.p0.1470567-e17.parcel
- CDH-6.3.1-1.cdh6.3.1.p0.1470567-e17.parcel.shal
- maifest.json
JDK
- jdk-8u45-linux-x64.gz
集群节点初始化
1 修改hosts文件
首先工程师PC的hosts文件
- MAC: /etc/hosts
- Window: C:\windows\system32\drivers\etc\hosts
公⽹地址 机器名称:
47.74.130.251 ruozedata001
161.117.1.169 ruozedata002
47.88.170.121 ruozedata003
第二修改服务器 防止ip改变之后造成的大工作量的更改
echo '"172.21.230.219 ifeng001" >> /ect/hosts
echo '"172.21.230.220 ifeng002" >> /ect/hosts
echo '"172.21.230.221 ifeng003" >> /ect/hosts
2 关闭防火墙&清空规则
#停止
systemctl stop firewalled

#禁用
systemctl disable firewalld

#清空防火墙的规则
iptables -F
3 关闭所有节点的selinux
#安全增强型 Linux(Security-Enhanced Linux)简称 SELinux
vi /etc/selinux/config

4 统一时间
# 查看日期
date

# 设置时区
timedatectl --help
4-1 主从
主和互联网同步 ,从节点与主节点同步
4-2 主主
每一台都与互联网同步
4-3 公司内部时钟服务器 maven仓库中心
#部署ntp
yum install -y ntp
# 选择第一台机器作为主节点
vi /etc/ntp.conf
当网络时间不能用,用本地时间
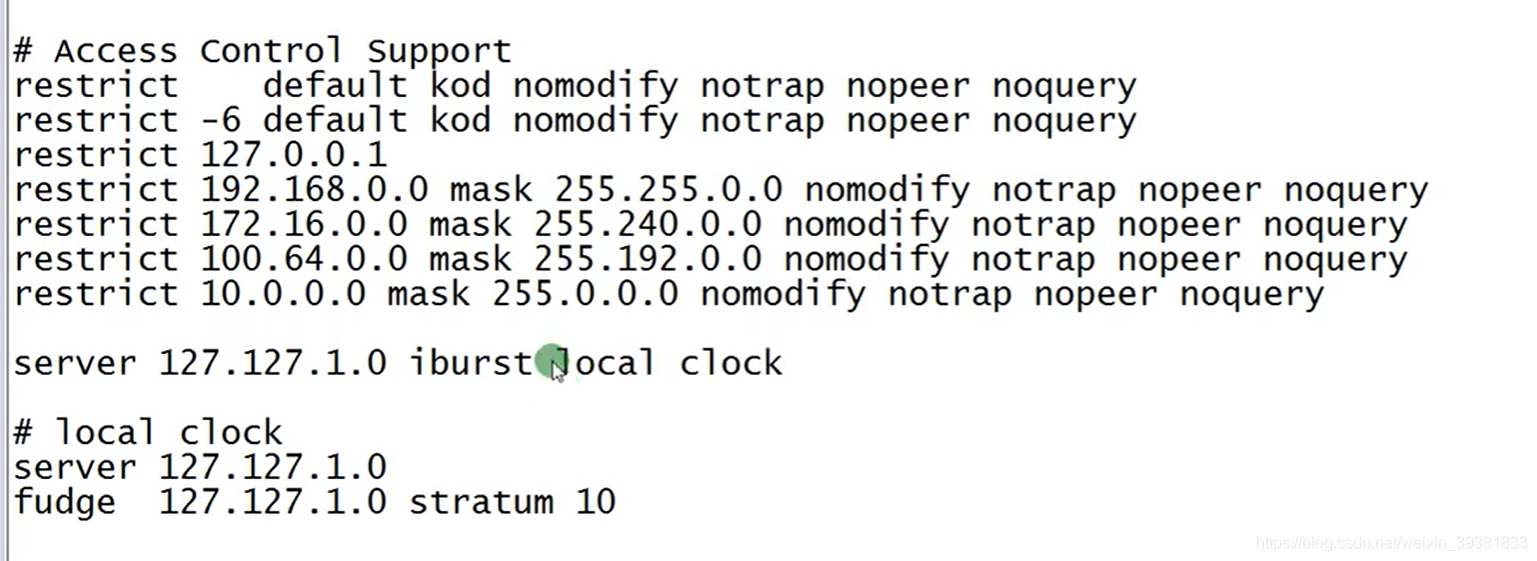
restrict 控制相关权限。

语法为: restrict IP地址 mask 子网掩码 参数

其中IP地址也可以是default ,default 就是指所有的IP

参数有以下几个:

ignore  :关闭所有的 NTP 联机服务

nomodify:客户端不能更改服务端的时间参数,但是客户端可以通过服务端进行网络校时。

notrust :客户端除非通过认证,否则该客户端来源将被视为不信任子网

noquery :不提供客户端的时间查询:用户端不能使用ntpq,ntpc等命令来查询ntp服务器

notrap :不提供trap远端登陆:拒绝为匹配的主机提供模式 6 控制消息陷阱服务。陷阱服务是 ntpdq 控制消息协议的子系统,用于远程事件日志记录程序。

nopeer :用于阻止主机尝试与服务器对等,并允许欺诈性服务器控制时钟

kod : 访问违规时发送 KoD 包。

restrict -6 表示IPV6地址的权限设置
# 主节点只接受172.21.230的网段链接
restrict 172.21.230.0 mask 255.255.255.0 nomodify notrap
# 重新启动服务
systemctl start
其他节点与主节点链接
# sotp
systemctl stop ntpd

# 禁止ntpd启动
systemctl disable ntpd

ntpdate ifeng001
# 每天同步一次
crontab -e
* * * * * /usr/sbin/ntpdate ifeng001
5 JDK
5.1 传送两个文件
scp -r CDH6.3.1 ifeng002:/root/
mkdir CDH6.3.1
mkdir /usr/java/

tar -xzvf jdk-8u45-linux-x64.gz -C /usr/java/
修正用户和用户组
chown -R root:root /usr/java/jdk1.8.0_45

echo "export JAVA_HOME=/usr/java/jdk1.8.0_45" >> /etc/profile
echo "export PATH={JAVA_HOME}/bin:${PATH}" >> /etc/
 source /etc/profile
 which java
6 离线部署MySQL
1.解压及创建目录
[root@hadoop39 local]# tar xzvf mysql-5.7.11-linux-glibc2.5-x86_64.tar.gz -C
[root@hadoop39 local]# mv mysql-5.7.11-linux-glibc2.5-x86_64 mysql

[root@hadoop39 local]# mkdir mysql/arch mysql/data mysql/tmp
2.创建my.cnf(见文件)
[root@hadoop39 local]# vi /etc/my.cnf
[client]
port            = 3306
socket          = /usr/local/mysql/data/mysql.sock
default-character-set=utf8mb4

[mysqld]
port            = 3306
socket          = /usr/local/mysql/data/mysql.sock

skip-slave-start

skip-external-locking
key_buffer_size = 256M
sort_buffer_size = 2M
read_buffer_size = 2M
read_rnd_buffer_size = 4M
query_cache_size= 32M
max_allowed_packet = 16M
myisam_sort_buffer_size=128M
tmp_table_size=32M

table_open_cache = 512
thread_cache_size = 8
wait_timeout = 86400
interactive_timeout = 86400
max_connections = 600

# Try number of CPU's*2 for thread_concurrency
#thread_concurrency = 32

#isolation level and default engine
default-storage-engine = INNODB
transaction-isolation = READ-COMMITTED

server-id  = 1739
basedir     = /usr/local/mysql
datadir     = /usr/local/mysql/data
pid-file     = /usr/local/mysql/data/hostname.pid

#open performance schema
log-warnings
sysdate-is-now

binlog_format = ROW
log_bin_trust_function_creators=1
log-error  = /usr/local/mysql/data/hostname.err
log-bin = /usr/local/mysql/arch/mysql-bin
expire_logs_days = 7

innodb_write_io_threads=16

relay-log  = /usr/local/mysql/relay_log/relay-log
relay-log-index = /usr/local/mysql/relay_log/relay-log.index
relay_log_info_file= /usr/local/mysql/relay_log/relay-log.info

log_slave_updates=1
gtid_mode=OFF
enforce_gtid_consistency=OFF

# slave
slave-parallel-type=LOGICAL_CLOCK
slave-parallel-workers=4
master_info_repository=TABLE
relay_log_info_repository=TABLE
relay_log_recovery=ON

#other logs
#general_log =1
#general_log_file  = /usr/local/mysql/data/general_log.err
#slow_query_log=1
#slow_query_log_file=/usr/local/mysql/data/slow_log.err

#for replication slave
sync_binlog = 500


#for innodb options
innodb_data_home_dir = /usr/local/mysql/data/
innodb_data_file_path = ibdata1:1G;ibdata2:1G:autoextend

innodb_log_group_home_dir = /usr/local/mysql/arch
innodb_log_files_in_group = 4
innodb_log_file_size = 1G
innodb_log_buffer_size = 200M

#根据生产需要,调整pool size
innodb_buffer_pool_size = 12G
#innodb_additional_mem_pool_size = 50M #deprecated in 5.6
tmpdir = /usr/local/mysql/tmp

innodb_lock_wait_timeout = 1000
#innodb_thread_concurrency = 0
innodb_flush_log_at_trx_commit = 2

innodb_locks_unsafe_for_binlog=1

#innodb io features: add for mysql5.5.8
performance_schema
innodb_read_io_threads=4
innodb-write-io-threads=4
innodb-io-capacity=200
#purge threads change default(0) to 1 for purge
innodb_purge_threads=1
innodb_use_native_aio=on

#case-sensitive file names and separate tablespace
innodb_file_per_table = 1
lower_case_table_names=1

[mysqldump]
quick
max_allowed_packet = 128M

[mysql]
no-auto-rehash
default-character-set=utf8mb4

[mysqlhotcopy]
interactive-timeout

[myisamchk]
key_buffer_size = 256M
sort_buffer_size = 256M
read_buffer = 2M
write_buffer = 2M
3.创建用户组及用户
[root@hadoop39 local]# groupadd -g 101 dba
[root@hadoop39 local]# useradd -u 514 -g dba -G root -d /usr/local/mysql mysqladmin
[root@hadoop39 local]# id mysqladmin
uid=514(mysqladmin) gid=101(dba) groups=101(dba),0(root)

## 一般不需要设置mysqladmin的密码,直接从root或者LDAP用户sudo切换
#[root@hadoop39 local]# passwd mysqladmin
Changing password for user mysqladmin.
New UNIX password:
BAD PASSWORD: it is too simplistic/systematic
Retype new UNIX password:
passwd: all authentication tokens updated successfully.


## if user mysqladmin is existing,please execute the following command of usermod.
#[root@hadoop39 local]# usermod -u 514 -g dba -G root -d /usr/local/mysql mysqladmin
4.copy 环境变量配置文件至mysqladmin用户的home目录中,为了以下步骤配置个人环境变量
[root@hadoop39 local]# cp /etc/skel/.* /usr/local/mysql ###important
5.配置环境变量
[root@hadoop39 local]# vi mysql/.bashrc
# .bashrc
# Get the aliases and functions

if [ -f ~/.bashrc ]; then
        . ~/.bashrc
fi

# User specific environment and startup programs
export MYSQL_BASE=/usr/local/mysql
export PATH=${MYSQL_BASE}/bin:$PATH


unset USERNAME

#stty erase ^H
set umask to 022
umask 022
PS1=`uname -n`":"'$USER'":"'$PWD'":>"; export PS1

## end
6.赋权限和用户组,切换用户mysqladmin,安装
[root@hadoop39 local]# chown  mysqladmin:dba /etc/my.cnf
[root@hadoop39 local]# chmod  640 /etc/my.cnf


[root@hadoop39 local]# chown -R mysqladmin:dba /usr/local/mysql
[root@hadoop39 local]# chmod -R 755 /usr/local/mysql
7.配置服务及开机自启动
[root@hadoop39 local]# cd /usr/local/mysql
#将服务文件拷贝到init.d下,并重命名为mysql
[root@hadoop39 mysql]# cp support-files/mysql.server /etc/rc.d/init.d/mysql
#赋予可执行权限
[root@hadoop39 mysql]# chmod +x /etc/rc.d/init.d/mysql
#删除服务
[root@hadoop39 mysql]# chkconfig --del mysql
#添加服务
[root@hadoop39 mysql]# chkconfig --add mysql
[root@hadoop39 mysql]# chkconfig --level 345 mysql on
8.安装libaio及安装mysql的初始db
[root@hadoop39 mysql]# yum -y install libaio
[root@hadoop39 mysql]# sudo su - mysqladmin

hadoop39.ruoze:mysqladmin:/usr/local/mysql:> bin/mysqld \
--defaults-file=/etc/my.cnf \
--user=mysqladmin \
--basedir=/usr/local/mysql/ \
--datadir=/usr/local/mysql/data/ \
--initialize

在初始化时如果加上 –initial-insecure,则会创建空密码的 root@localhost 账号,否则会创建带密码的 root@localhost 账号,密码直接写在 log-error 日志文件中
(在5.6版本中是放在 ~/.mysql_secret 文件里,更加隐蔽,不熟悉的话可能会无所适从)
9.查看临时密码
hadoop39.ruoze:mysqladmin:/usr/local/mysql/data:>cat hostname.err |grep password
2017-07-22T02:15:29.439671Z 1 [Note] A temporary password is generated for root@localhost: kFCqrXeh2y(0
hadoop39.ruoze:mysqladmin:/usr/local/mysql/data:>
10.启动
/usr/local/mysql/bin/mysqld_safe --defaults-file=/etc/my.cnf &
11.登录及修改用户密码
hadoop39.ruoze:mysqladmin:/usr/local/mysql/data:>mysql -uroot -p'kFCqrXeh2y(0'
mysql: [Warning] Using a password on the command line interface can be insecure.
Welcome to the MySQL monitor.  Commands end with ; or \g.
Your MySQL connection id is 2
Server version: 5.7.11-log

Copyright (c) 2000, 2016, Oracle and/or its affiliates. All rights reserved.

Oracle is a registered trademark of Oracle Corporation and/or its
affiliates. Other names may be trademarks of their respective
owners.

Type 'help;' or '\h' for help. Type '\c' to clear the current input statement.

mysql> alter user root@localhost identified by 'ruozedata';
Query OK, 0 rows affected (0.05 sec)

mysql> GRANT ALL PRIVILEGES ON *.* TO 'root'@'%' IDENTIFIED BY 'ruozedata' ;
Query OK, 0 rows affected, 1 warning (0.02 sec)


mysql> flush privileges;
Query OK, 0 rows affected (0.00 sec)

mysql> exit;
Bye
12.重启
hadoop39.ruoze:mysqladmin:/usr/local/mysql:> service mysql restart

hadoop39.ruoze:mysqladmin:/usr/local/mysql/data:>mysql -uroot -pruozedata
mysql: [Warning] Using a password on the command line interface can be insecure.
Welcome to the MySQL monitor.  Commands end with ; or \g.
Your MySQL connection id is 2
Server version: 5.7.11-log MySQL Community Server (GPL)

Copyright (c) 2000, 2016, Oracle and/or its affiliates. All rights reserved.

Oracle is a registered trademark of Oracle Corporation and/or its
affiliates. Other names may be trademarks of their respective
owners.

Type 'help;' or '\h' for help. Type '\c' to clear the current input statement.

mysql>
7 创建CDH元数据的用户和amon的服务的库
create database cmf dafult chatacter ser utf8;
create database amon dafult chatacter ser utf8;

grant all privileges on cmf.* to 'cmf'@'%' identified by '123456'
grant all privileges on amon.* to 'amon'@'%' identified by '123456'
选择第一台部署 amon进程 那么mysql jar包就需要
java目录:/usr/java
jar包目录:/usr/share/java
创建jar包存放目录
mkdir -p /usr/share/java

重命名jar包
cp mysql-connector-java-5.1.47.jar /usr/share/java/mysql-connector-java.jar
11 部署CM Server+agent rpm
tar -xzvf cm6.3.1-redhat7.tar.gz
tar开之后进入到文件夹cm6.3.1
需要安装的模块
Server:
cloudera-manager-daemons-6.3.1-1466458.e17.x86_64.rpm
cloudera-manager-server-6.3.1-1466458.e17.x86_64.rpm

先安装核心的daemon
agent:
cloudera-manager-daemons-6.3.1-1466458.e17.x86_64.rpm
cloudera-manager-agent-6.3.1-1466458.e17.x86_64.rpm

先安装核心的daemon rpm包
网络允许的情况下:
yum install cloudera-manager-daemons-6.3.1-1466458.e17.x86_64.rpm
网络不被放开的情况下用
# 不去下载依赖包,直接裸装这个rpm包
rpm -ivh cloudera-manager-daemons-6.3.1-1466458.e17.x86_64.rpm
