一、写在前面
工作需要,最近开始接触一点知识图谱的东西,从0开始,老大确定了要使用的图计算框架,其余的,全都靠自己,由于毫无经验所言, 图谱的概念对我来说是新的,JanusGraph这个框架是新的,它所基于的TinkerPop没听过,拿来写入数据的语言java基本上也算是新的了(虽然几年前在学校用过),部署可视化界面要使用的nginx也是新的,这些东西搅到一起,足足搞了10天才理出点头绪来,记录一下,给有相同需要的小伙伴点参考。
二、JanusGraph+HBase+ElasticSearch的环境搭建
一开始找到了好教程,但由于自己知识储备不足,不知道好教程是好教程,附上原文
参考的安装教程
我这里,由于是公司环境,Hbase和ES都是安装好的,不需要自己再装什么,下面记录一下我在安装的过程中踩了哪些坑
1.JanusGraph组件安装
(1)官方下载地址 github下载
坑:版本
在安装之前,我有想过这个问题,查了一下服务器上Hbase和ES的版本
- hbase 版本查询:在服务器上使用 hbase shell 命令打开 hbase 客户端,信息的最后一行即可看到:
Version 1.2.0-cdh5.16.1 - ES 版本查询:在服务器上执行
curl -XGET ip:port(把ip和port改成你ES服务器的ip和端口号),返回信息中即可看到:{"version":{"number" : "5.5.1"}}
接着,去JanusGraph下载页面查每一个版本的JanusGraph所支持的组件版本,在每一个版本的“Tested Compatibility”里,新版本的JanusGraph支持的其他组件的版本都比较高,一定要使用支持自己组件版本的JanusGraph。一开始,我发现最新的几个版本都不支持我的Hbase和ES,得用很久之前的版本,心里比较反感,谁还不想用新的呢,想着,那么老的版本,都没多少人用了,都不更新了的,就全然不当回事,心存侥幸心理下载了最新版,后面被事实啪啪打脸,我慢慢降低版本,重新配置,脸肿了之后才学乖去找支持我组件的版本,最终找到了 0.2.3 版本,这才发现,人家最近才更新完
(2)解压
unzip janusgraph-0.2.3-hadoop2.zip
mv janusgraph-0.2.3-hadoop2 janusgraph
(3)配置环境变量
打开 ~/.bashrc 文件,在末尾追加
export JANUSGRAPH_HOME=你的janusgraph文件夹所在路径
export PATH=:$JANUSGRAPH_HOME/bin:$PATH
让环境变量生效source ~/.bashrc
2.配置JanusGraph Server
这一步的配置需要修改两个配置文件:janusgraph-hbase-es-server.properties 和 gremlin-hbase-es-server.yaml
文件放在 janusgraph/conf/gremlin-server/ 下,如果没有,复制一份其他的配置文件再做修改即可
(1)janusgraph-hbase-es-server.properties
拷贝文件
cp janusgraph-cassandra-es-server.properties janusgraph-hbase-es-server.properties
修改配置信息
gremlin.graph=org.janusgraph.core.JanusGraphFactory
# 配置后端存储数据库
storage.backend=hbase
storage.hostname=node007164:2182,node007166:2182,node007167:2182  # 这里写你hbase的ip:port,如果是集群,可以像我这样写集群的zookeeper地址
storage.hbase.table=cpf_item_tag_graph  # 这里写hbase里的表,事先库里有没有这个表都行,有的话他会直接用,没有的话,他会新建,如果事先建好了,无论你对那个表设置了神马,都会被清除掉,他会重新按自己的需要配置信息,别问我咋知道的,没被我们数仓小哥哥骂死已经是他脾气好了

# 下面中间的那个search你可以随便改名字,后面在设置schema建索引的时候保持一致即可,后面到那会再提一下
index.search.backend=elasticsearch
index.search.hostname=192.168.2.198:9201  # ES所在服务器的ip和端口,集群的话,写一个就行,我的就是集群
index.search.elasticsearch.health-request-timeout=120s  # 这个是后面我查数据的时候报错信息提示ES超时之类的,查了一圈才查到这,莫得配置是30s,如果你跑数据的时候碰到类似问题,可以试一下
其余配置信息没有修改
(2)gremlin-hbase-es-server.yaml
拷贝文件

cp gremlin-server.yaml gremlin-hbase-es-server.yaml
这个文件比较好改
channelizer: org.apache.tinkerpop.gremlin.server.channel.WsAndHttpChannelizer  # 改成同时支持websocket和http
graphs: {
  graph: conf/gremlin-server/janusgraph-hbase-es-server.properties  # 你自己的.properties文件路径
}
(3)启动JanusGraph Server
任意目录下执行gremlin-server.sh conf/gremlin-server/gremlin-hbase-es-server.yaml
三、向hbase中写入数据,并同步到ES中
好像有批量写入数据的工具,也许是我心不够静,还没研究明白,你们可以自己研究一下 janusgraph-utils
这里主要记录一下自己用Java往库里写数据的过程(不是不支持python,只是项目需要):
1.建项目
(1)请使用 maven 创建一个新项目
(2)修改源,不然速度太慢了,慢到想砸电脑
找到maven的settings.xml文件,目录:(command+,)IntelliJ IDEA -> Preferences -> 搜索框搜 maven -> 右边面板倒数第2行 User settings file后面就是你的路径,倒数第1行是存储jar包的仓库地址,记住这两个地址
修改:打开settings.xml文件,找到<mirrors>标签,加入以下信息
	<mirror>
		<!--该镜像的唯一标识符。id用来区分不同的mirror元素。 -->
        <id>nexus-aliyun</id>
		<!--镜像名称 -->
        <name>Nexus aliyun</name>
		<!--该镜像的URL。构建系统会优先考虑使用该URL,而非使用默认的服务器URL。 -->
        <url>http://maven.aliyun.com/nexus/content/groups/public/</url>
		<!--被镜像的服务器的id。例如,如果我们要设置了一个Maven中央仓库(http://repo1.maven.org/maven2)的镜像,就需要将该元素设置成central。这必须和中央仓库的id central完全一致。-->
		<mirrorOf>central</mirrorOf>
    </mirror>
找到<localRepository>标签,确定仓库目录是正确的
这样加载pom.xml依赖的时候就快很多了
(3)pom.xml文件:
依赖项如下,挑你需要的即可
    <dependencies>
        <dependency>
            <groupId>org.janusgraph</groupId>
            <artifactId>janusgraph-hbase</artifactId>
            <version>0.2.3</version>
        </dependency>
        <dependency>
            <groupId>org.janusgraph</groupId>
            <artifactId>janusgraph-core</artifactId>
            <version>0.2.3</version>
        </dependency>
        <dependency>
            <groupId>org.apache.tinkerpop</groupId>
            <artifactId>gremlin-driver</artifactId>
            <version>3.4.1</version>
        </dependency>
        <dependency>
            <groupId>org.janusgraph</groupId>
            <artifactId>janusgraph-all</artifactId>
            <version>0.2.3</version>
        </dependency>
        <dependency>
            <groupId>org.apache.httpcomponents</groupId>
            <artifactId>httpclient</artifactId>
            <version>4.5</version>
        </dependency>
        <dependency>
            <groupId>com.alibaba</groupId>
            <artifactId>fastjson</artifactId>
            <version>1.2.47</version>
        </dependency>
        <dependency>
            <groupId>junit</groupId>
            <artifactId>junit</artifactId>
            <version>3.8.1</version>
            <scope>test</scope>
        </dependency>
        <dependency>
            <groupId>org.apache.hadoop</groupId>
            <artifactId>hadoop-hdfs</artifactId>
            <version>2.7.3</version>
        </dependency>
        <dependency>
            <groupId>org.apache.hbase</groupId>
            <artifactId>hbase-client</artifactId>
            <version>1.2.6</version>
        </dependency>
        <dependency>
            <groupId>jdk.tools</groupId>
            <artifactId>jdk.tools</artifactId>
            <version>1.8</version>
            <scope>system</scope>
            <systemPath>${JAVA_HOME}/lib/tools.jar</systemPath>
        </dependency>
    </dependencies>
别忘了写build项,不然项目不知道要执行的main函数在哪哦
    <build>
        <plugins>
            <plugin>
                <groupId>org.apache.maven.plugins</groupId>
                <artifactId>maven-assembly-plugin</artifactId>
                <version>2.4</version>
                <configuration>
                    <archive>
                        <manifest>
                            <mainClass>mfw.graph.JanusMain</mainClass>
                        </manifest>
                    </archive>
                    <descriptorRefs>
                        <descriptorRef>jar-with-dependencies</descriptorRef>
                    </descriptorRefs>
                </configuration>
            </plugin>
        </plugins>
    </build>
2.设置Schema
为graph设置schema就相当于在mysql中建表的时候需要事先指定有哪些字段,要是你实在不想设置,那就任性吧,虽然我还是建议你自己设置,毕竟这样你可以将他玩弄于股掌之间。具体的知识点网上有很多,这里就只粘贴一下代码,在注释里解释一点自己的理解。(有提到1.2.1节ES的配置项)
Schema.java文件
package a;
import org.apache.tinkerpop.gremlin.structure.Edge;
import org.apache.tinkerpop.gremlin.structure.Vertex;
import org.janusgraph.core.*;
import org.janusgraph.core.schema.JanusGraphManagement;
import org.janusgraph.core.schema.SchemaStatus;
import org.janusgraph.graphdb.database.management.ManagementSystem;
import static org.janusgraph.core.Multiplicity.SIMPLE;

public class Schema {
    public void setSchema(String properties_path) {
        JanusGraph graph = JanusGraphFactory.open(properties_path);
        JanusGraphManagement mgmt = graph.openManagement();

        // JanusGraph schema 的构成有三部分: vertex label,edge label,property key
        // vertex labels: 创建 poi 节点, .make() 用于完成标签定义并返回标签
        VertexLabel poi = mgmt.makeVertexLabel("poi").make();
        VertexLabel tag = mgmt.makeVertexLabel("tag").make();

        // edge labels: 创建 Score 边
        EdgeLabel Score = mgmt.makeEdgeLabel("Score").multiplicity(SIMPLE).make();

        // vertex and edge properties: 设置 点 和 边 可以具有的属性,需要定义他们的数据类型
        PropertyKey itemId = mgmt.makePropertyKey("itemId").dataType(Integer.class).make();
        PropertyKey name = mgmt.makePropertyKey("name").dataType(String.class).make();
        PropertyKey uptime = mgmt.makePropertyKey("uptime").dataType(String.class).make();
        PropertyKey score = mgmt.makePropertyKey("score").dataType(Float.class).make();

        // 这里是跟前面配置的ES相关的地方,buildMixedIndex里面的参数与 配置项中间的名称(我的是search) 保持一直即可,ES里面就会生成对应的表
        // global indices 设置索引
        String item_tag_vertex = "item_tag_vertex";  // 这里自己随意设置即可,ES里生成的表名即为 janusgraph_item_tag_vertex
        // 后面的每一个 addKey() 添加的字段都会出现在ES表中,至于后面用buildMixedIndex还是别的,你google一下"janusgraph 索引"看看哪种符合自己的要求即可
        mgmt.buildIndex(item_tag_vertex, Vertex.class)addKey(itemId).addKey(name).addKey(uptime).buildMixedIndex("search");
        String item_tag_edge = "item_tag_edge";  // 我这里建了2张索引表
        mgmt.buildIndex(item_tag_edge, Edge.class).addKey(score).addKey(uptime).buildMixedIndex("search");
        mgmt.commit();

        //注册索引
        try {
            ManagementSystem
                    .awaitGraphIndexStatus(graph, item_tag_vertex)
                    .status(SchemaStatus.REGISTERED)
                    .call();
            ManagementSystem
                    .awaitGraphIndexStatus(graph, item_tag_edge)
                    .status(SchemaStatus.REGISTERED)
                    .call();
            //等待索引ok
            ManagementSystem.awaitGraphIndexStatus(graph, item_tag_vertex).status(SchemaStatus.ENABLED).call();
            ManagementSystem.awaitGraphIndexStatus(graph, item_tag_edge).status(SchemaStatus.ENABLED).call();
        } catch (InterruptedException e) {
            e.printStackTrace();
        }
        graph.close();
    }
}
3.多线程向hbase里写数据
如果代码报了很多:Usage of API documented as …
去看一下项目的语法版本(command+;),Language Level 改成8 即可
package a;
import com.alibaba.fastjson.JSON;
import com.alibaba.fastjson.JSONObject;
import org.apache.commons.lang3.concurrent.BasicThreadFactory;
import org.apache.tinkerpop.gremlin.process.traversal.dsl.graph.GraphTraversalSource;
import org.janusgraph.core.JanusGraph;
import org.janusgraph.core.JanusGraphFactory;
import org.janusgraph.core.schema.JanusGraphManagement;
import org.janusgraph.diskstorage.BackendException;

import java.io.*;
import java.nio.file.Files;
import java.nio.file.Paths;
import java.text.SimpleDateFormat;
import java.time.LocalDate;
import java.util.*;

import java.util.concurrent.ArrayBlockingQueue;
import java.util.concurrent.ThreadPoolExecutor;
import java.util.concurrent.TimeUnit;
import java.util.logging.FileHandler;
import java.util.logging.Level;
import java.util.logging.Logger;

public class JanusMain {
    String uptime;
    // 各种路径我都用的绝对路径。。。
    private static final String PROPERTIES_PATH = "";  // 前面配置的 janusgraph-hbase-es-server.properties 文件的路径
    private static final String DIRECTORY = "项目路径/src/main/resources/";  // 记得把你的
    private static final String TAG_PATH = DIRECTORY + "poi_tag_leaves_interest.json";
    private static final String BASE_LOG_PATH = "";  // log路径
    /**
     * 自定义线程池
     */
    private static ThreadPoolExecutor threadPoolExecutor = new ThreadPoolExecutor(
            18, 18,
            2, TimeUnit.SECONDS,
            new ArrayBlockingQueue<>(1000),
            new BasicThreadFactory
                    .Builder()
                    .namingPattern("item_tag_custom_thread-%d")
                    .daemon(true)
                    .build(),
            new ThreadPoolExecutor.AbortPolicy());

    private JanusMain() {
        SimpleDateFormat sdf = new SimpleDateFormat();// 格式化时间
        sdf.applyPattern("yyyy-MM-dd HH:mm:ss a");// a为am/pm的标记
        uptime = sdf.format(new Date());
    }
    public Logger getLogger(String suffix) {
        String threadName = Thread.currentThread().getName();
        Logger logger = Logger.getLogger(JanusMain.class.getName() + "_" + threadName);
        //设置文件名
        String logPath = BASE_LOG_PATH + LocalDate.now() + suffix + "_" + threadName + ".log";
        //将输出handler加入logger
        try {
            FileHandler fileHandler = new FileHandler(logPath, true);
            logger.addHandler(fileHandler);
        } catch (IOException e) {
            logger.log(Level.WARNING, "set Logger Exception", e);
        }
        return logger;
    }
    /**
     * @param fileName:
     * @return
     */
    public JSONObject readJsonFile(String fileName) {
        try {
            String fileRead = new String(Files.readAllBytes(Paths.get(fileName)));
            return JSON.parseObject(fileRead);
        } catch (IOException e) {
            System.out.println(fileName + " 不存在");
            e.printStackTrace();
            return null;
        }
    }
    public ArrayList<JSONObject> readTxtFile(String fileName) {
        try {
            String fileRead = new String(Files.readAllBytes(Paths.get(fileName)));
            String[] files = fileRead.split("\n");
            ArrayList<JSONObject> scoreList = new ArrayList<>();
            for(String file: files){
                scoreList.add(JSON.parseObject(file));
            }
            return scoreList;
        } catch (IOException e) {
            System.out.println(fileName + " 不存在");
            e.printStackTrace();
            return null;
        }
    }
    /**
     * 先把所有标签写入库中
     */
    public void writeTag() {
        String[] suffix = TAG_PATH.split("/");
        Logger logger = getLogger(suffix[suffix.length - 1].split("\\.")[0]);
        JanusGraph graph = JanusGraphFactory.open(PROPERTIES_PATH);
        JSONObject items = readJsonFile(TAG_PATH);
        // 写你自己的文件处理逻辑
        // ...
        graph.tx().commit();
        graph.close();
    }
    public void writePOI(File file) {
        JanusGraph graph = JanusGraphFactory.open(PROPERTIES_PATH);
        GraphTraversalSource g = graph.traversal();
        String threadName = Thread.currentThread().getName();

        Logger logger = getLogger(file.getName());
        logger.log(Level.WARNING, "执行线程名:" + threadName);
        logger.log(Level.WARNING, "文件:" + file.getName() + "执行开始");
        // 写你自己的文件处理逻辑
        // ...
        graph.close();
        logger.log(Level.WARNING, "文件:" + file.getName() + "执行完毕");
    }
    /**
     * 用这个函数分发多线程
     */
    public void writePOIs() {
        // 读取原始数据
        File files = new File(DIRECTORY);
        File[] filesArr = files.listFiles();
        int i = 1;
        for (File file : filesArr) {
            threadPoolExecutor.prestartAllCoreThreads();
            System.out.println("当前正在创建第" + i++ + "个线程");
            threadPoolExecutor.submit(() -> {
                new JanusMain().writePOI(file);
            });
        }
    }
    public static void main(String[] args) throws BackendException {
        JanusMain jm = new JanusMain();
        String properties_path = PROPERTIES_PATH;
        Logger logger = jm.getLogger(JanusMain.class.getName());
        JanusGraph graph = JanusGraphFactory.open(properties_path);
        JanusGraphFactory.drop(graph);  // 删除旧的schema, 同时会删除所有数据
        // 设置schema
        new Schema().setSchema(properties_path);
        logger.info("Schema 设置 over");
        graph.close();

        graph = JanusGraphFactory.open(properties_path);
        JanusGraphManagement mgmt = graph.openManagement();
        logger.info(mgmt.printSchema());
        graph.close();
        // 处理tag
        jm.writeTag();
        // 多线程处理poi
        jm.writePOIs();
        // 一直等到所有线程都执行完
        while (true) {
            if (threadPoolExecutor.getActiveCount() == 0) {
                break;
            }
            try {
                TimeUnit.SECONDS.sleep(5);
            } catch (InterruptedException e) {
                logger.log(Level.WARNING, "休眠异常", e);
            }
        }
        graph = JanusGraphFactory.open(properties_path);
        GraphTraversalSource g = graph.traversal();
        // 查询图中有多少节点和边
        logger.info("Vertex count = " + g.V().count().next());
        logger.info("Edges count = " + g.E().count().next());
        graph.close();
    }
}
在检查相同节点是否已经创建过时,我废了好大劲,这里额外贴出来,希望能帮到你
GraphTraversal<Vertex, Vertex> has = g.V().has("tag", "itemId", tagid); // 第一个参数是节点label,前面schema里创建的,第二个参数是自己设置的属性,第三个参数是第二个参数的值,我的项目中,label+itemId即可唯一确定一个节点
好啦,跑起来运行就好啦
四、可视化配置
1.下载项目
修改graphexp.html文件,将Server Address的value值改为你自己的ip
2.安装并配置nginx
网上找了好多教程,一通改,一通失败,然而用yum只需要一个命令,不过需要保证系统是基于CentOS的,查询命令
cat /etc/redhat-release
(1)用yum安装,如果没有yum源,自己去搜索添加一下
sudo yum install nginx
nginx会被安装到/etc/nginx/目录,修改配置文件nginx.conf,找到server配置,我的在第38行,默认的80端口没被占用的话就不用管他,将原来的root注释掉,修改location
# root         /usr/share/nginx/html;
location ~*^.+$ {
          root 你的graphexp文件夹所在的路径;
}
(2)启动服务
sudo systemctl start nginx
(3)检查防火墙是否已关闭
坑: 一定要确定 两个 防火墙都关闭了
- firewall
firewall-cmd --state
返回not running即可
如果没关就把它关掉systemctl stop firewalld.service
- iptables
service iptables status
输出信息中有 Active: inactive (dead) 即可
如果没关就把它关掉service iptables stop
3.见证奇迹
坑: 这里如果出不来,你试着改改下面的配置项(我折腾了老半天):
- Sever Address:改成你自己的ip,默认是localhost
- Gremlin version:版本调低一点试试,默认是最高版本
坑: 不知道为啥,明明是刚从github上拉下来的项目,不好使又删了重新拉有的时候就好使了。。。。。github上显示并不是刚刚更新过。。。。。
在浏览器中输入:http://ip:port/graphexp.html,点击右上角的Search
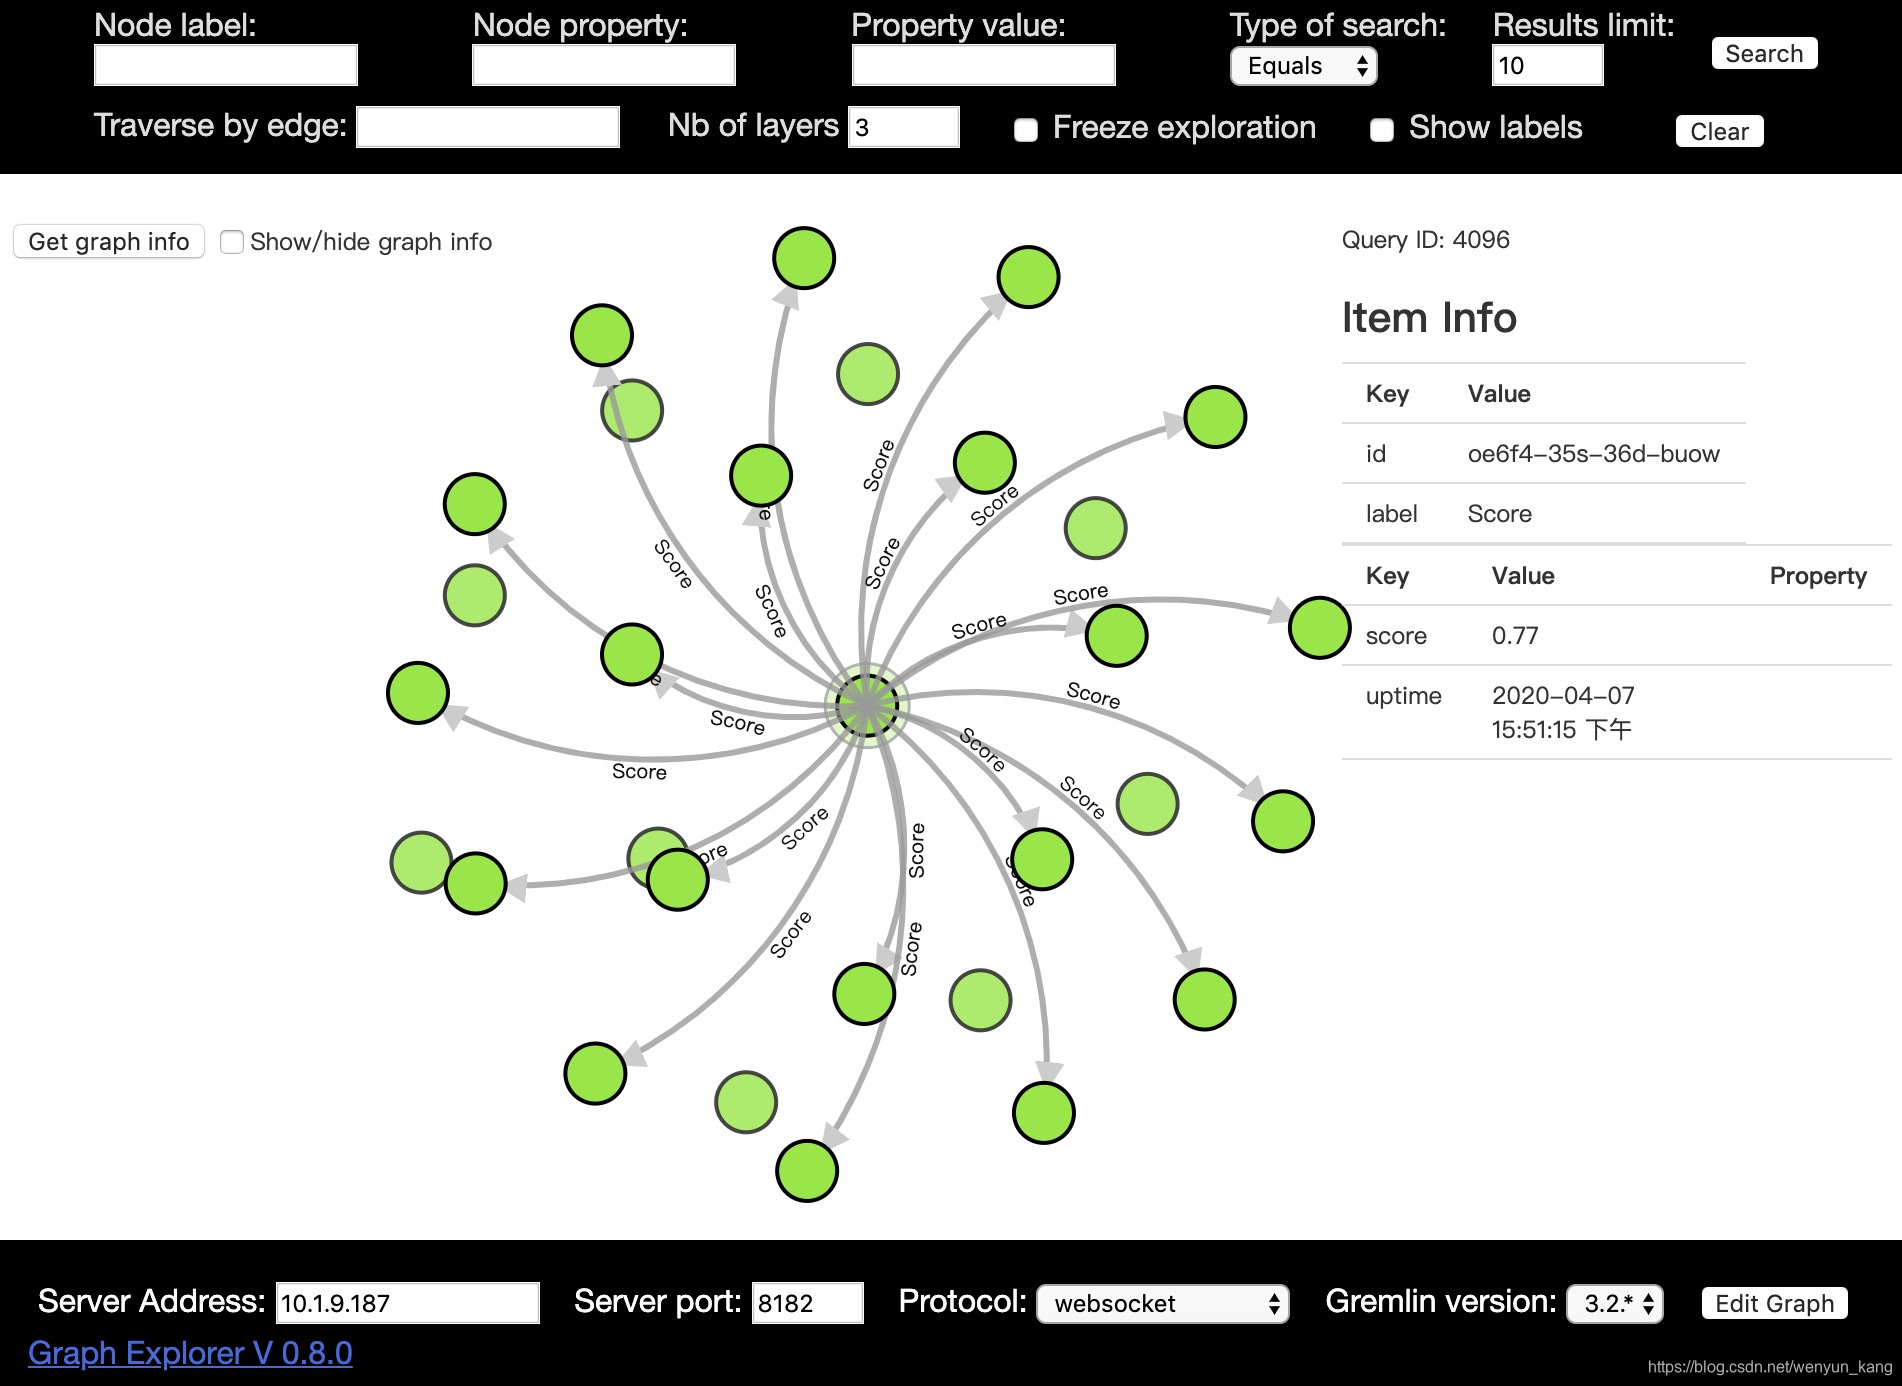
数据量太大的话,点击左上角的Get graph info按钮会报错,就是因为数据量太大,我还不知道该怎么办,如果你知道,请留言告诉我一下,谢谢
