版权声明:欢迎转载,转载请注明作者和出处 https://blog.csdn.net/bruesz/article/details/7011780
折腾了好几天,终于把SSH2的框架搭起来,期间经历的兴奋,痛苦,犹豫...最终是领悟:太完美的要求,其实就是拖延...所以在以下的jar包的选择上,跟前面几篇的原则有了很大的区别:
- Struts包保持原样。
- Spring 和hibernate的包按最大的导入,因为少了个jar文件导致的错误查找,实在是这两天最痛苦的事情。
- Hibernate从4.0降到3.6.8,原因是Hibernate4改变太大,我又不想在期初用Maven来更新Jar包.
上一篇中提到怎么整合Struts2和hibernate,接下来,到了最最最关键的时刻,要把Spring融合进来...
Spring在MVC中的作用应该是C的功能,提供了一个对象的容器...
言归正传. 我们需要开始引入几个Spring的包.
1. 下载Hibernate3.6.8的包,解压后copy requred目录下的所有的文件到lib目录下,注意这里有一个antlr2.7.7.jar的, 要替换掉原先struts引入的那个低版本(2.7.2)的jar文件。保险一点把jpa目录下的那个jpa的jar包也copy(hibernate-jpa-2.0-api-1.0.1.Final.jar)
2. 导入struts2-spring-plugin-2.2.3.1.jar (这个在Struts2的包里面找),copy到WEB-INF/lib目录下
3. 导入Spring的一些Jar包 : 导入spring 的dist 目录下的所有的jar文件
- 配置web.xml, -- 一些Struts和Spring的启动项会在这里配置
- 配置ApplicationContext.xml -- 删除hibernate.cfg.xml, 将配置挪到这里来做(增加SessionFactory和dataSource的设置),也就是由Spring来接管
- 增加POJO类和Hibernate的ORM映射文件(xxx.hbm.xml) -- 个人建议,如果Table间的关系比较简单,用annotation来避免重复维护ORM映射文件. 但是这里还是按照传统的做法。
- 编写DAO接口和DAO实现类 -- 将接口和实现类分离的好处就不用我讲了,(OO设计原则:将类的行为和实现分离,面向接口编程)
- 将DAO的实现类的配置增加到ApplicationContext.xml中 -- 注意,Application中的Bean都是class,而不是interface.
- 增加业务类接口和实现类 -- (个人理解:DAO类只对应一个Table,但是业务类对应的可能是一个业务流程...欢迎扔砖)
- 增加Client端Jsp页面
- 增加Action类,将jsp的请求转发给业务处理类(其实这里是转给业务接口类)
- 修改struts.xml, 增加action的调用,这里用了struts的伪调用,实际上action的请求和转发由spring接管了 --- (struts2-spring-plugin-2.2.3.1.jar )会干这个活。
- 修改applicationContext.xml, 增加action bean
马上开始:
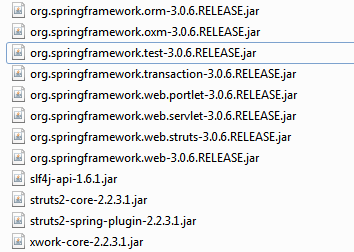
1. 先把需要的jar包列一下:
2. web.xml文件的配置,增加struts2和spring的启动项
<?xml version="1.0" encoding="UTF-8"?>
<web-app
		xmlns:xsi="http://www.w3.org/2001/XMLSchema-instance"
		xmlns="http://java.sun.com/xml/ns/javaee"
		xmlns:web="http://java.sun.com/xml/ns/javaee/web-app_2_5.xsd"
		xsi:schemaLocation="http://java.sun.com/xml/ns/javaee http://java.sun.com/xml/ns/javaee/web-app_2_5.xsd"
		id="WebApp_ID" version="2.5">

	<!-- Spring configuration -->
	<context-param>
		<param-name>contextConfigLocation</param-name>
		<param-value>classpath:applicationContext*.xml</param-value>
	</context-param>
	<listener>
		<listener-class>org.springframework.web.context.ContextLoaderListener</listener-class>
	</listener>

	<!-- Struts2 configuration -->
	<filter>
         <filter-name>struts2</filter-name>
         <filter-class>org.apache.struts2.dispatcher.ng.filter.StrutsPrepareAndExecuteFilter</filter-class>
     </filter>
     <filter-mapping>
         <filter-name>struts2</filter-name>
         <url-pattern>/*</url-pattern>
     </filter-mapping>

</web-app>
3. 配置ApplicationContext.xml -- 删除hibernate.cfg.xml, 将配置挪到这里来做( 增加SessionFactory和dataSource的设置),也就是由Spring来接管,该文件放在src目录下:
注意这里我将一个applicationContext.xml分成了3部分,
- 数据库的连接串单独放一个文件(dataSource.properties)
- 平时不大会动的数据库配置放到database.xml中
- applicationContext.xml会导入上面的内容,我们可以集中在bean的设置上
applicationContext.xml
<?xml version="1.0" encoding="UTF-8"?>
<beans xmlns="http://www.springframework.org/schema/beans"
xmlns:xsi="http://www.w3.org/2001/XMLSchema-instance" xmlns:context="http://www.springframework.org/schema/context"
xmlns:aop="http://www.springframework.org/schema/aop"
xmlns:tx="http://www.springframework.org/schema/tx"
xsi:schemaLocation="http://www.springframework.org/schema/beans
           http://www.springframework.org/schema/beans/spring-beans-2.5.xsd
           http://www.springframework.org/schema/aop
           http://www.springframework.org/schema/aop/spring-aop-2.5.xsd
           http://www.springframework.org/schema/context
           http://www.springframework.org/schema/context/spring-context-2.5.xsd
           http://www.springframework.org/schema/tx
  		   http://www.springframework.org/schema/tx/spring-tx-2.5.xsd">

	<!-- Hibernate configuration -->
	<import resource="classpath:database.xml"/>

</beans>
<?xml version="1.0" encoding="UTF-8"?>
<beans xmlns="http://www.springframework.org/schema/beans"
xmlns:xsi="http://www.w3.org/2001/XMLSchema-instance" xmlns:context="http://www.springframework.org/schema/context"
xmlns:aop="http://www.springframework.org/schema/aop"
xmlns:tx="http://www.springframework.org/schema/tx"
xsi:schemaLocation="http://www.springframework.org/schema/beans
           http://www.springframework.org/schema/beans/spring-beans-2.5.xsd
           http://www.springframework.org/schema/aop
           http://www.springframework.org/schema/aop/spring-aop-2.5.xsd
           http://www.springframework.org/schema/context
           http://www.springframework.org/schema/context/spring-context-2.5.xsd
           http://www.springframework.org/schema/tx
  		   http://www.springframework.org/schema/tx/spring-tx-2.5.xsd">

	<bean id="configBean" class="org.springframework.beans.factory.config.PropertyPlaceholderConfigurer">
		<property name="location">
			<value>classpath:dataSource.properties</value>
		</property>
	</bean>
	<bean id="dataSource" class="org.springframework.jdbc.datasource.DriverManagerDataSource">
		<property name="driverClassName" value="${dataSource.driverClassName}" />
		<property name="url" value="${dataSource.url}" />
		<property name="username" value="${dataSource.username}" />
		<property name="password" value="${dataSource.password}" />
	</bean>
	<bean id="sessionFactory" class="org.springframework.orm.hibernate3.LocalSessionFactoryBean">
		<property name="dataSource" ref="dataSource" />
		<property name="hibernateProperties">
			<props>
				<prop key="hibernate.dialect">org.hibernate.dialect.MySQLDialect</prop>
				<prop key="hibernate.show_sql">true</prop>
			</props>
		</property>
		<property name="mappingResources">
			<list>
				<value>com/test/bean/User.hbm.xml</value>
			</list>
		</property>
	</bean>


</beans>
dataSource.properties
dataSource.driverClassName=com.mysql.jdbc.Driver
dataSource.url=jdbc:mysql://localhost/test?characterEncoding=utf-8
dataSource.username=root
dataSource.password=rootpackage com.test.bean;
public class User {
private Integer id;
public Integer getId() {
return id;
}
public void setId(Integer id) {
this.id = id;
}
private String name;
private String password;
public String getName() {
return name;
}
public void setName(String name) {
this.name = name;
}
public String getPassword() {
return password;
}
public void setPassword(String password) {
this.password = password;
}
}
User.hbm.xml
<?xml version="1.0"?>
<!DOCTYPE hibernate-mapping PUBLIC
    "-//Hibernate/Hibernate Mapping DTD 3.0//EN"
    "http://hibernate.sourceforge.net/hibernate-mapping-3.0.dtd">
<hibernate-mapping>
    <class name="com.test.bean.User" table="User" catalog="test">
        <id name="id" type="java.lang.Integer">
            <column name="id" />
            <generator class="native" />
        </id>
        <property name="name" type="java.lang.String">
            <column name="name" length="40" />
        </property>
        <property name="password" type="java.lang.String">
            <column name="password" length="40" />
        </property>
    </class>
</hibernate-mapping>
5. 编写DAO接口和DAO实现
package com.test.dao;

import com.test.bean.User;

public interface UserDao {
	public User find(String name, String password);
	public User find(User user);
}
package com.test.daoImpl;

import java.util.List;

import org.hibernate.Query;
import org.hibernate.Session;
import org.hibernate.SessionFactory;

import com.test.bean.User;
import com.test.dao.UserDao;

public class UserDaoImpl implements UserDao {

	private SessionFactory sessionFactory;

	@Override
	public User find(String name, String password) {
		Session session = sessionFactory.openSession();
		String hql = "FROM User AS u WHERE u.name = :name AND u.password = :password";
		Query q = session.createQuery(hql);
		q.setString("name", name);
		q.setString("password", password);
		List<User> list = q.list();
		session.close();
		if (list.size()==0)
			return null;
		else
			return list.get(0);
	}

	public SessionFactory getSessionFactory() {
		return sessionFactory;
	}

	public void setSessionFactory(SessionFactory sessionFactory) {
		this.sessionFactory = sessionFactory;
	}


	public User find(User user) {
		return find(user.getName(),user.getPassword());
	}

}
6, 编写业务接口和实现类
UserService接口
package com.test.service;

import com.test.bean.User;

public interface UserService {

	public boolean isLogin(User user);
	public boolean isLogin(String name, String password);
}
package com.test.serviceImpl;

import com.test.bean.User;
import com.test.dao.UserDao;
import com.test.service.UserService;

public class UserServiceImpl implements UserService {
	private UserDao userDao;

	public boolean isLogin(User user) {
		return isLogin(user.getName(),user.getPassword());
	}

	public UserDao getUserDao() {
		return userDao;
	}

	public void setUserDao(UserDao userDao) {
		this.userDao = userDao;
	}

	@Override
	public boolean isLogin(String name, String password) {
		boolean isLogin = false;
		try
			{
			User u = userDao.find(name, password);
			if (u != null)
				{
				isLogin = true;
				}
			}
		catch (Exception e)
			{
			System.out.println("isLogin error\n" + e.getMessage());
			}
		return isLogin;
	}

}
6. 在applicatonContext.xml中配置bean
<?xml version="1.0" encoding="UTF-8"?>
<beans xmlns="http://www.springframework.org/schema/beans"
xmlns:xsi="http://www.w3.org/2001/XMLSchema-instance" xmlns:context="http://www.springframework.org/schema/context"
xmlns:aop="http://www.springframework.org/schema/aop"
xmlns:tx="http://www.springframework.org/schema/tx"
xsi:schemaLocation="http://www.springframework.org/schema/beans
           http://www.springframework.org/schema/beans/spring-beans-2.5.xsd
           http://www.springframework.org/schema/aop
           http://www.springframework.org/schema/aop/spring-aop-2.5.xsd
           http://www.springframework.org/schema/context
           http://www.springframework.org/schema/context/spring-context-2.5.xsd
           http://www.springframework.org/schema/tx
  		   http://www.springframework.org/schema/tx/spring-tx-2.5.xsd">

	<!-- Hibernate configuration -->
	<import resource="classpath:database.xml"/>

	<!-- struts beans -->
	<bean id="LoginAction" class="com.test.action.LoginAction" scope="prototype">
		<property name="userService" ref="userService" />
	</bean>

	<bean id="userDao" class="com.test.daoImpl.UserDaoImpl">
		<property name="sessionFactory" ref="sessionFactory"></property>
	</bean>

	<bean id="userService" class="com.test.serviceImpl.UserServiceImpl">
		<property name="userDao" ref="userDao"></property>
	</bean>

</beans>
7. 增加jsp页面
<%@ page language="java" contentType="text/html; charset=UTF-8" pageEncoding="UTF-8"%>
<%@ taglib uri="/struts-tags" prefix="s" %>

<%
String path = request.getContextPath();
String basePath = request.getScheme()+"://"+request.getServerName()+":"+request.getServerPort()+path+"/";
%>
<!DOCTYPE html PUBLIC "-//W3C//DTD HTML 4.01 Transitional//EN" "http://www.w3.org/TR/html4/loose.dtd">
<html>
<head>
	<base href="<%=basePath%>">
	<title><s:text name="home.title" /></title>
	<meta http-equiv="Content-Type" content="text/html; charset=UTF-8">
	<meta http-equiv="pragma" content="no-cache">
	<meta http-equiv="cache-control" content="no-cache">
	<meta http-equiv="expires" content="0">
	<meta http-equiv="keywords" content="easyTalk">
	<meta http-equiv="description" content="This is my page">
</head>
<body>
	<s:form name="loginFrm" action="login">
		<s:textfield name="username" key="username"></s:textfield>
		<s:textfield name="password" key="password"></s:textfield>
		<s:submit label="submit"></s:submit>
	</s:form>
	<s:actionerror/>
</body>
</html>
8. 配置struts.xml, 注意这里有两个改动,a. 增加了一个常量,声明objectFactory由Spring接管. b. action 的class属性中,维护的是Spring的bean对象,而不是具体的class.
<?xml version="1.0" encoding="UTF-8" ?>
<!DOCTYPE struts PUBLIC
     "-//Apache Software Foundation//DTD Struts Configuration 2.0//EN"
     "http://struts.apache.org/dtds/struts-2.0.dtd">
<struts>
	<constant name="struts.custom.i18n.resources" value="message"></constant>
	<constant name="struts.objectFactory" value="spring"></constant>
	<constant name="struts.devMode" value="true" />

	<package name="struts2" extends="struts-default">
		<action name="login" class="LoginAction">
			<result name="success" >loginresult.jsp</result>
			<result name="input">login.jsp</result>
			<result name="error">login.jsp</result>
		</action>
	</package>

</struts>
9. 增加action类,接受客户端的响应
package com.test.action;

import com.opensymphony.xwork2.ActionContext;
import com.opensymphony.xwork2.ActionSupport;
import com.test.service.UserService;

public class LoginAction extends ActionSupport {

		public String username;
		public String password;
		private UserService userService;

		public LoginAction()
		{
			System.out.println("initialize LoginAction......");
		}
		public void setUserService(UserService userService)
		{
			this.userService = userService;
		}

		public String execute()
		{
			if (true == this.userService.isLogin(username, password))
			{
				ActionContext.getContext().getSession().put("username", username);
				return SUCCESS;
			}else{
				super.addActionError(super.getText("loginfailed"));
				return ERROR;
			}
		}

		public void validate()
		{
			if ((null == username) || (0==username.length()))
			{
				super.addActionError(super.getText("warning.empty",new String[] {getText("username")}));
			}

			if ((null == password) || (0 == password.length()))
			{
				super.addActionError(super.getText("warning.empty",new String[] {getText("password")}));

			}
		}
}
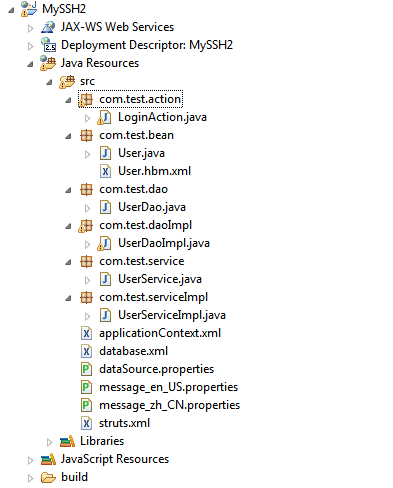
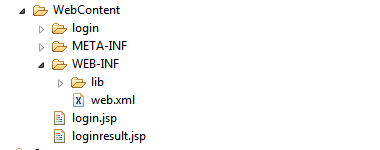
11. 最后整个代码的架构如下:
12. 测试登录功能
Login 页面:

登录成功:

系统日志:

测试通过............................................................
12. 总结:
- 初期阶段不要过分追求jar包的最小配置,否则会出现很多意料之外的错误.
- Jar包的版本要小心,最后我无奈将Hibernate从4.0降回3.6.8, 因为差异太大.
- spring中bean的配置要小心,注入的时候是实现类,不是接口,名字也要注意,property name是引用对象的名字,而不是类的名字,这里我就吃了一次亏,login的时候怎么都说LoginAction对象找不到,其实是配置文件写得有问题,结果Spring无法生成bean实例,这个错误很像Struts无法调用Spring的容器...但是其实是Spring容器无法生成Bean对象。
源代码已上传,请 点击此处下载