一、准备工作
安装RabbitMQ,安装步骤参考:https://blog.csdn.net/pkxwyf/article/details/105155865
二、消息生产者
1、创建生产者SpringBoot工程,导入相关依赖坐标
<!-- 引入父工程 -->
<parent>
    <groupId>org.springframework.boot</groupId>
    <artifactId>spring-boot-starter-parent</artifactId>
    <version>2.1.5.RELEASE</version>
</parent>

<dependencies>
    <!-- 引入SpringBoot整合RabbitMQ依赖-->
    <dependency>
        <groupId>org.springframework.boot</groupId>
        <artifactId>spring-boot-starter-amqp</artifactId>
    </dependency>

    <!-- 引入测试依赖 -->
    <dependency>
        <groupId>org.springframework.boot</groupId>
        <artifactId>spring-boot-starter-test</artifactId>
    </dependency>
</dependencies>
2、编写配置文件:application.yml
# 配置RabbitMQ基本信息
spring:
  rabbitmq:
    host: 192.168.33.100
    username: guest
    password: guest
    virtual-host: /
    port: 5672
3、编写启动类:ProducerApplication
@SpringBootApplication
public class ProducerApplication {
    public static void main(String[] args) {
        SpringApplication.run(ProducerApplication.class, args);
    }
}
4、编写配置类:RabbitMQConfig
在配置类定义交互机,队列以及绑定交互机和队列的关系
@Configuration
public class RabbitMQConfig {
    // 交换机名称
    public static final String EXCHANGE_NAME = "xkp_topic_exchange";
    // 队列名称
    public static final String QUEUE_NAME = "xkp_queue";

    // 1. 定义交换机
    @Bean("xkpExchange")
    public Exchange createExchange(){
        return ExchangeBuilder.topicExchange(EXCHANGE_NAME).durable(true).build();
    }

    // 2. 定义队列
    @Bean("xkpQueue")
    public Queue createQueue(){
        return QueueBuilder.durable(QUEUE_NAME).build();
    }

    // 3. 队列与交换机绑定关系
    @Bean
    public Binding bindExchangeAndQueue(@Qualifier("xkpQueue") Queue queue,
                                        @Qualifier("xkpExchange") Exchange exchange){
        return BindingBuilder.bind(queue).to(exchange).with("xkp.#").noargs();
    }

}
5、编写测试类
@RunWith(SpringRunner.class)
@SpringBootTest
public class TestRabbitMQ {
@Autowired
private RabbitTemplate rabbitTemplate;
/**
* 发送消息到MQ:发送字符串消息
*/
@Test
public void testSendStr(){
// 参数1:交换机名字
// 参数2:路由键
// 参数3:消息字符串
rabbitTemplate.convertAndSend(
RabbitMQConfig.EXCHANGE_NAME,
"xkp.news",
"hello rabbitmq......");
}
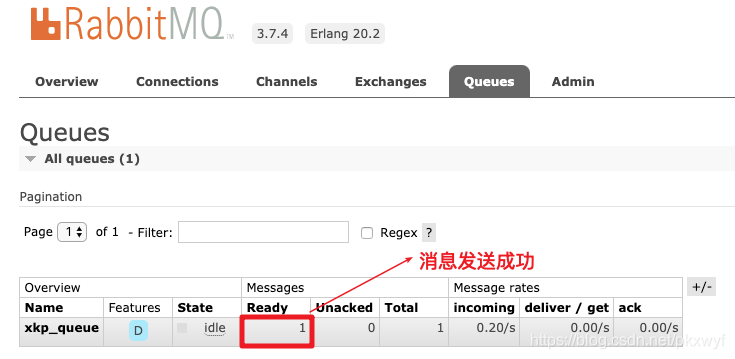
}6、查看管理控制台
三、消息消费者
1、创建消费者SpringBoot工程,导入相关依赖坐标
<!-- 引入父工程 -->
<parent>
    <groupId>org.springframework.boot</groupId>
    <artifactId>spring-boot-starter-parent</artifactId>
    <version>2.1.5.RELEASE</version>
</parent>

<dependencies>
    <!-- 引入SpringBoot整合RabbitMQ依赖-->
    <dependency>
        <groupId>org.springframework.boot</groupId>
        <artifactId>spring-boot-starter-amqp</artifactId>
    </dependency>

    <!-- 引入测试依赖 -->
    <dependency>
        <groupId>org.springframework.boot</groupId>
        <artifactId>spring-boot-starter-test</artifactId>
    </dependency>
</dependencies>
2、编写配置文件:application.yml
# 配置RabbitMQ基本信息
spring:
  rabbitmq:
    host: 192.168.33.100
    username: guest
    password: guest
    virtual-host: /
    port: 5672
3、编写启动类:ConsumerApplication
@SpringBootApplication
public class ConsumerApplication {
    public static void main(String[] args) {
        SpringApplication.run(ConsumerApplication.class, args);
    }
}
4、编写监听类监听队列的消息
方式1:使用@RabbitListener和@RabbitHandler实现消息监听
@Component
// @RabbitListener:监听指定队列的消息(xkp_queue 是队列名字)
@RabbitListener(queues = "xkp_queue")
public class RabbitMQConfig {
    /**
     @RabbitListener 和 @RabbitHandler 搭配使用
        * @RabbitListener 可以标注在类上面,需配合 @RabbitHandler 注解一起使用
        * @RabbitListener 标注在类上面表示当收到消息的时候,就交给 @RabbitHandler 的方法处理
            * 具体使用哪个方法处理,根据 MessageConverter 转换后的参数类型决定。
            * 注意事项:方法参数类型和消息生成者发送消息类型要一致
     */
    @RabbitHandler
    public void handlerMessage(String message){
        System.out.println("handlerMessage 接收到mq的消息:" + message);
    }
}
方式2:使用@RabbitListener修饰方式方法实现消息监听
@Component
public class RabbitMQConfig {
    // bindings: 绑定交互机和队列并指定路由键,如果交互机和队列不存在则会自动创建
    @RabbitListener(bindings = @QueueBinding(
            exchange = @Exchange(value = "xkp_topic_exchange",type = "topic"),
            value = @Queue(value = "xkp_queue",durable = "true"),
            key = "xkp.#"
    ))
    public void handlerMessage(String message) {
        System.out.println("handlerMessage " + message);
    }
}
以上两种方式选择其一即可,推荐方式2。
5、运行启动类可以看到控制台输出

