Unity3d is a powerful 3d game creation editor and engine that runs on Mac and Windows.
This plugin adds the ability to call the Unity3d Editor from the command line to automate build and packaging of Unity3d applications.
Table of content
- Background
- Features
- Documentation
- Changelog
- Version 1.4 (DEV IN PROGRESS)
- Version 1.3 (11.09.2015)
- Version 1.2 (10.09.2015)
- Version 1.1 (07.07.2015)
- Version 1.0 (29.05.2015)
- Version 0.9 (26.05.2015)
- Version 0.8 (25.05.2015)
- Version 0.7 (02.04.2015)
- Version 0.6 (24.03.2014)
- Version 0.5 (27.09.2003)
- Version 0.4 (16.09.2013)
- Version 0.3 (06.06.202)
- Version 0.2 (30.01.2012)
- Version 0.1 (24.01.2012)
Background
Automating Unity3d builds from the command line is possible. There are a few problems though:
- the unity runner writes its output to a separate log file, instead of the output
- tool and file locations are platform specific
- the editor is very GUI centered and only provides default build strategies
Features
This plugin aims to make it easier to run Unity3d builds easily in Jenkins, by adding the following features:
- log file redirection
- distributed builds
The plugin was tested with versions ranging from unity3d 3.4.2 to 5.0.1. Tested on distributed and single server environments
Documentation
Installation guide
As Unity3d is multi-platform, you may need to install the proper third party OS & tools (Android SDK, XCode, etc) depending on the type of build targets you intend to exercise.
Install the latest version of the plugin from the update center and configure a freestyle job (see #Usage Guide). If necessary restrict the job to the node(s) that will perform the build(s).
On the node(s) you are going to build Unity projects, add at least one unity3d installation (Manage Jenkins -> Global Tool Configuration) and configure the location of the Unity3d installation. This location is by default /Applications/Unity/Unity.app on Mac OS X and C:\Program Files (x86)\Unity on Windows. The plugin will automatically suffix the installation path with the proper executable location.
Usage guide
Prerequisites
The plugin assumes you've created a special Editor class with at least one method responsible for your build.
Here's an example extracted from one of our projects:
Assets/Editor/MyEditorScript.cs
| class MyEditorScript { static string[] SCENES = FindEnabledEditorScenes();
static string APP_NAME = "YourProject"; static string TARGET_DIR = "target";
[MenuItem ("Custom/CI/Build Mac OS X")] static void PerformMacOSXBuild () { string target_dir = APP_NAME + ".app"; GenericBuild(SCENES, TARGET_DIR + "/" + target_dir, BuildTarget.StandaloneOSXIntel,BuildOptions.None); }
private static string[] FindEnabledEditorScenes() { List<string> EditorScenes = new List<string>(); foreach(EditorBuildSettingsScene scene in EditorBuildSettings.scenes) { if (!scene.enabled) continue; EditorScenes.Add(scene.path); } return EditorScenes.ToArray(); }
static void GenericBuild(string[] scenes, string target_dir, BuildTarget build_target, BuildOptions build_options) { EditorUserBuildSettings.SwitchActiveBuildTarget(build_target); string res = BuildPipeline.BuildPlayer(scenes,target_dir,build_target,build_options); if (res.Length > 0) { throw new Exception("BuildPlayer failure: " + res); } } } |
User/OS setup
Mac OS X
On Mac OS X, the user running needs to be logged in otherwise the Unity3d editor might fail to acquire the graphical resources.
If you don't you might see something like
| Piping unity Editor.log from /Users/Shared/Jenkins/Library/Logs/Unity/Editor.log [Schicksalsklinge HD Windows] $ /Applications/Unity/Unity.app/Contents/MacOS/Unity -projectPath "/Users/Shared/Jenkins/Home/workspace/ProjectXYZ/repo" -quit -batchmode -buildLinux32Player -executeMethod BuildProject.PerformLinuxTestBuild Initialize mono Mono path[0] = '/Applications/Unity/Unity.app/Contents/Frameworks/Managed' Mono path[1] = '/Applications/Unity/Unity.app/Contents/Frameworks/Mono/lib/mono/2.0' Mono config path = '/Applications/Unity/Unity.app/Contents/Frameworks/Mono/etc' Using monoOptions --debugger-agent=transport=dt_socket,embedding=1,defer=y _RegisterApplication(), FAILED TO establish the default connection to the WindowServer, _CGSDefaultConnection() is NULL. 2015-04-18 21:20:08.497 Unity[702:27617] NSDocumentController Info.plist warning: The values of CFBundleTypeRole entries must be 'Editor', 'Viewer', 'None', or 'Shell'. |
Windows
FIXME describe and add a log about what happens on Windows.
Linux
On Linux, you will need an X server. If you are running Jenkins on a headless server, use the Xvfb Plugin. See also this thread.
Build queue
The Unity Editor can only perform one build at a time on a given projectPath. If you want to run multiple builds in parallels for the same project, you will need to create multiple jobs, each with their workspace.
Setting up a build step
Add the Unity3d build step to a free-style project, select the unity3d installation and set your command line arguments (e.g. -quit -batchmode -executeMethod MyEditorScript.PerformMacOSXBuild). If you do not specify -projectPath (case-sensitive), the plugin will use the current workspace. You may want to add an extra step to clean the project before you build to make sure the build starts in a clean state.
If you want to build for iOS, you will have to add extra build steps to trigger xcode build. This step isn't covered here. Same for Windows 8/10.
Unity3d Builder configuration parameters
| Parameter |
Since version |
Description |
| command line |
0.1 |
The full command line, the builder adding the -projectPath (case-sensitive) if it isn't specified |
| unstable return codes |
1.0 |
The optional comma separated list of command line return codes that should result in unstable builds instead of failures. E.g '2,3' if you use Unity3d Test Results |
Tips
Using Unity3d with large set of jobs
- use multiple executors. Ensure that you do not run multiple concurrent build from the same job
- use the global argLine (from 0.6) to configure default configuration in one place
- specify the -logFile argument to be relative to each project. You don't want all concurrent projects to use the same standard editor.log file
- combine it with a plugin like EnvInject to differentiate between jobs
- automate the install of unity
Automatically installing unity3d (MacOSX)
To automatically install unity3d from jenkins (even beta versions),
1. install this set of scripts.
- Install this script somewhere on your machines. E.g. /Users/Shared/Jenkins/Home/bin/
- Create a parametrized job that takes a String parameter
name: UNITY3D_URL
default value: e.g. http://netstorage.unity3d.com/unity/unity-4.2.1.dmg
description: The URL of the DMG package to install - Add a shell builder to your job:
shell build step
| cd echo "Installing $UNITY3D_URL" download_install_unity3d.sh "$UNITY3D_URL" |
Friendly plugins
- The EnvInject Plugin can help you parametrize your command line for maintaining large amount of projects in a similar manner
- The Log Parser Plugin can help you to quickly set some parsing rules for your Unity3d builds. Here's a tentative set of rules that we use in one project:
| start /^Initialize mono/ start /^- starting compile/ start /^Mono dependencies included in the build/ start /^Textures/ info /^Complete size/ warning /warning CS/ error /error CS/ start /^-----CompilerOutput:-stdout/ info /^Compilation succeeded/ error /^Compilation failed/ start /^Used Assets, sorted by uncompressed size/ info /^\*\*/ info /^Exiting batchmode successfully now/ start /^=== BUILD NATIVE TARGET/ start /^Packaging IPA/ start /^Archiving artifacts/ start /Uploading to testflight/ |
- Xvfb Plugin for running Unity on Linux headless servers.
Known issues
| type |
key |
summary |
assignee |
reporter |
priority |
status |
resolution |
created |
updated |
due |
| Data cannot be retrieved due to an unexpected error. |
||||||||||
Troubleshooting failures
If the plugin fails to run the command you want it to run here are some steps you can perform to help identifying the issue:
- check the editor.log and/or the job console for any errors. If you don't see any log, check if you specify the -logFile argument.
- if you are trying to run an -executeMethod argument, expose the editor method in the Unity3d menus ( [MenuItem (".../...")] ) and run it. Bonus if you are able to run it on the machine it is supposed to run. If the command doesn't run here, then the problem isn't in the plugin
- run your build command from a Jenkins "Run in a Windows batch command" build step. If the job fails, then check the arguments (the plugins may have fiddled with the arguments incorrectly).
- run your build command from a CMD on the machine you intend to. If that works, and the run from jenkins doesn't, compare the environments (user, permissions, access to graphics devices, etc)
Related information
- Automated management of iOS provisioning profiles
- Unity3d build pipeline using jenkins
- Command line install of Unity3d on mac
Changelog
Version 1.4 (DEV IN PROGRESS)
Version 1.3 (11.09.2015)
- fix broken mac build support (JENKINS-30396)
Version 1.2 (10.09.2015)
- added Linux support (JENKINS-30321)
Version 1.1 (07.07.2015)
- improve documentation and feedback when using parametrized path for jenkins installation homes (JENKINS-29218)
- improved command line parsing WRT environment and build parameters (JENKINS-29226)
Version 1.0 (29.05.2015)
- allow some return codes to turn the build to UNSTABLE, easing UnityTestTools integration (JENKINS-24386)
Version 0.9 (26.05.2015)
- fixed the detection of the proper location of the Editor.log on Windows (JENKINS-24265)
- improved Unity3d installation directory configuration documentation and error checks for both distributed and non distributed setups (JENKINS-20349)
Version 0.8 (25.05.2015)
- fixed the "Pipe broken" issue (JENKINS-23958) in distributed builds
Version 0.7 (02.04.2015)
- Prevent hanging if the Editor.log file we are looking at isn't been written to (JENKINS-27710). Consequence of us not finding the Editor.log on Windows 2008 installations.
Version 0.6 (24.03.2014)
- reduce risks of truncating console
- fix command line documentation issue
- properly handle editor.log piping when using the -logFile argument
- global argLine
Version 0.5 (27.09.2003)
- fix command line setting been overwritten at execution time
Version 0.4 (16.09.2013)
- support build and environment variables injection into the command line
Version 0.3 (06.06.202)
- Validity of Unity3D project folder was not correctly checked when projectPath parameter was used.
Version 0.2 (30.01.2012)
Version 0.1 (24.01.2012)
- live redirection of the Editor.log file into the console
- supports distributed builds
- automatically adds the -projectPath command line
///////////////////////////////////////////////////////////////////////////////////////
Continuous integration with Unity3D and jenkins
///////////////////////////////////////////////////////////////////////////////////////
Introduction
Jenkins is a Continuous Integration and automation server. It is an open-source and a web-based application written in Java, which can be installed on any platform that supports the Java Runtime. With the addition of hundreds of plugins Jenkins can be used to automate Continuous Integration tasks for many programming languages. Here at it Matters Games we are using Jenkins to automatically build all of our Unity3D based game projects and the Doxygencode documentation. Even for smaller companies and projects you can’t neglect the advantage of having a centralized place to keep all your build configurations, automate your builds and tests, and store all build results.
This is the first part of a series that will explain in detail:
- How to set up a Jenkins server
- How to perform Unity3D builds
- How to integrate Xcode
- How to add additional slave nodes to perform builds in parallel
In this post I will describe what hardware you need, how to set up a so called Jenkins Master Server and how to run your first build job for a Unity3D project.
The Basic Setup
- Even if you can install Jenkins on a Windows or Linux machine, I recommend using OS X.
- You should install a fast hard drive, e.g. an SSD.
- Make sure your master has enough storage; we are using a minimum of 512GB to be able to store all build job workspaces and the build artifacts. 8GB of memory should be enough for building Unity3D projects.
- You need at least OS X 10.8; we were unable to install the latest version of Jenkins on an older version of OS X. Older versions do not support the latest Java SDK. If your are targeting the latest iOS Version 10.3 you will need to install OS X 10.12 (Sierra) anyways.
- It might be reasonable to use a so called Hackintosh (a regular PC with OS X installed). Jenkins and Unity3D work absolutely fine on a Hackintosh (Details on how to set up a Hackintosh can be found here). However, please note that installing OS X an a different computer than a Mac violates the Apple terms of condition.
Once you have your machine up and running you need the following things:
- The Jenkins install package
- An OS X user (best the default one)
- The latest Java SDK being installed
- The latest version of Git (only needed if Git is used as SCM)
- Unity3D (versions prior to Unity3D 5 need a pro license to execute command line builds, newer versions don’t)
- Xcode (if you target iOS platforms)
After finishing installing Jenkins you can open http://localhost:8080 in Safari. Unfortunately, as we are going to use Jenkins with Unity3D we have to change the out of the box Jenkins setup. Unity3D needs to be started with a user that has access to the OS X windowserver. To be able to do so, Jenkins has to run as a LaunchAgent with a logged-in user.
First you need to stop Jenkins. Open the Terminal and enter the following command:
| 1 |
|
Move the Jenkins LaunchDaemon to LaunchAgents
| 1 |
|
No we have to change the default user for the LaunchAgent:
| 1 |
|
Find the part that looks like this:
| 12 |
|
And change it to this:
| 12 |
|
You need access to the Jenkins work (home) directory:
| 12 |
|
Since OS X Yosemite there is a new log rotation system. You have to give your user access to var/log/jenkins:
| 1 |
|
As it seems, this step has to be repeated every time you update the major version of OS X.
Edit the log rotation:
| 1 |
|
Change the following line to accordingly:
| 1 |
|
Now save the file and restart Jenkins with the following command:
| 1 |
|
Now Jenkins should be running using your logged-in user which has access to the windowserver. Open http://localhost:8080 in Safari.
Installing Plugins
You’ll need to install the Unity3d plugin to be able to perform Unity3D builds with Jenkins. This plugin makes it very easy to use Unity3D installations as a build step in Jenkins jobs.
Inside Jenkins go to Manage Jenkins → Manage Plugins → Available. Search for “Unity” and install the resulting plugin. As we are already here, we should install some more useful plugins.
- Xcode integration is used to target iOS and tvOS platforms
- Environment Injector Plugin is used to switch between different Xcode installations on the system (only needed if you really target different Xcode installation)
- Folders Plugin makes it very convenient to organize jobs into sub-folders
- iOS Device connector plugin and Android Device connector plugin enable you to deploy *.ipa and *.apk application packages directly to a connected device
- Slack Notification Plugin lets you notify build results to a slack channel
- ThinBackup comes in very handy when you want to backup or restore all Jenkins settings and all jobs
Once you are done installing the plugins Jenkins might have to restart. The following links can be used to restart or shutdown Jenkins manually:
| 123 |
http://localhost:8080/exithttp://localhost:8080/restarthttp://localhost:8080/reload |
Setup Unity3D for Jenkins
Your Unity3D installation should be set up correctly on each Jenkins instance. For example if you target Android platforms you should install the latest Android SDK and point the Unity3D Editor to it. If you target iOS platforms, then Xcode should be installed properly. Once everything is in place, you have to add your Unity3D installation to Jenkins.
In Jenkins go to Manage Jenkins → Configure System. The Unity3D Jenkins plugin has added a new tool entry to Jenkins. Add a new Unity3D installation which points to your Unity3D Editor location in OS X Applications.
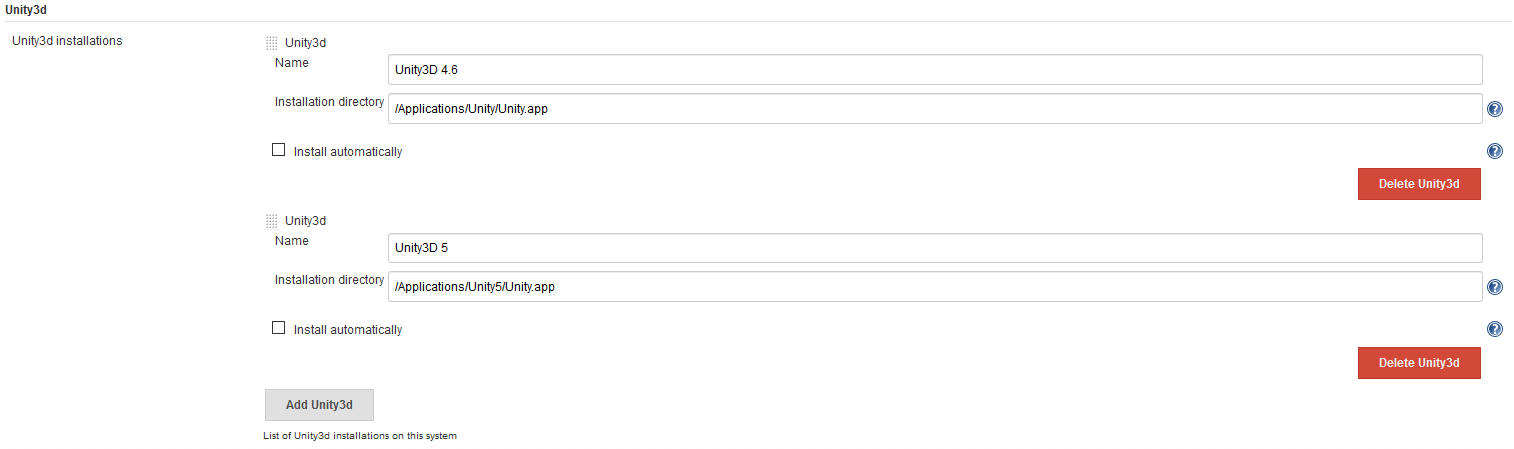
Jenkins Unity3D installations
Create Your First Build Job
Now that you have everything set up and in place it is time to create your first build job. In the Jenkins sidebar click on New Item. Select Freestyle Project and give the job a name. A page opens with your jobs configuration. The first thing to do is to set up your source code management.
If you are using a SVN enter the repository URL and your SVN credentials. We had some trouble checking out from SVN repositories that included externals. For some reason adding the same credentials twice as additional credentials resolved the issue.

Build job SVN setup
For Git it is basically the same. Enter your Git URL and set up the Git credentials for your repository:
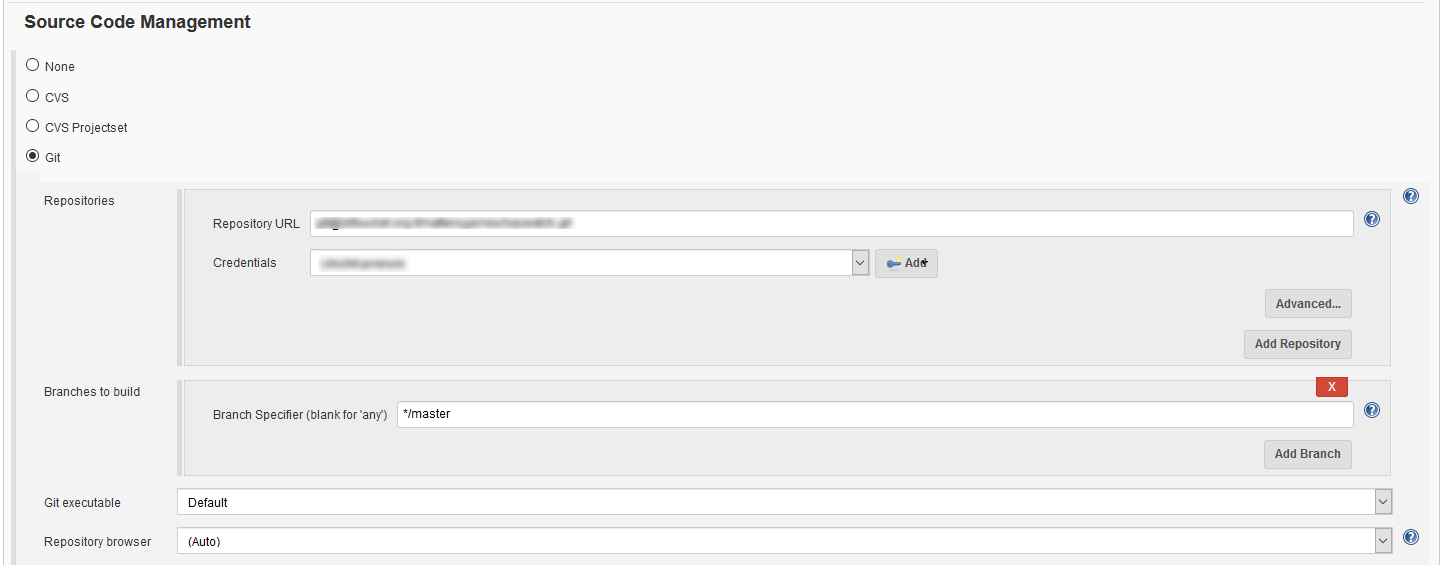
Build job Git setup
You might run into some trouble if your Git repositories are using sub-modules. Due to an issue in the Git plugin, credentials are not forwarded when pulling sub-modules. There is a way of logging into your Git remote server using a ssh connection with a private/public key. But this will be the topic of a future post.
Once you have your source code management settings entered correctly, it is time to add the actual build step. Scroll down and click Add Build Step, then choose Invoke Unity Editor. Select your target Unity3D installation and use the following command line to execute the Unity build:

Unity3D build step
| 1 |
|
You need to have a script in an Editor folder of your Unity3D project and a static function in that class to use -executeMethod:
| 12345678910 |
|
More details on that can be found here.
Save the job configuration. Now it’s time to run your first build job: just click the Build Now button in the jobs sidebar. Jenkins will now check out your projects source code from the configured SCM repository. After that the Unity command line is executed. If your PerformBuild method is set up correctly you will get the build artifacts inside the job’s workspace.
Abstract and Outlook
You now have a Jenkins master server up and running. The server starts automatically when the Mac starts up and the user logs in. You should automate that process using e.g. “wake on lan” or something like that. The default OS X user should also log in automatically.
In the next part of this series I’m going to describe how to build iOS projects that will create an ipa package which can be directly deployed onto a device, to Testflight or to the Apple App Store.– Ulrich Kaminski is the Technical Director of it Matters Games. He graduated from the University of Magdeburg and holds a diploma of engineering in computational visualistics (CV). During his 5 years at Reakktor Media, Ulrich gained extensive knowledge in AAA development. Since 2012 Ulrich has been working at it Matters Games, successfully developing and shipping games to a global market.
Intro
In the previous part I explained how to set up Jenkins and how to run a simple free-style job to build a Unity3D project. This works fine for all Unity3D projects that don’t require any additional steps after the Unity build step has finished (e.g. Standalone and Android builds). If you are targeting iOS or tvOS, you need to add an additional step to build and package the application, making it a deployable app package.
In this part of the series I am going to describe the integration of the Xcode build step into a Jenkins free-style job. You will be able to build a Xcode project and export a so called *.ipa file. An ipa file is an iOS archive which packages the actual iOS application into a deployable package. When signed correctly the ipa file can be transferred to an iOS device using e.g. iTunes or Testflight.
Preparing Xcode
If not already done install Xcode from the OS X App Store. Once you have installed Xcode start it at least once. This will install some additional mandatory Xcode components. Additionally you will need to install the Xcode command line developer tools. The command line tools enable Jenkins to perform Xcode builds, and then package and sign apps in headless mode. You’ll find them here: Command Line Tools. To download them you’ll need an Apple Developer Account. If not already done create one. This is necessary anyway to be able to sign and deploy apps to the App Store.
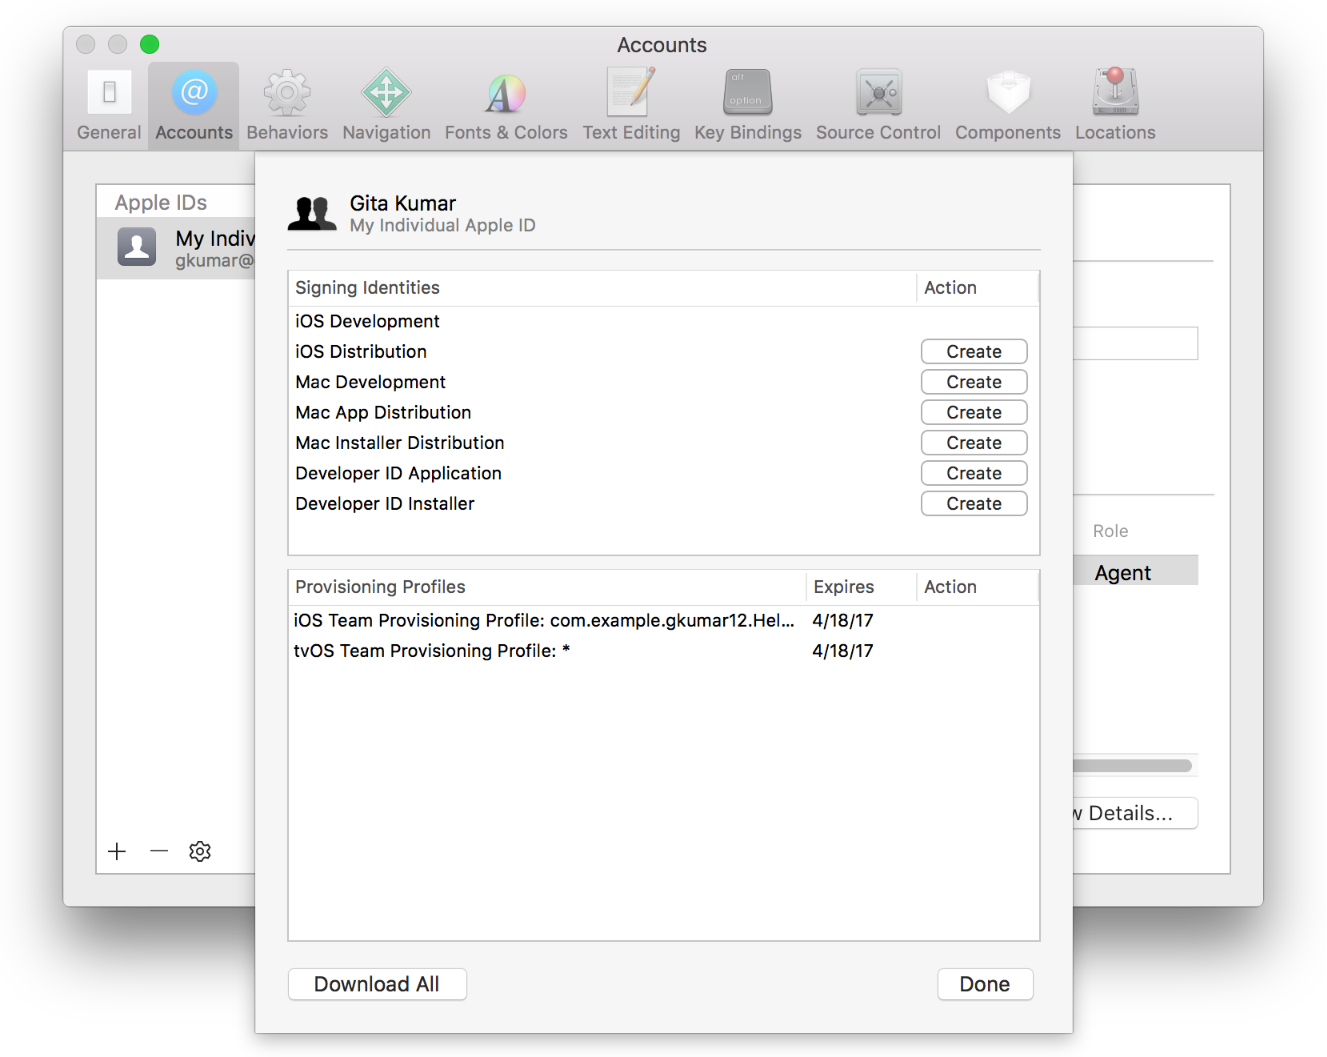
Before being able to package an app you have to create a developer certificate and provisioning profiles for your app. Use the Apple Developer Member Center to create new app IDs, provisioning profiles or upload new developer certificates. Here is a guide on how to create, install and maintain developer certificates and provisioning profiles of your Apple Developer Account.
Preparing Jenkins
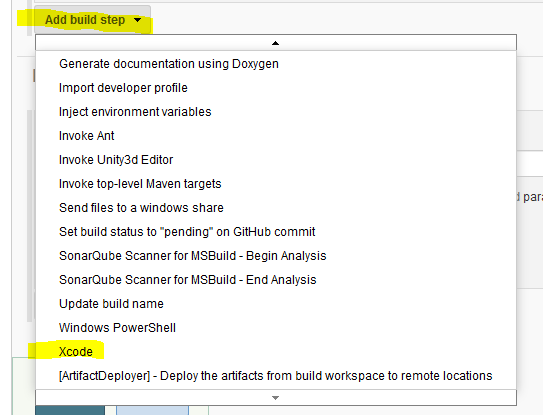
If not already done, install the latest version of the Jenkins Xcode plugin. In Jenkins go to Manage Jenkins -> Manage Plugins. Switch to the Available tab and search for Xcode. Install the resulting Xcode integration plugin.
Now it’s time to set up some global settings for Xcode. Go to Manage Jenkins -> Global Configuration. Scroll to the Xcode settings and check if the following settings are correct:

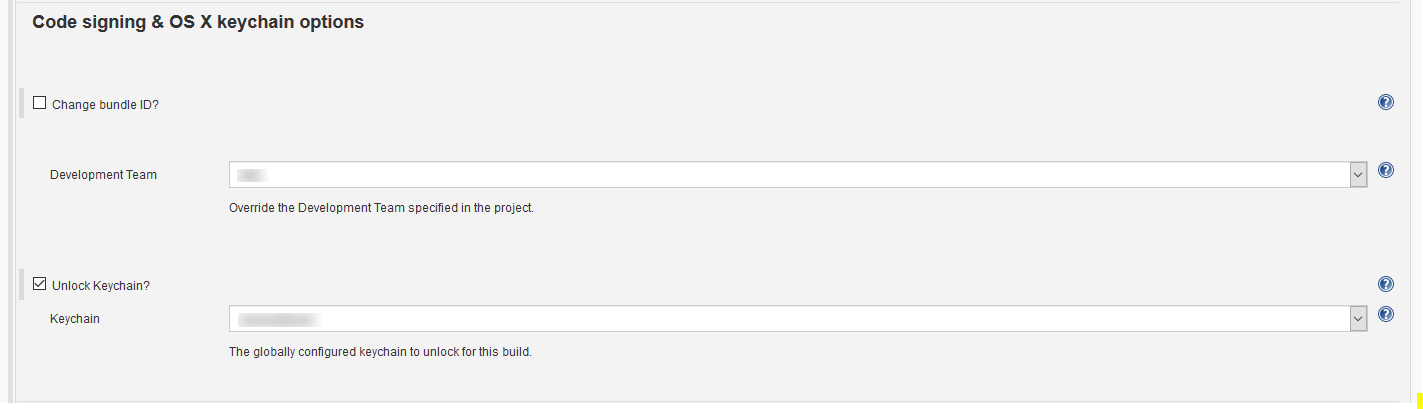
Newer versions of the Xcode integration plugin require a list of available development teams to sign ipa files with a provisioning profile. Therefore you need to add at least one Apple Development Team, specifying a Jenkins internal name and the Team ID:

The last thing you need to set up is the default keychain that should be unlocked to perform the signing:
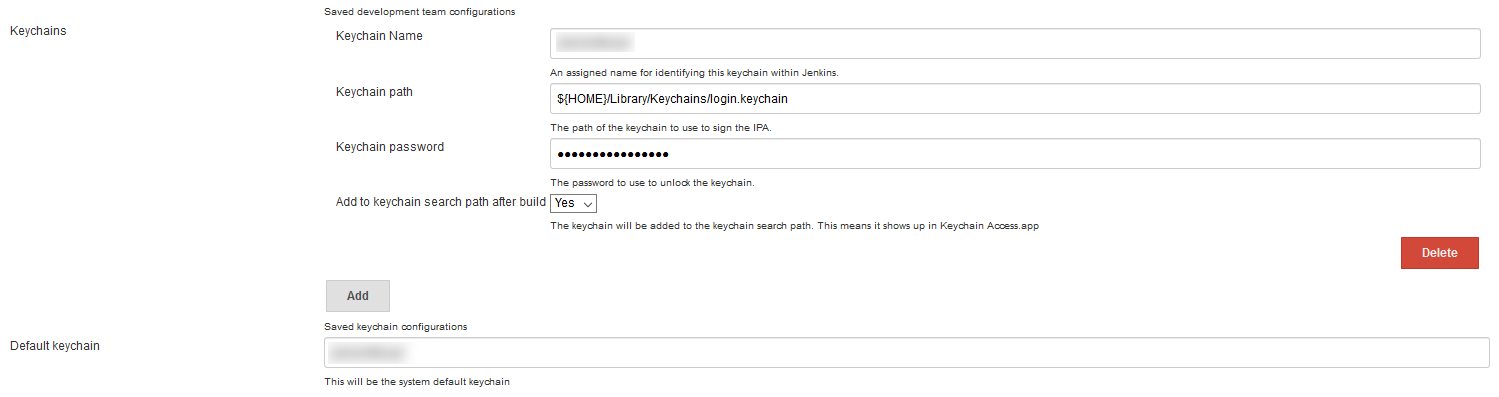
Specify a Jenkins internal name for your keychain, the keychain path and the password. By default this will be your logged in OS X user.
Changing the Build Job
The first thing you need to do is to add a new Xcode build step into the existing Jenkins job. Add it after the Unity3D build step:
Once the build step is added, use the following general build settings:
Specify the target ipa name and the target output location for your ipa file. Define the export method with ad-hoc for Ad-Hoc signed builds and app-store for builds that are deployed into the App Store or Testflight.
In the next section select the development team you added in the Global Configuration for Xcode and the keychain to unlock:
Please make sure you’ve installed all needed provisioning profiles and developer certificates on your build machine.
Next specify the Xcode project to build. Use the following settings:
The latest version of the Xcode integration plugin does not use xcrun to package apps. Instead is uses xcodebuild. Therefore you have to define the Xcode scheme file. The default for Unity3D projects is Unity-iPhone. The Xcode project directory is the path of the Xcode project exported by Unity3D relative to the workspace directory. The build output directory is the same as the project directory prefixed with the ${WORSPACE} environment variable and postfixed with build/Unity-iPhone.build.
From this point on you are able to create an ipa file with your Jenkins build job.
Multiple Versions of Xcode
Some of our projects at it Matters Games only support an older version of Unity3D. Unfortunately, the latest version of Xcode is not compatible with those. Therefore, we have to install multiple versions of Xcode on our build machine and add a pre-selection to the build job. This can be achieved by changing the developer directory environment variable before performing the Xcode build step. Jenkins has the possibility to inject variables into the build process. By injecting a new path to the DEVELOPER_DIR variable a different version of Xcode will be used:

We have two installations of Xcode: the latest version of Xcode 8 and Xcode 7. If both versions are installed in separate application folders, like let’s say Applications/Xcode8 and Applications/Xcode7, you can use the following content for the Properties Content field to select the target version of Xcode:
| 12 |
|
Abstract and Outlook
Automatically performing a XCode build step creating an ipa file for deployment is a big step forward in Unity3D iOS development. We have projects where we need to create builds for multiple versions of a game a couple of times per day. Performing builds manually can block a developer for hours. Using Jenkins saves a lot of time and adds real value to the development of any project. Furthermore, all of your employees and clients are able to deploy and test build results of your Jenkins jobs very easily.
If you are working on multiple projects in parallel your number of builds will probably also increase. Depending on the size of your projects each Unity3D build can take a couple of minutes. This will lead to the point were your build pipeline will be blocked by the pure number of builds. To avoid long waiting times one can add so called slave nodes to Jenkins. In the third part of this series I will explain how to add additional Windows and OS X slaves to the CI pipeline, increasing the number of builds that can be performed in parallel.– Ulrich Kaminski is the Technical Director of it Matters Games. He graduated from the University of Magdeburg and holds a diploma of engineering in computational visualistics (CV). During his 5 years at Reakktor Media, Ulrich gained extensive knowledge in AAA development. Since 2012 Ulrich has been working at it Matters Games, successfully developing and shipping games to a global market.
Introduction
For smaller game companies it is fairly common to work on multiple game projects at the same time. Utilizing Continuous Integration for multiple projects with each targeting multiple platforms can result in an increased number of builds.
In this post I am going to describe a way to decrease waiting times by adding additional so called slave nodes to Jenkins. Jenkins uses a “master/slave” mode in which the workload of build jobs is delegated to different slave nodes.
Jenkins Slave Nodes
Slave nodes are computers that offload build jobs from the Jenkins master. Once the slave is setup Jenkins handles the delegation of work fairly automatically. Each job can specify how the delegation behaves. Jobs can be bound to a specific slave, while some may roam freely between slave nodes. Each slave is setup as a so called “slave agent”. Therefore there is no need to install Jenkins on the slave computers. There are different ways to set up a slave, but in the end the master and the slave establish a bi-directional communication. The next sections will explain how to add slave agents using a windows or OSX computer. Keep in mind that your computers need to have a logged-in user with access to the windowsserver (OSX) or the graphical desktop (Windows) if you want to perform Unity builds.
Windows Slave Agents
First you need to add a new slave agent in Jenkins.
- Go to Manage Jenkins -> Manage Nodes -> Add New Node.
- Create a new node of type Dumb.
- Set the slave name to something like the target computers name.
- You can specify a label for the slave that can be used to bind Jenkins jobs to slaves with a specific label. For example: iOS, Android, Win32 etc.
- Set the target base directory for the slave agent executable to be installed. That will also be the location of the slaves local Jenkins work spaces.
- Set the slave to start via JNLP.
Now its time to setup the Jenkins slave agent.
- On the target machine open the following url: http://<jenkins-ip-and-port>/computer/<slave-name>/slave-agent.jnlp.
- Download the jnlp file and open it. It might be necessary to update Java before being able to run the application.
- Once the jnlp is opened, click on File -> Install Jenkins as a Service.
- Now the slave agent is up and running, but it does not have access to the graphic card. Go to Services -> Jenkins Slave -> Properties -> Log On. Check Allow service to interact with desktop and enter a credentials of the default computers user.
The Jenkins agent is now started automatically when the user logs into windows. If you want you can setup wake-on-lan and let the user login automatically once the computer is started. The last thing you need to do is install Unity3D on your slave agents. After that you’ll have to specify the Unity3D installations location in the Jenkins agent settings.
OSX Slave Agents
Adding an OSX slave is a bit more complicated than adding a Windows slave node. The master and the slave will have to communicate using ssh. Jenkins already has a built-in SSH client that it uses to communicate with a remote sshd and start a slave agent. The creation of a new OSX slave node is basically the same as for Windows. As Launch Method however you need to chose Launch slave agents via SSH. Provide the IP address of the target slave computer and the ssh credentials.

The slave will need the master’s public ssh key copied to ~/.ssh/authorized_keys. This removes the need of having to enter the slave’s account details to connect via ssh. On the Jenkins master we need to create a private/public pair of authorization keys. Open the terminal on the master and generate a new key:
| 1 |
|
Do not enter a passphrase.
Copy the public key to the slave’s agents ssh folder:
| 1 |
|
From now on you can log into your slave as the slaves user from the Jenkins master without a password.
Abstract and Outlook
If everything is setup correctly you have a very powerful automation and build pipeline for all your Unity3D projects. By letting your pipelines run automatically every time a developer commits or just in regular intervals a couple of times per day, you reduce the probability of build or compile errors being undetected for a longer time. Adding a stop-and-fix mentality once a build fails will leave your repository in a state that is always build-, deploy- and presentable to your stakeholders. Continuous integration will add real business value to your company and increase your reputation as a professional game development company.– Ulrich Kaminski is the Technical Director of it Matters Games. He graduated from the University of Magdeburg and holds a diploma of engineering in computational visualistics (CV). During his 5 years at Reakktor Media, Ulrich gained extensive knowledge in AAA development. Since 2012 Ulrich has been working at it Matters Games, successfully developing and shipping games to a global market.
//////////////////////////////////////////////////////////////////////////////////////////////
/////////////////////////////////////////////////////////////////////////////////////////////
This article will discuss Unity Build Automation using Jenkins, an open source automation and continuous integration server, to automatically create new Unity3d builds when the master Git branch is updated.
Automating repetitive chores is a good idea when working on a project, and one such chore is building the product after each feature or bug fix is merged into the master branch. This article on Unity Build Automation is one option to automate the process of creating, packaging, and distributing builds for multiple platforms. Another option is to use a build automation server to monitor a source control branch and kick off new builds in response to a change.
In this article, I’m going to outline the steps for automating the build process utilizing a Jenkins build server to watch a Git branch for changes and automatically create a new build in response to any changes.
Contents:
- Jenkins Setup
- Git Credentials
- MacOS and Unity
- Unity Build Script
- Jenkins Build Setup
- Test Jenkins Build
- Helpful References
- In Closing
First, prep the machine you are going to install Jenkins on and ensure that it has the necessary JRE version. I’m hosting Jenkins on an older Mac Mini running MacOS Mojave with Java(TM) SE Runtime Environment 1.8.
Next, download the appropriate Jenkins installer for your platform and get it installed. See platform specific installer tips such as the Jenkins Install Doc, or the general Jenkins Doc.
After Jenkins is installed, you should be directed to http://localhost:8080 to login/unlock using the password created by the installer. e.g. cat /Users/Shared/Jenkins/Home/secrets/initialAdminPassword
Once logged in, will need to select and install plugins. I installed the default plugins, plus:
- Build Name Setter
- Build Timeout
- Dashboard View
- Folders Plugin
- Git Parameter Plug-in
- Timestamper
- Unity3d plugin
After installing plugins, you will be prompted to create a new Admin login/password, after which Jenkins will be ready for use.
Next, take a pass through the Jenkins configuration (Jenkins -> Manage Jenkins -> Configure System) and configure it for your purposes (e.g. URL, admin e-mail, SMTP server, etc).
One last bit of configuration on MacOS. In order for Jenkins to be able to auto-update, you will need to set the jenkins user as owner of the jenkins.war file.
sh-3.2# cd /Applications
sh-3.2# pwd
/Applications
sh-3.2# chown -R jenkins Jenkins/
sh-3.2# chgrp -R jenkins Jenkins/
sh-3.2# ls -al Jenkins/*.war
-rw-r--r-- 1 jenkins jenkins 77330993 Apr 29 09:45 Jenkins/jenkins.war
sh-3.2#
Next, you will need to create credentials to your Git server for Jenkins. On the Git server, create a new user/sshkey for the repo(s) you wish Jenkins to access, and then add that to Jenkin’s Credentials for the System. These Git credentials will be selected when setting up the build view later.
[user@server .ssh]# ssh-keygen
Generating public/private rsa key pair.
Enter file in which to save the key (/home/user/.ssh/id_rsa): /home/user/.ssh/id_rsa.jenkins
Enter passphrase (empty for no passphrase):
Enter same passphrase again:
Your identification has been saved in /home/user/.ssh/id_rsa.jenkins.
Your public key has been saved in /home/user/.ssh/id_rsa.jenkins.pub.
The key fingerprint is:
12:34:56:78:90:12:34:56:78:90:12:34:56:78:90:12 user@server
[user@server .ssh]#
Keep these private and public keys safe. The public key should be added to your remote Git server, and the private key will be added to Jenkins under Credentials.
I took some additional steps to prepare Jenkins for building with Unity.
First, Open MacOS Settings -> User & Groups. Jenkins created a new Standard account. Right click on jenkins and select Advanced. Fill in an account name and icon, and reset the password to something new. Also, under User & Groups, enable Fast User Switching.
Next, login as the Jenkins user and setup the Unity build environment: install Unity Hub, log in and authorize this build machine for the Unity license, and install the necessary versions of Unity (e.g. 2018.3.x), etc.
Once Unity Hub and Unity were installed, I created a new sample project to ensure Unity was all set to build for the required OS platforms.
Jenkins then needs to be configured for each installed version of Unity: Jenkins -> Manage Jenkins -> Global Tool Configuration -> Unity3d -> Unity3d installations…
In order for Jenkins to build the project, need to create a new editor class in the project. Note, the Unity3d Pluginreference has an example script in the Usage Guide named Assets/Editor/MyEditorScript.cs, which is out of date for Unity 2018.3. Here’s the VR Dungeons example for building for MacOS located in the project as Assets/Editor/JenkinsBuild.cs. Note: System.Console.WriteLine shows up in the logs as a single line instead of several lines of stack info like Debug.Log!
| 1 2 3 4 5 6 7 8 9 10 11 12 13 14 15 16 17 18 19 20 21 22 23 24 25 26 27 28 29 30 31 32 33 34 35 36 37 38 39 40 41 42 43 44 45 46 47 48 49 50 51 52 53 54 55 56 57 58 59 60 61 62 63 64 65 66 67 68 69 70 71 72 73 74 75 76 77 78 79 80 81 82 83 84 85 86 87 88 |
// ------------------------------------------------------------------------------------------------- // Assets/Editor/JenkinsBuild.cs // ------------------------------------------------------------------------------------------------- using UnityEngine; using UnityEditor; using System.Collections.Generic; using UnityEditor.Build.Reporting;
// ------------------------------------------------------------------------ // https://docs.unity3d.com/Manual/CommandLineArguments.html // ------------------------------------------------------------------------ public class JenkinsBuild {
static string[] EnabledScenes = FindEnabledEditorScenes();
// ------------------------------------------------------------------------ // called from Jenkins // ------------------------------------------------------------------------ public static void BuildMacOS(){
string appName = "AppName"; string targetDir = "~/Desktop";
// find: -executeMethod // +1: JenkinsBuild.BuildMacOS // +2: VRDungeons // +3: /Users/Shared/Jenkins/Home/jobs/VRDungeons/builds/47/output string[] args = System.Environment.GetCommandLineArgs(); for (int i=0; i<args.Length; i++){ if (args[i] == "-executeMethod"){ if (i+4 < args.Length){ // BuildMacOS method is args[i+1] appName = args[i+2]; targetDir = args[i+3]; i += 3; } else { System.Console.WriteLine("[JenkinsBuild] Incorrect Parameters for -executeMethod Format: -executeMethod BuildMacOS <app name> <output dir>"); return; } } }
// e.g. // /Users/Shared/Jenkins/Home/jobs/VRDungeons/builds/47/output/VRDungeons.app string fullPathAndName = targetDir + System.IO.Path.DirectorySeparatorChar + appName + ".app"; BuildProject(EnabledScenes, fullPathAndName, BuildTargetGroup.Standalone, BuildTarget.StandaloneOSX, BuildOptions.None); }
// ------------------------------------------------------------------------ // ------------------------------------------------------------------------ private static string[] FindEnabledEditorScenes(){
List<string> EditorScenes = new List<string>(); foreach (EditorBuildSettingsScene scene in EditorBuildSettings.scenes){ if (scene.enabled){ EditorScenes.Add(scene.path); } } return EditorScenes.ToArray(); }
// ------------------------------------------------------------------------ // e.g. BuildTargetGroup.Standalone, BuildTarget.StandaloneOSX // ------------------------------------------------------------------------ private static void BuildProject(string[] scenes, string targetDir, BuildTargetGroup buildTargetGroup, BuildTarget buildTarget, BuildOptions buildOptions){ System.Console.WriteLine("[JenkinsBuild] Building:" + targetDir + " buildTargetGroup:" + buildTargetGroup.ToString() + " buildTarget:" + buildTarget.ToString());
// https://docs.unity3d.com/ScriptReference/EditorUserBuildSettings.SwitchActiveBuildTarget.html bool switchResult = EditorUserBuildSettings.SwitchActiveBuildTarget(buildTargetGroup, buildTarget); if (switchResult){ System.Console.WriteLine("[JenkinsBuild] Successfully changed Build Target to: " + buildTarget.ToString()); } else { System.Console.WriteLine("[JenkinsBuild] Unable to change Build Target to: " + buildTarget.ToString() + " Exiting..."); return; }
// https://docs.unity3d.com/ScriptReference/BuildPipeline.BuildPlayer.html BuildReport buildReport = BuildPipeline.BuildPlayer(scenes, targetDir, buildTarget, buildOptions); BuildSummary buildSummary = buildReport.summary; if (buildSummary.result == BuildResult.Succeeded){ System.Console.WriteLine("[JenkinsBuild] Build Success: Time:" + buildSummary.totalTime + " Size:" + buildSummary.totalSize + " bytes"); } else { System.Console.WriteLine("[JenkinsBuild] Build Failed: Time:" + buildSummary.totalTime + " Total Errors:" + buildSummary.totalErrors); } } } |
This script will be used as a build hook for the Jenkins build process in the next step.
Now that Unity is setup, it’s time to configure Jenkins to build for a project. In this example, I’m going to use a VR Dungeons test project.
First, click New Item in Jenkins, name the project, click Freestyle project, and then OK.
Now, it’s time to fill in the general build details. In this example, I’m discarding old builds after 30 days or if there are more than 50 builds. Note, the specific job directory (e.g. /Users/Shared/Jenkins/Home/jobs/VRDungeons/builds/47) contains the Unity build output and the resulting Zip file, and discarding an old builds will discard the old unity output and zip too.
Next, in the Source Code Management section, it’s time to fill in the Git server details. The Repository URL should be the URL you would use to clone the project. The credentials are the credentials setup earlier in the Git Credentials step. The Branch Specifier is the branch to monitor. In this example, Jenkins is only monitoring the master branch, which is only updated after feature or bug fix branches are merged back into master.
Further, the Build Triggers section is where Jenkins is setup to watch the Git repo. In this example, Jenkins is set to poll the remote repo sometime during the 8am hour (once a day). The schedule is setup similar to cron. For example, */5 * * * would poll every 5 minutes. The H parameter adds additional randomness so all jobs don’t execute at the same time. Click the (?) next to Schedule for exhaustive examples.
Note, Jenkins will store the configured repository locally in the Jenkins/Home/workspace directory (e.g. /Users/Shared/Jenkins/Home/workspace/VRDungeons).
The Build Environment section is where the build is actually configured. In this example, Jenkins is setup to terminate the build if it takes longer than 30 minutes. Normally, the builds take less than 5 minutes at this stage in the project. The Add timestamps to console output adds a timestamp for each line (shown further down).
The Set Build name option configures how Jenkins will name each build. The BUILD_NUMBER is a Jenkins set parameter, and see http://localhost:8080/env-vars.html/ for all supported parameters. In this example, Jenkins uses the Job Name and current Build Number:
${JOB_NAME}#${BUILD_NUMBER}
The Build Section, this is where Unity is configured to execute the build. The Unity3d installation name references the Unity3d install configured above.
The Unity3d Editor Command Line Arguments is where the magic happens. In this example, Jenkins passes the following to Unity for the build:
-nographics -batchmode -quit -executeMethod JenkinsBuild.BuildMacOS ${JOB_NAME} "${JENKINS_HOME}"/jobs/${JOB_NAME}/builds/"${BUILD_NUMBER}"/output
The parameters are as follows:
-nographics : prevents the windows server errors when running in batch mode on a headless server
-batchmode : run in headless mode
-quit : quit Unity3d once all the other commands have finished
-executeMethod JenkinsBuild.BuildMacOS: this is where the public static JenkinsBuild.BuildMacOS method is called.
The additional 2 parameters after -executeMethod JenkinsBuild.BuildMacOS are read inside the BuildMacOS method to set additional build information. Note, the “${JOB_NAME}”, “${JENKINS_HOME}”, and “$BUILD_NUMBER” parameters are from Jenkins and allows Unity to build the project to a particular directory. e.g. /Users/Shared/Jenkins/Home/jobs/VRDungeons/builds/47/output
Note, these parameters could also be retrieved via system.environment.getenvironmentvariable.
The Execute Shell section creates the build artifact (the downloadable zip on the build report).
| 1 2 3 4 5 6 7 8 |
# create the archive folder in the job to hold the build artifact /bin/mkdir $JENKINS_HOME/jobs/$JOB_BASE_NAME/builds/$BUILD_NUMBER/archive/
# fix macOS VR issue with json files not being in the .app mv $JENKINS_HOME/jobs/$JOB_BASE_NAME/builds/$BUILD_NUMBER/output/*.json $JENKINS_HOME/jobs/$JOB_BASE_NAME/builds/$BUILD_NUMBER/output/$JOB_BASE_NAME.app
# zip build output directory and place in job archive cd $JENKINS_HOME/jobs/$JOB_BASE_NAME/builds/$BUILD_NUMBER/output/ && /usr/bin/zip -r $JENKINS_HOME/jobs/$JOB_BASE_NAME/builds/$BUILD_NUMBER/archive/$JOB_BASE_NAME$BUILD_NUMBER.zip * |
As an example, for the project VRDungeons build #47, the above uses the following directories which are automatically created during the build:
- JOBS DIR: /Users/Shared/Jenkins/Home/jobs/VRDungeons
- BUILDS DIR: /Users/Shared/Jenkins/Home/jobs/VRDungeons/builds
- SPECIFIC BUILD DIR: /Users/Shared/Jenkins/Home/jobs/VRDungeons/builds/47
- UNITY OUTPUT DIR: /Users/Shared/Jenkins/Home/jobs/VRDungeons/builds/47/output
- FINAL ZIP DIR: /Users/Shared/Jenkins/Home/jobs/VRDungeons/builds/47/archive
- FINAL ZIP: /Users/Shared/Jenkins/Home/jobs/VRDungeons/builds/47/archive/VRDungeons47.zip
The Final Zip is what Jenkins calls a Build Artifact and will be downloadable in Jenkins from the Project page or the specific build page.
The final section is Post-build Actions. In here, Jenkins will send an email if there is an unstable/failed build.
Once everything is set, click Save! If you just want to snapshot save and stay on the page to continue editing, click Apply.
After saving, Jenkins will show the Project view. Click, “Build Now” to schedule a build to test the build process out. Once it starts, the Build will show in the Build History section. Click the in progress build link (e.g. VR Dungeons#47) to see the details.
Next, click Console Output to watch the build progress live. Searching for [JenkinsBuild] will show the console output lines from the build script. If successful, the build should be waiting in the Job’s archive directory (e.g. /Users/Shared/Jenkins/Home/jobs/VRDungeons/builds/47/archive/VRDungeons47.zip) and downloadable as a Build Artifact.
All done, the new build is ready! From here on, Jenkins will automatically create new builds at 8am if there are any changes on the master branch.
In the future, I’ll add additional information on build actions such as automatically uploading the bundle to Steam, itch.io, etc.
* https://jenkins.io/download/
* https://jenkins.io/download/thank-you-downloading-osx-installer-stable/
* https://jenkins.io/doc/
* https://plugins.jenkins.io/unity3d-plugin
* https://docs.unity3d.com/Manual/CommandLineArguments.html
https://smashriot.com/unity-build-automation-with-jenkins/
