废话少说,先上图:
一直想训练一个目标检测的级联分类器,花了一天的时间阅读其他优秀博客,然后自己实践了一下,里面也遇到一些坑,希望能给阅读本文章的读者带来帮助。
opencv 已经提供了训练好的人脸和眼睛的目标检测的xml文件 ,可以做到检测视频图像中是否有人脸 ,但无法做到 像dlib提供的人脸的具体特征点的定位
但是 自定义目标检测 才是我们真正感兴趣的。
实现流程:
1、正负样本的获取
1.1 正样本的抠图(代码在最后)
1.2 负样本(背景)
2、训练
3、检测(代码在最后)
正样本的抠图 :没用像objectmaker 或者 LabelImg之类的 目标截取软件 而是在vs中 自己写了一个 如下图所示:
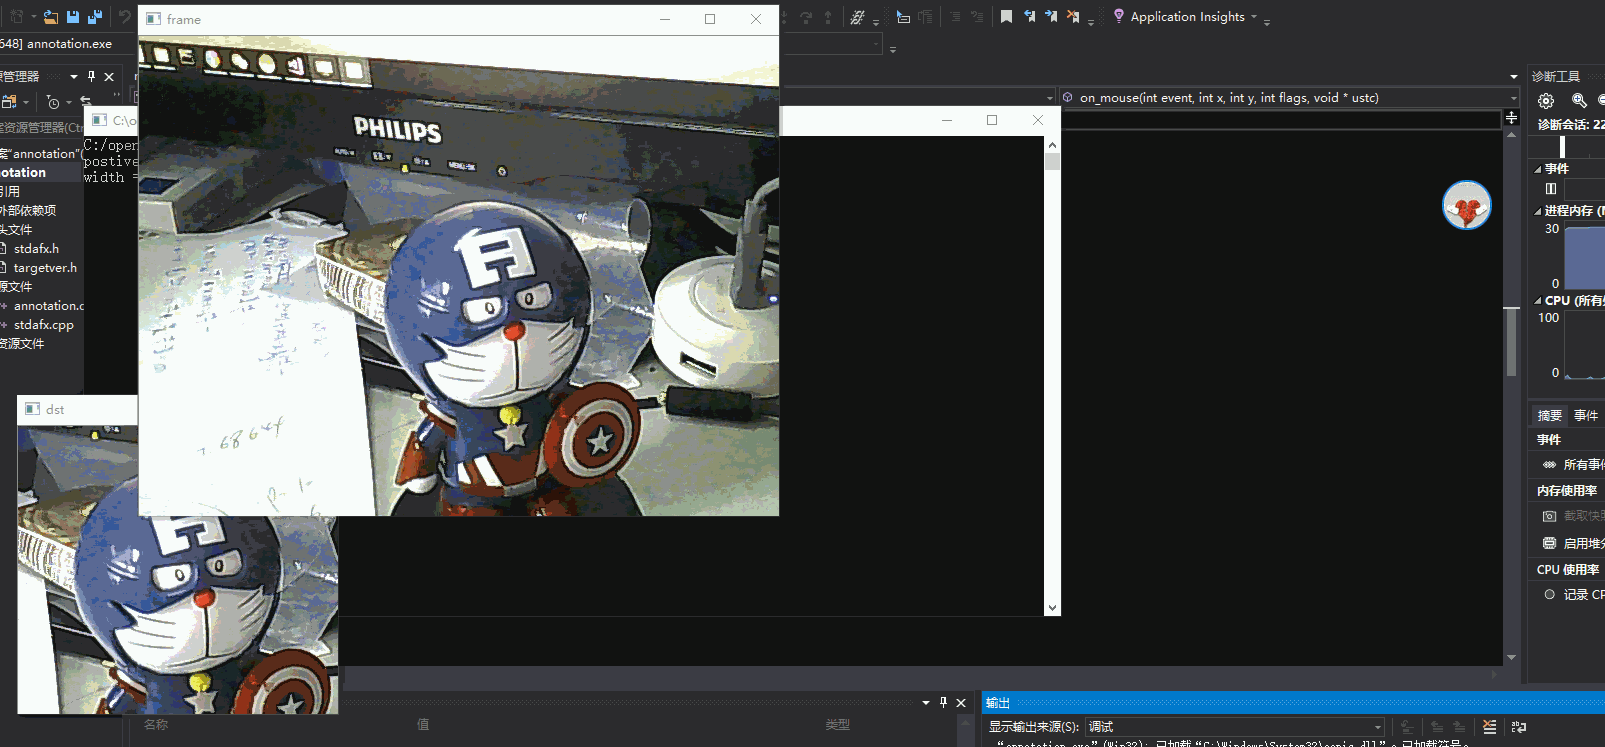
时间比较紧,具体过程就不一步一步阐述了,需要注意的坑 有 ,生成负样本描述文件的 文件名 最好是文件的绝对路径,这样就可以忽略 在不同的文件夹 命令行执行 opencv_traincascade.exe 所产生的错误 如:大家所常遇到的 pos count:consumed Train dataset for temp stage can not be filled
执行训练的命令如下所示:
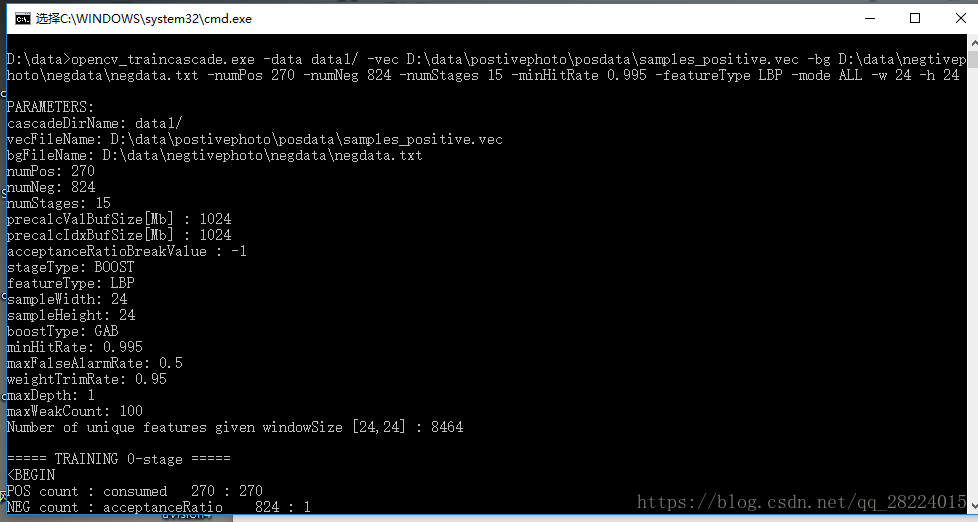
训练过程很短, 不超过一分钟, 样本 数量信息:正样本300个 ,负样本824个
1 抠图代码 opencv 实现
//

#include "stdafx.h"

#include "stdafx.h"
#include<opencv2\opencv.hpp>
#include <opencv2/core/core.hpp>
#include <opencv2/highgui/highgui.hpp>
#include <iostream>
#include <stdio.h>
using namespace cv;
using namespace std;

char filename[200];
String flodername = "C:/opencv/sources/apps/annotation/vs/annotation/postivephoto/";
int countss = 102;
cv::Mat org, dst, img, tmp ,frame;
void on_mouse(int event, int x, int y, int flags, void *ustc)//event鼠标事件代号,x,y鼠标坐标,flags拖拽和键盘操作的代号
{
	static Point pre_pt(-1, -1);//初始坐标
	static Point cur_pt(-1, -1);//实时坐标
	char temp[16];
	if (event == CV_EVENT_LBUTTONDOWN)//左键按下,读取初始坐标,并在图像上该点处划圆
	{
		org.copyTo(img);//将原始图片复制到img中
		sprintf_s(temp, "(%d,%d)", x, y);
		pre_pt = Point(x, y);
		putText(img, temp, pre_pt, FONT_HERSHEY_SIMPLEX, 0.5, Scalar(0, 0, 0, 255), 1, 8);//在窗口上显示坐标
		circle(img, pre_pt, 2, Scalar(255, 0, 0, 0), CV_FILLED, CV_AA, 0);//划圆
		imshow("img", img);
	}
	else if (event == CV_EVENT_MOUSEMOVE && !(flags & CV_EVENT_FLAG_LBUTTON))//左键没有按下的情况下鼠标移动的处理函数
	{
		img.copyTo(tmp);//将img复制到临时图像tmp上,用于显示实时坐标
		sprintf_s(temp, "(%d,%d)", x, y);
		cur_pt = Point(x, y);
		putText(tmp, temp, cur_pt, FONT_HERSHEY_SIMPLEX, 0.5, Scalar(0, 0, 0, 255));//只是实时显示鼠标移动的坐标
		imshow("img", tmp);
	}
	else if (event == CV_EVENT_MOUSEMOVE && (flags & CV_EVENT_FLAG_LBUTTON))//左键按下时,鼠标移动,则在图像上划矩形
	{
		img.copyTo(tmp);
		sprintf_s(temp, "(%d,%d)", x, y);
		cur_pt = Point(x, y);
		putText(tmp, temp, cur_pt, FONT_HERSHEY_SIMPLEX, 0.5, Scalar(0, 0, 0, 255));
		rectangle(tmp, pre_pt, cur_pt, Scalar(0, 255, 0, 0), 1, 8, 0);//在临时图像上实时显示鼠标拖动时形成的矩形
		imshow("img", tmp);
	}
	else if (event == CV_EVENT_LBUTTONUP)//左键松开,将在图像上划矩形
	{
		org.copyTo(img);
		sprintf_s(temp, "(%d,%d)", x, y);
		cur_pt = Point(x, y);
		putText(img, temp, cur_pt, FONT_HERSHEY_SIMPLEX, 0.5, Scalar(0, 0, 0, 255));
		circle(img, pre_pt, 2, Scalar(255, 0, 0, 0), CV_FILLED, CV_AA, 0);
		rectangle(img, pre_pt, cur_pt, Scalar(0, 255, 0, 0), 1, 8, 0);//根据初始点和结束点,将矩形画到img上
		imshow("img", img);
		img.copyTo(tmp);
		//截取矩形包围的图像,并保存到dst中
		int width = abs(pre_pt.x - cur_pt.x);
		int height = abs(pre_pt.y - cur_pt.y);
		if (width == 0 || height == 0)
		{
			printf("width == 0 || height == 0");
			return;
		}
		dst = org(Rect(min(cur_pt.x, pre_pt.x), min(cur_pt.y, pre_pt.y), width, height));
		namedWindow("dst");
		imshow("dst", dst);
		sprintf_s(filename, "postive%d.bmp", ++countss);
		String full_path = flodername + "/" + filename;
		resize(dst, dst, Size(24, 24));
		imwrite( full_path, dst);//图片保存到本工程目录中
		cout << "postive" << countss << ".bmp has been stored" << endl;

	}
}


int main()
{


#if 1

	String flodername = "C:/opencv/sources/apps/annotation/vs/annotation/negtivephoto/";
	//sprintf_s(flodername, "%s", flod.c_str());
	cout << flodername << endl;
	// 打开摄像头
	VideoCapture capture(0);
	if (false == capture.isOpened())
	{
		cout << "camera open failed!" << endl;
		return -1;
	}


	while (true)
	{
		// 获取图片帧
		capture >> org;
		if (true == org.empty())
		{
			cout << "get no frame" << endl;
			break;
		}

		// 显示原始图片
		imshow("frame", org);

		//复制采集到的frame到resultRGB


		char key = (char)waitKey(10);
		if (27 == key)
		{
			break;
		}
		//		char key = (char)waitKey(10);
		if (key == 32)//按空格键进行拍照
		{
			namedWindow("org");
			imshow("org", org);
			org.copyTo(tmp);
			org.copyTo(img);
			setMouseCallback("org", on_mouse, 0);
			while (1)
			{
				key = (char)waitKey(10);
				if (27 == key)
				{
					destroyWindow("org");
					destroyWindow("img");
					break;
				}
			}

		}
	}
#endif

	return 0;
}
2 、检测目标代码 opencv 实现
// suqianfeng.cpp: 定义控制台应用程序的入口点。
//

#include "stdafx.h"
#include <string>
#include <Windows.h>
#include<opencv2\opencv.hpp>
#include <opencv2/core/core.hpp>
#include <opencv2/highgui/highgui.hpp>
#include <iostream>
#include <stdio.h>
#include "opencv2/objdetect/objdetect.hpp"
#include "opencv2/imgproc/imgproc.hpp"
//#define unsigned char uchar
//#define unsigned int uint
#define MAXVALUE (255)
#define KERNEL_SIZE  5
using namespace std;
using namespace cv;


#include <iostream>
#include <stdio.h>

using namespace std;
using namespace cv;

/** Function Headers */
void detectAndDisplay(Mat frame);

/** Global variables */
//-- Note, either copy these two files from opencv/data/haarscascades to your current folder, or change these locations
String obj_cascade_name = "cascade.xml";
CascadeClassifier obj_cascade;
string window_name = "Capture - Face detection";
RNG rng(12345);

/**
* @function main
*/
int main(void)
{
	VideoCapture capture;
	Mat frame;

	//-- 1. Load the cascades
	if (!obj_cascade.load(obj_cascade_name)) { printf("--(!)Error loading\n");
	while (1)
	{
		;
	}
	return -1;
	};


	//-- 2. Read the video stream
	capture.open(0);
	if (capture.isOpened())
	{
		for (;;)
		{
			capture >> frame;

			//-- 3. Apply the classifier to the frame
			if (!frame.empty())
			{
				detectAndDisplay(frame);
			}
			else
			{
				printf(" --(!) No captured frame -- Break!"); break;
			}

			int c = waitKey(10);
			if ((char)c == 'c') { break; }

		}
	}
	return 0;
}

/**
* @function detectAndDisplay
*/
void detectAndDisplay(Mat frame)
{
	vector<Rect> rect;
	std::vector<Rect> obj;

	Mat frame_gray;

	cvtColor(frame, frame_gray, COLOR_BGR2GRAY);

	//-- Detect faces
	obj_cascade.detectMultiScale(frame_gray, obj, 1.1, 2, 0 , Size(20, 30), Size(640, 480));

	for (size_t i = 0; i < obj.size(); i++)
	{
		if (obj[i].width > 20 && obj[i].height > 20)
		{
			rect.push_back(Rect(obj[i].x, obj[i].y, obj[i].width, obj[i].height));
			rectangle(frame, rect[i], Scalar(0, 0, 255), 2);
		}
		//Point center(obj[i].x + obj[i].width / 2, obj[i].y + obj[i].height / 2);
		//ellipse(frame, center, Size(obj[i].width / 2, obj[i].height / 2), 0, 0, 360, Scalar(255, 0, 0), 3, 8, 0);
	}
	rect.clear();
	//-- Show what you got
	imshow(window_name, frame);
}