作者:billy
版权声明:著作权归作者所有,商业转载请联系作者获得授权,非商业转载请注明出处
前言
在进行 Qt Quick 开发时, 有些需求是无法在 QML 中实现的,我们必须要使用C++中的方法来完成它,这个时候我们就需要实现 QML 与 C++ 的混合编程。
通常我们会先把需要的功能在 C++ 中全部完成,然后在 QML 中直接调用 C++ 中的方法。博主查看了Qt的帮助文档发现一共有两种方法可以实现。
方法一:在QML系统中注册C++类型
官方文档说明:
 具体步骤如下:
- 实现C++类的功能;
myconfiguration.h

#ifndef MYCONFIGURATION_H
#define MYCONFIGURATION_H

#include <QObject>
#include <QSettings>

class MyConfiguration : public QObject
{
    Q_OBJECT
public:
    explicit MyConfiguration(QObject *parent = nullptr);

    // 使用 Q_INVOKABLE 宏修饰的方法才可以在 QML 中被调用
    Q_INVOKABLE void setProperty(QString name, QString section, QString key, QString value);

    Q_INVOKABLE QString getProperty(QString name, QString section, QString key);

signals:

public slots:
};

#endif // MYCONFIGURATION_H
myconfiguration.cpp

#include "myconfiguration.h"

MyConfiguration::MyConfiguration(QObject *parent) : QObject(parent)
{

}

void MyConfiguration::setProperty(QString name, QString section, QString key, QString value)
{
    QString fileName = name;
    QString path = section + "/" + key;

    QSettings *settings = new QSettings(fileName, QSettings::IniFormat);
    settings->setValue(path, value);
}

QString MyConfiguration::getProperty(QString name, QString section, QString key)
{
    QString fileName = name;
    QString path = section + "/" + key;

    QSettings *settings = new QSettings(fileName, QSettings::IniFormat);
    return settings->value(path, "").toString();
}
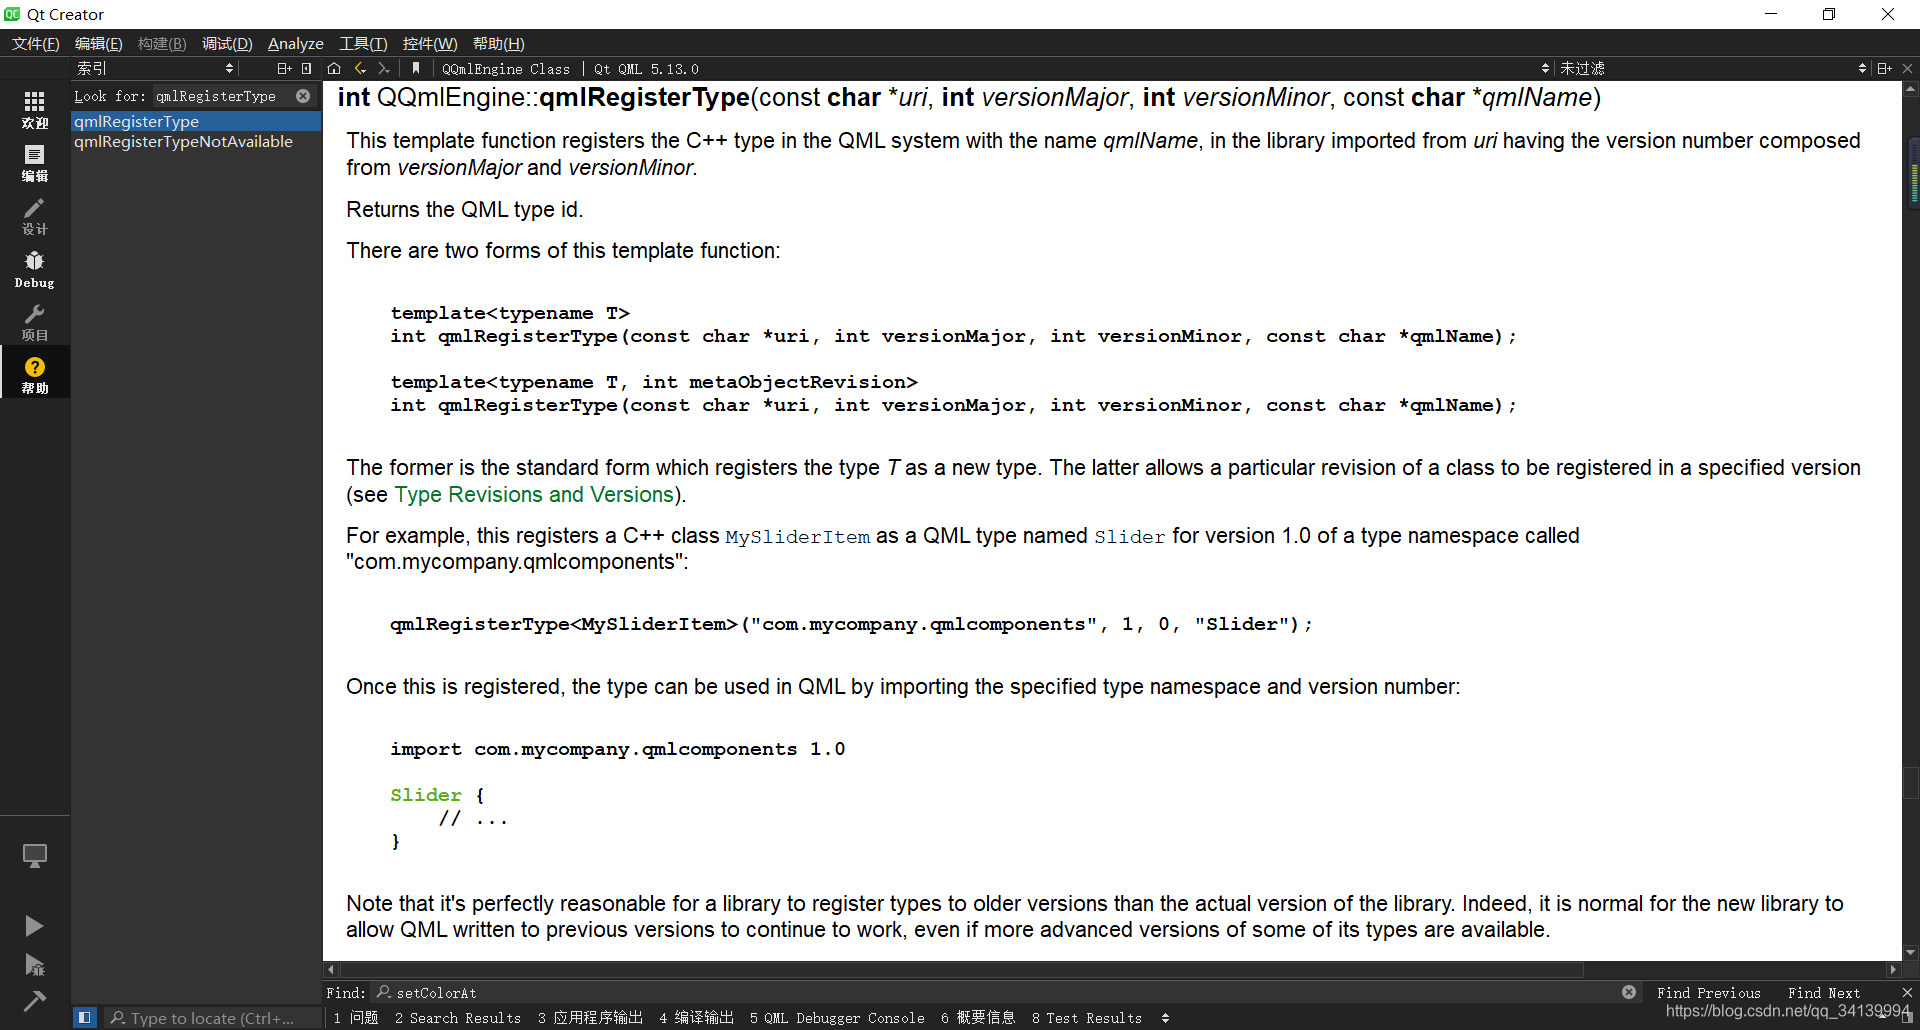
- 使用 qmlRegisterType 函数将类注册到 QML 中;
#include <QGuiApplication>
#include <QQmlApplicationEngine>
#include "myconfiguration.h"
#include <QQmlContext>

int main(int argc, char *argv[])
{
    QCoreApplication::setAttribute(Qt::AA_EnableHighDpiScaling);

    QGuiApplication app(argc, argv);

    QQmlApplicationEngine engine;
    //参数:qmlRegisterType<C++类型名> (命名空间 主版本 次版本 QML中的类型名)
    qmlRegisterType<MyConfiguration, 1>("MyConfiguration", 1, 0, "MyConfiguration");

    const QUrl url(QStringLiteral("qrc:/main.qml"));
    QObject::connect(&engine, &QQmlApplicationEngine::objectCreated,
                     &app, [url](QObject *obj, const QUrl &objUrl) {
        if (!obj && url == objUrl)
            QCoreApplication::exit(-1);
    }, Qt::QueuedConnection);
    engine.load(url);

    return app.exec();
}
- 使用 import 语句导入注册时填写的类所在的命名空间;
- 在 QML 文件中实例化对象;
- 通过该对象的 id 来访问对象的属性和方法;
import QtQuick 2.12
import QtQuick.Window 2.12
// 导入命名空间
import MyConfiguration 1.0
Window {
visible: true
width: 640
height: 480
// 实例化对象
MyConfiguration { id: myConfiguration }
Rectangle {
width: 200
height: 160
anchors.centerIn: parent
color: "yellow"
Text {
id: myText
anchors.centerIn: parent
font.pixelSize: 24
font.family: "微软雅黑"
color: "black"
text: "测试"
}
MouseArea {
anchors.fill: parent
onClicked: {
// 通过 id 调用 getProperty 和 setProperty
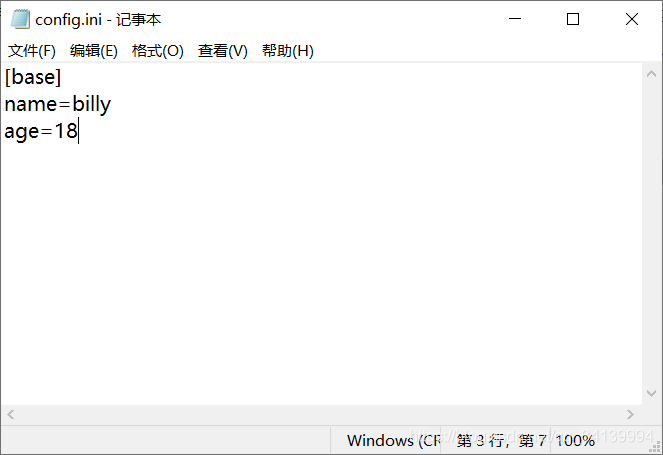
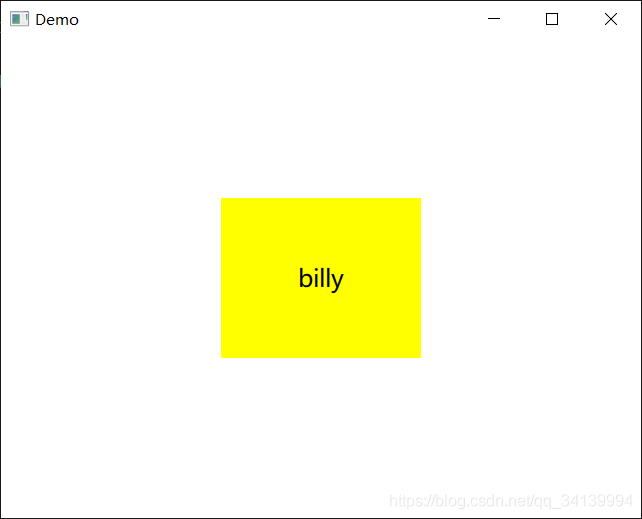
// 运行结果如下图所示,获取到配置文件中的 name 为 billy 并赋值给 text
// 修改配置文件中 age 的值为 30
myText.text = myConfiguration.getProperty("config.ini", "base", "name")
myConfiguration.setProperty("config.ini", "base", "age", "30")
}
}
}
}
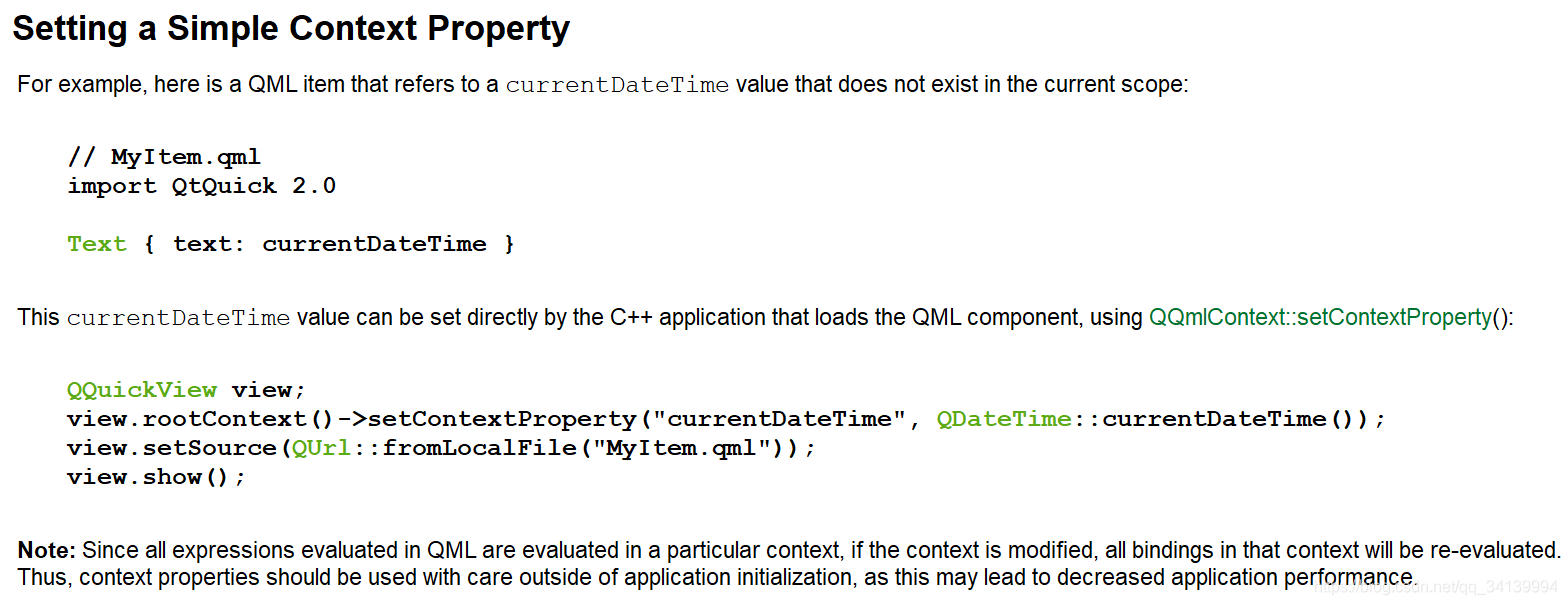
方法二:将对象设置为上下文属性
官方文档说明:
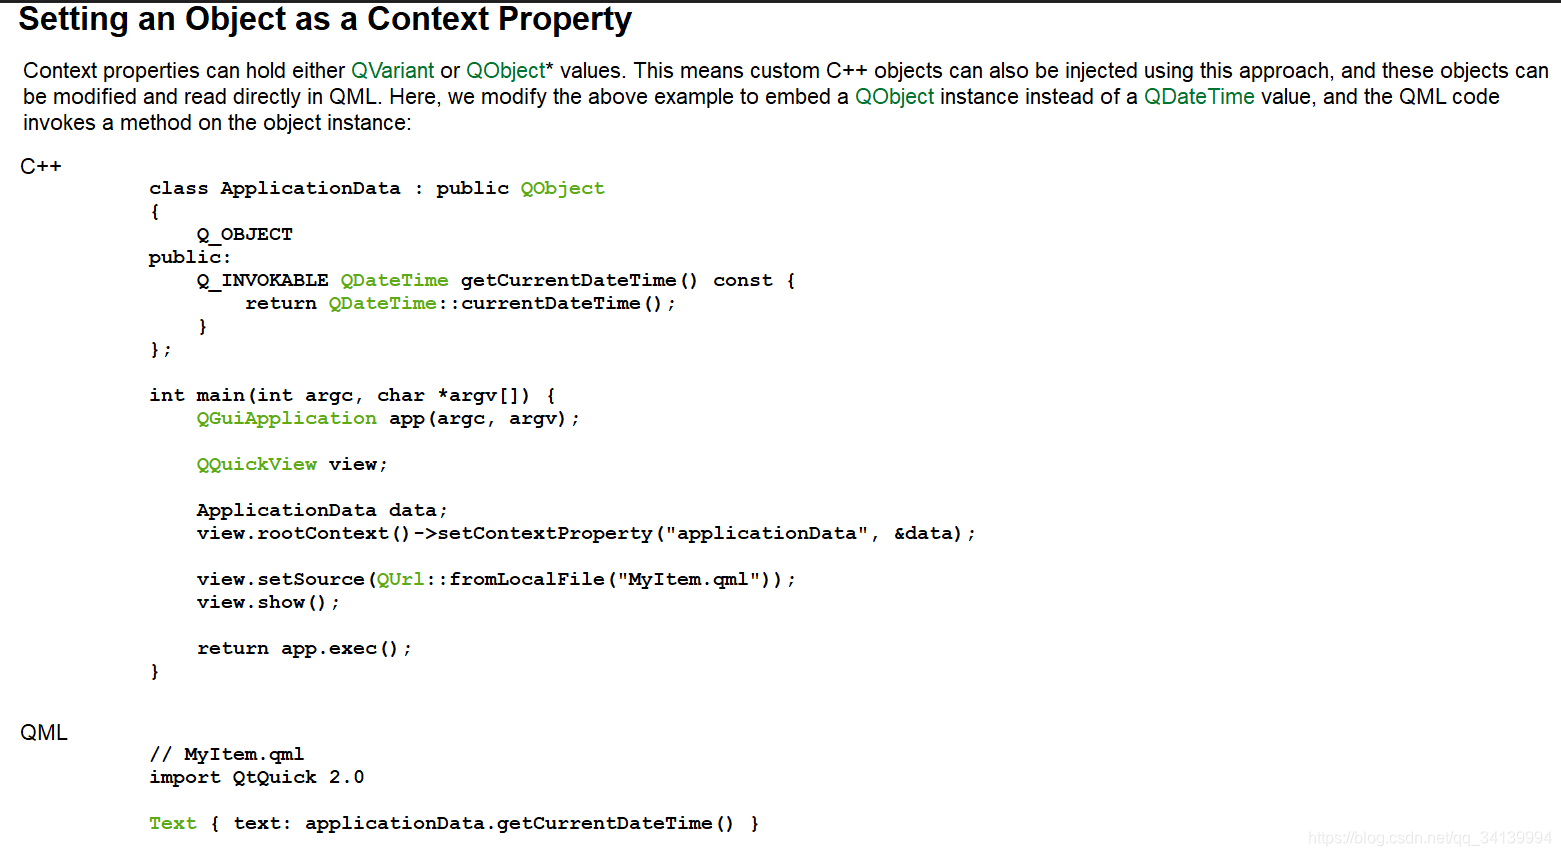
具体步骤如下:
- 实现C++类的功能(同法一的第一步);
- 在 main.cpp 中完成属性设置;
#include <QGuiApplication>
#include <QQmlApplicationEngine>
#include "myconfiguration.h"
#include <QQmlContext>

int main(int argc, char *argv[])
{
    QCoreApplication::setAttribute(Qt::AA_EnableHighDpiScaling);

    QGuiApplication app(argc, argv);

    QQmlApplicationEngine engine;

    // 把类的实例化对象 myConfiguration 设置为上下文属性
    // 可以在所有qml文件中通过 applicationConfiguration 来调用该类的属性和方法
    MyConfiguration myConfiguration;
    engine.rootContext()->setContextProperty("applicationConfiguration", &myConfiguration);

    const QUrl url(QStringLiteral("qrc:/main.qml"));
    QObject::connect(&engine, &QQmlApplicationEngine::objectCreated,
                     &app, [url](QObject *obj, const QUrl &objUrl) {
        if (!obj && url == objUrl)
            QCoreApplication::exit(-1);
    }, Qt::QueuedConnection);
    engine.load(url);

    return app.exec();
}
- 在所有qml文件中都可以通过设置好的名字来调用该类中的属性和方法;
import QtQuick 2.12
import QtQuick.Window 2.12

Window {
    visible: true
    width: 640
    height: 480

    Rectangle {
        width: 200
        height: 160
        anchors.centerIn: parent
        color: "yellow"

        Text {
            id: myText
            anchors.centerIn: parent
            font.pixelSize: 24
            font.family: "微软雅黑"
            color: "black"
            text: "测试"
        }

        MouseArea {
            anchors.fill: parent
            onClicked: {
                // 通过 applicationConfiguration 调用属性和方法
                myText.text  = applicationConfiguration.getProperty("config.ini", "base", "name")
                applicationConfiguration.setProperty("config.ini", "base", "age", "30")
            }
        }
    }
}
