立方体纹理
立方体纹理是环境映射的实现方式。可以模拟物体周围的环境,使用了环境映射的物体反射周围的环境,一共包含6张(对应空间的上、下、左、右、前、后)图像。
天空盒是游戏中模拟背景的一种方法。包含两个信息:模拟天空,且为一个盒子。

天空盒是所有不透明物体之后渲染的,其背后使用的网格是一个立方体或一个细分后的球体。
创建用于环境映射的立方体纹理的方法有三种:1.特殊布局的纹理创建;2.手动创建一个CubeMap资源,再把6张图赋给他;3.通过脚本生成(Camera.RenderToCubemap函数)。
通过脚本实现:
public class RenderCubemapWizard : ScriptableWizard {

	public Transform renderFromPosition;
	public Cubemap cubemap;

	void OnWizardUpdate () {
		helpString = "Select transform to render from and cubemap to render into";
		isValid = (renderFromPosition != null) && (cubemap != null);
	}

	void OnWizardCreate () {
		// 创建camera
		GameObject go = new GameObject( "CubemapCamera");
		go.AddComponent<Camera>();
		// 指定相机位置
		go.transform.position = renderFromPosition.position;
		// 渲染当前位置观察到的的图像到cubemap中。
		go.GetComponent<Camera>().RenderToCubemap(cubemap);
		// 最后销毁
		DestroyImmediate( go );
	}
	//添加到菜单栏
	[MenuItem("GameObject/Render into Cubemap")]
	static void RenderCubemap () {
		ScriptableWizard.DisplayWizard<RenderCubemapWizard>(
			"Render cubemap", "Render!");
	}
}

反射
Shader "Unlit/12"
{
    Properties
    {
        _Color("_Color",Color)=(1,1,1,1)
        _ReflectColor("_ReflectColor",Color)=(1,1,1,1)
        _ReflectAmount("_ReflectAmount",Range(0,1))=1
        _Cubemap("_Cubemap",Cube)=""{}
    }
    SubShader
    {                                //不透明物体使用这个渲染队列,也是默认的队列
        Tags { "RenderType"="Opaque" "Queue"="Geometry"}

        Pass
        {
        Tags{"LightMode"="ForwardBase"}
            CGPROGRAM
             #pragma multi_compile_fwdbase
            #pragma vertex vert
            #pragma fragment frag

            #include "Lighting.cginc"
            #include "AutoLight.cginc"

            fixed4 _Color;
            fixed4 _ReflectColor;
            fixed _ReflectAmount;
            //Cube纹理
            samplerCUBE _Cubemap;
            struct a2v
            {
                float4 vertex : POSITION;
                float3 normal : NORMAL;
            };

            struct v2f
            {
                float4 pos : SV_POSITION;
                float3 worldPos:TEXCOORD0;
                fixed3 worldNormal:TEXCOORD1;
                fixed3 worldViewDir:TEXCOORD2;
                fixed3 worldRef:TEXCOORD3;
                //阴影纹理采样的坐标,参数是已使用的插值寄存器的个数
                SHADOW_COORDS(4)
            };

            v2f vert (a2v v)
            {
                v2f o;
                o.pos = UnityObjectToClipPos(v.vertex);
                o.worldPos=mul(unity_ObjectToWorld,v.vertex).xyz;
                o.worldNormal=UnityObjectToWorldNormal(v.normal);
                o.worldViewDir=UnityWorldSpaceViewDir(o.worldPos);
                //得到反射方向
                o.worldRef=reflect(-o.worldViewDir,o.worldNormal);
                //计算阴影纹理坐标
                TRANSFER_SHADOW(o);
                return o;
            }

            fixed4 frag (v2f i) : SV_Target
            {
               fixed3 worldNormal=normalize(i.worldNormal);
               fixed3 worldLightDir=normalize(UnityWorldSpaceLightDir(i.worldPos));
               fixed3 worldView=normalize(i.worldViewDir);

               fixed3 ambient=UNITY_LIGHTMODEL_AMBIENT.xyz;

               fixed3 diffuse=_LightColor0.rgb * _Color.rgb * saturate(dot(worldNormal,worldLightDir));
               //通过texCUBE立方体采样函数 cube纹理和发射方向
              fixed3 reflecttion=texCUBE(_Cubemap,i.worldRef).rgb * _ReflectColor.rgb;
               //计算阴影和衰减
               UNITY_LIGHT_ATTENUATION(atten,i,i.worldPos);
               //使用lerp函数通过_ReflectAmount 混合颜色
               fixed3 color=ambient+lerp(diffuse,reflecttion,_ReflectAmount)*atten;
               return fixed4(color,1.0);
            }
            ENDCG
        }
    }
    //需要fallback去找到实现了LightMode=ShadowCaster阴影处理的pass
    FallBack "Reflective/VertexLit"
}

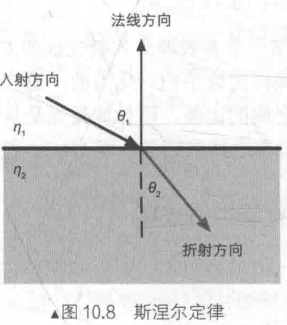
折射
当光线从一个介质斜射入另一个介质,传播方向会发生改变,给定入射角,通过菲涅尔定律来计算反射角。

Shader "Unlit/13"
{
    Properties
    {
        _Color("_Color",Color)=(1,1,1,1)
        _RefractColor("_RefractColor",Color)=(1,1,1,1)
        _RefractAmount("_RefractAmount",Range(0,1))=1
        _RefractRatio("_RefractRatio",Range(0,1))=0.5
        _Cubemap("_Cubemap",Cube)=""{}
    }
    SubShader
    {
        Tags { "RenderType"="Opaque" }
        Pass
        {
            Tags{"LightMode"="ForwardBase"}
            CGPROGRAM
            #pragma vertex vert
            #pragma fragment frag
            #pragma multi_compile_fwdbase

            #include "Lighting.cginc"
            #include "AutoLight.cginc"

            fixed4 _Color;
			fixed4 _RefractColor;
			float _RefractAmount;
			fixed _RefractRatio;
			samplerCUBE _Cubemap;

            struct a2v {
				float4 vertex : POSITION;
				float3 normal : NORMAL;
			};

			struct v2f {
				float4 pos : SV_POSITION;
				float3 worldPos : TEXCOORD0;
				fixed3 worldNormal : TEXCOORD1;
				fixed3 worldViewDir : TEXCOORD2;
				fixed3 worldRefr : TEXCOORD3;
				SHADOW_COORDS(4)
			};
            v2f vert(a2v v) {
				v2f o;
				o.pos = UnityObjectToClipPos(v.vertex);
				o.worldNormal = UnityObjectToWorldNormal(v.normal);
				o.worldPos = mul(unity_ObjectToWorld, v.vertex).xyz;
				o.worldViewDir = UnityWorldSpaceViewDir(o.worldPos);
				// 计算折射方向 视角和法线 折射率 refract折射函数 reflect 反射函数
				o.worldRefr = refract(-normalize(o.worldViewDir), normalize(o.worldNormal), _RefractRatio);
				TRANSFER_SHADOW(o);
				return o;
			}

            fixed4 frag (v2f i) : SV_Target
            {
                fixed3 worldNormal = normalize(i.worldNormal);
				fixed3 worldLightDir = normalize(UnityWorldSpaceLightDir(i.worldPos));
				fixed3 worldViewDir = normalize(i.worldViewDir);
				fixed3 ambient = UNITY_LIGHTMODEL_AMBIENT.xyz;
				fixed3 diffuse = _LightColor0.rgb * _Color.rgb * max(0, dot(worldNormal, worldLightDir));
				//texCUBE进行立方体纹理采样
				fixed3 refraction = texCUBE(_Cubemap, i.worldRefr).rgb * _RefractColor.rgb;
				UNITY_LIGHT_ATTENUATION(atten, i, i.worldPos);
				// lerp混合颜色
				fixed3 color = ambient + lerp(diffuse, refraction, _RefractAmount) * atten;

				return fixed4(color, 1.0);
            }
            ENDCG
        }
    }
    FallBack "Reflective/VertexLit"
}

菲涅尔反射
菲涅尔效应描述了一种光学现象,即当光线照射到物体表面时,一部分发生发射,一部分进入物体内部,发生折射或散射。入射光和反射的光之间存在一定的比率关系,这个关系就是菲涅尔等式进行计算。

Shader "Unlit/14"
{
   Properties {
		_Color ("Color Tint", Color) = (1, 1, 1, 1)
		_FresnelScale ("Fresnel Scale", Range(0, 1)) = 0.5
		_Cubemap ("Reflection Cubemap", Cube) = "_Skybox" {}
	}
	SubShader {
		Tags { "RenderType"="Opaque" "Queue"="Geometry"}
		Pass {
			Tags { "LightMode"="ForwardBase" }
			CGPROGRAM
			#pragma multi_compile_fwdbase
			#pragma vertex vert
			#pragma fragment frag

			#include "Lighting.cginc"
			#include "AutoLight.cginc"

			fixed4 _Color;
			fixed _FresnelScale;
			samplerCUBE _Cubemap;

			struct a2v {
				float4 vertex : POSITION;
				float3 normal : NORMAL;
			};

			struct v2f {
				float4 pos : SV_POSITION;
				float3 worldPos : TEXCOORD0;
  				fixed3 worldNormal : TEXCOORD1;
  				fixed3 worldViewDir : TEXCOORD2;
  				fixed3 worldRefl : TEXCOORD3;
 	 			SHADOW_COORDS(4)
			};

			v2f vert(a2v v) {
				v2f o;
				o.pos = UnityObjectToClipPos(v.vertex);
				o.worldNormal = UnityObjectToWorldNormal(v.normal);
				o.worldPos = mul(unity_ObjectToWorld, v.vertex).xyz;
				o.worldViewDir = UnityWorldSpaceViewDir(o.worldPos);
				o.worldRefl = reflect(-o.worldViewDir, o.worldNormal);
				TRANSFER_SHADOW(o);

				return o;
			}

			fixed4 frag(v2f i) : SV_Target {
				fixed3 worldNormal = normalize(i.worldNormal);
				fixed3 worldLightDir = normalize(UnityWorldSpaceLightDir(i.worldPos));
				fixed3 worldViewDir = normalize(i.worldViewDir);
				fixed3 ambient = UNITY_LIGHTMODEL_AMBIENT.xyz;
				UNITY_LIGHT_ATTENUATION(atten, i, i.worldPos);
				fixed3 reflection = texCUBE(_Cubemap, i.worldRefl).rgb;
				//schlick菲涅尔近似等式
				fixed fresnel = _FresnelScale + (1 - _FresnelScale) * pow(1 - dot(worldViewDir, worldNormal), 5);

				fixed3 diffuse = _LightColor0.rgb * _Color.rgb * max(0, dot(worldNormal, worldLightDir));
				fixed3 color = ambient + lerp(diffuse, reflection, saturate(fresnel)) * atten;
				return fixed4(color, 1.0);
			}

			ENDCG
		}
	}
	FallBack "Reflective/VertexLit"
}

渲染纹理
GPU允许我们把整个三维场景渲染到一个中间缓冲,即渲染目标纹理(Render Target Texture,RTT),而不是传统的帧缓冲或后备缓冲(back buffer)。与之相关的时多重渲染目标(Multiple Render Target,MRT),允许把场景同时渲染到多个渲染目标纹理中,而不再需要为每个渲染目标单独渲染完整的场景。延迟渲染就是使用多重渲染目标的一个应用。
渲染纹理(Render Texture)专门处理的纹理类型。unity中使用的方式:1.在project下创建渲染纹理(Render Texture),再把摄像机的渲染目标设置为该渲染纹理,这样摄像机的渲染结果就会实时的更新到渲染纹理中,而不会显示在屏幕上,可以选择纹理的分辨率、滤波模式等属性。2.在屏幕后处理时使用GrabPass命令或OnRenderImage函数来获取当前屏幕图像,unity会把这个屏幕图像放到一张和屏幕分辨率等同的渲染纹理中,可以自定义的pass处理这些纹理,从而实现屏幕特效。
镜面效果

渲染纹理__是在运行时创建和更新的特殊类型的__纹理。要使用渲染纹理,首先要创建一个新的渲染纹理,并指定一个摄像机以渲染到其中。然后,即可像使用常规纹理一样在__材质__中使用渲染纹理。
| Property: | Function: | |
|---|---|---|
| Dimension | The dimensionality (type) of the render texture. | |
| 2D | The render texture is two-dimensional. | |
| Cube | The render texture is a cube map. | |
| 3D | The render texture is three-dimensional. | |
| Size | The size of the render texture in pixels . You can only enter power-of-two values, such as 128 and 256. |
|
| Anti-Aliasing | The number of anti-aliasing samples. You can select None, 2 samples, 4 samples, or 8 samples. If you select None, Unity does not apply anti-aliasing. | |
| Color Format | The color format of the render texture. | |
| Depth Buffer | The format of the depth buffer. You can select No depth buffer, At least 16 bits depth (no stencil), or At least 24 bits depth (with stencil). The stencil buffer is a general purpose buffer that allows you to store an additional unsigned 8-bit integer (0–255) for each pixel drawn to the screen. | |
| sRGB (Color RenderTexture) | Check this box to make the render texture use sRGB read/write conversions. | |
| Enable Mip Maps | Check this box to make the render texture generate mipmaps. | |
| Auto generate Mip Maps | Check this box to automatically fill the generated mipmaps with relevant data. If you don’t enable this, you’ll have to use the GenerateMips function to fill those mipmaps manually. Alternatively, choose which mip to render into when you call the various SetRenderTarget functions. For more information about the SetRenderTarget functions, see Graphics.SetRenderTarget and Rendering.CommandBuffer.SetRenderTarget. |
|
| Dynamic Scaling | Check this box to let dynamic resolution scaling resize the render texture. If you don’t enable this, the render texture maintains the same size regardless of the Dynamic Resolution setting. |
|
| Wrap Mode | Controls how the texture is wrapped: | |
| Repeat | Tiles the texture to create a repeating pattern. | |
| Clamp | Stretches the edges of the texture. This is useful for preventing wrapping artifacts when you map an image onto an object and you don’t want the texture to tile. | |
| Mirror | Tiles the texture to create a repeating pattern that mirrors the texture at every integer boundary. | |
| Mirror Once | Mirrors the texture once, and then falls back to clamping. | |
| Per-axis | Lets you set different wrap modes for the U axis and the V axis. The available options are also Repeat, Clamp, Mirror and Mirror Once. For example, when you use latitude-longitude environment maps for reflection probes , it is useful to have Clamp on the vertical coordinate (V axis), but Repeat on the horizontal coordinate (U axis). |
|
| Filter Mode | Controls how the sampling of the texture uses nearby pixels. The options are: | |
| Point | Uses the nearest pixel. This makes the texture appear pixelated. | |
| Bilinear | Uses a weighted average of the four nearest texels. This makes the texture appear blurry when you magnify it. | |
| Trilinear | Uses a weighted average of the two nearest mips, which are bilinearly filtered. This creates a soft transition between mips, at the cost of a slightly more blurry appearance. | |
| Aniso Level | Anisotropic filtering level of the texture. This increases texture quality when you view the texture at a steep angle. Good for floor, ground, or road textures. | |
Shader "Unlit/15"
{
    Properties
    {
        _MainTex ("Texture", 2D) = "white" {}
    }
    SubShader
    {
        Tags { "RenderType"="Opaque" }
        Pass
        {
            CGPROGRAM
            #pragma vertex vert
            #pragma fragment frag

            struct a2v
            {
                float4 vertex : POSITION;
                float3 texcoord : TEXCOORD0;
            };
            struct v2f
            {
                float4 pos : SV_POSITION;
                float2 uv:TEXCOORD0;
            };

            sampler2D _MainTex;
            float4 _MainTex_ST;

            v2f vert (a2v v)
            {
                v2f o;
                o.pos = UnityObjectToClipPos(v.vertex);
                o.uv = v.texcoord;
                //镜面效果需要 反转
                o.uv.x=1-o.uv.x;
                return o;
            }
            fixed4 frag (v2f i) : SV_Target
            {
                fixed4 col = tex2D(_MainTex, i.uv);
                return col;
            }
            ENDCG
        }
    }
    FallBack Off
}

玻璃效果
shader通过GrabPass抓取屏幕图像绘制在一张纹理中,在后续的pass中访问它。使用GrabPass可以对物体后面的图像进行更加复杂的处理。

// Upgrade NOTE: replaced '_Object2World' with 'unity_ObjectToWorld'
// Upgrade NOTE: replaced 'mul(UNITY_MATRIX_MVP,*)' with 'UnityObjectToClipPos(*)'

Shader "Unilt/16" {
	Properties {
		_MainTex ("Main Tex", 2D) = "white" {}
		_BumpMap ("Normal Map", 2D) = "bump" {}
		_Cubemap ("Environment Cubemap", Cube) = "_Skybox" {}
		_Distortion ("Distortion", Range(0, 100)) = 10
		_RefractAmount ("Refract Amount", Range(0.0, 1.0)) = 1.0
	}
	SubShader {
		// "Queue"="Transparent" 保证不透明物体会先渲染到屏幕
		// "RenderType"="Opaque" 着使用色器替换时,该物体能够正确渲染
		Tags { "Queue"="Transparent" "RenderType"="Opaque" }

		// GrabPass通道将对象背后的屏幕抓取到一个纹理中。
		//抓取的纹理存放到_RefractionTex中,后续的pass可以直接访问
		//可以忽略名称,但直接声明纹理名称能得到更高的性能
		GrabPass { "_RefractionTex" }

		Pass {
			CGPROGRAM

			#pragma vertex vert
			#pragma fragment frag

			#include "UnityCG.cginc"

			sampler2D _MainTex;
			float4 _MainTex_ST;
			sampler2D _BumpMap;
			float4 _BumpMap_ST;
			samplerCUBE _Cubemap;
			float _Distortion;
			fixed _RefractAmount;
			//对应GrabPass中定义的纹理,
			sampler2D _RefractionTex;
			//得到该纹理的纹素大小     256x512像素 纹素值为(1/256,1/512)
			float4 _RefractionTex_TexelSize;

			struct a2v {
				float4 vertex : POSITION;
				float3 normal : NORMAL;
				float4 tangent : TANGENT;
				float2 texcoord: TEXCOORD0;
			};

			struct v2f {
				float4 pos : SV_POSITION;
				float4 scrPos : TEXCOORD0;
				float4 uv : TEXCOORD1;
				float4 TtoW0 : TEXCOORD2;
			    float4 TtoW1 : TEXCOORD3;
			    float4 TtoW2 : TEXCOORD4;
			};

			v2f vert (a2v v) {
				v2f o;
				o.pos = UnityObjectToClipPos(v.vertex);
				//内置的抓取函数,得到屏幕图像的采样坐标。
				o.scrPos = ComputeGrabScreenPos(o.pos);

				o.uv.xy = TRANSFORM_TEX(v.texcoord, _MainTex);
				o.uv.zw = TRANSFORM_TEX(v.texcoord, _BumpMap);

				float3 worldPos = mul(unity_ObjectToWorld, v.vertex).xyz;
				fixed3 worldNormal = UnityObjectToWorldNormal(v.normal);
				fixed3 worldTangent = UnityObjectToWorldDir(v.tangent.xyz);
				fixed3 worldBinormal = cross(worldNormal, worldTangent) * v.tangent.w;

				o.TtoW0 = float4(worldTangent.x, worldBinormal.x, worldNormal.x, worldPos.x);
				o.TtoW1 = float4(worldTangent.y, worldBinormal.y, worldNormal.y, worldPos.y);
				o.TtoW2 = float4(worldTangent.z, worldBinormal.z, worldNormal.z, worldPos.z);

				return o;
			}

			fixed4 frag (v2f i) : SV_Target {
				float3 worldPos = float3(i.TtoW0.w, i.TtoW1.w, i.TtoW2.w);
				fixed3 worldViewDir = normalize(UnityWorldSpaceViewDir(worldPos));

				// 得到切向空间下的法线
				fixed3 bump = UnpackNormal(tex2D(_BumpMap, i.uv.zw));
				// 计算切线空间下的offset,模拟折射效果
				float2 offset = bump.xy * _Distortion * _RefractionTex_TexelSize.xy;
				//通过透视除法得到真正的屏幕坐标。
				i.scrPos.xy = offset * i.scrPos.z + i.scrPos.xy;
				//模拟得到折射颜色
				fixed3 refrCol = tex2D(_RefractionTex, i.scrPos.xy/i.scrPos.w).rgb;

				// 得到世界法线
				bump = normalize(half3(dot(i.TtoW0.xyz, bump), dot(i.TtoW1.xyz, bump), dot(i.TtoW2.xyz, bump)));
				//反射方向
				fixed3 reflDir = reflect(-worldViewDir, bump);
				fixed4 texColor = tex2D(_MainTex, i.uv.xy);
				//对立方体纹理采样 反射颜色
				fixed3 reflCol = texCUBE(_Cubemap, reflDir).rgb * texColor.rgb;

				fixed3 finalColor = reflCol * (1 - _RefractAmount) + refrCol * _RefractAmount;

				return fixed4(finalColor, 1);
			}

			ENDCG
		}
	}

	FallBack "Diffuse"
}

渲染纹理和GrabPass
1.渲染纹理+摄像机的方式实现抓屏。2.使用GrabPass进行抓屏。GrabPass实现简单。渲染纹理需要和摄像机结合实现。通过渲染纹理的好处:可以自定义渲染纹理大小,以及调整摄像机的渲染层来减少二次渲染的场景大小,或其他方式控制摄像机是否需要开启,这个方式更加的灵活以及可调控。GrabPass获得图像分辨率和显示屏幕一致。高分辨率下可能造成带宽影响。而且移动设备上,GrabPass不会重新渲染场景,但它往往需要CPU直接读取后备缓冲,破坏了CPU和GPU的并行性,比较耗时,甚至不支持。Unity提供了命令缓冲(Command Buffer)来允许扩展Unity的渲染流水线。
程序纹理
程序纹理是指通过计算机生成的图像。除此之外还可以使用Substance Designer进行纹理生成
using UnityEngine;
using System.Collections;
using System.Collections.Generic;

//使脚本能够在编辑器模式下运行
[ExecuteInEditMode]
public class ProceduralTextureGeneration : MonoBehaviour {

	public Material material = null;

	//#region #endregion仅仅为了组织代码,无其他作用
	#region Material properties
	[SerializeField, SetProperty("textureWidth")]
	private int m_textureWidth = 512;
	public int textureWidth {
		get {
			return m_textureWidth;
		}
		set {
			m_textureWidth = value;
			_UpdateMaterial();
		}
	}

	[SerializeField, SetProperty("backgroundColor")]
	private Color m_backgroundColor = Color.white;
	public Color backgroundColor {
		get {
			return m_backgroundColor;
		}
		set {
			m_backgroundColor = value;
			_UpdateMaterial();
		}
	}

	[SerializeField, SetProperty("circleColor")]
	private Color m_circleColor = Color.yellow;
	public Color circleColor {
		get {
			return m_circleColor;
		}
		set {
			m_circleColor = value;
			_UpdateMaterial();
		}
	}

	[SerializeField, SetProperty("blurFactor")]
	private float m_blurFactor = 2.0f;
	public float blurFactor {
		get {
			return m_blurFactor;
		}
		set {
			m_blurFactor = value;
			_UpdateMaterial();
		}
	}
	#endregion

	private Texture2D m_generatedTexture = null;

	// Use this for initialization
	void Start () {
		if (material == null) {
			Renderer renderer = gameObject.GetComponent<Renderer>();
			if (renderer == null) {
				Debug.LogWarning("Cannot find a renderer.");
				return;
			}
			material = renderer.sharedMaterial;
		}
		_UpdateMaterial();
	}

	private void _UpdateMaterial() {
		if (material != null) {
			m_generatedTexture = _GenerateProceduralTexture();
			material.SetTexture("_MainTex", m_generatedTexture);
		}
	}

	private Color _MixColor(Color color0, Color color1, float mixFactor) {
		Color mixColor = Color.white;
		mixColor.r = Mathf.Lerp(color0.r, color1.r, mixFactor);
		mixColor.g = Mathf.Lerp(color0.g, color1.g, mixFactor);
		mixColor.b = Mathf.Lerp(color0.b, color1.b, mixFactor);
		mixColor.a = Mathf.Lerp(color0.a, color1.a, mixFactor);
		return mixColor;
	}

	private Texture2D _GenerateProceduralTexture() {
		Texture2D proceduralTexture = new Texture2D(textureWidth, textureWidth);

		// The interval between circles
		float circleInterval = textureWidth / 4.0f;
		// The radius of circles
		float radius = textureWidth / 10.0f;
		// The blur factor
		float edgeBlur = 1.0f / blurFactor;

		for (int w = 0; w < textureWidth; w++) {
			for (int h = 0; h < textureWidth; h++) {
				// Initalize the pixel with background color
				Color pixel = backgroundColor;

				// Draw nine circles one by one
				for (int i = 0; i < 3; i++) {
					for (int j = 0; j < 3; j++) {
						// Compute the center of current circle
						Vector2 circleCenter = new Vector2(circleInterval * (i + 1), circleInterval * (j + 1));

						// Compute the distance between the pixel and the center
						float dist = Vector2.Distance(new Vector2(w, h), circleCenter) - radius;

						// Blur the edge of the circle
						Color color = _MixColor(circleColor, new Color(pixel.r, pixel.g, pixel.b, 0.0f), Mathf.SmoothStep(0f, 1.0f, dist * edgeBlur));

						// Mix the current color with the previous color
						pixel = _MixColor(pixel, color, color.a);
					}
				}
                //设置计算好的像素
				proceduralTexture.SetPixel(w, h, pixel);
			}
		}
         //应用设置的数据
		proceduralTexture.Apply();

		return proceduralTexture;
	}
}

