一、概述
目前流行的安全框架有Shiro和Spring Security
Shiro较简单易用
Spring Security较复杂 但功能强大
Spring Security能无缝整合SpringBoot 因此SpringBoot底层使用的是SpringSecurity
Spring Security是针对Spring项目的安全框架 其可以实现强大的web安全控制
对于安全控制 仅需引入spring-boot-starter-security模块 然后进行少量的配置 即可实现强大的安全管理
认证和授权:
应用程序的两个主要区域是“认证”和“授权”(即访问控制)
这两个主要区域是Spring Security的两个控制目标
- “认证”(Authentication)是建立一个声明的主体的过程
一个主体一般是指用户 设备或一些可在应用程序中执行动作的其他系统 - “授权”(Authorization)指确定一个主体是否允许在应用程序中执行某个动作的过程
二、使用
引入Spring Security模块的依赖:
<dependency>
	<groupId>org.springframework.boot</groupId>
	<artifactId>spring-boot-starter-security</artifactId>
</dependency>
然后 编写配置类:
该配置类必须继承WebSecurityConfigurerAdapter类
然后给配置类上添加@EnableWebSecurity注解
@EnableWebSecurity注解已经自带了@Configuration注解 因此无须添加@Configuration注解了
1、访问权限控制及开启默认登录页
重写configure(HttpSecurity http)方法 定制请求的授权规则
使用antMatchers()方法添加路径 使用permitAll()方法允许所有用户访问 使用hasRole()方法指定可访问的角色
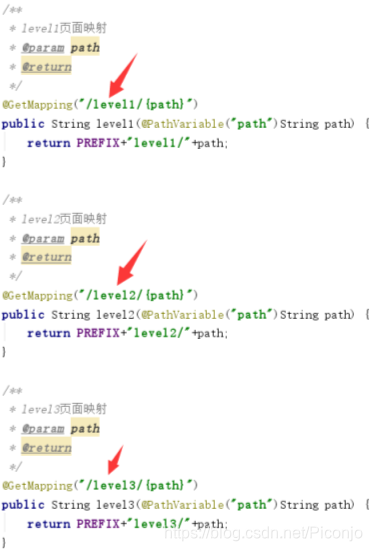
根据不同等级的页面设置不同的访问权限
@EnableWebSecurity
public class MySecurityConfig extends WebSecurityConfigurerAdapter {

    @Override
    protected void configure(HttpSecurity http) throws Exception {
        http.authorizeRequests().antMatchers("/").permitAll()
        .antMatchers("/level1/**").hasRole("VIP1")
        .antMatchers("/level2/**").hasRole("VIP2")
        .antMatchers("/level3/**").hasRole("VIP3");

        // 开启自动配置的登录功能 若没有权限则会自动来到登录页面
        http.formLogin();
        // 通过/login请求来到登录页 若登录失败会重定向到/login?error
    }
}
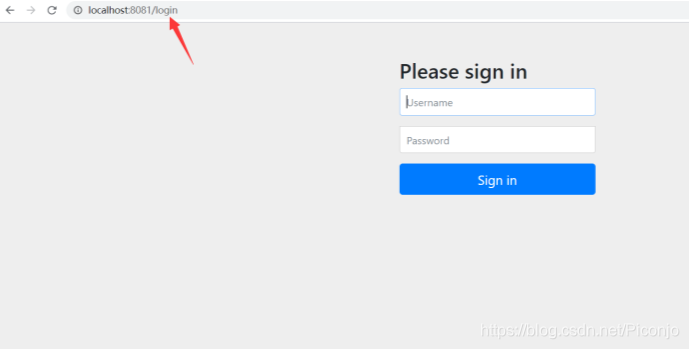
默认的自动生成的登录页:
2、定义认证规则
使用inMemoryAuthentication()方法来配置内存中的用户
当然 还可从数据库中查询用户 此处为演示方便 只演示保存在内存中的用户
@EnableWebSecurity
public class MySecurityConfig extends WebSecurityConfigurerAdapter {

    // 定义认证规则
    @Override
    protected void configure(AuthenticationManagerBuilder auth) throws Exception {
        // inMemoryAuthentication() 内存中的用户
        // 通过passwordEncoder()指定加密方式 通过withUser()方法来定义用户名 通过password()方法来定义密码 通过roles()方法来定义角色
        auth.inMemoryAuthentication().passwordEncoder(new BCryptPasswordEncoder()).withUser("guest").password(new BCryptPasswordEncoder().encode("123456")).roles("VIP1","VIP2")
        .and()
        .passwordEncoder(new BCryptPasswordEncoder()).withUser("user").password(new BCryptPasswordEncoder().encode("123456")).roles("VIP2","VIP3")
        .and()
        .passwordEncoder(new BCryptPasswordEncoder()).withUser("admin").password(new BCryptPasswordEncoder().encode("123456")).roles("VIP1","VIP2","VIP3");
    }
}
用guest登录 访问成功
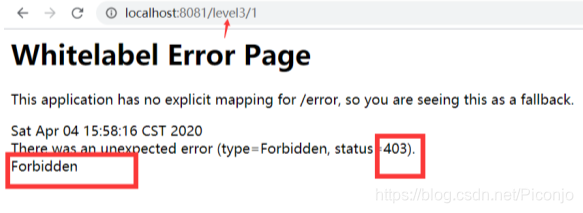
权限不够 还是无法访问:
3、开启注销(logout)功能
@EnableWebSecurity
public class MySecurityConfig extends WebSecurityConfigurerAdapter {

    @Override
    protected void configure(HttpSecurity http) throws Exception {
        // 开启自动配置的注销功能
        http.logout();
    }
}
默认访问/logout以注销用户并清空Session
页面代码编写:
引入Thymeleaf命名空间:
<html xmlns:th="http://www.thymeleaf.org">
编写注销页面:
<form th:action="@{/logout}" method="post">
	<input type="submit" value="注销">
</form>
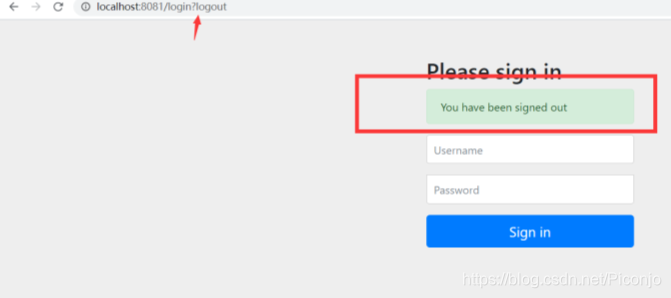
注销完默认会返回登录页 并显示You have been signed out字样:
可以设置指定注销后跳转的页面
使用logoutSuccessUrl()方法来设置注销成功后的页面:
@EnableWebSecurity
public class MySecurityConfig extends WebSecurityConfigurerAdapter {

    @Override
    protected void configure(HttpSecurity http) throws Exception {
        // 开启自动配置的注销功能
        // 使用logoutSuccessUrl()方法来设置注销成功后的页面
        http.logout().logoutSuccessUrl("/");
    }
}
4、根据用户是否登录及用户的权限来选择性地显示页面信息
引入Spring Security和Thymeleaf的整合模块:
<dependency>
	<groupId>org.thymeleaf.extras</groupId>
	<artifactId>thymeleaf-extras-springsecurity4</artifactId>
	<version>3.0.4.RELEASE</version>
</dependency>
引入命名空间:
<html xmlns:sec="http://www.thymeleaf.org/thymeleaf-extras-springsecurity4">
编写页面代码:
注:SpringBoot的版本高于或等于2.x可能会出现sec:authorize失效的问题
用isAuthenticated()方法来指定是否已认证:
<div sec:authorize="!isAuthenticated()">
    <h2 align="center">游客您好,如果想查看学生 <a th:href="@{/login}">请登录</a></h2>
</div>
<div sec:authorize="isAuthenticated()">
    <h2><span sec:authentication="name"></span>您好,您的角色有<span sec:authentication="principal.authorities"></span></h2>
    <form th:action="@{/logout}" method="post">
        <input type="submit" value="注销">
    </form>
</div>
用hasRole()方法来指定需要拥有的权限:
<div sec:authorize="hasRole('VIP1')">
<h3>查看学生</h3>
<ul>
<li><a th:href="@{/level1/1}">查看学生A</a></li>
<li><a th:href="@{/level1/2}">查看学生B</a></li>
<li><a th:href="@{/level1/3}">查看学生C</a></li>
</ul>
</div>
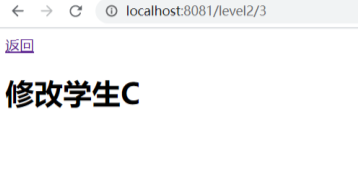
<div sec:authorize="hasRole('VIP2')">
<h3>修改学生</h3>
<ul>
<li><a th:href="@{/level2/1}">修改学生A</a></li>
<li><a th:href="@{/level2/2}">修改学生B</a></li>
<li><a th:href="@{/level2/3}">修改学生C</a></li>
</ul>
</div>
<div sec:authorize="hasRole('VIP3')">
<h3>删除学生</h3>
<ul>
<li><a th:href="@{/level3/1}">删除学生A</a></li>
<li><a th:href="@{/level3/2}">删除学生B</a></li>
<li><a th:href="@{/level3/3}">删除学生C</a></li>
</ul>
</div>

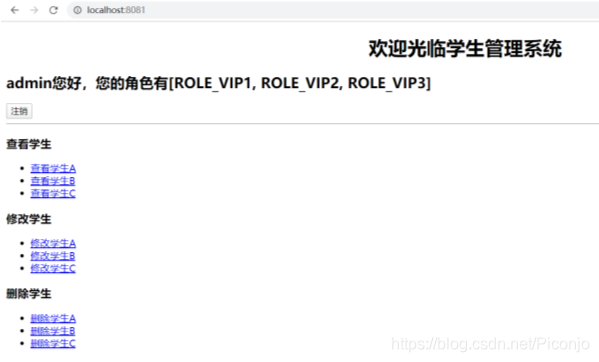
成功
5、记住我
用rememberMe()方法开启记住我功能
@EnableWebSecurity
public class MySecurityConfig extends WebSecurityConfigurerAdapter {

    @Override
    protected void configure(HttpSecurity http) throws Exception {
        // 开启记住我功能
        http.rememberMe();
    }
}
开启后 默认的登录界面就会多了一个勾选框
若勾选 则启用记住我
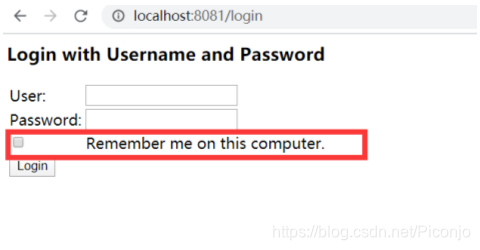
在勾选记住我勾选框之后 若登录成功 SpringSecurity会给浏览器发送一个名为remember-me的Cookie 该Cookie默认保存14天
在注销之后 该Cookie会被立即删除

6、自定义登录页
默认的提交用的用户名的name是username
默认的提交用的密码的name是password
可以自定义修改:
通过usernameParameter()方法设置登录时提交的用户名的name 通过passwordParameter()方法设置登录时提交的密码的name
@EnableWebSecurity
public class MySecurityConfig extends WebSecurityConfigurerAdapter {

    @Override
    protected void configure(HttpSecurity http) throws Exception {
        // 自定义登录页
        http.formLogin().usernameParameter("user").passwordParameter("pwd").loginPage("/userlogin");
    }
}
默认情况下:/login请求的类型若为post 则是处理认证的
/login请求的类型若为get 则是去往登录表单的
若自定义了登录路径 例如/aaa
则/aaa请求的类型若为post 则是处理认证的
/aaa请求的类型若为get 则是去往登录表单的
/aaa?error请求若为get 则是去往错误页面的
/aaa?logout请求若为get 则是退出登录
也就是说 一旦修改了默认的/login登录路径 则这些路径全都变成修改后的 默认的/login就不生效了
除非用loginProcessingUrl()方法来指定处理请求的路径
页面代码:
<form th:action="@{/userlogin}" method="post">
    用户名:<input name="user"/><br>
    密码:<input name="pwd"><br/>
        <input type="submit" value="登陆">
</form>
给自定义登录页加上记住我:
用rememberMeParameter()方法来指定记住我提交参数的name
@EnableWebSecurity
public class MySecurityConfig extends WebSecurityConfigurerAdapter {

    @Override
    protected void configure(HttpSecurity http) throws Exception {
        // 指定记住我提交参数的name
        http.rememberMe().rememberMeParameter("remember");
    }
}

成功
