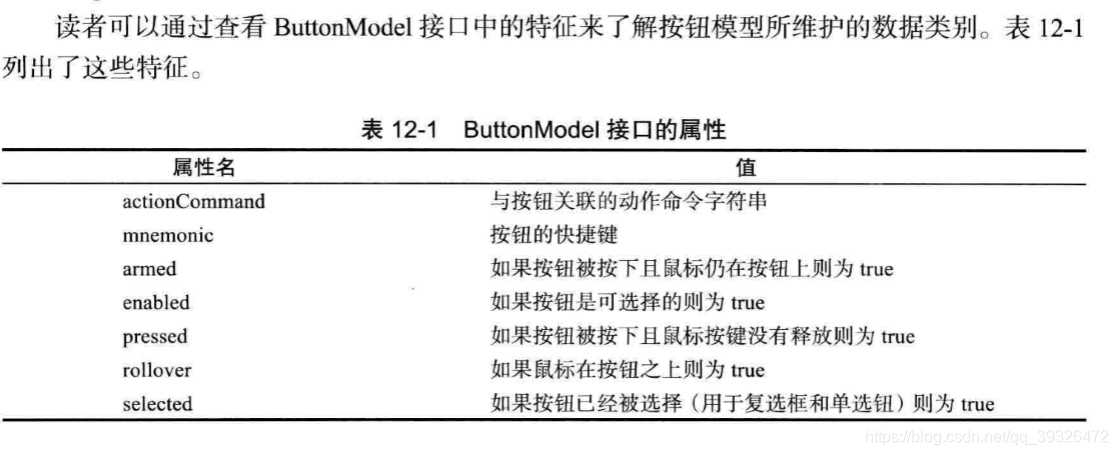
一、SWING和MVC设计模式
每个组件都有三个要素:
- 内容, 如: 按钮的状态(是否按下), 或者文本框的文本
- 外观(颜色,大小等)。
- 行为(对事件的反应)。
在程序员使用 Swing组件时, 通常不需要考虑模型 -视图-控制器体系结构。每个用户 界面元素都有一个包装器类(如 JButton 或 JTextField) 来保存模型和视图。当需要查询内容 (如文本域中的文本)时, 包装器类会向模型询问并且返回所要的结果。当想改变视图时(例 如, 在一个文本域中移动光标位置), 包装器类会把此请求转发给视图。然而,有时候包装器 转发命令并不得力。在这种情况下,就必须直接地与模型打交道(不必直接操作视图— —这 是观感代码的任务)。
对于大多数组件来说, 模型类将实现一个名字以 Model结尾的接口,例如,按钮就实现 了 ButtonModel 接口。实现了此接口的类可以定义各种按钮的状态。实际上,按钮并不复杂, 在 Swing 库中有一个名为 DefaultButtonModel 的类就实现了这个接口。
每个 JButton 对象都存储了一个按钮模型对象, 可以用下列方式得到它的引用。
Button button = new JButton("Blue");
ButtonModel model = button.getModel();
通常, 每 个 Swing组件都有一个相关的后缀为UI 的视图对象, 但并不是所有的 Swing组件都有专门 的控制器对象。
在阅读 JButton底层工作的简介之后可能会想到: JButton究竟是什么? 事实上, 它仅仅 是一个继承了 JComponent 的包装器类,JComponent 包含了一个 DefauUButtonModel 对象, 一些视图数据(例如按钮标签和图标)和一个负责按钮视图的 BasicButtonUI 对象
二、布局管理概述
通常,组件放置在容器中, 布局管理器决定容 器中的组件具体放置的位置和大小。
这几个按钮被放置在一个 JPane͉对象中,且用流布局管理器(flow layout manager) 管 理, 这是面板的默认布局管理器。
通常,组件放置在容器中, 布局管理器决定容 器中的组件具体放置的位置和大小。 按钮、文本域和其他的用户界面元素都继承于 Component 类, 组件可以放置在面板这样的容器 中。由于 Container类继承于 Component类,所以 容器也可以放置在另一个容器中
可惜的是, 继承层次有两点显得有点混乱。 首先, 像 JFrame 这样的顶层窗口 是 Container 的子类, 所以也是 Component 的子类, 但却不能放在其他容器内。 另外, JComponent 是 Container 的子类, 但不直接继承 Component, 因此, 可以将其他组件添 置到 JButton 中。(但无论如何, 这些组件无法显示出来)
每个容器都有一个默认的布局管理器,但可以重新进行设置

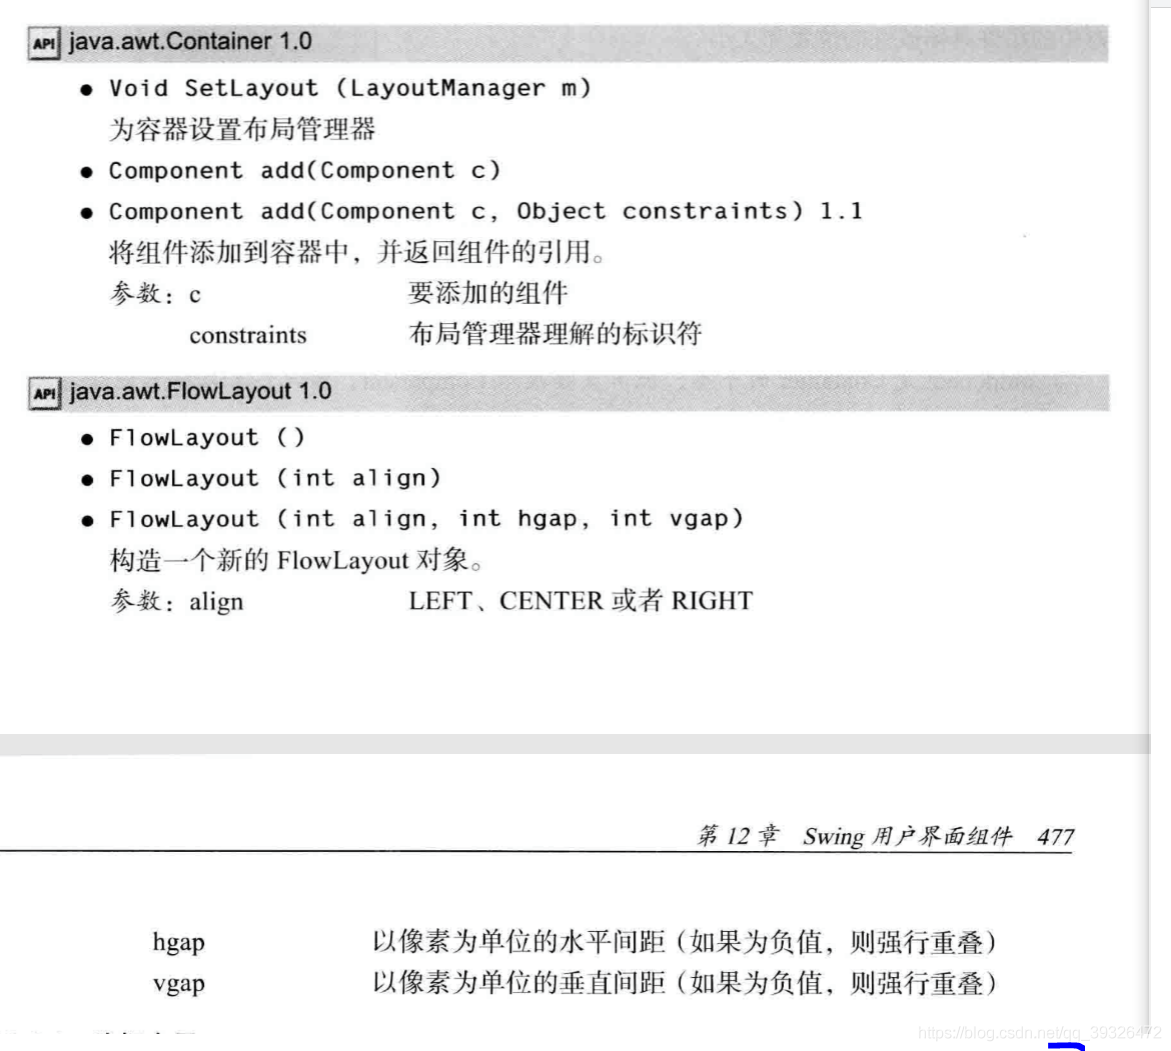
        JPanel jPanel = new JPanel();
        jPanel.setLayout(new FlowLayout(FlowLayout.CENTER,100,20));
        jPanel.add(new Button("a"));
        jPanel.add(new Button("a"));
        jPanel.add(new Button("a"));
        add(jPanel);
2.1边框布局
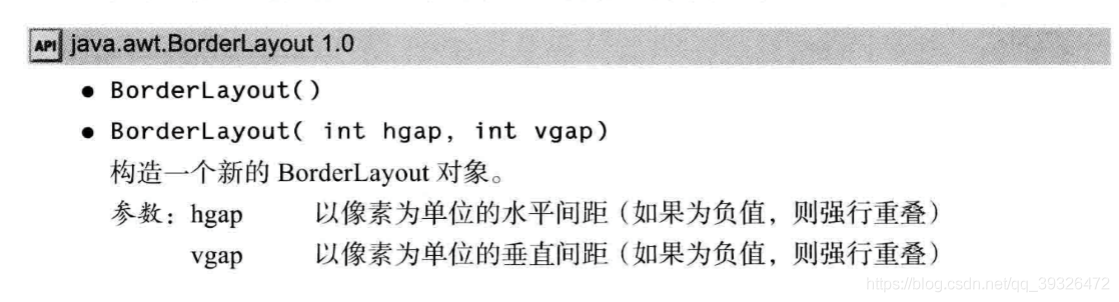
边框布局管理器ҁborderlayout manager) 是每个 JFrame 的内容窗格的默认布局管理器。
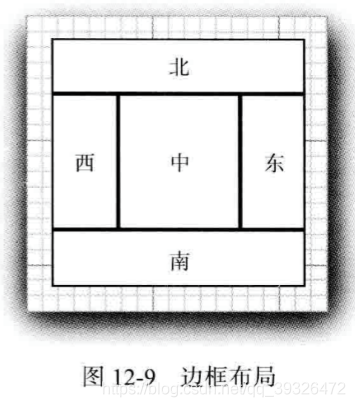
先放置边缘组件,剩余的可用空间由中间组件占据。当 图 12-9 边框布局 容器被缩放时,边缘组件的尺寸不会改变,而中部组件的大 小会发生变化。在添加组件时可以指定 BorderLayout类中的 CENTER、NORTH、SOUTH̵EAST 和WEST常量。并非需要占用所有的位置,如果没有提供任何值,系统默认为CENTER。
与流布局不同,边框布局会扩展所有组件的尺寸以便填满可用空间(流布局将维持每个 组件的最佳尺寸)。当将一个按钮添加到容器中时会出现问题:
frame.add(yellowButton, BorderLayout.SOUTH); // don't
解决这个问题的常见方法是使用另外一个面板(panel)。例如,如图 12-11 所示。屏幕底 部的三个按钮全部包含在一个面板中。这个面板被放置在内容窗格的南部。

2.2 网格布局
网格布局像电子数据表一样, 按行列排列所有的组件。不过,它 的每个单元大小都是一样的。当缩放窗口时,计算器按钮将随之变大或 变小,但所有的按钮尺寸始终保持一致。在将组件添加到框架之后,调用了 pack方法。 这个方法使用所有组件的最佳大小来计算框架的高度和宽度
package calculator;

import java.awt.*;
import java.awt.event.*;
import javax.swing.*;

/**
 * A panel with calculator buttons and a result display.
 */
public class CalculatorPanel extends JPanel
{
   private JButton display;
   private JPanel panel;
   private double result;
   private String lastCommand;
   private boolean start;

   public CalculatorPanel()
   {
      setLayout(new BorderLayout());

      result = 0;
      lastCommand = "=";
      start = true;

      // add the display

      display = new JButton("0");
      display.setEnabled(false);
      add(display, BorderLayout.NORTH);

      ActionListener insert = new InsertAction();
      ActionListener command = new CommandAction();

      // add the buttons in a 4 x 4 grid

      panel = new JPanel();
      panel.setLayout(new GridLayout(4, 4));

      addButton("7", insert);
      addButton("8", insert);
      addButton("9", insert);
      addButton("/", command);

      addButton("4", insert);
      addButton("5", insert);
      addButton("6", insert);
      addButton("*", command);

      addButton("1", insert);
      addButton("2", insert);
      addButton("3", insert);
      addButton("-", command);

      addButton("0", insert);
      addButton(".", insert);
      addButton("=", command);
      addButton("+", command);

      add(panel, BorderLayout.CENTER);
   }

   /**
    * Adds a button to the center panel.
    * @param label the button label
    * @param listener the button listener
    */
   private void addButton(String label, ActionListener listener)
   {
      JButton button = new JButton(label);
      button.addActionListener(listener);
      panel.add(button);
   }

   /**
    * This action inserts the button action string to the end of the display text.
    */
   private class InsertAction implements ActionListener
   {
      public void actionPerformed(ActionEvent event)
      {
         String input = event.getActionCommand();
         if (start)
         {
            display.setText("");
            start = false;
         }
         display.setText(display.getText() + input);
      }
   }

   /**
    * This action executes the command that the button action string denotes.
    */
   private class CommandAction implements ActionListener
   {
      public void actionPerformed(ActionEvent event)
      {
         String command = event.getActionCommand();

         if (start)
         {
            if (command.equals("-"))
            {
               display.setText(command);
               start = false;
            }
            else lastCommand = command;
         }
         else
         {
            calculate(Double.parseDouble(display.getText()));
            lastCommand = command;
            start = true;
         }
      }
   }

   /**
    * Carries out the pending calculation.
    * @param x the value to be accumulated with the prior result.
    */
   public void calculate(double x)
   {
      if (lastCommand.equals("+")) result += x;
      else if (lastCommand.equals("-")) result -= x;
      else if (lastCommand.equals("*")) result *= x;
      else if (lastCommand.equals("/")) result /= x;
      else if (lastCommand.equals("=")) result = x;
      display.setText("" + result);
   }
}
三、文本输入
3.1 文本域
]Panel panel = new JPanel();
JTextField textField = new JTextField("Default input", 20);
panel,add(textField);
在这个示例中,宽度值为 20“ 列”。但是,这里所说 的列不是一个精确的测量单位。一列就是在当前使用的字体下一个字符的宽度。如果需要在运行时重新设置列数,可以使用 setColumns方法。
使用 setColumns 方法改变了一个文本域的大小之后, 需要调用包含这个文本框的 容器的 revalidate 方法。
revalidate 方法会重新计算容器内所有组件的大小,并且对它们重新进行布局。调用 revalidate 方法以后, 布局管理器会重新设置容器的大小, 然后就可以看到改变尺寸后的 文本域了。
revalidate 方法是JComponent 类中的方法。它并不是马上就改变组件大小, 而是给 这个组件加一个需要改变大小的标记。这样就避免了多个组件改变大小时带来的重复计 算。但是, 如果想重新计算一个JFrame 中的所有组件, 就必须调用 validate 方法 JFrame 没有扩展JComponent。
如果想要将 getText 方法返回的文本域中的内容的前后空格去掉,就应该 调用 trim方法:String text = textField.getText().trim();
3.2 标签和标签组件
标签是容纳文本的组件,它们没有任何的修饰(例如没有边缘), 也不能响应用户输入。 可以利用标签标识组件。例如: 与按钮不同,文本域没有标识它们的标签 要想用标识符标 识这种不带标签的组件,应该:
- 1) 用相应的文本构造一个 JLabel 组件。
- 2) 将标签组件放置在距离需要标识的组件足够近的地方, 以便用户可以知道标签所标 识的组件。
Swing Constants 接口中的常量来指定排列方式。在这个接口中定义了几个很有用的常量, 如 LEFT、 RIGHT、CENTER、NORTH、 EAST 等。JLabel 是实现这个接口的一个 Swing类。因此,可以指定右对齐标签:
JLabel label = new JLabel("User name: ", SwingConstants.RIGHT);
或者 JLabel label = new JLabel("User name: ", JLabel.RIGHT);
可以在按钮、标签和菜单项上使用无格式文本或 HTML 文本
label = new JLabel("<html><b>Required</b> entry:</html>°);

3.3 密码域
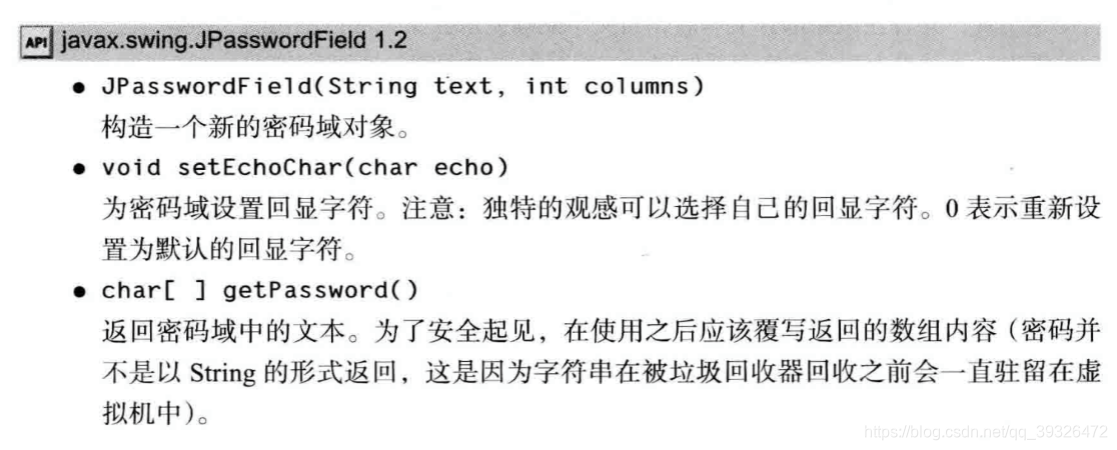
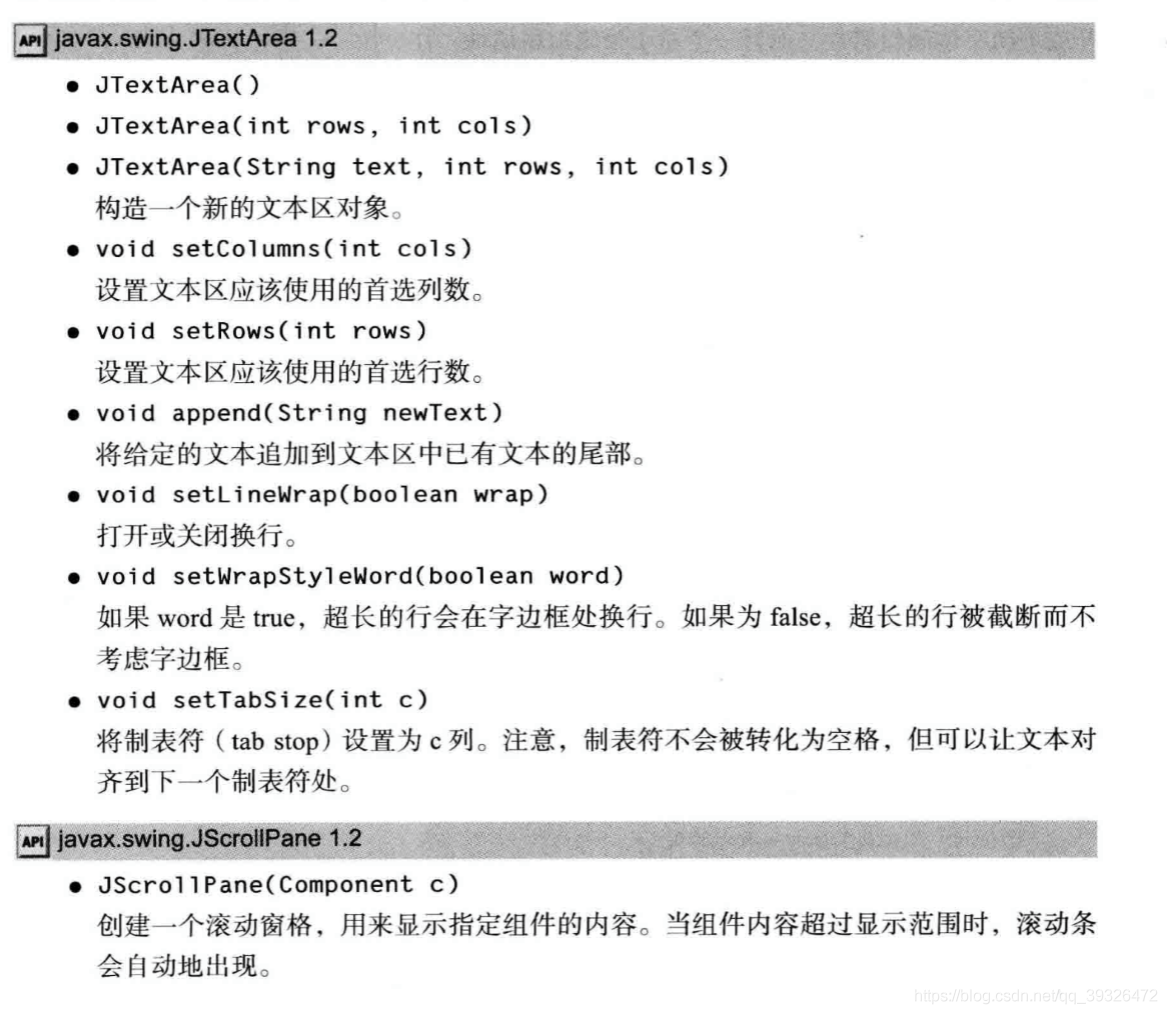
3.4 文本区
在 JTextArea组件的构造器中,可以指定文本区的行数 和列数。例如:
textArea = new JTextArea(8, 40); // 8 lines of 40 columns each
用户并不受限于输人指定的行数和列数。 当输人过长时,文本会滚动
如果文本区的文本超出显示的范围, 那么剩下的文本就会被剪裁掉。可以通过开启换行 特性来避免裁剪过长的行:
textArea.setLineWrap(true): // long lines are wrapped
换行只是视觉效果;文档中的文本没有改变,在文本中并没有插入“ \n” 字符
3.5 滚动窗格
在 Swing中, 文本区没有滚动条。 如果需要滚动条, 可以将文本区插人到滚动窗格 (scroll pane) 中。 要想 为组件添加滚动条, 只需将它们放人一个滚动窗格中即可。
package text;

import java.awt.BorderLayout;
import java.awt.GridLayout;

import javax.swing.JButton;
import javax.swing.JFrame;
import javax.swing.JLabel;
import javax.swing.JPanel;
import javax.swing.JPasswordField;
import javax.swing.JScrollPane;
import javax.swing.JTextArea;
import javax.swing.JTextField;
import javax.swing.SwingConstants;

/**
 * A frame with sample text components.
 */
public class TextComponentFrame extends JFrame
{
   public static final int TEXTAREA_ROWS = 8;
   public static final int TEXTAREA_COLUMNS = 20;

   public TextComponentFrame()
   {
      JTextField textField = new JTextField();
      JPasswordField passwordField = new JPasswordField();

      JPanel northPanel = new JPanel();
      northPanel.setLayout(new GridLayout(2, 2));
      northPanel.add(new JLabel("User name: ", SwingConstants.RIGHT));
      northPanel.add(textField);
      northPanel.add(new JLabel("Password: ", SwingConstants.RIGHT));
      northPanel.add(passwordField);

      add(northPanel, BorderLayout.NORTH);

      JTextArea textArea = new JTextArea(TEXTAREA_ROWS, TEXTAREA_COLUMNS);
      JScrollPane scrollPane = new JScrollPane(textArea);

      add(scrollPane, BorderLayout.CENTER);

      // add button to append text into the text area

      JPanel southPanel = new JPanel();

      JButton insertButton = new JButton("Insert");
      southPanel.add(insertButton);
      insertButton.addActionListener(event ->
         textArea.append("User name: " + textField.getText() + " Password: "
            + new String(passwordField.getPassword()) + "\n"));

      add(southPanel, BorderLayout.SOUTH);
      pack();
   }
}
四、选择组件
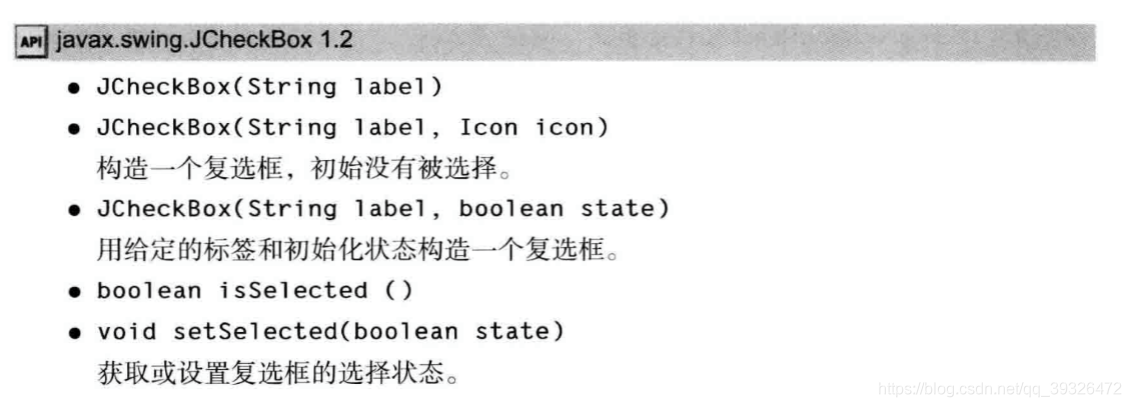
4.1 复选框
当复选框获得焦点时, 用户也可以通过按空格键来切换选择。
package checkBox;

import java.awt.*;
import java.awt.event.*;
import javax.swing.*;

/**
 * A frame with a sample text label and check boxes for selecting font
 * attributes.
 */
public class CheckBoxFrame extends JFrame
{
   private JLabel label;
   private JCheckBox bold;
   private JCheckBox italic;
   private static final int FONTSIZE = 24;

   public CheckBoxFrame()
   {
      // add the sample text label

      label = new JLabel("The quick brown fox jumps over the lazy dog.");
      label.setFont(new Font("Serif", Font.BOLD, FONTSIZE));
      add(label, BorderLayout.CENTER);

      // this listener sets the font attribute of
      // the label to the check box state

      ActionListener listener = event -> {
         int mode = 0;
         if (bold.isSelected()) mode += Font.BOLD;
         if (italic.isSelected()) mode += Font.ITALIC;
         label.setFont(new Font("Serif", mode, FONTSIZE));
      };

      // add the check boxes

      JPanel buttonPanel = new JPanel();

      bold = new JCheckBox("Bold");
      bold.addActionListener(listener);
      bold.setSelected(true);
      buttonPanel.add(bold);

      italic = new JCheckBox("Italic");
      italic.addActionListener(listener);
      buttonPanel.add(italic);

      add(buttonPanel, BorderLayout.SOUTH);
      pack();
   }
}
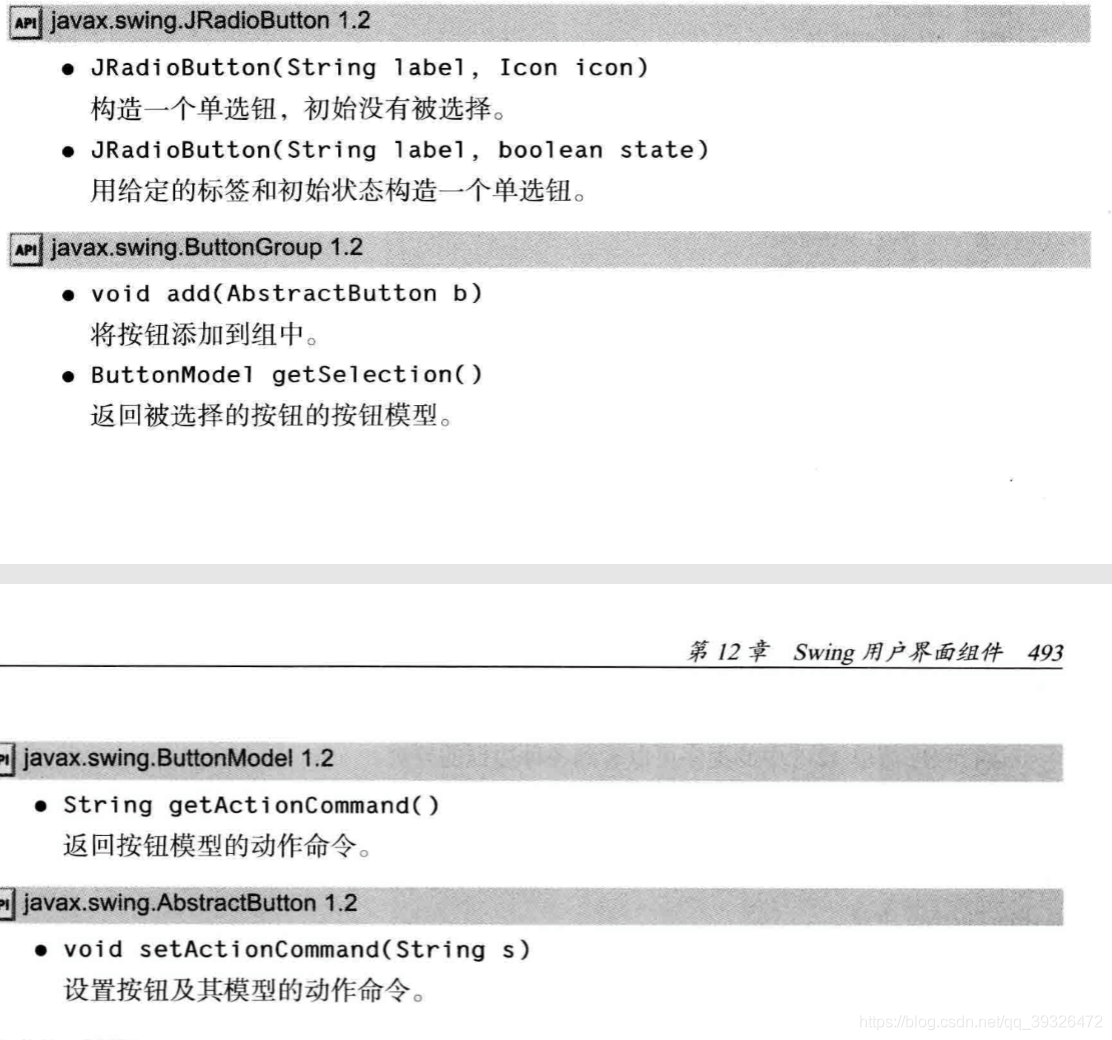
4.2 单选钮
构造器的第二个参数为 true表明这个按钮初始状态是被选择,其他按钮构造器的这个参 数为 false。注意,按钮组仅仅控制按钮的行为,如果想把这些按钮组织在一起布局, 需要把 它们添加到容器中,如 JPanel。
package radioButton;

import java.awt.*;
import java.awt.event.*;
import javax.swing.*;

/**
 * A frame with a sample text label and radio buttons for selecting font sizes.
 */
public class RadioButtonFrame extends JFrame
{
   private JPanel buttonPanel;
   private ButtonGroup group;
   private JLabel label;
   private static final int DEFAULT_SIZE = 36;

   public RadioButtonFrame()
   {
      // add the sample text label

      label = new JLabel("The quick brown fox jumps over the lazy dog.");
      label.setFont(new Font("Serif", Font.PLAIN, DEFAULT_SIZE));
      add(label, BorderLayout.CENTER);

      // add the radio buttons

      buttonPanel = new JPanel();
      group = new ButtonGroup();

      addRadioButton("Small", 8);
      addRadioButton("Medium", 12);
      addRadioButton("Large", 18);
      addRadioButton("Extra large", 36);

      add(buttonPanel, BorderLayout.SOUTH);
      pack();
   }

   /**
    * Adds a radio button that sets the font size of the sample text.
    * @param name the string to appear on the button
    * @param size the font size that this button sets
    */
   public void addRadioButton(String name, int size)
   {
      boolean selected = size == DEFAULT_SIZE;
      JRadioButton button = new JRadioButton(name, selected);
      group.add(button);
      buttonPanel.add(button);

      // this listener sets the label font size

      ActionListener listener = event -> label.setFont(new Font("Serif", Font.PLAIN, size));

      button.addActionListener(listener);
   }
}
4.3 边框
如果在一个窗口中有多组单选按钮,就需要用可视化的形式指明哪些按钮属于同一组。 Swing 提供了一组很有用的边框(borders) 来解决这个问题。可以在任何继承了 JComponent 的组件上应用边框。最常用的用途是在一个面板周围放置一个边框,然后用其他用户界面元 素(如单选钮)填充面板。
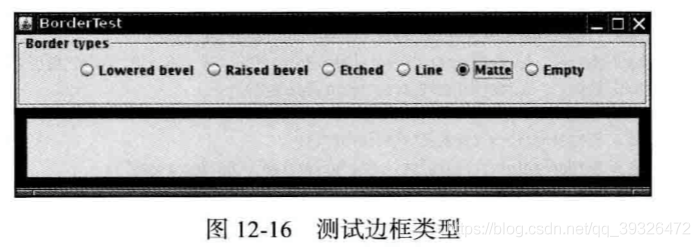
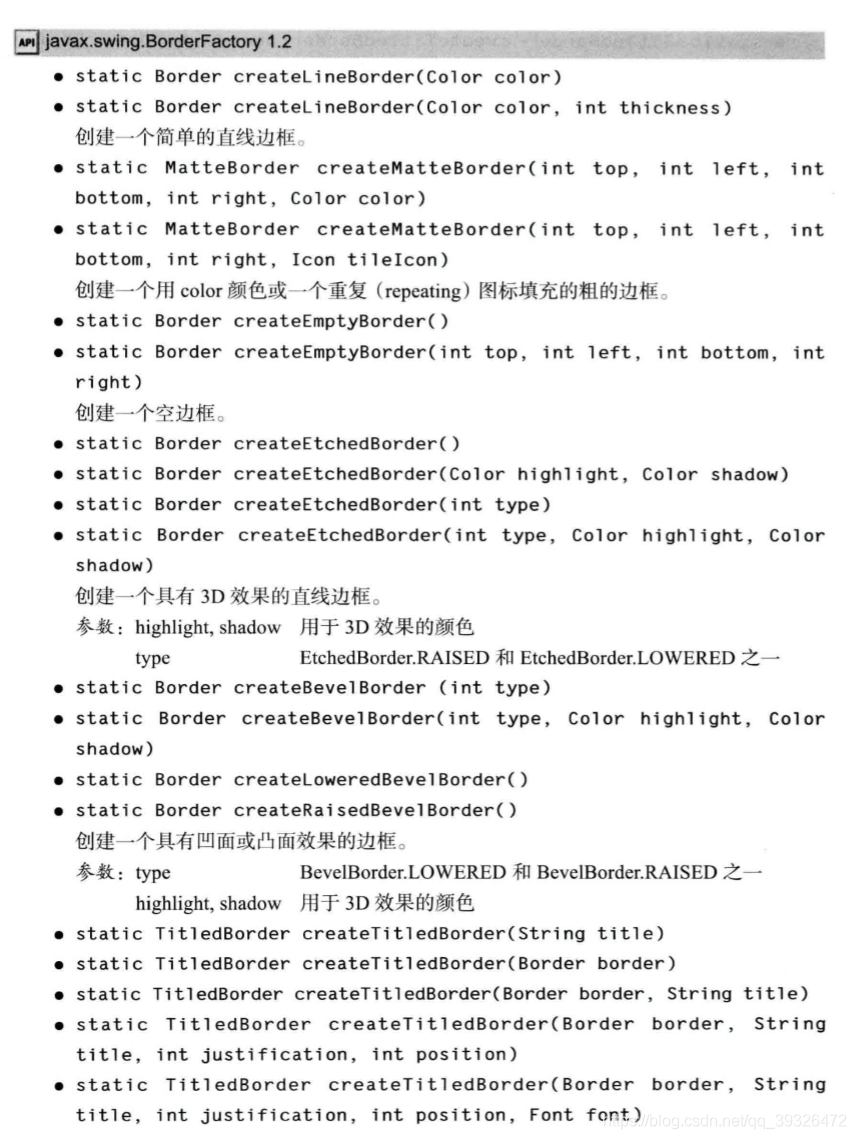
1 ) 调用 BorderFactory 的静态方法创建边框。下面是几种可选的风格(如图 12-16所示):
•凹斜面 •凸斜面 •蚀刻 •直线 •蒙版 •空(只是在组件外围创建一些空白空间)
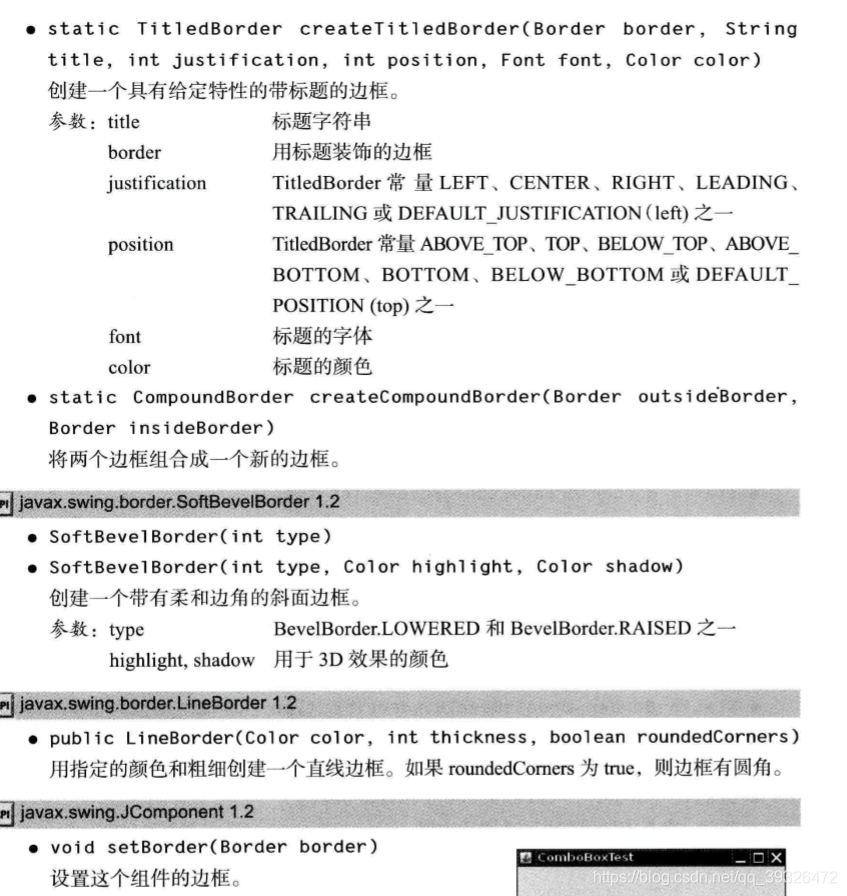
2) 如果愿意的话, 可以给边框添加标题, 具体的实现方法是将边框传递给 BroderFactory.createTitledBorder。
不同的边框有不同的用于设置边框的宽度和颜色的选项。详情请参看 API 注释。偏 爱使用边框的人都很欣赏这一点。SoftBevelBorder 类用于构造具有柔和拐角的斜面边 框, LineBorder 类也能够构造圆拐角。这些边框只能通过类中的某个构造器构造, 而没有 BorderFactory 方法。
package border;

import java.awt.*;
import javax.swing.*;
import javax.swing.border.*;

/**
 * A frame with radio buttons to pick a border style.
 */
public class BorderFrame extends JFrame
{
   private JPanel demoPanel;
   private JPanel buttonPanel;
   private ButtonGroup group;

   public BorderFrame()
   {
      demoPanel = new JPanel();
      buttonPanel = new JPanel();
      group = new ButtonGroup();

      addRadioButton("Lowered bevel", BorderFactory.createLoweredBevelBorder());
      addRadioButton("Raised bevel", BorderFactory.createRaisedBevelBorder());
      addRadioButton("Etched", BorderFactory.createEtchedBorder());
      addRadioButton("Line", BorderFactory.createLineBorder(Color.BLUE));
      addRadioButton("Matte", BorderFactory.createMatteBorder(10, 10, 10, 10, Color.BLUE));
      addRadioButton("Empty", BorderFactory.createEmptyBorder());

      Border etched = BorderFactory.createEtchedBorder();
      Border titled = BorderFactory.createTitledBorder(etched, "Border types");
      buttonPanel.setBorder(titled);

      setLayout(new GridLayout(2, 1));
      add(buttonPanel);
      add(demoPanel);
      pack();
   }

   public void addRadioButton(String buttonName, Border b)
   {
      JRadioButton button = new JRadioButton(buttonName);
      button.addActionListener(event -> demoPanel.setBorder(b));
      group.add(button);
      buttonPanel.add(button);
   }
}
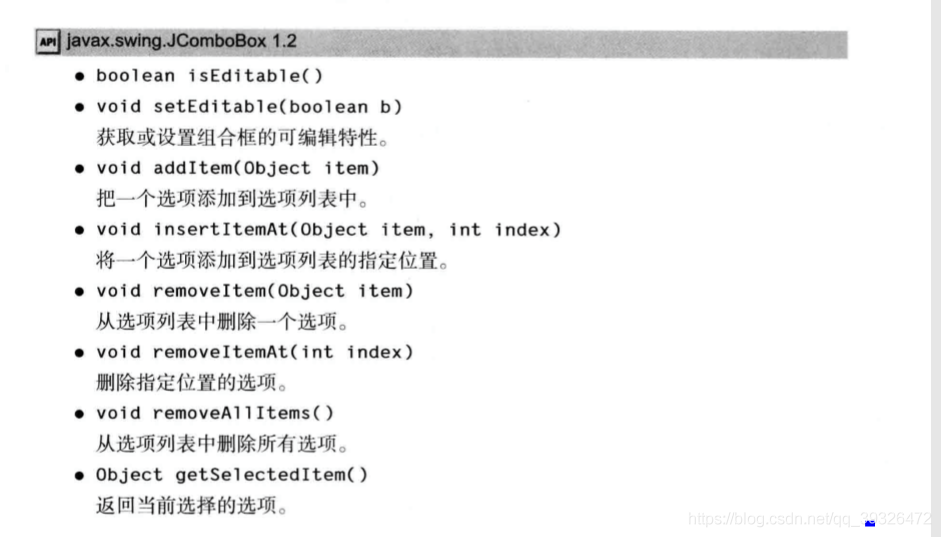
4.4 组合框

如果下拉列表框被设置成可编辑(editable), 就可以像编辑文本一样编辑当前的选项内容。注意, 编辑只会影响当前项, 而不会改变列 表内容。如果你的组合框不是可编辑的, 最好调用
combo.getltemAt(combo.getSelectedlndex() )
可以增加任何类型的选项,组合框可以调用每个选项的 toString方法显示其内容
如果需要往组合框中添加大量的选项,addltem 方法的性能就显得很差了 n 取而代 之的是构造一个 DefaultComboBoxModel, 并调用 addElement 方法进行加载, 然后再调 用 JComboBox 中的 setModel 方法。
当用户从组合框中选择一个选项时,组合框就将产生一个动作事件。为了判断哪个选 项被选择, 可以通过事件参数调用getSource方法来得到发送事件的组合框引用,接着调用 getSelectedltem方法获取当前选择的选项。需要把这个方法的返回值转化为相应的类型,通 常是 String 型。
package comboBox;

import java.awt.BorderLayout;
import java.awt.Font;

import javax.swing.JComboBox;
import javax.swing.JFrame;
import javax.swing.JLabel;
import javax.swing.JPanel;

/**
 * A frame with a sample text label and a combo box for selecting font faces.
 */
public class ComboBoxFrame extends JFrame
{
   private JComboBox<String> faceCombo;
   private JLabel label;
   private static final int DEFAULT_SIZE = 24;

   public ComboBoxFrame()
   {
      // add the sample text label

      label = new JLabel("The quick brown fox jumps over the lazy dog.");
      label.setFont(new Font("Serif", Font.PLAIN, DEFAULT_SIZE));
      add(label, BorderLayout.CENTER);

      // make a combo box and add face names

      faceCombo = new JComboBox<>();
      faceCombo.addItem("Serif");
      faceCombo.addItem("SansSerif");
      faceCombo.addItem("Monospaced");
      faceCombo.addItem("Dialog");
      faceCombo.addItem("DialogInput");

      // the combo box listener changes the label font to the selected face name

      faceCombo.addActionListener(event ->
         label.setFont(
            new Font(faceCombo.getItemAt(faceCombo.getSelectedIndex()),
               Font.PLAIN, DEFAULT_SIZE)));

      // add combo box to a panel at the frame's southern border

      JPanel comboPanel = new JPanel();
      comboPanel.add(faceCombo);
      add(comboPanel, BorderLayout.SOUTH);
      pack();
   }
}
4.5 滑动条
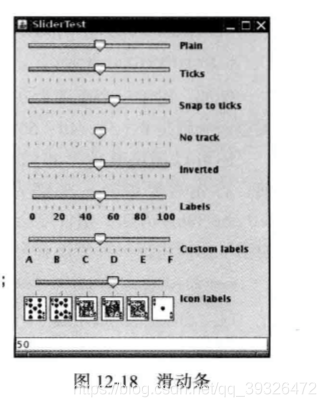
当值发生变化时,ChangeEvent 就会发送给所有变化的监听器。
为了得到这些 改变的通知,需要调用addChangeListener方法并且安装一个实现了 ChangeListener接口的对 象。这个接口只有一个方法 StateChanged。
可以通过显示标尺(tick) 对滑动条进行修饰。
如果标尺的标记或者标签不显示, 请检查一下是否调用了 setPaintTicks(true) 和 setPaintLabels(true)。
package slider;

import java.awt.*;
import java.util.*;
import javax.swing.*;
import javax.swing.event.*;

/**
 * A frame with many sliders and a text field to show slider values.
 */
public class SliderFrame extends JFrame
{
   private JPanel sliderPanel;
   private JTextField textField;
   private ChangeListener listener;

   public SliderFrame()
   {
      sliderPanel = new JPanel();
      sliderPanel.setLayout(new GridBagLayout());

      // common listener for all sliders
      listener = event -> {
         // update text field when the slider value changes
         JSlider source = (JSlider) event.getSource();
         textField.setText("" + source.getValue());
      };

      // add a plain slider

      JSlider slider = new JSlider();
      addSlider(slider, "Plain");

      // add a slider with major and minor ticks

      slider = new JSlider();
      slider.setPaintTicks(true);
      slider.setMajorTickSpacing(20);
      slider.setMinorTickSpacing(5);
      addSlider(slider, "Ticks");

      // add a slider that snaps to ticks

      slider = new JSlider();
      slider.setPaintTicks(true);
      slider.setSnapToTicks(true);
      slider.setMajorTickSpacing(20);
      slider.setMinorTickSpacing(5);
      addSlider(slider, "Snap to ticks");

      // add a slider with no track

      slider = new JSlider();
      slider.setPaintTicks(true);
      slider.setMajorTickSpacing(20);
      slider.setMinorTickSpacing(5);
      slider.setPaintTrack(false);
      addSlider(slider, "No track");

      // add an inverted slider

      slider = new JSlider();
      slider.setPaintTicks(true);
      slider.setMajorTickSpacing(20);
      slider.setMinorTickSpacing(5);
      slider.setInverted(true);
      addSlider(slider, "Inverted");

      // add a slider with numeric labels

      slider = new JSlider();
      slider.setPaintTicks(true);
      slider.setPaintLabels(true);
      slider.setMajorTickSpacing(20);
      slider.setMinorTickSpacing(5);
      addSlider(slider, "Labels");

      // add a slider with alphabetic labels

      slider = new JSlider();
      slider.setPaintLabels(true);
      slider.setPaintTicks(true);
      slider.setMajorTickSpacing(20);
      slider.setMinorTickSpacing(5);

      Dictionary<Integer, Component> labelTable = new Hashtable<>();
      labelTable.put(0, new JLabel("A"));
      labelTable.put(20, new JLabel("B"));
      labelTable.put(40, new JLabel("C"));
      labelTable.put(60, new JLabel("D"));
      labelTable.put(80, new JLabel("E"));
      labelTable.put(100, new JLabel("F"));

      slider.setLabelTable(labelTable);
      addSlider(slider, "Custom labels");

      // add a slider with icon labels

      slider = new JSlider();
      slider.setPaintTicks(true);
      slider.setPaintLabels(true);
      slider.setSnapToTicks(true);
      slider.setMajorTickSpacing(20);
      slider.setMinorTickSpacing(20);

      labelTable = new Hashtable<Integer, Component>();

      // add card images

      labelTable.put(0, new JLabel(new ImageIcon("nine.gif")));
      labelTable.put(20, new JLabel(new ImageIcon("ten.gif")));
      labelTable.put(40, new JLabel(new ImageIcon("jack.gif")));
      labelTable.put(60, new JLabel(new ImageIcon("queen.gif")));
      labelTable.put(80, new JLabel(new ImageIcon("king.gif")));
      labelTable.put(100, new JLabel(new ImageIcon("ace.gif")));

      slider.setLabelTable(labelTable);
      addSlider(slider, "Icon labels");

      // add the text field that displays the slider value

      textField = new JTextField();
      add(sliderPanel, BorderLayout.CENTER);
      add(textField, BorderLayout.SOUTH);
      pack();
   }

   /**
    * Adds a slider to the slider panel and hooks up the listener
    * @param s the slider
    * @param description the slider description
    */
   public void addSlider(JSlider s, String description)
   {
      s.addChangeListener(listener);
      JPanel panel = new JPanel();
      panel.add(s);
      panel.add(new JLabel(description));
      panel.setAlignmentX(Component.LEFT_ALIGNMENT);
      GridBagConstraints gbc = new GridBagConstraints();
      gbc.gridy = sliderPanel.getComponentCount();
      gbc.anchor = GridBagConstraints.WEST;
      sliderPanel.add(panel, gbc);
   }
}
五、菜单
5,1 创建菜单
当用户选择菜单时,将触发一个动作事件。这里需要为每个菜单项安装一个动作监听器。
可以使用 JMenu.add(Striiigs)方法将菜单项插入到菜单的尾部, 例如: editMenu.add("Paste");
Add方法返回创建的子菜单项。可以采用下列方式获取它,并添加监听器:
JMenuItem pasteltem = editMenu.add("Paste");
pasteltem.addActionListener(listener);
5.2 菜单栏中的图标
实际上,JMenuItem 类扩展了 AbstractButton类。与按钮一样, 菜单可以包含文本标签、图标,也可以两者都包含。
正如所看到的,在默认情况下,菜单项的文本被放置在图标的右侧。如果喜欢将文本放置在左侧, 可以调用JMenuItem类中的 setHorizontalTextPosition 方法(继承自 AbstractButton类)设置。
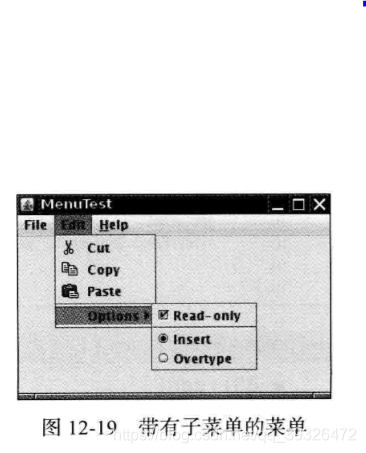
5.3 复选框和单选钮菜单项 JCheckBoxMenuItem
5.4 弹出菜单 JPopupMenu
弹出菜单并不像常规菜单栏那样总是显示在框架的顶 部,必须调用 show方法菜单才能显示出来。调用时需要给 出父组件以及相对父组件坐标的显示位置。例如:
popup.show(panel, x, y);
要想在用户点击某一个组件 时弹出菜单, 需要按照下列方式调用方法: component.setComponentPopupMenu(popup);
偶尔会遇到在一个含有弹出菜单的组件中放置一个组件的情况。这个子组件可以调用下 列方法继承父组件的弹出菜单。调用: child.setlnheritsPopupMenu(true);
5.5 快捷键和加速器
JMenuItem aboutltem = new ]HenuItem("About", 'A');
快捷键会自动地显示在菜单项中, 并带有一条下划线 (如图 12-21 所示)。例如,在上面的例子中, 菜单项中的标 签为 “ About”, 字母 A 带有一个下划线。
“ About”, 字母 A 带有一个下划线。当显示菜单时, 用户只需要按下“ A” 键就可以这个选择菜单项(如果快捷 字母没有出现在菜单项标签字符串中, 同样可以按下快捷 键选择菜单项, 只是快捷键没有显示出来。很自然,这种 不可见的快捷键没有提示效果)。
有时候不希望在菜单项的第一个快捷键字母下面加下划线。例如, 如果在菜单项“ Save As” 中使用快捷键“ A”, 则在第二个“ A” (Save As) 下面加下划线更为合理。。可以调用 setDisplayedMnemonicIndex方法指定希望加下划线的字符。
只能在菜单项的构造器中设定快捷键字母, 而不是在菜单构造器中。如果想为菜单设置 快捷键, 需要调用 setMnemonic 方法。
可以同时按下 ALT 键和菜单的快捷键来实现在菜单栏中选择一个顶层菜单的操作。例 如:按下 ALT+H 可以从菜单中选择 Help菜单项。

可以使用快捷键从当前打开的菜单中选择一个子菜单或者菜单项。而加速器是在不打开 菜单的情况下选择菜单项的快捷键。
可以使用 setAccelerator将加速器键关联到一个菜单项 上。这个方法使用 Keystroke类型的对象作为参数。例如:下面的调用将加速器 CTRL+O 关 联到 Openltem 菜单项。可以使用 setAccelerator将加速器键关联到一个菜单项 上。这个方法使用 Keystroke类型的对象作为参数。例如:下面的调用将加速器 CTRL+O 关 联到 Openltem 菜单项。
openItem.setAccelerator(KeyStroke.getKeyStroke("ctrl O"));
加速器只能关联到菜单项上, 不能关联到菜单上。加速器键并不实际打开菜单。它将直 接地激活菜单关联的动作事件。
从概念上讲,把加速器添加到菜单项与把加速器添加到 Swing组件上所使用的技术十分 类似(在第 11 章中讨论了这个技术)。但是, 当加速器添加 到菜单项时, 对应的组合键就会自动地显示在相应的菜单 上(见图 12-22)。
5.6 启用和禁用菜单项
启用和禁用菜单项有两种策略。每次环境发生变化就 对相关的菜单项或动作调用setEnabled。例如: 只要当文档 以只读方式打开, 就禁用Save和 SaveAs菜单项。另一种 方法是在显示菜单之前禁用这些菜单项。这里必须为“ 菜单选中” 事件注册监听器。
MenuListener接口:
void menuSelected(MenuEvent event)
void menuDeselected(MenuEvent event)
void menuCanceled(MenuEvent event)
由于在菜单显示之前调用menuSelected方法, 所以可以在这个方法中禁用或启用菜单项。
在显示菜单之前禁用菜单项是一种明智的选择, 但这种方式不适用于带有加速键 的菜单项。这是因为在按下加速键时并没有打开菜单, 因此动作没有被禁用, 致使加速 键还会触发这个行为
package menu;
import java.awt.event.*;
import javax.swing.*;
/**
* A frame with a sample menu bar.
*/
public class MenuFrame extends JFrame
{
private static final int DEFAULT_WIDTH = 300;
private static final int DEFAULT_HEIGHT = 200;
private Action saveAction;
private Action saveAsAction;
private JCheckBoxMenuItem readonlyItem;
private JPopupMenu popup;
/**
* A sample action that prints the action name to System.out
*/
class TestAction extends AbstractAction
{
public TestAction(String name)
{
super(name);
}
public void actionPerformed(ActionEvent event)
{
System.out.println(getValue(Action.NAME) + " selected.");
}
}
public MenuFrame()
{
setSize(DEFAULT_WIDTH, DEFAULT_HEIGHT);
JMenu fileMenu = new JMenu("File");
fileMenu.add(new TestAction("New"));
// demonstrate accelerators
JMenuItem openItem = fileMenu.add(new TestAction("Open"));
openItem.setAccelerator(KeyStroke.getKeyStroke("ctrl O"));
fileMenu.addSeparator();
saveAction = new TestAction("Save");
JMenuItem saveItem = fileMenu.add(saveAction);
saveItem.setAccelerator(KeyStroke.getKeyStroke("ctrl S"));
saveAsAction = new TestAction("Save As");
fileMenu.add(saveAsAction);
fileMenu.addSeparator();
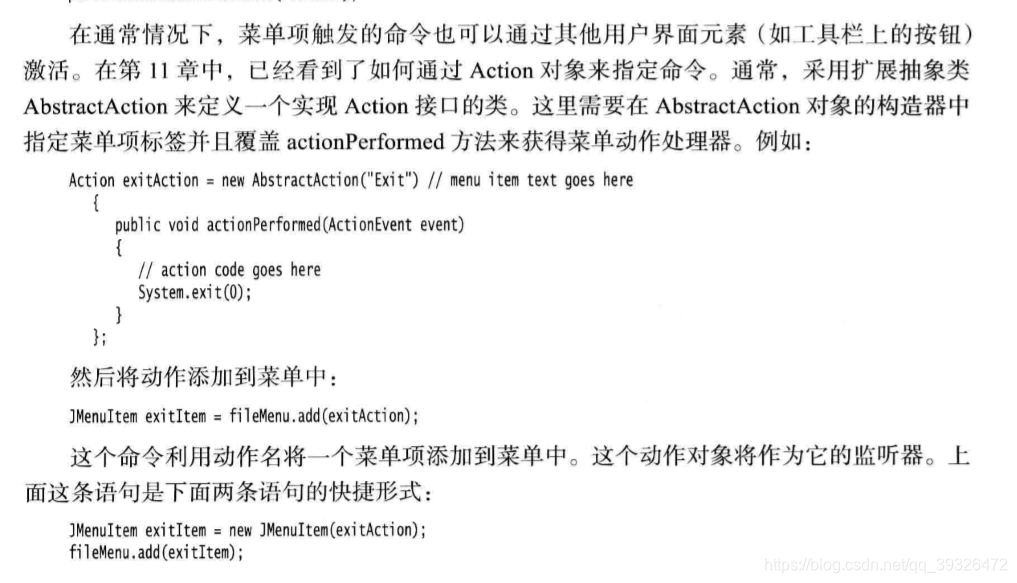
fileMenu.add(new AbstractAction("Exit")
{
public void actionPerformed(ActionEvent event)
{
System.exit(0);
}
});
// demonstrate checkbox and radio button menus
readonlyItem = new JCheckBoxMenuItem("Read-only");
readonlyItem.addActionListener(new ActionListener()
{
public void actionPerformed(ActionEvent event)
{
boolean saveOk = !readonlyItem.isSelected();
saveAction.setEnabled(saveOk);
saveAsAction.setEnabled(saveOk);
}
});
ButtonGroup group = new ButtonGroup();
JRadioButtonMenuItem insertItem = new JRadioButtonMenuItem("Insert");
insertItem.setSelected(true);
JRadioButtonMenuItem overtypeItem = new JRadioButtonMenuItem("Overtype");
group.add(insertItem);
group.add(overtypeItem);
// demonstrate icons
Action cutAction = new TestAction("Cut");
cutAction.putValue(Action.SMALL_ICON, new ImageIcon("cut.gif"));
Action copyAction = new TestAction("Copy");
copyAction.putValue(Action.SMALL_ICON, new ImageIcon("copy.gif"));
Action pasteAction = new TestAction("Paste");
pasteAction.putValue(Action.SMALL_ICON, new ImageIcon("paste.gif"));
JMenu editMenu = new JMenu("Edit");
editMenu.add(cutAction);
editMenu.add(copyAction);
editMenu.add(pasteAction);
// demonstrate nested menus
JMenu optionMenu = new JMenu("Options");
optionMenu.add(readonlyItem);
optionMenu.addSeparator();
optionMenu.add(insertItem);
optionMenu.add(overtypeItem);
editMenu.addSeparator();
editMenu.add(optionMenu);
// demonstrate mnemonics
JMenu helpMenu = new JMenu("Help");
helpMenu.setMnemonic('H');
JMenuItem indexItem = new JMenuItem("Index");
indexItem.setMnemonic('I');
helpMenu.add(indexItem);
// you can also add the mnemonic key to an action
Action aboutAction = new TestAction("About");
aboutAction.putValue(Action.MNEMONIC_KEY, new Integer('A'));
helpMenu.add(aboutAction);
// add all top-level menus to menu bar
JMenuBar menuBar = new JMenuBar();
setJMenuBar(menuBar);
menuBar.add(fileMenu);
menuBar.add(editMenu);
menuBar.add(helpMenu);
// demonstrate pop-ups
popup = new JPopupMenu();
popup.add(cutAction);
popup.add(copyAction);
popup.add(pasteAction);
JPanel panel = new JPanel();
panel.setComponentPopupMenu(popup);
add(panel);
}
}
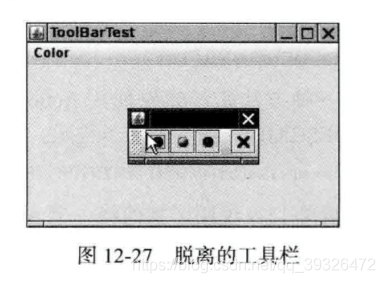
5.7 工具栏
工具栏是在程序中提供的快速访问常用命令的按钮栏,工具栏的特殊之处在于可以将它随处移动。 可以将它拖拽到框架的四个边框上, 。释放鼠标按钮后, 工具栏将会停靠在新的位置上。
工具栏只有位于采用边框布局或者任何支持North、East、South 和 West 约束布局 管理器的容器内才能够被拖拽。
工具栏可以完全脱离框架。 这样的工具栏将包含在自己的框架中,
当 关闭包含工具栏的框架时, 它会冋到原始的框架中。
JToolBar类还有一个用来添加 Action 对象的方法,可以用 Action对象填充工具栏
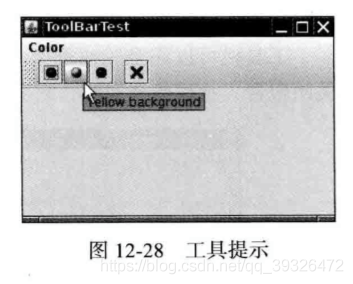
5.8 工具提示
工具栏有一个缺点,这就是用户常常需要猜测按钮上小图标按钮的含义。为了解决这个 问题,用户界面设计者发明了工具提示(tooltips)。当光标停留在某个按钮上片刻时,工具提 示就会被激活。
/**
 * A frame with a toolbar and menu for color changes.
 */
public class ToolBarFrame extends JFrame
{
   private static final int DEFAULT_WIDTH = 300;
   private static final int DEFAULT_HEIGHT = 200;
   private JPanel panel;

   public ToolBarFrame()
   {
      setSize(DEFAULT_WIDTH, DEFAULT_HEIGHT);

      // add a panel for color change

      panel = new JPanel();
      add(panel, BorderLayout.CENTER);

      // set up actions

      Action blueAction = new ColorAction("Blue", new ImageIcon("blue-ball.gif"), Color.BLUE);
      Action yellowAction = new ColorAction("Yellow", new ImageIcon("yellow-ball.gif"),
            Color.YELLOW);
      Action redAction = new ColorAction("Red", new ImageIcon("red-ball.gif"), Color.RED);

      Action exitAction = new AbstractAction("Exit", new ImageIcon("exit.gif"))
         {
            public void actionPerformed(ActionEvent event)
            {
               System.exit(0);
            }
         };
      exitAction.putValue(Action.SHORT_DESCRIPTION, "Exit");

      // populate toolbar

      JToolBar bar = new JToolBar();
      bar.add(blueAction);
      bar.add(yellowAction);
      bar.add(redAction);
      bar.addSeparator();
      bar.add(exitAction);
      add(bar, BorderLayout.NORTH);

      // populate menu

      JMenu menu = new JMenu("Color");
      menu.add(yellowAction);
      menu.add(blueAction);
      menu.add(redAction);
      menu.add(exitAction);
      JMenuBar menuBar = new JMenuBar();
      menuBar.add(menu);
      setJMenuBar(menuBar);
   }

   /**
    * The color action sets the background of the frame to a given color.
    */
   class ColorAction extends AbstractAction
   {
      public ColorAction(String name, Icon icon, Color c)
      {
         putValue(Action.NAME, name);
         putValue(Action.SMALL_ICON, icon);
         putValue(Action.SHORT_DESCRIPTION, name + " background");
         putValue("Color", c);
      }

      public void actionPerformed(ActionEvent event)
      {
         Color c = (Color) getValue("Color");
         panel.setBackground(c);
      }
   }
}
六、复杂的布局管理
6.1 网格组布局
要想使用网格组管理器进行布局, 必须经过下列过程:
- 1 ) 建立一个 GridBagLayout 的对象。不需要指定网格的行数和列数。布局管理器会根据 后面所给的信息猜测出来。
- 2) 将 GridBagLayout 对象设置成组件的布局管理器。
- 3) 为每个组件建立一个 GridBagConstraints 对象。设置 GridBagConstraints 对象的域以 便指出组件在网格组中的布局方案。
- 4) 最后,通过下面的调用添加组件的约束: add(component, constraints);
下面将详细地介绍几个最重要的约束:
- gridx、gridy.gridwidth 和 gridheight 参数.gridx 和 gridy 指定了被添加组件左上角的行、列 位置。gridwidth 和 gridheight 指定了组件占据的行数和列数。
- 增量域(weightx 和 weighty)。.另一方面, 如果将增量设置为 0, 则这个区域将永远为初始尺寸。如果将所有区域的增量 都设置为 0, 容器就会集聚在为它分配的区域中间, 而不是通过拉伸来填充它。从概念上讲,增量参数属于行和列的属性, 而不属于某个单独的单元格。但却需要在单 元格上指定它们,这是因为网格组布局并不暴露行和列。或每列单元 格的增量最大值。因此, 如果想让一行或一列的大小保持不变,就需要将这行、这列的所有 组件的增量都设置为 0。当容器超过首选大小时, 增量表示分配给每个 区域的扩展比例值.这么说并不太直观。这里建议将所有的增量设置为 100, 运行程序,查看一下布局情况。缩放对话框,查看一下行和列是如何调整的。如果发现某行或某列不应该 扩大,就将那行或那列中的所有组件的增量设置为 0。也可以使用其他的增量值进行修补, 但是这么做的意义并不大。
- fill 和anchor参数,如果不希望组件拉伸至整个区域, 就需要设置 fill 约束。它有四个有效值ғGridBag Constraints.NONE、GridBagConstraints.HORIZONTAL、GridBagConstraints. VERTICAL 和 GridBagConstraints.BOTH.0 如果组件没有填充整个区域, 可以通过设置anchor域指定其位置。 有效值为 GridBag Constraints.CENTER ( 默认值) 、GridBagConstraints.NORTH、GridBagConstraints. NORTHEAST 和 GridBagConstraints.EAST 等。
- 填充,可以通过设置 GridBagLayout 的 insets域在组件周围增加附加的空白区域。通过设置 Insets 对象的 left、top、right 和 bottom指定组件周围的空间量。这被称作外部填充(或外边距) (externalpadding)。 通过设置 ipadx 和 ipady 指定内部填充(或内外距)(internalpadding)。这两个值被加到组 件的最小宽度和最小高度上。这样可以保证组件不会收缩至最小尺寸之下。
- 指定 gridx,gridy,gridwidth 和 gridheight 参數的另一种方法。AWT 文档建议不要将 gridx 和 gridy设置为绝对位置,应该将它们设置为常量GridBag Constraints.RELATIVEo 然后,按照标准的顺序,将组件添加到网格组布局中。即第一行从 左向右,然后再开始新的一行,以此类推。 还需要通过为gridheight 和 gridwidth 域指定一个适当的值来设置组件横跨的行数和列 数。除此之外,如果组件扩展至最后一行或最后一列,则不要给出一个实际的数值, 而是用 常量GridBagConstraints.REMAINDER 替代,这样会告诉布局管理器这个组件是本行上的最 后一个组件。


package gridbag;

import java.awt.*;

/**
 * This class simplifies the use of the GridBagConstraints class.
 * @version 1.01 2004-05-06
 * @author Cay Horstmann
 */
public class GBC extends GridBagConstraints
{
   /**
    * Constructs a GBC with a given gridx and gridy position and all other grid
    * bag constraint values set to the default.
    * @param gridx the gridx position
    * @param gridy the gridy position
    */
   public GBC(int gridx, int gridy)
   {
      this.gridx = gridx;
      this.gridy = gridy;
   }

   /**
    * Constructs a GBC with given gridx, gridy, gridwidth, gridheight and all
    * other grid bag constraint values set to the default.
    * @param gridx the gridx position
    * @param gridy the gridy position
    * @param gridwidth the cell span in x-direction
    * @param gridheight the cell span in y-direction
    */
   public GBC(int gridx, int gridy, int gridwidth, int gridheight)
   {
      this.gridx = gridx;
      this.gridy = gridy;
      this.gridwidth = gridwidth;
      this.gridheight = gridheight;
   }

   /**
    * Sets the anchor.
    * @param anchor the anchor value
    * @return this object for further modification
    */
   public GBC setAnchor(int anchor)
   {
      this.anchor = anchor;
      return this;
   }

   /**
    * Sets the fill direction.
    * @param fill the fill direction
    * @return this object for further modification
    */
   public GBC setFill(int fill)
   {
      this.fill = fill;
      return this;
   }

   /**
    * Sets the cell weights.
    * @param weightx the cell weight in x-direction
    * @param weighty the cell weight in y-direction
    * @return this object for further modification
    */
   public GBC setWeight(double weightx, double weighty)
   {
      this.weightx = weightx;
      this.weighty = weighty;
      return this;
   }

   /**
    * Sets the insets of this cell.
    * @param distance the spacing to use in all directions
    * @return this object for further modification
    */
   public GBC setInsets(int distance)
   {
      this.insets = new Insets(distance, distance, distance, distance);
      return this;
   }

   /**
    * Sets the insets of this cell.
    * @param top the spacing to use on top
    * @param left the spacing to use to the left
    * @param bottom the spacing to use on the bottom
    * @param right the spacing to use to the right
    * @return this object for further modification
    */
   public GBC setInsets(int top, int left, int bottom, int right)
   {
      this.insets = new Insets(top, left, bottom, right);
      return this;
   }

   /**
    * Sets the internal padding
    * @param ipadx the internal padding in x-direction
    * @param ipady the internal padding in y-direction
    * @return this object for further modification
    */
   public GBC setIpad(int ipadx, int ipady)
   {
      this.ipadx = ipadx;
      this.ipady = ipady;
      return this;
   }
}

package gridbag;

import java.awt.Font;
import java.awt.GridBagLayout;
import java.awt.event.ActionListener;

import javax.swing.BorderFactory;
import javax.swing.JCheckBox;
import javax.swing.JComboBox;
import javax.swing.JFrame;
import javax.swing.JLabel;
import javax.swing.JTextArea;

/**
 * A frame that uses a grid bag layout to arrange font selection components.
 */
public class FontFrame extends JFrame
{
   public static final int TEXT_ROWS = 10;
   public static final int TEXT_COLUMNS = 20;

   private JComboBox<String> face;
   private JComboBox<Integer> size;
   private JCheckBox bold;
   private JCheckBox italic;
   private JTextArea sample;

   public FontFrame()
   {
      GridBagLayout layout = new GridBagLayout();
      setLayout(layout);

      ActionListener listener = event -> updateSample();

      // construct components

      JLabel faceLabel = new JLabel("Face: ");

      face = new JComboBox<>(new String[] { "Serif", "SansSerif", "Monospaced",
            "Dialog", "DialogInput" });

      face.addActionListener(listener);

      JLabel sizeLabel = new JLabel("Size: ");

      size = new JComboBox<>(new Integer[] { 8, 10, 12, 15, 18, 24, 36, 48 });

      size.addActionListener(listener);

      bold = new JCheckBox("Bold");
      bold.addActionListener(listener);

      italic = new JCheckBox("Italic");
      italic.addActionListener(listener);

      sample = new JTextArea(TEXT_ROWS, TEXT_COLUMNS);
      sample.setText("The quick brown fox jumps over the lazy dog");
      sample.setEditable(false);
      sample.setLineWrap(true);
      sample.setBorder(BorderFactory.createEtchedBorder());

      // add components to grid, using GBC convenience class

      add(faceLabel, new GBC(0, 0).setAnchor(GBC.EAST));
      add(face, new GBC(1, 0).setFill(GBC.HORIZONTAL).setWeight(100, 0)
            .setInsets(1));
      add(sizeLabel, new GBC(0, 1).setAnchor(GBC.EAST));
      add(size, new GBC(1, 1).setFill(GBC.HORIZONTAL).setWeight(100, 0)
            .setInsets(1));
      add(bold, new GBC(0, 2, 2, 1).setAnchor(GBC.CENTER).setWeight(100, 100));
      add(italic, new GBC(0, 3, 2, 1).setAnchor(GBC.CENTER).setWeight(100, 100));
      add(sample, new GBC(2, 0, 1, 4).setFill(GBC.BOTH).setWeight(100, 100));
      pack();
      updateSample();
   }

   public void updateSample()
   {
      String fontFace = (String) face.getSelectedItem();
      int fontStyle = (bold.isSelected() ? Font.BOLD : 0)
            + (italic.isSelected() ? Font.ITALIC : 0);
      int fontSize = size.getItemAt(size.getSelectedIndex());
      Font font = new Font(fontFace, fontStyle, fontSize);
      sample.setFont(font);
      sample.repaint();
   }
}
6.2 组布局
6.3 不使用布局管理器
frame.setLayout(null);
6.4 定制布局管理器
定制布局管理器必须实现LayoutManager 接口,并且需要覆盖下面5个方法:
在添加或删除一个组件时会调用前面两个方法。如果不需要保存组件的任何附加信息, 那么可以让这两个方法什么都不做。接下来的两个方法计算组件的最小布局和首选布局所需 要的空间。两者通常相等。第 5 个方法真正地实施操作,它调用所有组件的 setBounds方法。
package circleLayout;

import java.awt.*;

/**
 * A layout manager that lays out components along a circle.
 */
public class CircleLayout implements LayoutManager
{
   private int minWidth = 0;
   private int minHeight = 0;
   private int preferredWidth = 0;
   private int preferredHeight = 0;
   private boolean sizesSet = false;
   private int maxComponentWidth = 0;
   private int maxComponentHeight = 0;

   public void addLayoutComponent(String name, Component comp)
   {
   }

   public void removeLayoutComponent(Component comp)
   {
   }

   public void setSizes(Container parent)
   {
      if (sizesSet) return;
      int n = parent.getComponentCount();

      preferredWidth = 0;
      preferredHeight = 0;
      minWidth = 0;
      minHeight = 0;
      maxComponentWidth = 0;
      maxComponentHeight = 0;

      // compute the maximum component widths and heights
      // and set the preferred size to the sum of the component sizes.
      for (int i = 0; i < n; i++)
      {
         Component c = parent.getComponent(i);
         if (c.isVisible())
         {
            Dimension d = c.getPreferredSize();
            maxComponentWidth = Math.max(maxComponentWidth, d.width);
            maxComponentHeight = Math.max(maxComponentHeight, d.height);
            preferredWidth += d.width;
            preferredHeight += d.height;
         }
      }
      minWidth = preferredWidth / 2;
      minHeight = preferredHeight / 2;
      sizesSet = true;
   }

   public Dimension preferredLayoutSize(Container parent)
   {
      setSizes(parent);
      Insets insets = parent.getInsets();
      int width = preferredWidth + insets.left + insets.right;
      int height = preferredHeight + insets.top + insets.bottom;
      return new Dimension(width, height);
   }

   public Dimension minimumLayoutSize(Container parent)
   {
      setSizes(parent);
      Insets insets = parent.getInsets();
      int width = minWidth + insets.left + insets.right;
      int height = minHeight + insets.top + insets.bottom;
      return new Dimension(width, height);
   }

   public void layoutContainer(Container parent)
   {
      setSizes(parent);

      // compute center of the circle

      Insets insets = parent.getInsets();
      int containerWidth = parent.getSize().width - insets.left - insets.right;
      int containerHeight = parent.getSize().height - insets.top - insets.bottom;

      int xcenter = insets.left + containerWidth / 2;
      int ycenter = insets.top + containerHeight / 2;

      // compute radius of the circle

      int xradius = (containerWidth - maxComponentWidth) / 2;
      int yradius = (containerHeight - maxComponentHeight) / 2;
      int radius = Math.min(xradius, yradius);

      // lay out components along the circle

      int n = parent.getComponentCount();
      for (int i = 0; i < n; i++)
      {
         Component c = parent.getComponent(i);
         if (c.isVisible())
         {
            double angle = 2 * Math.PI * i / n;

            // center point of component
            int x = xcenter + (int) (Math.cos(angle) * radius);
            int y = ycenter + (int) (Math.sin(angle) * radius);

            // move component so that its center is (x, y)
            // and its size is its preferred size
            Dimension d = c.getPreferredSize();
            c.setBounds(x - d.width / 2, y - d.height / 2, d.width, d.height);
         }
      }
   }
}
6.5 遍历顺序
当把很多组件添加到窗口中时, 需要考虑遍历顺序(traversal order) 的问题。窗口被初 次显示时,遍历序列的第一个组件会有键盘焦点。每次用户按下 TAB 键, 下一个组件就会获得焦点。遍历顺序很直观, 它的顺序是从左至右,从上至下。示例文本区(按下 CTRL+TAB 键移动到下一个文本 域, TAB字符被认为是文本输入)。
如果容器还包含其他的容器,情况就更加复杂了。当焦点给予另外一个容器时,那个容 器左上角的组件就会自动地获得焦点,然后再遍历那个容器中的所有组件。最后,将焦点移 交给紧跟着那个容器的组件。 利用这一点,可以将相关元素组织在一起并放置在一个容器中。例如’ 放置在一个面板中
调用 component.setFocusable(false) ; 可以从焦点遍历中删除一个组件。这对于不接受键盘输入、 自行绘制的组件很有用
七、对话框
与大多数的窗口系统一样, AWT 也分为模式对话框和无模式对话框。所谓模式对话框是 指在结束对它的处理之前, 不允许用户与应用程序的其余窗口进行交互。模式对话框主要用 于在程序继续运行之前获取用户提供的信息。所谓无模式对话框是指允许用户同时在对话框和应用程序的其他窗口中输入信息。Swing 有一个很容易使用 的类JOptionPane, 它可以弹出一个简单的对话框,而不必编写任何对话框的相关代码。
7.1 选项对话框
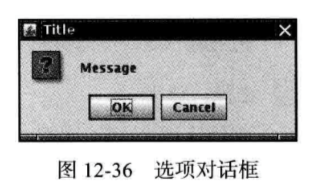
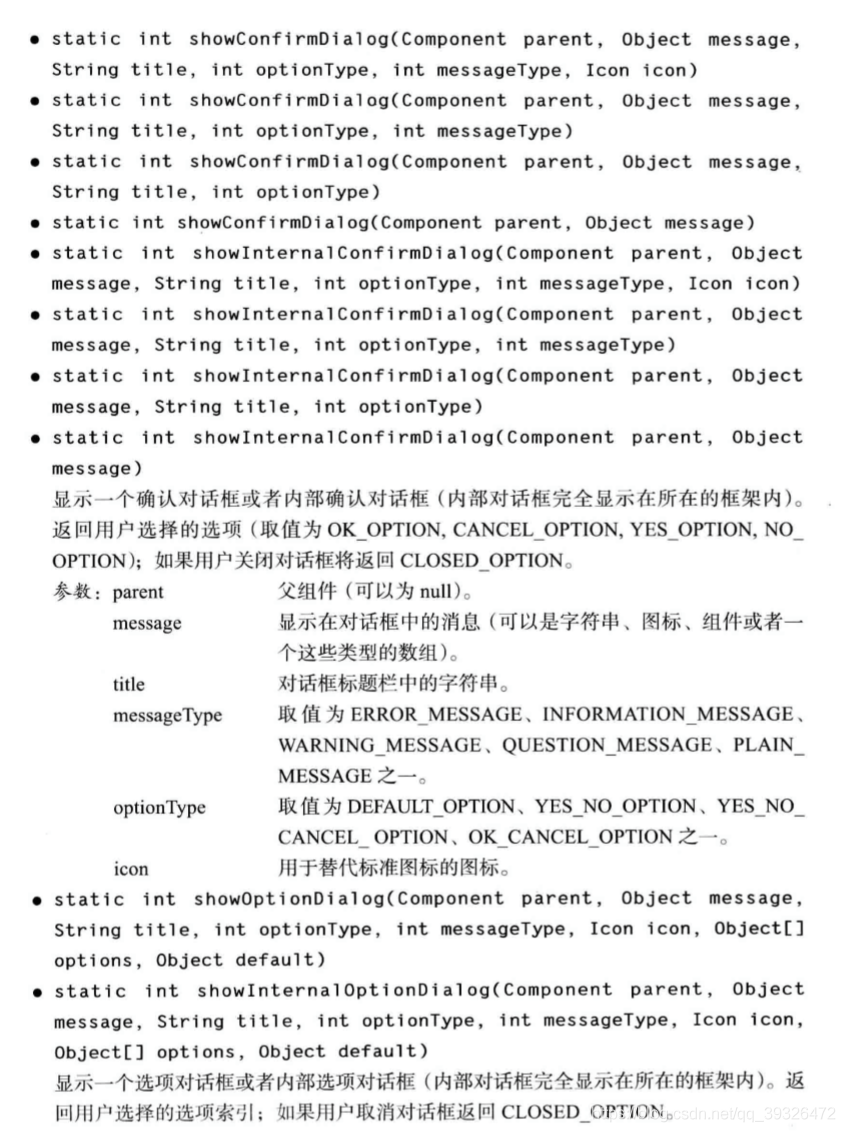
Swing 有一套简单的对话框, 用于获取用户的一些简单信息。JOptionPane 有 4个用于显 示这些对话框的静态方法:
showMessageDialog: showConfirmDialog:
显示一条消息并等待用户点击 OK 显示一条消息并等待用户确认(与 OK/Cancel类似)
showOptionDialog: showInputDialog:
显示一条消息并获得用户在一组选项中的选择 显示一条消息并获得用户输人的一行文本
左侧的图标将由下面 5 种消息类型决定:
- ERROR_MESSACE
- INFORMATION_MESSACE
- WARNING_MESSACE
- QUESTION_MESSACE
- PLAIN_MESSACE
PLAIN_MESSAGE类型没有图标。每个对话框类型都有一个方法,可以用来提供自己的 图标, 以替代原来的图标。
可以为每个对话框类型指定一条消息。这里的消息既可以是字符串、图标、用户界面组件, 也可以是其他类型的对象。下面是显示消息对象的基本方式:
String: Icon: Component Object[]:
绘制字符串 显示图标 显示组件 显示数组中的所有对象, 依次叠加
任何其他对象: 调用 toString方法来显示结果字符串
位于底部的按钮取决于对话框类型和选项类型。 当调用showMessageDialog 和 showInputDialog时,只能看到一组标准按钮(分别是 OK/Cancel)。当调用showConfirmDialog 时, 可以选择下面四种选项类型之一:
- DEFAULTOPTION
- YES_NO_OPTION
- YES_N0_CANCEL_OPTION
- OK_CANCEL_OPTION
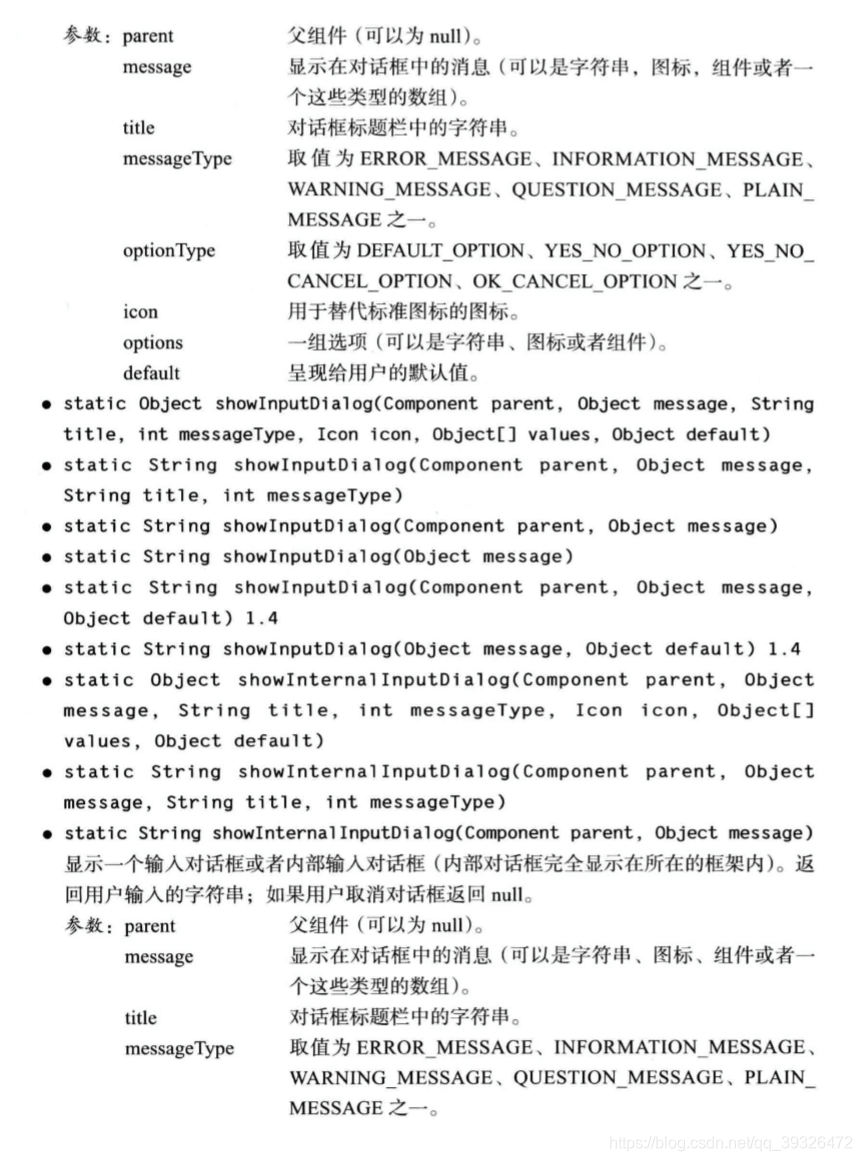
使用showOptionDialog 可以指定任意的选项。这里需要为选项提供一个对象数组。每个 数组元素可以是下列类型之一:
- String: 使用字符串标签创建一个按钮
- Icon: 使用图标创建一个按钮
- Component: 显示这个组件
- 其他类型的对象:使用toString方法,然后用结果字符串作为标签创建按钮
下面是这些方法的返回值:
- showMessageDialog 无
- showConfirmDialog 表示被选项的一个整数
- showOptionDialog 表示被选项的一个整数
- showInputDialog 用户选择或输入的字符串
showConfirmDialog 和 showOptionDialog返回一个整数用来表示用户选择了哪个按钮。 对于选项对话框来说, 这个值就是被选的选项的索引值或者是CLOSED_OPTION (此时用户 没有选择可选项, 而是关闭了对话框)。对于确认对话框,返回值可以是下列值之一:
- OK_OPTI0N
- CANCEL_OPTION
- YES_OPTION
- NO_OPTION
- CLOSED_OPTION
其他类型的对象:使用toString方法,然后用结果字符串作为标签创建按钮
这些选项似乎令人感到迷惑不解, 实际上非常简单步骤如下:
- 选择对话框的类型(消息、确认、选项或者输人)。
- 选择图标(错误、信息、警告、问题、无或者自定义)。
- 选择消息(字符串、图表、 自定义组件或者它们的集合)。
- 对于确认对话框, 选择选项类型 (默认、Yes/No、Yes/No/Cancel 或者 Ok/Cancel)。
- 对于选项对话框, 选择选项(字符串、 图表或者自定义组件)和默认选项
- 对于输人对话框, 选择文本框或者组合框。
- 调用 JOptionPane API 中的相应方法
package optionDialog;

import java.awt.*;
import java.awt.event.*;
import java.awt.geom.*;
import java.util.*;
import javax.swing.*;

/**
 * A frame that contains settings for selecting various option dialogs.
 */
public class OptionDialogFrame extends JFrame
{
   private ButtonPanel typePanel;
   private ButtonPanel messagePanel;
   private ButtonPanel messageTypePanel;
   private ButtonPanel optionTypePanel;
   private ButtonPanel optionsPanel;
   private ButtonPanel inputPanel;
   private String messageString = "Message";
   private Icon messageIcon = new ImageIcon("blue-ball.gif");
   private Object messageObject = new Date();
   private Component messageComponent = new SampleComponent();

   public OptionDialogFrame()
   {
      JPanel gridPanel = new JPanel();
      gridPanel.setLayout(new GridLayout(2, 3));

      typePanel = new ButtonPanel("Type", "Message", "Confirm", "Option", "Input");
      messageTypePanel = new ButtonPanel("Message Type", "ERROR_MESSAGE", "INFORMATION_MESSAGE",
            "WARNING_MESSAGE", "QUESTION_MESSAGE", "PLAIN_MESSAGE");
      messagePanel = new ButtonPanel("Message", "String", "Icon", "Component", "Other",
            "Object[]");
      optionTypePanel = new ButtonPanel("Confirm", "DEFAULT_OPTION", "YES_NO_OPTION",
            "YES_NO_CANCEL_OPTION", "OK_CANCEL_OPTION");
      optionsPanel = new ButtonPanel("Option", "String[]", "Icon[]", "Object[]");
      inputPanel = new ButtonPanel("Input", "Text field", "Combo box");

      gridPanel.add(typePanel);
      gridPanel.add(messageTypePanel);
      gridPanel.add(messagePanel);
      gridPanel.add(optionTypePanel);
      gridPanel.add(optionsPanel);
      gridPanel.add(inputPanel);

      // add a panel with a Show button

      JPanel showPanel = new JPanel();
      JButton showButton = new JButton("Show");
      showButton.addActionListener(new ShowAction());
      showPanel.add(showButton);

      add(gridPanel, BorderLayout.CENTER);
      add(showPanel, BorderLayout.SOUTH);
      pack();
   }

   /**
    * Gets the currently selected message.
    * @return a string, icon, component, or object array, depending on the Message panel selection
    */
   public Object getMessage()
   {
      String s = messagePanel.getSelection();
      if (s.equals("String")) return messageString;
      else if (s.equals("Icon")) return messageIcon;
      else if (s.equals("Component")) return messageComponent;
      else if (s.equals("Object[]")) return new Object[] { messageString, messageIcon,
            messageComponent, messageObject };
      else if (s.equals("Other")) return messageObject;
      else return null;
   }

   /**
    * Gets the currently selected options.
    * @return an array of strings, icons, or objects, depending on the Option panel selection
    */
   public Object[] getOptions()
   {
      String s = optionsPanel.getSelection();
      if (s.equals("String[]")) return new String[] { "Yellow", "Blue", "Red" };
      else if (s.equals("Icon[]")) return new Icon[] { new ImageIcon("yellow-ball.gif"),
            new ImageIcon("blue-ball.gif"), new ImageIcon("red-ball.gif") };
      else if (s.equals("Object[]")) return new Object[] { messageString, messageIcon,
            messageComponent, messageObject };
      else return null;
   }

   /**
    * Gets the selected message or option type
    * @param panel the Message Type or Confirm panel
    * @return the selected XXX_MESSAGE or XXX_OPTION constant from the JOptionPane class
    */
   public int getType(ButtonPanel panel)
   {
      String s = panel.getSelection();
      try
      {
         return JOptionPane.class.getField(s).getInt(null);
      }
      catch (Exception e)
      {
         return -1;
      }
   }

   /**
    * The action listener for the Show button shows a Confirm, Input, Message, or Option dialog
    * depending on the Type panel selection.
    */
   private class ShowAction implements ActionListener
   {
      public void actionPerformed(ActionEvent event)
      {
         if (typePanel.getSelection().equals("Confirm")) JOptionPane.showConfirmDialog(
               OptionDialogFrame.this, getMessage(), "Title", getType(optionTypePanel),
               getType(messageTypePanel));
         else if (typePanel.getSelection().equals("Input"))
         {
            if (inputPanel.getSelection().equals("Text field")) JOptionPane.showInputDialog(
                  OptionDialogFrame.this, getMessage(), "Title", getType(messageTypePanel));
            else JOptionPane.showInputDialog(OptionDialogFrame.this, getMessage(), "Title",
                  getType(messageTypePanel), null, new String[] { "Yellow", "Blue", "Red" },
                  "Blue");
         }
         else if (typePanel.getSelection().equals("Message")) JOptionPane.showMessageDialog(
               OptionDialogFrame.this, getMessage(), "Title", getType(messageTypePanel));
         else if (typePanel.getSelection().equals("Option")) JOptionPane.showOptionDialog(
               OptionDialogFrame.this, getMessage(), "Title", getType(optionTypePanel),
               getType(messageTypePanel), null, getOptions(), getOptions()[0]);
      }
   }
}

/**
 * A component with a painted surface
 */

class SampleComponent extends JComponent
{
   public void paintComponent(Graphics g)
   {
      Graphics2D g2 = (Graphics2D) g;
      Rectangle2D rect = new Rectangle2D.Double(0, 0, getWidth() - 1, getHeight() - 1);
      g2.setPaint(Color.YELLOW);
      g2.fill(rect);
      g2.setPaint(Color.BLUE);
      g2.draw(rect);
   }

   public Dimension getPreferredSize()
   {
      return new Dimension(10, 10);
   }
}

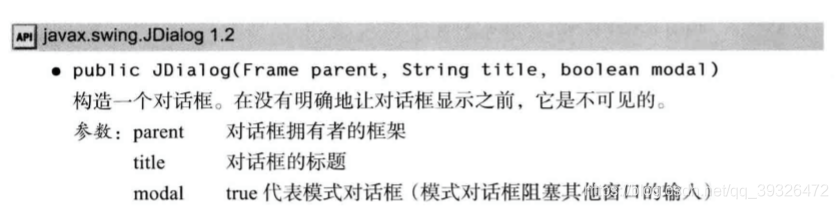
7.2 创建对话框
要想实现一个对话框,需要从 JDialog 派生一个类。这与应用 程序窗口派生于 JFrame 的过程完全一样。具体过程如下:
- 在对话框构造器中,调用超类JDialog 的构造器
- 添加对话框的用户界面组件
- 添加事件处理器。
- 设置对话框的大小。
调用超类构造器时,需要提供拥有者框架(ownerframe)、对话框标题及模式特征。拥有者框架控制对话框的显示位置,如果将拥有者标识为null, 那么对话框将由一个隐 藏框架所拥有。模式特征将指定对话框处于显示状态时,应用程序中其他窗口是否被锁住。无模式对话 框不会锁住其他窗口,而有模式对话框将锁住应用程序中的所有其他窗口(除对话框的子窗 口外)。用户经常使用的工具栏就是无模式对话框, 另一方面, 如果想强迫用户在继续操作 之前提供一些必要的信息就应该使用模式对话框。
package dialog;

import javax.swing.JFrame;
import javax.swing.JMenu;
import javax.swing.JMenuBar;
import javax.swing.JMenuItem;

/**
 * A frame with a menu whose File->About action shows a dialog.
 */
public class DialogFrame extends JFrame
{
   private static final int DEFAULT_WIDTH = 300;
   private static final int DEFAULT_HEIGHT = 200;
   private AboutDialog dialog;

   public DialogFrame()
   {
      setSize(DEFAULT_WIDTH, DEFAULT_HEIGHT);

      // Construct a File menu.

      JMenuBar menuBar = new JMenuBar();
      setJMenuBar(menuBar);
      JMenu fileMenu = new JMenu("File");
      menuBar.add(fileMenu);

      // Add About and Exit menu items.

      // The About item shows the About dialog.

      JMenuItem aboutItem = new JMenuItem("About");
      aboutItem.addActionListener(event -> {
         if (dialog == null) // first time
            dialog = new AboutDialog(DialogFrame.this);
         dialog.setVisible(true); // pop up dialog
      });
      fileMenu.add(aboutItem);

      // The Exit item exits the program.

      JMenuItem exitItem = new JMenuItem("Exit");
      exitItem.addActionListener(event -> System.exit(0));
      fileMenu.add(exitItem);
   }
}

package dialog;

import java.awt.BorderLayout;

import javax.swing.JButton;
import javax.swing.JDialog;
import javax.swing.JFrame;
import javax.swing.JLabel;
import javax.swing.JPanel;

/**
 * A sample modal dialog that displays a message and waits for the user to click the OK button.
 */
public class AboutDialog extends JDialog
{
   public AboutDialog(JFrame owner)
   {
      super(owner, "About DialogTest", true);

      // add HTML label to center

      add(
            new JLabel(
                  "<html><h1><i>Core Java</i></h1><hr>By Cay Horstmann</html>"),
            BorderLayout.CENTER);

      // OK button closes the dialog

      JButton ok = new JButton("OK");
      ok.addActionListener(event -> setVisible(false));

      // add OK button to southern border

      JPanel panel = new JPanel();
      panel.add(ok);
      add(panel, BorderLayout.SOUTH);

      pack();
   }
}
7.3 数据交换
package dataExchange;
import java.awt.*;
import java.awt.event.*;
import javax.swing.*;
/**
* A frame with a menu whose File->Connect action shows a password dialog.
*/
public class DataExchangeFrame extends JFrame
{
public static final int TEXT_ROWS = 20;
public static final int TEXT_COLUMNS = 40;
private PasswordChooser dialog = null;
private JTextArea textArea;
public DataExchangeFrame()
{
// construct a File menu
JMenuBar mbar = new JMenuBar();
setJMenuBar(mbar);
JMenu fileMenu = new JMenu("File");
mbar.add(fileMenu);
// add Connect and Exit menu items
JMenuItem connectItem = new JMenuItem("Connect");
connectItem.addActionListener(new ConnectAction());
fileMenu.add(connectItem);
// The Exit item exits the program
JMenuItem exitItem = new JMenuItem("Exit");
exitItem.addActionListener(event -> System.exit(0));
fileMenu.add(exitItem);
textArea = new JTextArea(TEXT_ROWS, TEXT_COLUMNS);
add(new JScrollPane(textArea), BorderLayout.CENTER);
pack();
}
/**
* The Connect action pops up the password dialog.
*/
private class ConnectAction implements ActionListener
{
public void actionPerformed(ActionEvent event)
{
// if first time, construct dialog
if (dialog == null) dialog = new PasswordChooser();
// set default values
dialog.setUser(new User("yourname", null));
// pop up dialog
if (dialog.showDialog(DataExchangeFrame.this, "Connect"))
{
// if accepted, retrieve user input
User u = dialog.getUser();
textArea.append("user name = " + u.getName() + ", password = "
+ (new String(u.getPassword())) + "\n");
}
}
}
}
package dataExchange;
import java.awt.BorderLayout;
import java.awt.Component;
import java.awt.Frame;
import java.awt.GridLayout;
import javax.swing.JButton;
import javax.swing.JDialog;
import javax.swing.JLabel;
import javax.swing.JPanel;
import javax.swing.JPasswordField;
import javax.swing.JTextField;
import javax.swing.SwingUtilities;
/**
* A password chooser that is shown inside a dialog
*/
public class PasswordChooser extends JPanel
{
private JTextField username;
private JPasswordField password;
private JButton okButton;
private boolean ok;
private JDialog dialog;
public PasswordChooser()
{
setLayout(new BorderLayout());
// construct a panel with user name and password fields
JPanel panel = new JPanel();
panel.setLayout(new GridLayout(2, 2));
panel.add(new JLabel("User name:"));
panel.add(username = new JTextField(""));
panel.add(new JLabel("Password:"));
panel.add(password = new JPasswordField(""));
add(panel, BorderLayout.CENTER);
// create Ok and Cancel buttons that terminate the dialog
okButton = new JButton("Ok");
okButton.addActionListener(event -> {
ok = true;
dialog.setVisible(false);
});
JButton cancelButton = new JButton("Cancel");
cancelButton.addActionListener(event -> dialog.setVisible(false));
// add buttons to southern border
JPanel buttonPanel = new JPanel();
buttonPanel.add(okButton);
buttonPanel.add(cancelButton);
add(buttonPanel, BorderLayout.SOUTH);
}
/**
* Sets the dialog defaults.
* @param u the default user information
*/
public void setUser(User u)
{
username.setText(u.getName());
}
/**
* Gets the dialog entries.
* @return a User object whose state represents the dialog entries
*/
public User getUser()
{
return new User(username.getText(), password.getPassword());
}
/**
* Show the chooser panel in a dialog
* @param parent a component in the owner frame or null
* @param title the dialog window title
*/
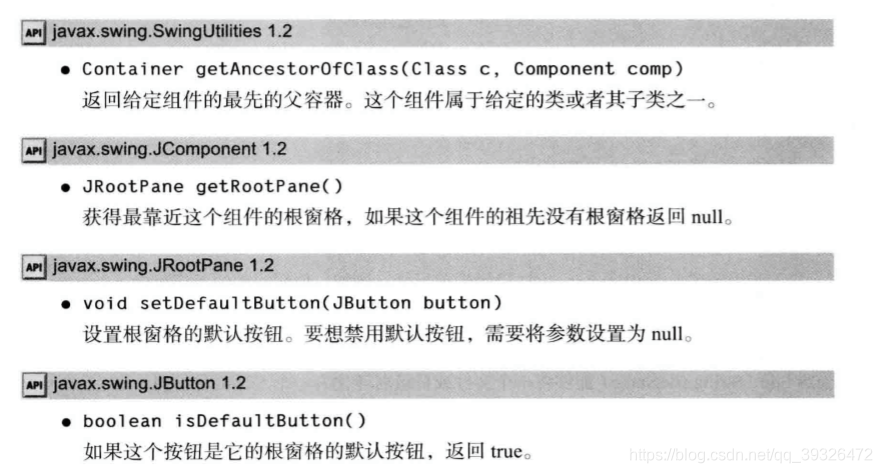
public boolean showDialog(Component parent, String title)
{
ok = false;
// locate the owner frame
Frame owner = null;
if (parent instanceof Frame)
owner = (Frame) parent;
else
owner = (Frame) SwingUtilities.getAncestorOfClass(Frame.class, parent);
// if first time, or if owner has changed, make new dialog
if (dialog == null || dialog.getOwner() != owner)
{
dialog = new JDialog(owner, true);
dialog.add(this);
dialog.getRootPane().setDefaultButton(okButton);
dialog.pack();
}
// set title and show dialog
dialog.setTitle(title);
dialog.setVisible(true);
return ok;
}
}
7.4 文件对话框
注意,JFileChooser类并不 是 JDialog类的子类。需要调用 showOpenDialog, 而不是调用 SetVisible(true)显示打开文件 的对话框,或者调用 showSaveDialog显示保存文件的对话框。接收文件的按钮被自动地标签 为 Open 或者 Save。也可以调用 showDialog方法为按钮设定标签

重用一个文件选择器对象是一个很好的想法,其原因是JFileChooser 的构造器相 当耗费时间。特别是在Windows 上, 用户映射了很多网络驱动器的情况下。
下面是建立文件对话框并且获取用户选择信息的步骤:
1 ) 建立一个 JFileChooser对象。与 JDialog 类的构造器不同,它不需要指定父组件。允 许在多个框架中重用一个文件选择器。
2) 调用setCurrentDirectory方法设置当前目录。例如, 使用当前的工作目录:
chooser.setCurrentDirectory(new File("."));
3) 如果有一个想要作为用户选择的默认文件名,可以使用setSelectedFile方法进行指定: chooser.setSelectedFi1e(new File(filename));
4) 如果允许用户在对话框中选择多个文件,需要调用setMultiSelectionEnabled方法。 当然,这是可选的。 chooser.setMultiSelectionEnabled(true);
5 ) 如果想让对话框仅显示某一种类型的文件(如,所有扩展名为 .gif的文件), 需要设 置文件过滤器, 稍后将会进行讨论。
6) 在默认情况下,用户在文件选择器中只能选择文件。如果希望选择目录,需要调用 setFileSelectionMode方法。 参数值为:JFileChooser.FILES_ONLY (默认值) ,JFileChooser. DIRECTORIES_ONLY 或者 JFileChooser.FILES_AND_DIRECTORIES.
7 ) 调用 showOpenDialog 或者 showSaveDialog方法显示对话框。必须为这些调用提供父组件:
仅当用户确认、 取消或者离开对话框时才返回调用。返回值可以是 JFileChooser. APPROVE_OPTION、JFileChooser.CANCE_LOPTION 或者 JFileChooser.ERROR_OPTION。
8) 调用getSelectedFile() 或者 getSelectedFiles()方法获取用户选择的一个或多个文件。 这些方法将返回一个文件对象或者一组文件对象。 如果需要知道文件对象名时,可以调用 getPath方法。
其实,设计专用文件过滤器非常简单,只要实现 FileFilter 超类 中的两个方法即可:
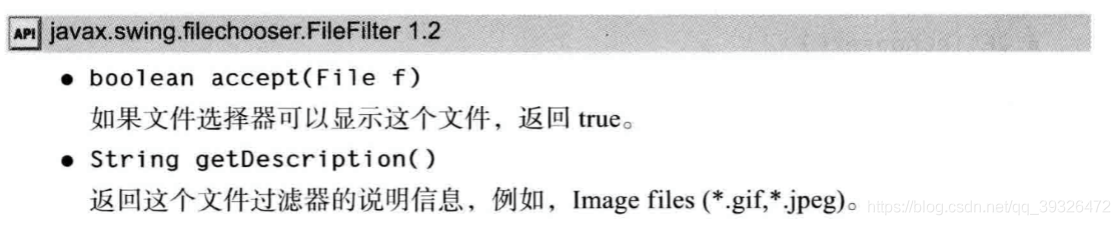
可以通过为文件选择器显示的每个文件提供特定的图标和文件描述来定制文件选 择器。这需要应用一个扩展于javax.swing.filechooser 包中的 FileView 类的对象。这是一个高 级技巧。在通常情况下,不需要提供文件视图— —可插观感会提供。然而, 如果想让某种特 定的文件类型显示不同的图标, 就需要安装自己的文件视图。这要扩展 FileView 并实现下面 5个方法:
文件选择器调用 isTraversable 方法来决定是否在用户点击一个目录的时候打开这个目录。 请注意,这个方法返回一个 Boolean对象, 而不是 boolean值。看起来似乎有点怪,但实际 上很方便— —如果需要使用默认的视图, 则返回 null。文件选择器将会使用默认的文件视图 。换句话说,这个方法返回的 Boolean对象能给出下面三种选择: 真(Boolean.TRUE), 假 (Boolean.FALSE) 和不关心(null)。
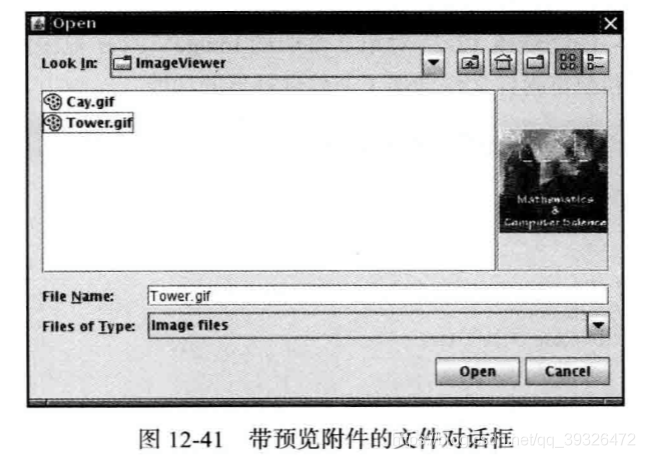
最后, 可以通过添加一个附件组件来定制文件对话框。例如, 图 12*41 在文件列表旁边 显示了一个预览附件。这个附件显示了当前选择文件的缩略视图。
package fileChooser;

import java.io.*;
import javax.swing.*;
import javax.swing.filechooser.*;
import javax.swing.filechooser.FileFilter;

/**
 * A file view that displays an icon for all files that match a file filter.
 */
public class FileIconView extends FileView
{
   private FileFilter filter;
   private Icon icon;

   /**
    * Constructs a FileIconView.
    * @param aFilter a file filter--all files that this filter accepts will be shown
    * with the icon.
    * @param anIcon--the icon shown with all accepted files.
    */
   public FileIconView(FileFilter aFilter, Icon anIcon)
   {
      filter = aFilter;
      icon = anIcon;
   }

   public Icon getIcon(File f)
   {
      if (!f.isDirectory() && filter.accept(f)) return icon;
      else return null;
   }
}

public class ImagePreviewer extends JLabel
{
   /**
    * Constructs an ImagePreviewer.
    * @param chooser the file chooser whose property changes trigger an image
    *        change in this previewer
    */
   public ImagePreviewer(JFileChooser chooser)
   {
      setPreferredSize(new Dimension(100, 100));
      setBorder(BorderFactory.createEtchedBorder());

      chooser.addPropertyChangeListener(event -> {
         if (event.getPropertyName() == JFileChooser.SELECTED_FILE_CHANGED_PROPERTY)
         {
            // the user has selected a new file
            File f = (File) event.getNewValue();
            if (f == null)
            {
               setIcon(null);
               return;
            }

            // read the image into an icon
            ImageIcon icon = new ImageIcon(f.getPath());

            // if the icon is too large to fit, scale it
            if (icon.getIconWidth() > getWidth())
               icon = new ImageIcon(icon.getImage().getScaledInstance(
                     getWidth(), -1, Image.SCALE_DEFAULT));

            setIcon(icon);
         }
      });
   }
}
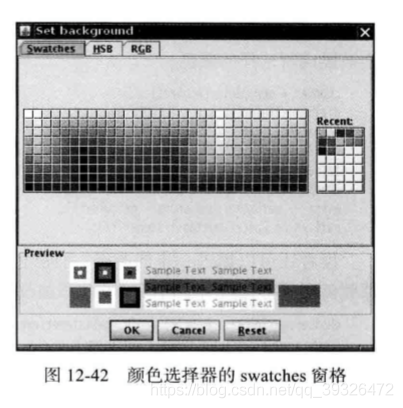
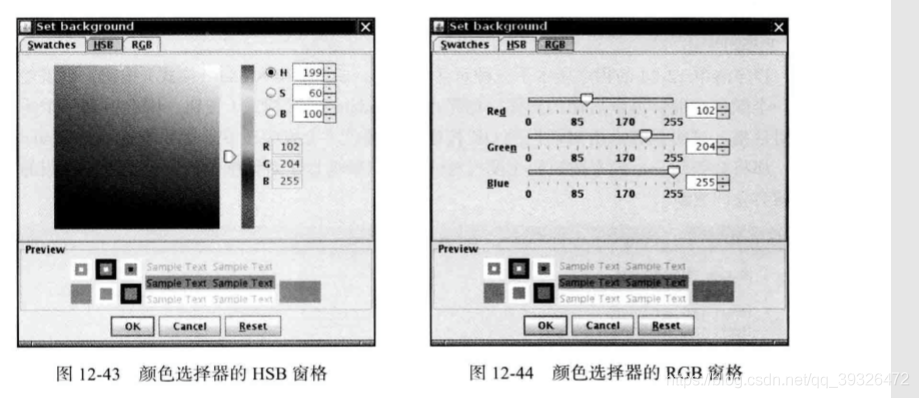
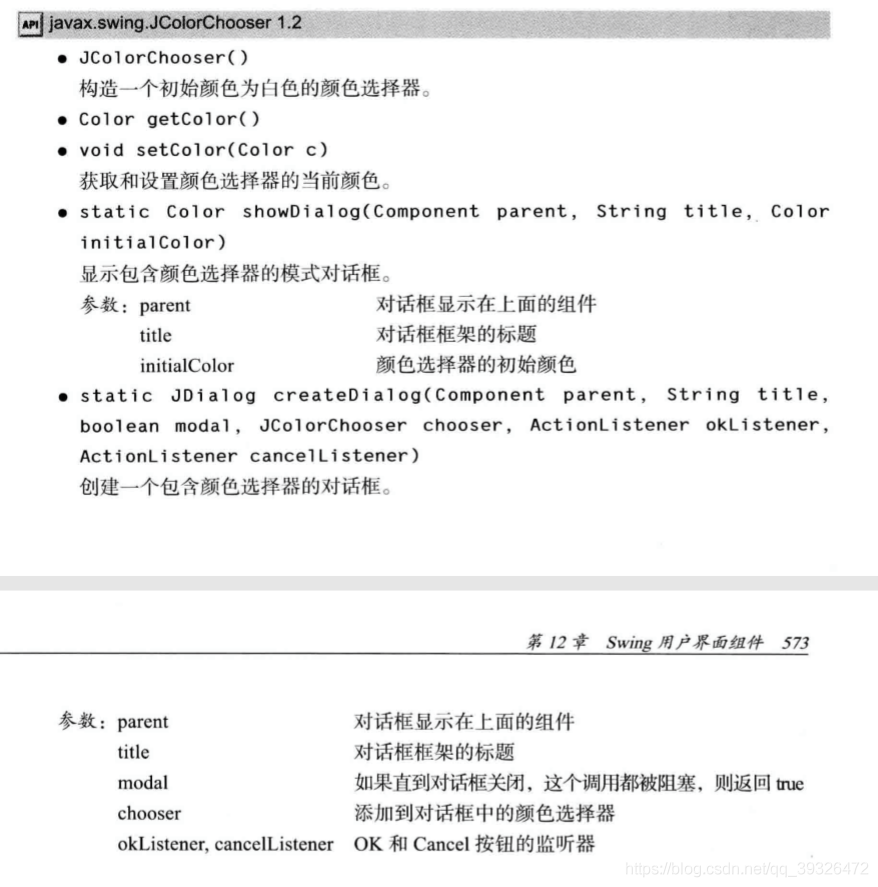
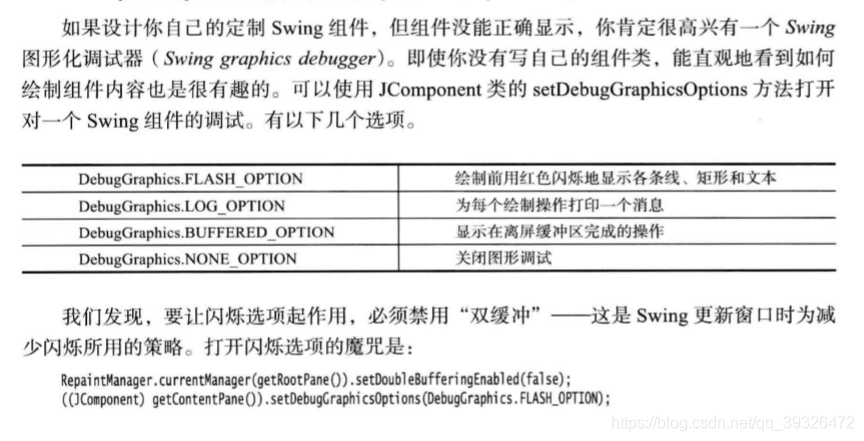
7.5 颜色选择器
除了文件选择器外,Swing还提供了一种选择 器— —JColorChooser (如图 12M2 ~图 12 44 )。可 以利用这个选择器选取颜色。与 JFileChooser 样, 颜色选择器也是一个组件,而不是一个对话 框, 但是它包含了用于创建包含颜色选择器组件的对话框方法。
下面这段代码说明了如何利用颜色选择器显示模式对话框:
Color selectedColor = JColorChooser.showDialog(parent,title, initialColor);
另外, 也可以显示无模式颜色选择器对话框, 需要提供:
- 一个父组件。
- 对话框的标题。
- 选择模式 / 无模式对话框的标志。
- 颜色选择器。
- OK 和 Cancel 按钮的监听器(如果不需要监听器可以设置为 null)。
package colorChooser;

import java.awt.Color;
import java.awt.Frame;
import java.awt.event.ActionEvent;
import java.awt.event.ActionListener;

import javax.swing.JButton;
import javax.swing.JColorChooser;
import javax.swing.JDialog;
import javax.swing.JPanel;

/**
 * A panel with buttons to pop up three types of color choosers
 */
public class ColorChooserPanel extends JPanel
{
   public ColorChooserPanel()
   {
      JButton modalButton = new JButton("Modal");
      modalButton.addActionListener(new ModalListener());
      add(modalButton);

      JButton modelessButton = new JButton("Modeless");
      modelessButton.addActionListener(new ModelessListener());
      add(modelessButton);

      JButton immediateButton = new JButton("Immediate");
      immediateButton.addActionListener(new ImmediateListener());
      add(immediateButton);
   }

   /**
    * This listener pops up a modal color chooser
    */
   private class ModalListener implements ActionListener
   {
      public void actionPerformed(ActionEvent event)
      {
         Color defaultColor = getBackground();
         Color selected = JColorChooser.showDialog(ColorChooserPanel.this, "Set background",
               defaultColor);
         if (selected != null) setBackground(selected);
      }
   }

   /**
    * This listener pops up a modeless color chooser. The panel color is changed when the user
    * clicks the OK button.
    */
   private class ModelessListener implements ActionListener
   {
      private JDialog dialog;
      private JColorChooser chooser;

      public ModelessListener()
      {
         chooser = new JColorChooser();
         dialog = JColorChooser.createDialog(ColorChooserPanel.this, "Background Color",
               false /* not modal */, chooser,
               event -> setBackground(chooser.getColor()),
               null /* no Cancel button listener */);
      }

      public void actionPerformed(ActionEvent event)
      {
         chooser.setColor(getBackground());
         dialog.setVisible(true);
      }
   }

   /**
    * This listener pops up a modeless color chooser. The panel color is changed immediately when
    * the user picks a new color.
    */
   private class ImmediateListener implements ActionListener
   {
      private JDialog dialog;
      private JColorChooser chooser;

      public ImmediateListener()
      {
         chooser = new JColorChooser();
         chooser.getSelectionModel().addChangeListener(
               event -> setBackground(chooser.getColor()));

         dialog = new JDialog((Frame) null, false /* not modal */);
         dialog.add(chooser);
         dialog.pack();
      }

      public void actionPerformed(ActionEvent event)
      {
         chooser.setColor(getBackground());
         dialog.setVisible(true);
      }
   }
}
八、GUI程序排错
8.1 调试技巧
只需要把这些代码行放在 feme 窗口构造器的末尾。程序运行时, 你将看到会用慢动作填充 内容窗格。
package eventTracer;

import java.awt.*;
import java.beans.*;
import java.lang.reflect.*;

/**
 * @version 1.31 2004-05-10
 * @author Cay Horstmann
 */
public class EventTracer
{
   private InvocationHandler handler;

   public EventTracer()
   {
      // the handler for all event proxies
      handler = new InvocationHandler()
         {
            public Object invoke(Object proxy, Method method, Object[] args)
            {
               System.out.println(method + ":" + args[0]);
               return null;
            }
         };
   }

   /**
    * Adds event tracers for all events to which this component and its children can listen
    * @param c a component
    */
   public void add(Component c)
   {
      try
      {
         // get all events to which this component can listen
         BeanInfo info = Introspector.getBeanInfo(c.getClass());

         EventSetDescriptor[] eventSets = info.getEventSetDescriptors();
         for (EventSetDescriptor eventSet : eventSets)
            addListener(c, eventSet);
      }
      catch (IntrospectionException e)
      {
      }
      // ok not to add listeners if exception is thrown

      if (c instanceof Container)
      {
         // get all children and call add recursively
         for (Component comp : ((Container) c).getComponents())
            add(comp);
      }
   }

   /**
    * Add a listener to the given event set
    * @param c a component
    * @param eventSet a descriptor of a listener interface
    */
   public void addListener(Component c, EventSetDescriptor eventSet)
   {
      // make proxy object for this listener type and route all calls to the handler
      Object proxy = Proxy.newProxyInstance(null, new Class[] { eventSet.getListenerType() },
            handler);

      // add the proxy as a listener to the component
      Method addListenerMethod = eventSet.getAddListenerMethod();
      try
      {
         addListenerMethod.invoke(c, proxy);
      }
      catch (ReflectiveOperationException e)
      {
      }
      // ok not to add listener if exception is thrown
   }
}
8.2 AWT 机器人完成工作
package robot;

import java.awt.*;
import java.awt.event.*;
import java.awt.image.*;
import javax.swing.*;

/**
 * @version 1.05 2015-08-20
 * @author Cay Horstmann
 */
public class RobotTest
{
   public static void main(String[] args)
   {
      EventQueue.invokeLater(() ->
            {
               // make frame with a button panel

               ButtonFrame frame = new ButtonFrame();
               frame.setTitle("ButtonTest");
               frame.setDefaultCloseOperation(JFrame.EXIT_ON_CLOSE);
               frame.setVisible(true);
            });

      // attach a robot to the screen device

      GraphicsEnvironment environment = GraphicsEnvironment.getLocalGraphicsEnvironment();
      GraphicsDevice screen = environment.getDefaultScreenDevice();

      try
      {
         final Robot robot = new Robot(screen);
         robot.waitForIdle();
         new Thread()
         {
            public void run()
            {
               runTest(robot);
            };
         }.start();
      }
      catch (AWTException e)
      {
         e.printStackTrace();
      }
   }

   /**
    * Runs a sample test procedure
    * @param robot the robot attached to the screen device
    */
   public static void runTest(Robot robot)
   {
      // simulate a space bar press
      robot.keyPress(' ');
      robot.keyRelease(' ');

      // simulate a tab key followed by a space
      robot.delay(2000);
      robot.keyPress(KeyEvent.VK_TAB);
      robot.keyRelease(KeyEvent.VK_TAB);
      robot.keyPress(' ');
      robot.keyRelease(' ');

      // simulate a mouse click over the rightmost button
      robot.delay(2000);
      robot.mouseMove(220, 40);
      robot.mousePress(InputEvent.BUTTON1_MASK);
      robot.mouseRelease(InputEvent.BUTTON1_MASK);

      // capture the screen and show the resulting image
      robot.delay(2000);
      BufferedImage image = robot.createScreenCapture(new Rectangle(0, 0, 400, 300));

      ImageFrame frame = new ImageFrame(image);
      frame.setVisible(true);
   }
}

/**
 * A frame to display a captured image
 */
class ImageFrame extends JFrame
{
   private static final int DEFAULT_WIDTH = 450;
   private static final int DEFAULT_HEIGHT = 350;

   /**
    * @param image the image to display
    */
   public ImageFrame(Image image)
   {
      setTitle("Capture");
      setSize(DEFAULT_WIDTH, DEFAULT_HEIGHT);

      JLabel label = new JLabel(new ImageIcon(image));
      add(label);
   }
}
