软件测试过程与方法_第4章 4.3单元JUnit的单元测试
简单测试
创建JUnit的过程


代码
package sample.ut;

import org.junit.After;
import org.junit.Before;
import org.junit.Test;

import static org.junit.Assert.*;

/**
 * @description
 * @Author wuzhichun
 * @date 2020/3/25 21:38
 */


public class BMITest {

    BMI testObj;//被测类

    @Before
    public void setUp() throws Exception {
    }

    @After
    public void tearDown() throws Exception {
    }

    @Test
    public void getBMIType() {
        //创建被测对象
        testObj = new BMI(45.0, 1.6);

        //调用测试方法
        String actual = testObj.getBMIType();

        //校验测试结果
        String expect = "偏瘦";
        assertTrue(expect == actual);
    }
}
独立的测试
package sample.ut;

import org.junit.*;

import static org.junit.Assert.*;

/**
 * @description
 * @Author wuzhichun
 * @date 2020/3/25 21:38
 */


public class BMITest {

    BMI testObj;//被测类

    @Before
    public void setUp() throws Exception {
        testObj = new BMI();
        System.out.println("Run @Before method");

    }

    @After
    public void tearDown() throws Exception {
        testObj = null;
        System.out.println("Run @After method");
    }

    @BeforeClass
    public static void prepareEnvironment(){
        System.out.println("Run @BeforeClass method");
    }

    @AfterClass
    public static void RestoreEnvironment(){
        System.out.println("RUn @AfterClass method");
    }

    @Test
    public void getBMIType() {
        //创建被测对象
//        testObj = new BMI(45.0, 1.6);
        testObj.setParams(45.0, 1.6);

        //调用测试方法
        String actual = testObj.getBMIType();

        //校验测试结果
        String expect = "偏瘦";
        assertTrue(expect == actual);
    }

    @Test
    public void getBMIType_Normal() {
        System.out.println("Run getBMIType_Normal");

        testObj.setParams(55.0, 1.6);
        assertTrue(testObj.getBMIType() == "正常");
    }

    @Test
    public void getBMIType_SlightlyFat() {
        System.out.println("Run getBMIType_SlightlyFat");

        testObj.setParams(68.0, 1.6);
        assertTrue(testObj.getBMIType() == "偏胖");
    }

}
4.3.4参数化运行器
参数化运行器
org.junit.runners.Parameterized
测试数据准备构造器注入: 用带参数的构造函数获取数据集
属性注入: 用属性指定获取数据集
package sample.ut;

import org.junit.After;
import org.junit.Before;
import org.junit.Test;
import org.junit.runner.RunWith;
import org.junit.runners.Parameterized;

import java.util.Arrays;
import java.util.Collection;
import static org.junit.Assert.*;

/**
 * @description
 * @Author wuzhichun
 * @date 2020/3/26 9:15
 */

// 1.指定参数化运行器
    @RunWith(Parameterized.class)


public class BMITestParam {
        BMI testObj;


    //1.定义属性,作为参数
    private double weight;//体重
    private double height;//身高
    private String expected;//预期输出

    //2.定义嗲参数的构造方法,传输数据
    public BMITestParam(double w, double h, String exp){
        this.weight = w;
        this.height = h;
        this.expected = exp;
    }

    //3.准备测试数据集
    @Parameterized.Parameters(name = "{index}:getBMIType[{0},{1}] = [{2}]")
    public static Collection testDataset(){
        return Arrays.asList(
                new Object[][]{
                        {45.0,1.6,"偏瘦"},
                        {55.0,1.6,"正常"},
                        {68.0,1.6, "偏胖"},
                        {80.0,1.6, "肥胖"}
                }
        );

    }

    @Before
    public void setUp() throws Exception {
        testObj = new BMI(weight, height);
    }

    @After
    public void tearDown() throws Exception {
        testObj = null;
    }

    @Test
    public void getBMIType() {
        assertTrue(testObj.getBMIType() == expected);
    }
}
输出结果

4.3.5 测试参数化_属性注入
1.指定参数化运行器
2.准备测试数据(属性注入)2.1. 定义参数:定义公有变量,用于保存输入和预期输出
2.2.引入参数: 指定每个属性为参数
2.3.准备测试数据:定义一个特殊方法
package sample.ut;

import org.junit.After;
import org.junit.Before;
import org.junit.Test;
import org.junit.runner.RunWith;
import org.junit.runners.Parameterized;

import java.util.Arrays;
import java.util.Collection;

import static org.junit.Assert.*;

/**
 * @description
 * @Author wuzhichun
 * @date 2020/3/26 9:52
 */

//指定参数化运行器\
    @RunWith(Parameterized.class)

public class BMITestParam2 {
    //定义属性
    @Parameterized.Parameter(0)
    public double weight;//体重

    @Parameterized.Parameter(1)
    public double height; //身高

    @Parameterized.Parameter(2)
    public String expected;//预期分类

    //准备测试数据集
    @Parameterized.Parameters
    public static Collection testDataset(){
        return Arrays.asList(
                new Object[][]{
                        {45.0,1.6,"偏瘦"},
                        {55.0,1.6,"正常"},
                        {68.0,1.6,"偏胖"},
                        {80.0,1.6,"肥胖"}
                }
        );
    }

    //定义被测类
    BMI testObj;

    @Before
    public void setUp() throws Exception {
        testObj = new BMI(weight, height);

    }

    @After
    public void tearDown() throws Exception {
        testObj = null;
    }

    @Test
    public void getBMIType() {
        assertTrue(testObj.getBMIType() == expected);
    }
}
属性注入输出结果

4.3.6 测试集
实例:血压计算(BloodPressure)

测试套包运行器
org.junit.runners.Suite

实现代码
package sample.ut;

/**
 * @description:根据血压值判断血压分级
 * @Author :wuzhichun
 * @date :2020年3月26日10:58:59
 */
public class BloodPressure {
    int systolicPressure;// 收缩压
    int diatolicPressure;// 舒张压

    // Getter and Setter
    public int getSystolicPressure() {
        return systolicPressure;
    }
    public void setSystolicPressure(int systolicPressure) {
        this.systolicPressure = systolicPressure;
    }
    public int getDiatolicPressure() {
        return diatolicPressure;
    }
    public void setDiatolicPressure(int diatolicPressure) {
        this.diatolicPressure = diatolicPressure;
    }
    // 设置收缩压和舒张压
    public void setParams(int sysPressure, int diaPressure){
        systolicPressure = sysPressure;
        diatolicPressure = diaPressure;
    }

    // Construction
    public BloodPressure(){
        systolicPressure = 0;
        diatolicPressure = 0;
    }
    public BloodPressure(int sysPressure, int diaPressure){
        systolicPressure = sysPressure;
        diatolicPressure = diaPressure;
    }

    // 根据血压值判断所属血压分级
    public String getPressureLevel(){
        String level = "";
        if(systolicPressure<120 && diatolicPressure<80){
            level = "正常";
        }else if( (systolicPressure>=120 && systolicPressure<=139) && (diatolicPressure>=80 && diatolicPressure<=89)){
            level = "正常高值";
        }else if( (systolicPressure>=140 && systolicPressure<=159) || (diatolicPressure>=90 && diatolicPressure<=99)){
            level = "1级高血压";
        }else if( (systolicPressure>=160 && systolicPressure<=179) || (diatolicPressure>=100 && diatolicPressure<=109)){
            level = "2级高血压";
        }else if( (systolicPressure>=180) || (diatolicPressure>=110)){
            level = "3级高血压";
        }else{
            level = "异常值";
        }
        return level;
    }
}
测试代码
package sample.ut;

import org.junit.After;
import org.junit.Before;
import org.junit.Test;

import static org.junit.Assert.*;

/**
 * @description
 * @Author wuzhichun
 * @date 2020/3/26 10:59
 */


public class BloodPressureTest {
    //定义被测类
    BloodPressure testObj;

    @Before
    public void setUp() throws Exception {
        testObj = new BloodPressure();
    }

    @After
    public void tearDown() throws Exception {
        testObj = null;
    }

    @Test
    public void getPressureLevel() {
        testObj.setParams(100,70);
        assertTrue(testObj.getPressureLevel() == "正常");
    }

    @Test
    public void getPressureLevel_NormalHigher() {
        testObj.setParams(130,85);
        assertTrue(testObj.getPressureLevel() == "正常高值");
    }

    @Test
    public void getPressureLevel_FirstLevel() {
        testObj.setParams(150,95);
        assertTrue(testObj.getPressureLevel() == "1级高血压");
    }

    @Test
    public void getPressureLevel_SecondLevel() {
        testObj.setParams(170,105);
        assertTrue(testObj.getPressureLevel() == "2级高血压");
    }

    @Test
    public void getPressureLevel_ThirdLevel() {
        testObj.setParams(190,120);
        assertTrue(testObj.getPressureLevel() == "3级高血压");
    }
}
测试结果

两个用例公用测试代码(套包测试)
package sample.ut;

import org.junit.runner.RunWith;
import org.junit.runners.Suite;

import static org.junit.Assert.*;

/**
 * @description
 * @Author wuzhichun
 * @date 2020/3/26 11:06
 */

//指定运行器,指定要加入的测试类
    @RunWith(Suite.class)
    @Suite.SuiteClasses({BMITest.class, BloodPressureTest.class})


public class testSuiteWIthBMIAndBP {

}
测试结果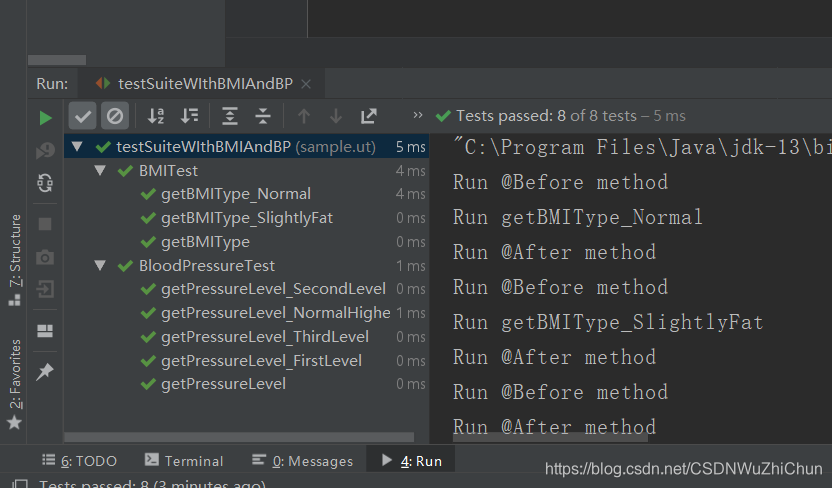
分类测试
基本步骤
1.创建新的测试类,并配置该测试类
2.修改已有测试类,定义具有特定分类的方法

import org.junit.experimental.categories.Categories;
import org.junit.runner.RunWith;
import org.junit.runners.Suite;
import sample.ut.BMITest;
import sample.ut.BVTTest;
import sample.ut.BloodPressureTest;
import sample.ut.EPTest;

/**
 * @description
 * @Author wuzhichun
 * @date 2020/3/26 11:56
 */


    //指定运行器
    //设置要执行的测试特性
    //设置候选测试集

    @RunWith(Categories.class)
    @Categories.IncludeCategory({BVTTest.class})
    @Suite.SuiteClasses({BMITest.class, BloodPressureTest.class})

public class CategoryTest {


}
