1 简介
Qml里面布局主要有Row,、Column、Grid,以及使用Anchor进行布局
- Row
QML 中的 Row 元素会将其子控件都排列在同一行,相互不重叠。我们还可以使用它的spacing 属性来定义子控件之间的距离。 - Column
QML 中的 Column元素会将其子控件都排列在同一行,相互不重叠。我们还可以使用它的spacing 属性来定义子控件之间的距离。 - Grid布局
Grid布局有GridLayout、ColumnLayout、RowLayout、Column、Row,其中ColumnLayout、RowLayout只是GridLayout的一种特例,ColumnLayout表示只有一列,RowLayout表示只有一行。
GridLayout使用columns、rows属性将空间分成若干单元格,使用columnSpacing、rowSpacing确立单元格之间的间隔。而GridLayout内部元素的大小由Layout.fillWidth、Layout.fillHeight以及Layout.preferredWidth、Layout.preferredHeight来确定,如Layout.fillWidth:true表示宽度填充整个单元格,Layout.preferredWidth则指定一个建议宽度。Layout.row、Layout.column确定内部元素处于哪个单元格。注意,不要将内部元素的宽度、高度、x、y与GridLayout进行绑定,容易导致绑定循环。
Column、Row类似于html中的float或是wpf中的StackPanel,会直接将元素一个个挨在一起,元素间的间隔使用spacing控制 - Anchor锚点布局
锚点允许我们灵活地设置两个元素的相对位置。它使两个元素之间形成一种类似于锚的关系,也就是两个元素之间形成一个固定点。锚点的行为类似于一种链接,它要比单纯地计算坐标改变更强。由于锚点描述的是相对位置,所以在使用锚点时,我们必须指定两个元素,声明其中一个元素相对于另外一个元素。锚点是Item元素的基本属性之一,因而适用于所有 QML 可视元素。
2 Row布局
Row {
    spacing: 2
    Rectangle { color: "red"; width: 50; height: 50 }
    Rectangle { color: "green"; width: 20; height: 50 }
    Rectangle { color: "blue"; width: 50; height: 20 }
}

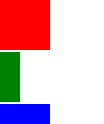
3 Column布局
Column {
    spacing: 2
    Rectangle { color: "red"; width: 50; height: 50 }
    Rectangle { color: "green"; width: 20; height: 50 }
    Rectangle { color: "blue"; width: 50; height: 20 }
}

4 Grid布局
QML 中的 Grid元素会将其子控件都均匀地排列在一个网格内,相互不重叠,每一个子控件都被放置在一个网格单元的(0,0)位置,也就是左上角。Grid的rows 和columns属性定义网格的行数和列数,列数默认是4。我们还可以使用Grid的spacing 属性来定义网格单元之间的距离,这里注意水平和垂直方向的spacing都是一样的。
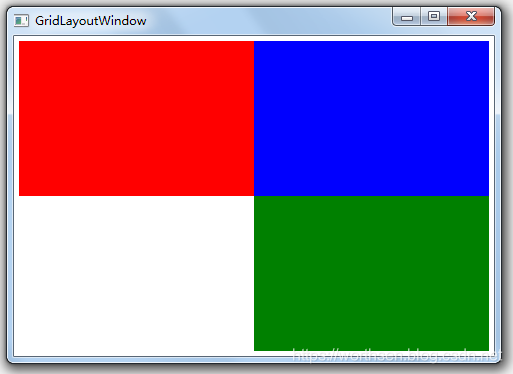
- GridLayout布局的一个示例
import QtQuick 2.3
import QtQuick.Window 2.0
import QtQuick.Layouts 1.1

Window {
    id:gridLayoutWindow;
    title:"GridLayoutWindow";
    width: 480;
    height: 320;
    GridLayout{
        id: gridLayout1
        columns: 2;
        rows:2;
        anchors.fill: parent;
        anchors.margins: 5;
        columnSpacing: 0;
        rowSpacing: 0;

        Rectangle{
            id:rect00;
            color: "red";
            Layout.fillWidth: true;
            Layout.fillHeight: true;
        }

        Rectangle{
            id:rect01;
            color: "blue";
            Layout.fillWidth: true;
            Layout.fillHeight: true;
        }

        Rectangle{
            id:rect10;
            color: "green";
            Layout.fillWidth: true;
            Layout.fillHeight: true;
            Layout.row:1;
            Layout.column: 1;
        }

    }
}

- SplitView布局示例
import QtQuick 2.3
import QtQuick.Window 2.0
import QtQuick.Layouts 1.1
import QtQuick.Controls 1.2

Window {
    width: 480;
    height: 320;
    title: "SplitView";

    SplitView{
        anchors.fill:parent;
        orientation: Qt.Horizontal;
        Rectangle{
            id:rect1;
            width:100;
            color:"red";
        }
        Rectangle{
            id:rect2;
            Layout.fillWidth: true;
            Layout.minimumWidth: 50;
            color:"blue";
        }
        Rectangle{
            id:rect3;
            width:100;
            color:"green";
        }
    }
}

5 锚点布局

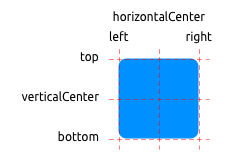
一个元素有6条锚定线(top顶,bottom底,left左,right右,horizontalCenter水平中,verticalCenter垂直中)。在文本元素(Text Element)中有一条文本的锚定基线(baseline)。每一条锚定线都有一个偏移(offset)值,在top(顶),bottom(底),left(左),right(右)的锚定线中它们也被称作边距。对于horizontalCenter(水平中)与verticalCenter(垂直中)与baseline(文本基线)中被称作偏移值。
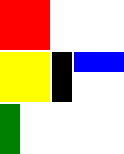
6 混合应用
Column {
    spacing: 2
    Rectangle { color: "red"; width: 50; height: 50 }

    Row {
        spacing: 2
        Rectangle { color: "yellow"; width: 50; height: 50 }
        Rectangle { color: "black"; width: 20; height: 50 }
        Rectangle { color: "blue"; width:50; height: 20 }
    }
    Rectangle { color: "green"; width: 20; height: 50 }
}

参考
1、QT开发(五十三)———QML基本元素
2、QML入门教程:七、布局元素(Layout Items)
3、Qt Quick快速入门之qml布局
4、QML基础——UI布局管理
5、Qt 学习之路 2(81):元素布局
