写在前面
上次介绍了一个Android App项目的文件结构以及各个文件的大致含义,本篇主要介绍Android的界面布局(Layout)。Android界面布局的目的是为了合理利用屏幕空间,并能适配多种屏幕。我们可以利用布局来设计各个控件的位置排布。
Android提供了6种基本布局类:帧布局(FrameLayout)、线性布局(LinearLayout)、绝对布局(AbsoluteLayout)、相对布局(RelativeLayout)、表格布局(TableLayout)和网格布局(GridLayout)。另外,Android还推出一种新的布局方式:ConstraintLayout。有些布局像绝对布局等使用较少,本文只针对线性布局和相对布局等常用布局进行重点介绍,有时间再补齐其它布局方式。
1 帧布局
FrameLayout帧布局,是一种最简单的布局方式。这种布局下,所有的视图和控件都将固定在屏幕的左上角显示,不能指定视图和控件的位置,但允许多个视图和控件的叠加,帧布局很少直接使用,而是使用它的子类,如TextSwitcher、ImageSwitcher和ScrollView。
<?xml version="1.0" encoding="utf-8"?>
<FrameLayout xmlns:android="http://schemas.android.com/apk/res/android"
    xmlns:app="http://schemas.android.com/apk/res-auto"
    xmlns:tools="http://schemas.android.com/tools"
    android:layout_width="match_parent"
    android:layout_height="match_parent"
    tools:context=".MainActivity">

    <ImageView
        android:id="@+id/imageView2"
        android:layout_width="300dp"
        android:layout_height="197dp"
        tools:srcCompat="@tools:sample/backgrounds/scenic" />

    <ImageView
        android:id="@+id/imageView3"
        android:layout_width="163dp"
        android:layout_height="114dp"
        tools:srcCompat="@tools:sample/backgrounds/scenic[1]" />
</FrameLayout>
布局模拟效果如下:
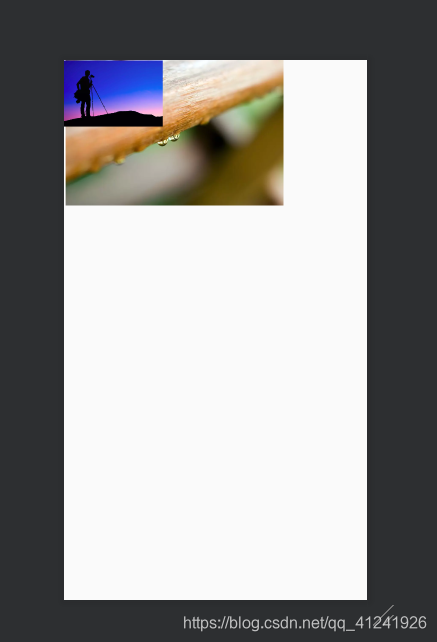
我们直接向FrameLayout中插入了两个ImageView,它们默认在布局的左上角而且位置不能够调整,第二个ImageView叠加在了第一个上面。FrameLayout和其它布局一样有layout_width和layout_height两个属性。
2 线性布局
线性布局是比较常用的一种布局方式,它可以让其中的视图垂直排列或者水平排列。通常来说复杂的布局都是通过线性布局等多层嵌套完成的。通过设置orientation属性来设置排列方向, android:orientation = "vertical"是垂直排列;android:orientation = "horizontal"是水平排列。
2.1 使用线性布局实现登录界面
<?xml version="1.0" encoding="utf-8"?>
<LinearLayout xmlns:android="http://schemas.android.com/apk/res/android"
    xmlns:app="http://schemas.android.com/apk/res-auto"
    xmlns:tools="http://schemas.android.com/tools"
    android:layout_width="match_parent"
    android:layout_height="match_parent"
    android:orientation="vertical"
    tools:context=".MainActivity" >

    <TextView
        android:id="@+id/textView"
        android:layout_width="match_parent"
        android:layout_height="wrap_content"
        android:gravity="center"
        android:text="线性布局实例"
        android:textSize="24sp" />

    <LinearLayout
        android:layout_width="match_parent"
        android:layout_height="50dp"
        android:orientation="horizontal">

        <TextView
            android:id="@+id/textView2"
            android:layout_width="2dp"
            android:layout_height="match_parent"
            android:layout_weight="1"
            android:gravity="center_vertical"
            android:text="用户名:"
            android:textSize="24sp" />

        <EditText
            android:id="@+id/editText"
            android:layout_width="wrap_content"
            android:layout_height="match_parent"
            android:layout_weight="1"
            android:ems="10"
            android:inputType="textPersonName"
            android:text="Name" />
    </LinearLayout>

    <LinearLayout
        android:layout_width="match_parent"
        android:layout_height="50dp"
        android:orientation="horizontal">

        <TextView
            android:id="@+id/textView3"
            android:layout_width="2dp"
            android:layout_height="match_parent"
            android:layout_weight="1"
            android:gravity="center_vertical"
            android:text="密码:"
            android:textSize="24sp" />

        <EditText
            android:id="@+id/editText2"
            android:layout_width="wrap_content"
            android:layout_height="match_parent"
            android:layout_weight="1"
            android:ems="10"
            android:inputType="textPersonName"
            android:text="password" />
    </LinearLayout>

    <LinearLayout
        android:layout_width="match_parent"
        android:layout_height="wrap_content"
        android:orientation="horizontal">

        <Button
            android:id="@+id/button"
            android:layout_width="wrap_content"
            android:layout_height="wrap_content"
            android:layout_weight="1"
            android:text="登录" />

        <Button
            android:id="@+id/button2"
            android:layout_width="wrap_content"
            android:layout_height="wrap_content"
            android:layout_weight="1"
            android:text="注册" />
    </LinearLayout>
</LinearLayout>
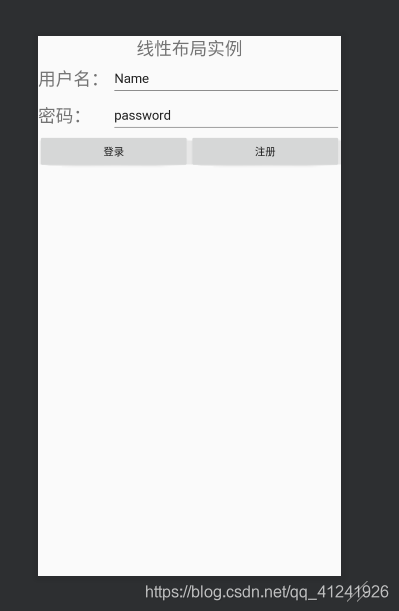
这里直接在一个大的垂直线性布局里面加三个水平的线性布局,实现套娃 。这里特别注意最后一个线性布局中的 android:layout_weight=“1” ,这个属性是用来调整线性布局中几个控件的权重占比;各个小控件的layout_width和layout_height属性的wrap_content和match_parent分别指该控件的宽度/高度是包含自身内容或填满父控件。但是过多的嵌套会消耗很多的系统资源,且看起来结构复杂,所以可以线性布局配合相对布局一起使用。
3 相对布局
相对布局也是比较常用的布局之一,它允许一个视图指定相对于其它视图或者父视图的位置。可以左右对齐、上下对齐或者置于父视图中间。同样我们给出一个实例。
3.1 使用相对布局实现登录界面
还是上面那个登录界面的实现,使用相对布局稍微麻烦一点点。
<?xml version="1.0" encoding="utf-8"?>
<RelativeLayout xmlns:android="http://schemas.android.com/apk/res/android"
    xmlns:app="http://schemas.android.com/apk/res-auto"
    xmlns:tools="http://schemas.android.com/tools"
    android:layout_width="match_parent"
    android:layout_height="match_parent"
    android:orientation="vertical"
    tools:context=".MainActivity" >

    <TextView
        android:id="@+id/title"
        android:layout_width="match_parent"
        android:layout_height="wrap_content"
        android:gravity="center_horizontal"
        android:text="相对布局"
        android:textSize="24sp" />

    <TextView
        android:id="@+id/user"
        android:layout_width="wrap_content"
        android:layout_height="46dp"
        android:layout_below="@id/title"
        android:gravity="center_vertical"
        android:text="用户名:"
        android:textSize="24sp" />

    <EditText
        android:id="@+id/editText3"
        android:layout_width="match_parent"
        android:layout_height="wrap_content"
        android:layout_alignTop="@id/user"
        android:layout_alignParentEnd="true"
        android:layout_toRightOf="@id/user"
        android:inputType="textPersonName"
        android:text="Name" />

    <TextView
        android:id="@+id/password"
        android:layout_width="wrap_content"
        android:layout_height="46dp"
        android:layout_below="@id/user"
        android:gravity="center_vertical"
        android:text="密  码:"
        android:textSize="24sp" />

    <EditText
        android:id="@+id/editText4"
        android:layout_width="wrap_content"
        android:layout_height="wrap_content"
        android:layout_alignTop="@id/password"
        android:layout_alignParentEnd="true"
        android:layout_toRightOf="@id/password"
        android:ems="10"
        android:inputType="textPassword" />

    <Button
        android:id="@+id/button3"
        android:layout_width="wrap_content"
        android:layout_height="wrap_content"
        android:layout_below="@id/password"
        android:layout_alignParentLeft="true"
        android:layout_marginLeft="90dp"
        android:layout_marginTop="20dp"
        android:text="登录" />

    <Button
        android:id="@+id/button4"
        android:layout_width="wrap_content"
        android:layout_height="wrap_content"
        android:layout_alignBottom="@id/button3"
        android:layout_marginLeft="45dp"
        android:layout_toRightOf="@id/button3"
        android:text="注册" />
</RelativeLayout>
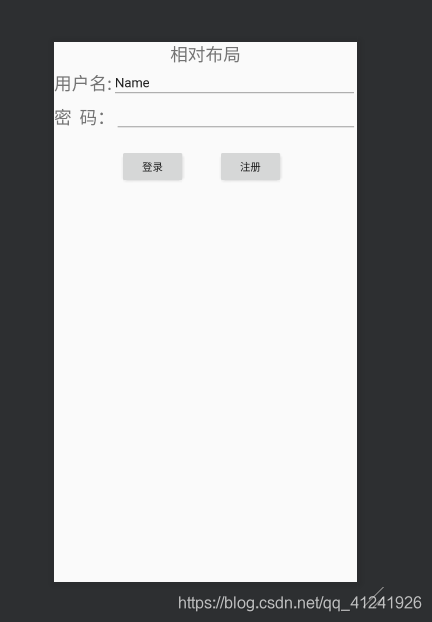
实现的效果如图:
这里重点介绍几个用到的属性:
1.根据父容器来定位(图源:菜鸟教程RelativeLayouthttps://www.runoob.com/w3cnote/android-tutorial-relativelayout.html):
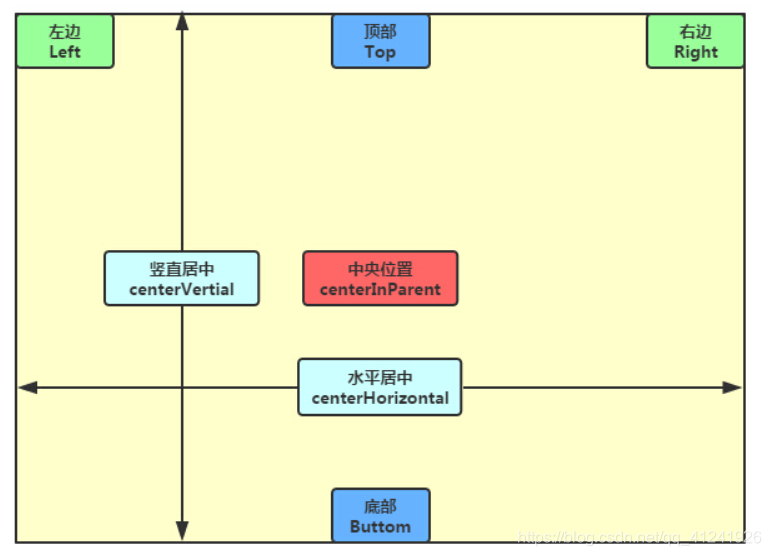
通俗的说就是可以直接选择自己在父容器中的相对位置,如:android:layout_alignParentEnd=“true"和android:layout_centerVertical=“true"分别表示:和父控件右对齐、在父控件中垂直居中,其它命令也可类推。
2.根据其它控件布局:
就是可以选择和其它同级控件选择对齐、相对方位等,如android:layout_below=”@id/password"和android:layout_alignTop=”@id/user"两条命令分别表示:处于@id控件的下面、和@id控件顶部对齐,其它命令类推。
4 总结
本文主要对Android的几种界面布局方式进行了简要介绍,其中最常用的两种布局方式为线性布局(LinearLayout)和相对布局(RelativeLayout),也是本文中重点介绍的,了解Android界面布局方法是Android开发中必不可少的一步。
