这篇博客接着上篇把复选框(CheckBox)、进度栏(ProgressBar)和拖动栏(SeekBar)补充完。
复选框(CheckBox)
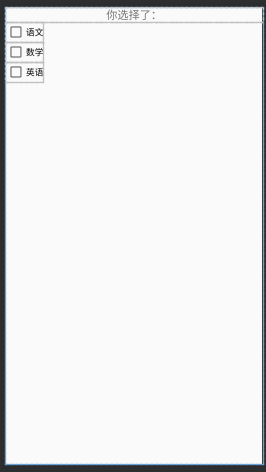
复选框可以给用户提供多个选项,其对应的类是:android.widget.CheckBox;其是它是间接继承了android.widget.Button的;也就是说,复选框本质上也是一种按钮,它其实和ToggleButton很像。此外,复选框有一个特有的属性:android:checked,该属性设置CheckBox的选中状态,是一个布尔值。
废话不多说,直接看一个例子:
布局:
<?xml version="1.0" encoding="utf-8"?>
<RelativeLayout xmlns:android="http://schemas.android.com/apk/res/android"
    xmlns:app="http://schemas.android.com/apk/res-auto"
    xmlns:tools="http://schemas.android.com/tools"
    android:layout_width="match_parent"
    android:layout_height="match_parent"
    android:orientation="vertical"
    tools:context=".MainActivity" >

    <TextView
        android:id="@+id/tv"
        android:layout_width="match_parent"
        android:layout_height="wrap_content"
        android:gravity="center_horizontal"
        android:text="你选择了:"
        android:textSize="18sp" />

    <CheckBox
        android:id="@+id/checkBox"
        android:layout_width="wrap_content"
        android:layout_height="wrap_content"
        android:layout_below="@id/tv"
        android:layout_alignParentStart="true"
        android:text="语文" />

    <CheckBox
        android:id="@+id/checkBox2"
        android:layout_width="wrap_content"
        android:layout_height="wrap_content"
        android:layout_below="@id/checkBox"
        android:layout_alignParentStart="true"
        android:text="数学" />

    <CheckBox
        android:id="@+id/checkBox3"
        android:layout_width="wrap_content"
        android:layout_height="wrap_content"
        android:layout_below="@id/checkBox2"
        android:text="英语" />

</RelativeLayout>
MainActivity.java编写如下:
package com.beihang.test;

import androidx.appcompat.app.AppCompatActivity;

import android.os.Bundle;
import android.widget.CheckBox;
import android.widget.CompoundButton;
import android.widget.TextView;


public class MainActivity extends AppCompatActivity implements CompoundButton.OnCheckedChangeListener {
    public static final String TAG = "MainActivity";

    private TextView tv;
    private CheckBox ch1, ch2, ch3;

    @Override
    protected void onCreate(Bundle savedInstanceState) {
        super.onCreate(savedInstanceState);
        setContentView(R.layout.activity_main);

        initUI();
    }

    @Override
    public void onCheckedChanged(CompoundButton bt, boolean isChecked) {
        StringBuffer sb = new StringBuffer();
        CheckBox ckb = (CheckBox) bt;
        sb.append(ckb.getText());
        if (!isChecked) {
            sb.append("cancelled");
        }
        tv.setText(sb.toString());
    }

    private void initUI() {
        tv = findViewById(R.id.tv);
        ch1 = findViewById(R.id.checkBox);
        ch2 = findViewById(R.id.checkBox2);
        ch3 = findViewById(R.id.checkBox3);
        ch1.setOnCheckedChangeListener(this);
        ch2.setOnCheckedChangeListener(this);
        ch3.setOnCheckedChangeListener(this);
    }

}
代码逻辑也很简单,就是给每个CheckBox设置监听器,这里设置为活动类本身;然后覆写onCheckedChanged()方法。这里要注意的是:CheckBox的事件处理是实现CompoundButton.OnCheckedChangeListener接口,和RadioButton不同,RadioButton的事件处理者要实现的接口是RadioGroup.OnCheckedChangeListener。它们的事件源差别很大,前者事件源是CheckBox,而后者的事件源是RadioGroup,不是RadioButton。
进度栏(ProgressBar)
进度栏(ProgressBar)用来反馈后台任务是否正在处理或者处理的进度。进度栏属于android.widget.ProgressBar类,其直接继承android.view.View类。
下面是一些ProgressBar常用的属性和方法:
android:max 设置进度最大值。
android:progress 设置当前进度。
android:secondaryProgress 第二层进度栏进度。
android:indeterminate 设置不确定模式进度栏,true为不确定模式。(不确定模式就是不能确定进度,只是一直转圈…)
getMax() 返回进度最大值。
getProgress() 返回进度值。
getSecondaryProgress() 返回第二层进度栏进度值。
incrementProgressBy(int diff) 设置增加进度。
isIndeterminate() 是否为不确定模式。
setIndeterminate(boolean) 设置不确定模式。
进度栏的种类有很多种,有水平条状进度栏、大圆形进度栏、小圆形进度栏等,这里举例介绍两种。
一般来说条状进度栏用来表示进度确定的任务,圆形表示进度不能确定的任务。
布局如下:
<?xml version="1.0" encoding="utf-8"?>
<RelativeLayout xmlns:android="http://schemas.android.com/apk/res/android"
    xmlns:app="http://schemas.android.com/apk/res-auto"
    xmlns:tools="http://schemas.android.com/tools"
    android:layout_width="match_parent"
    android:layout_height="match_parent"
    android:orientation="vertical"
    tools:context=".MainActivity" >

    <ProgressBar
        android:id="@+id/progressBar"
        style="?android:attr/progressBarStyleHorizontal"
        android:layout_width="200dp"
        android:layout_height="wrap_content"
        android:layout_marginTop="20dp" />

    <Button
        android:id="@+id/inc_btn"
        android:layout_width="wrap_content"
        android:layout_height="wrap_content"
        android:layout_below="@id/progressBar"
        android:layout_alignParentLeft="true"
        android:text="INC" />

    <Button
        android:id="@+id/dec_btn"
        android:layout_width="wrap_content"
        android:layout_height="wrap_content"
        android:layout_below="@id/progressBar"
        android:layout_toRightOf="@id/inc_btn"
        android:text="DEC" />

    <ProgressBar
        android:id="@+id/progressBar2"
        style="?android:attr/progressBarStyle"
        android:layout_width="wrap_content"
        android:layout_height="wrap_content"
        android:layout_below="@id/inc_btn"
        android:layout_alignParentLeft="true"
        android:layout_marginTop="20dp"
        android:visibility="gone"/>

    <ToggleButton
        android:id="@+id/load_btn"
        android:layout_width="wrap_content"
        android:layout_height="wrap_content"
        android:layout_below="@id/progressBar2"
        android:text="ToggleButton"
        android:textOff="加载"
        android:textOn="停止" />

</RelativeLayout>
布局包括了条状进度栏和圆形进度栏,通过按钮来调节它们的状态,其中条状进度栏通过按钮设置进度,圆形进度栏不确定。
MainActivity.java如下:
package com.beihang.test;

import androidx.appcompat.app.AppCompatActivity;
import android.os.Bundle;
import android.view.View;
import android.widget.Button;
import android.widget.ProgressBar;
import android.widget.ToggleButton;

public class MainActivity extends AppCompatActivity implements View.OnClickListener{
    public static final String TAG = "MainActivity";
    private Button incBtn,decBtn;
    private ToggleButton loadBtn;
    private ProgressBar pb1, pb2;

    @Override
    protected void onCreate(Bundle savedInstanceState) {
        super.onCreate(savedInstanceState);
        setContentView(R.layout.activity_main);

        initUI();
    }

    @Override
    public void onClick(View v) {
        switch (v.getId()) {
            case R.id.inc_btn:
                pb1.incrementProgressBy(1);
                break;
            case R.id.dec_btn:
                pb1.incrementProgressBy(-1);
                break;
            case R.id.load_btn:
                if (!loadBtn.isChecked()) {
                    pb2.setVisibility(ProgressBar.GONE);
                } else {
                    pb2.setVisibility(ProgressBar.VISIBLE);
                }
        }
    }

    private void initUI() {
        incBtn = findViewById(R.id.inc_btn);
        decBtn = findViewById(R.id.dec_btn);
        loadBtn = findViewById(R.id.load_btn);
        incBtn.setOnClickListener(this);
        decBtn.setOnClickListener(this);
        loadBtn.setOnClickListener(this);

        pb1 = findViewById(R.id.progressBar);
        pb2 = findViewById(R.id.progressBar2);
    }

}
这里使用incrementProgressBy()方法来调节条状进度的当前值,当然你也可以显示出当前值。通过调节圆形进度栏的Visibility属性来控制它是否可见,其中ProgressBar.GONE为不可见且不会占用空间,设置成ProgressBar.VISIBLE为可见,即一直转圈。
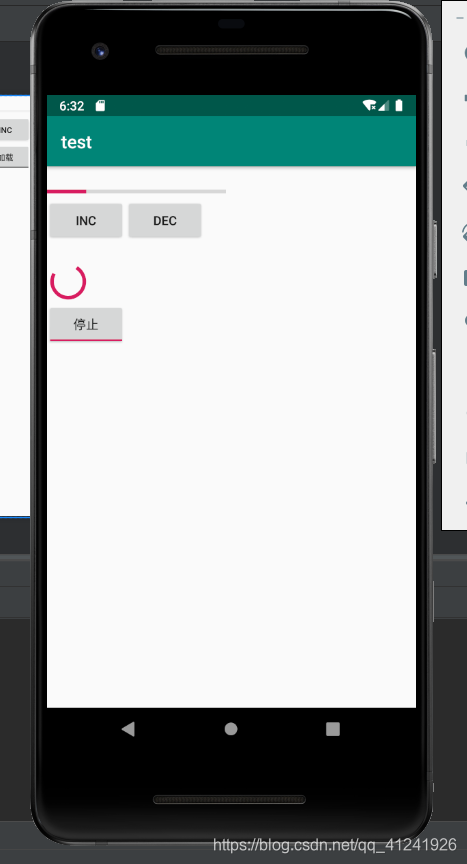
运行的结果如上图,按钮调节进度,按钮控制圆形进度栏是否显示,如我们所愿。
拖动栏(SeekBar)
拖动栏是可以拖动的进度栏,也就是说用户可以调节这个空间的进度,经常用在播放器中。拖动栏对应的类是android.widget.SeekBar,它继承了进度栏android.widget.ProgressBar,也就是说SeekBar也是一种进度栏。此外,可以通过android:thumb属性来自定义滑块的样式。
同样举例说明:
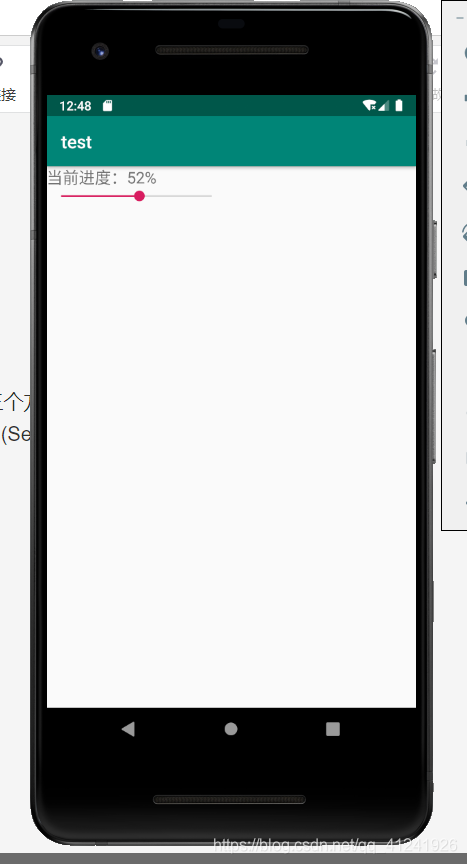
布局只有一个TextView和一个SeekBar。
<?xml version="1.0" encoding="utf-8"?>
<RelativeLayout xmlns:android="http://schemas.android.com/apk/res/android"
    xmlns:app="http://schemas.android.com/apk/res-auto"
    xmlns:tools="http://schemas.android.com/tools"
    android:layout_width="match_parent"
    android:layout_height="match_parent"
    android:orientation="vertical"
    tools:context=".MainActivity" >

    <TextView
        android:id="@+id/tv"
        android:layout_width="wrap_content"
        android:layout_height="wrap_content"
        android:text="当前进度:"
        android:textSize="18sp" />

    <SeekBar
        android:id="@+id/seekBar"
        android:layout_width="200dp"
        android:layout_height="wrap_content"
        android:layout_below="@id/tv" />
</RelativeLayout>
下面是MainActivity.java文件内容。
package com.beihang.test;

import androidx.appcompat.app.AppCompatActivity;
import android.os.Bundle;
import android.util.Log;
import android.widget.SeekBar;
import android.widget.TextView;

public class MainActivity extends AppCompatActivity implements SeekBar.OnSeekBarChangeListener{
    public static final String TAG = "MainActivity";
    private TextView tv;
    private SeekBar sb;

    @Override
    protected void onCreate(Bundle savedInstanceState) {
        super.onCreate(savedInstanceState);
        setContentView(R.layout.activity_main);

        initUI();
    }

    @Override
    public void onProgressChanged(SeekBar sb, int progress, boolean fromUser) {
        tv.setText("当前进度:" + progress + "%");
    }

    @Override
    public void onStartTrackingTouch(SeekBar sb) {
        Log.i(TAG, "开始拖动!");
    }

    @Override
    public void onStopTrackingTouch(SeekBar sb) {
        Log.i(TAG, "结束拖动!");
    }

    private void initUI() {
        tv = findViewById(R.id.tv);
        sb = findViewById(R.id.seekBar);
        sb.setOnSeekBarChangeListener(this);
    }

}
注意SeekBar的监听器需要实现SeekBar.OnSeekBarChangeListener接口,这个接口中有三个方法需要覆写,即:onProgressChanged(SeekBar sb, int progress, boolean fromUser);onStartTrackingTouch(SeekBar sb);onStopTrackingTouch(SeekBar sb)。可以用来监听拖动栏被操作的情况。
效果如下:
总结
本篇介绍了Android的CheckBox、ProgressBar、SeekBar三种控件的使用,和上篇一起对Android中较为简单的一些控件的使用就介绍完毕了,还有较为复杂一点的如:列表类控件、对话框类控件等有时间后续补齐。
