一、 摘要
介绍Android中View的异步消息,以及消息传递流程。
二、 分析View.post()
说起View的异步消息,也就是View.post()这个方法,它常用于在主线程更新UI,我们要搞清楚它的具体实现,先来看看post()的源码(postDelayed()原理相同,因此不再单独讲解):
/**
 * <p>Causes the Runnable to be added to the message queue.
 * The runnable will be run on the user interface thread.</p>
 *
 * @param action The Runnable that will be executed.
 *
 * @return Returns true if the Runnable was successfully placed in to the
 *         message queue.  Returns false on failure, usually because the
 *         looper processing the message queue is exiting.
 *
 * @see #postDelayed
 * @see #removeCallbacks
 */
public boolean post(Runnable action) {
    final AttachInfo attachInfo = mAttachInfo;
    if (attachInfo != null) {
        return attachInfo.mHandler.post(action);
    }

    // Postpone the runnable until we know on which thread it needs to run.
    // Assume that the runnable will be successfully placed after attach.
    getRunQueue().post(action);
    return true;
}
这部分告诉我们以下几点信息:
- Runnable会被加入到消息队列。
- Runnable将在主线程执行。
- 当mAttachInfo为空时,消息会被发送到RunQueue当中。
因此,我们分别讨论这两种情况:(1)mAttachInfo不为空:AttachInfo的实例化;(2)mAttachInfo为空:RunQueue机制。
1. AttachInfo的实例化
先追踪mAttachInfo的赋值过程:
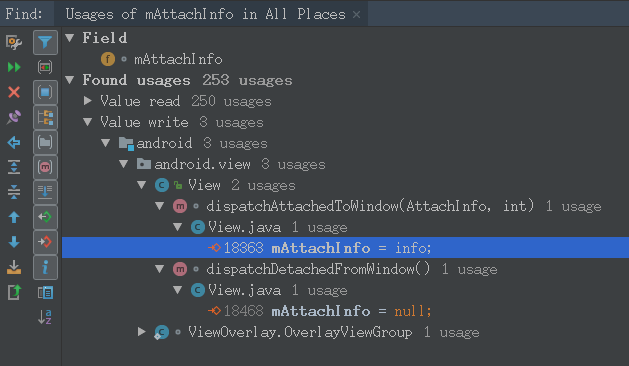
然后我们来看dispatchAttachedToWindow()的调用:
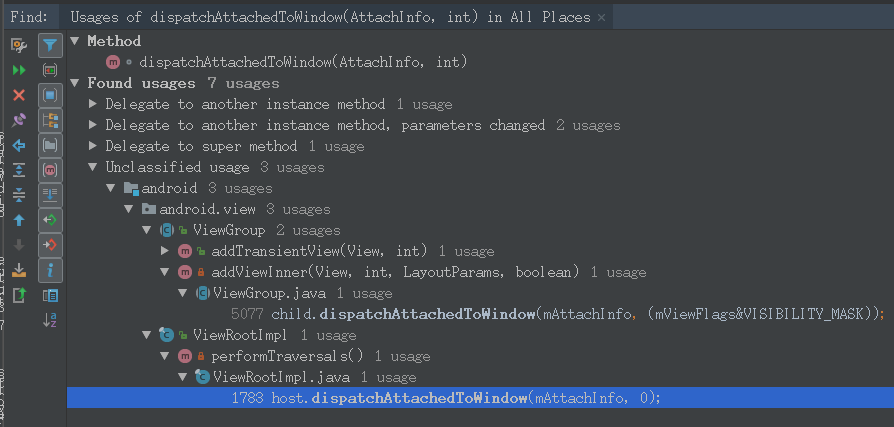
根据上一章《Android中View的绘制流程》所学内容,我们知道了ViewRootImpl中的这个View对象是一个DecorView实例,而DecorView又继承ViewGroup,因此通过ViewGroup的dispatchAttachedToWindow(),可以从ViewRootImpl到DecorView再到子View进行递归调用,将同一个AttachInfo对象传给它们。所以我们直接看ViewRootImpl中的这处调用,并且它位于上一章中分析过的performTraversals()中:
private void performTraversals() {
    final View host = mView;
    // ...
    if (mFirst) {
        host.dispatchAttachedToWindow(mAttachInfo, 0);
        // ...
    }
    // ...
    performMeasure();
    // ...
    performLayout();
    // ...
    performDraw();
    // ...
}
- 第一次初始化时绑定mAttachInfo。
- 绑定mAttachInfo在measure过程之前。
假如我们在绑定mAttachInfo之后,performMeasure()之前,调用View.post()并在其中获取View的宽高,那么能正确获得宽高吗?答案是,可以!这涉及到Activity的消息轮询机制——MessageQueue,为了不偏离主题,此处直接以结论形式表述,具体分析将在单独一篇文章中介绍,Activity位于ActivityThread中,ActivityThread有一个Looper成员,这就是主线程的轮询,它里面包含了一个MessageQueue,我们的主线程异步消息最终都是被加入到这个MessageQueue中,当Looper轮询到一个Message时,便执行Message,并且会调用ViewRootImpl.performTraversals(),那么,当我们在绑定mAttachInfo之后,performMeasure()之前,调用View.post(),此时会创建一个新的Message到消息队列中,只有当下一次轮询到该Message时,才会去执行里面的获取宽高操作,而那时,View早已完成了测量工作,并且有具体的宽高值了。
说完了dispatchAttachedToWindow(),我们接着追踪mAttachInfo的实例化过程:

在ViewRootImpl实例化时进行mAttachInfo的实例化,并且我们可以看到传入了一个mHandler,这也就是View.post()中使用的Handler对象,我们再来看看这个mHandler的实例化:
final class ViewRootHandler extends Handler {...}

final ViewRootHandler mHandler = new ViewRootHandler();
在声明时便实例化,Handler的无参构造表示使用当前Looper,ViewRootImpl又是运行于主线程,因此最终到View.post()中,也是由主线程的Looper执行,这也解释了无论我们的View对象是在子线程还是主线程调用post(),最终都能在主线程执行。
补充说明一点,如果我们使用View.postDelayed(),并在其中使用外部Activity的引用,就存在内存泄露的风险,这涉及到“非静态内部类持有外部引用导致内存泄漏”这个问题,假如此时我们的Activity对象已经销毁,但是主线程中延迟执行该消息,其中涉及到对Activity实例的操作,那就会引发很严重的问题,解决方法是使用弱引用去创建外部Activity的引用。感兴趣的读者可以参考我的另一篇文章《Java四种引用方式》
2. RunQueue机制
由View.post()中的getRunQueue()方法开始入手:
/**
 * Returns the queue of runnable for this view.
 *
 * @return the queue of runnables for this view
 */
private HandlerActionQueue getRunQueue() {
    if (mRunQueue == null) {
        mRunQueue = new HandlerActionQueue();
    }
    return mRunQueue;
}
返回当前View对象的mRunQueue,如果为空,则实例化。
再看HandlerActionQueue:
/**
 * Class used to enqueue pending work from Views when no Handler is attached.
 *
 * @hide Exposed for test framework only.
 */
public class HandlerActionQueue {
    private HandlerAction[] mActions;
    private int mCount;

    public void post(Runnable action) {
        postDelayed(action, 0);
    }

    public void postDelayed(Runnable action, long delayMillis) {
        final HandlerAction handlerAction = new HandlerAction(action, delayMillis);

        synchronized (this) {
            if (mActions == null) {
                mActions = new HandlerAction[4];
            }
            mActions = GrowingArrayUtils.append(mActions, mCount, handlerAction);
            mCount++;
        }
    }

    // ...

    public void executeActions(Handler handler) {
        synchronized (this) {
            final HandlerAction[] actions = mActions;
            for (int i = 0, count = mCount; i < count; i++) {
                final HandlerAction handlerAction = actions[i];
                handler.postDelayed(handlerAction.action, handlerAction.delay);
            }

            mActions = null;
            mCount = 0;
        }
    }

    // ...

    private static class HandlerAction {
        final Runnable action;
        final long delay;

        public HandlerAction(Runnable action, long delay) {
            this.action = action;
            this.delay = delay;
        }
        // ...
    }
}
- 这个类专用于当View中还未绑定Handler时,将待执行任务加入队列。
- post()只做了入列的事,并没有去执行任务。
- executeActions()使用传入的Handler对象去执行队列中的任务。
那么我们就去看什么时候调用的executeActions():
/**
 * @param info the {@link android.view.View.AttachInfo} to associated with
 *        this view
 */
void dispatchAttachedToWindow(AttachInfo info, int visibility) {
    mAttachInfo = info;
    // ...
    // Transfer all pending runnables.
    if (mRunQueue != null) {
        mRunQueue.executeActions(info.mHandler);
        mRunQueue = null;
    }
    // ...
}
只有这一处调用,而这一处又刚好是上一节讲过的dispatchAttachedToWindow(),由此我们明白了,当ViewRootImpl中进行AttachInfo实例的传递时,View中会去遍历RunQueue,并通过ViewRootHandler对象将消息发送到主线程的消息队列中,等待轮询执行。
三、 总结
View.post()内部分为两种执行方式:当View中的AttachInfo对象还未初始化时,post()将消息加入一个临时队列RunQueue中;当AttachInfo对象初始化之后,会一次性把临时队列中的消息全部加入主线程消息队列中等待执行,并且之后调用post()都会直接把消息加入到主线程消息队列中等待执行。
