目录
为什么Hander在子进程里发消息,最后会由handler所在的进程处理消息?
Looper.loop()在主进程里死循环,不会造成阻塞吗?
一、什么是Android异步消息机制?
想象这样一个需求场景,你的App现在需要从网络请求或数据库中去获取数据,然后将数据展示到屏幕上。因为网络请求和数据库查询属于是耗时操作,如果在主进程里进行,那么就会造成App卡顿,用户体验极差的后果。
所以,这时候你需要开启一个子线程去执行这些耗时操作,等耗时操作完成之后,再去更新UI界面。
这时候你兴冲冲的去写代码,
button.setOnClickListener {
    thread {
        ....          //耗时操作
        textView.text = date     //更新UI
    }
}
执行程序,点击按钮,发现程序直接崩溃了。然后日志里出现了这样一句话
Only the original thread that created a view hierarchy can touch its views.
说人话就是,只有创建这个Activity或者Fragment的线程才能够修改他的view。
这和很多的GUI库一样,UI操作是线程不安全的,所以禁止在子线程里去修改UI内容,只能在创建他的线程里去修改。
这时候你犯难了,那应该怎么办呢,这时候就需要用到异步消息机制了。
异步消息机制的作用在于不同线程之间的通信。也就是说,我们可以去在子线程里执行耗时操作,等操作执行完成,再利用异步消息机制告诉主线程我拿到数据了,这时候主线程再去修改UI。就能解决我们的需求了。
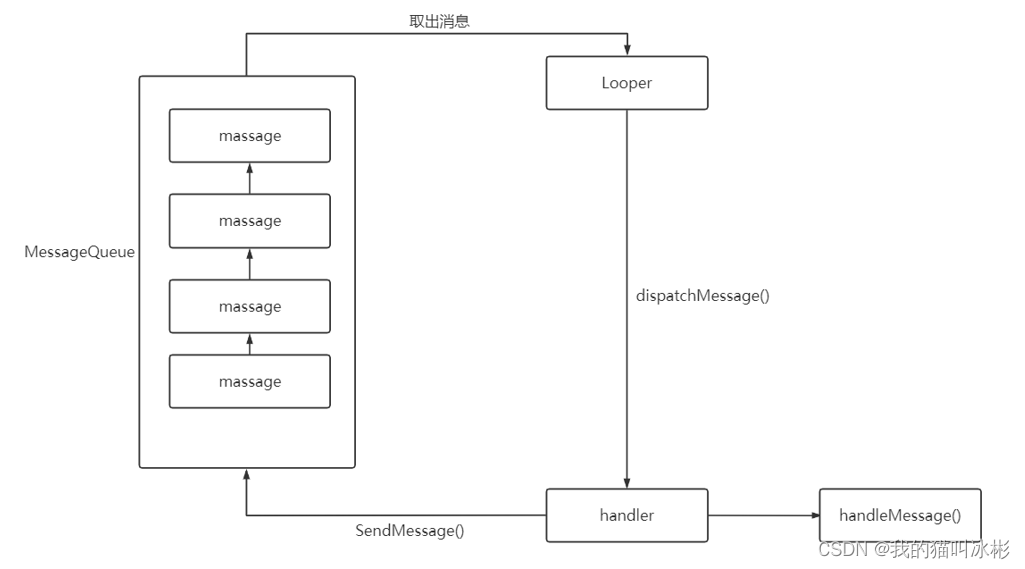
那么Android为我们提供了这样一套机制,他由下面几部分组成:
-
Message
在线程之间传递的消息
-
Handler
消息的处理者,用于发送和接受消息。
-
MessageQueue
消息队列,Handler发送的消息都会存在这个队列中。一个线程只有一个消息队列。
-
Looper
Looper顾名思义是循环,他是每个线程里MessageQueue的管理者,负责取出消息然后发送给handle。一个线程只有一个Looper
整个的工作流程如下图:
二、异步消息机制入门
前面我们说过了异步消息机制的主要成员,这里我们就来简单的应用一下,看异步消息机制是如何使用的。
首先我们在Activity的布局里添加一个TextView用户展示文字,这也是我们要修改的UI组件,再写一个Button用来开启一个线程。
<?xml version="1.0" encoding="utf-8"?>
<LinearLayout xmlns:android="http://schemas.android.com/apk/res/android"
xmlns:app="http://schemas.android.com/apk/res-auto"
xmlns:tools="http://schemas.android.com/tools"
android:orientation="vertical"
android:layout_width="match_parent"
android:layout_height="match_parent"
tools:context=".ThreadUpdateUiActivity">
<Button
android:id="@+id/btn_changeUI"
android:layout_width="match_parent"
android:layout_height="wrap_content"
android:text="修改内容"/>
<TextView
android:id="@+id/tv_content"
android:layout_width="match_parent"
android:layout_height="wrap_content"
android:text="this is a TextView"
android:gravity="center_horizontal"
android:textSize="20sp"
android:textColor="@color/black"/>
</LinearLayout>然后到Activity的代码里,去添加异步消息机制。
class HandlerUpdateUiActivity : AppCompatActivity() {
val updateText = 1
val handler = object : Handler(Looper.getMainLooper()) {
override fun handleMessage(msg: Message) {
when(msg.what) {
updateText -> {
tv_content.text = "我收到了消息"
}
}
}
}
override fun onCreate(savedInstanceState: Bundle?) {
super.onCreate(savedInstanceState)
setContentView(R.layout.activity_thread_update_ui)
btn_changeUI.setOnClickListener {
thread {
val msg = Message()
msg.what = updateText
handler.sendMessage(msg)
}
}
}
}首先我们定义了一个成员变量handler,并重写了其中的handleMessage()方法。这个方法里,根据接收到的msg.what这个参数来确定message的意图,然后进行相应的操作。
val updateText = 1
val handler = object : Handler(Looper.getMainLooper()) {
override fun handleMessage(msg: Message) {
when(msg.what) {
updateText -> {
tv_content.text = "我收到了消息"
}
}
}
}接着在button的点击事件中,我们创建了一个Message对象,并把msg.what这个变量设置为开头定义的udateText。最终调用handler.sendMessage()将事件发送。
最终运行效果呢,就是点击按钮后,TextView的内容就改变了。

点击后->

基本的入门用法呢就是这样了,可能你还有疑问,为什么没有看到Looper和MessageQueue,他们又是怎么工作的。那接下来就是到源码里的去解析的时候了。
三、源码解析
1.Message
异步消息机制,我们先来看看消息是由什么构成的。
1.1消息内容
public final class Message implements Parcelable {
public int what;
public int arg1;
public int arg2;
public Object obj;
...
Bundle data;
...
}先来看看五个重要的成员变量。
-
what
这个变量我们之前的例子中使用过,他的作用是让接收者知道你的消息是关于什么的。
-
arg1、arg2
如果你的消息在传输过程中,只需要传输一个或两个int变量,那么就可以直接用这两个变量赋值和获取。
-
obj
如果你需要传输一个对象,那么可以使用这个变量去存储。不过注意,这个对象需要通过Parcelable序列化才可以。
-
data
这是一个Bundle对象,利用Bundle就可以把你想要传输的所有数据都存在这里面,然后进行传输了。
利用这五个变量,你就可以在Message里传递数据了。
其中设置data的方法是调用setDate()
    public void setData(Bundle data) {
        this.data = data;
    }
获取有两个方法,一个是getData(),一个是peekData()。
public Bundle getData() {
if (data == null) {
data = new Bundle();
}
return data;
}
public Bundle peekData() {
return data;
}通过源码可以很清楚的看出来,getData()一定能获取到一个Bundle对象,而peekData()有可能获取到null。
1.2.处理消息
Message内部还有一个Handler变量和Runnable变量
@UnsupportedAppUsage
Handler target;
@UnsupportedAppUsage
Runnable callback;target很好理解,这条消息最终要发给哪一个handler。
callback会和handler的处理消息是一起讲到,现在只用知道Message的callback可以自己处理消息。
1.3.缓存机制
想象一下,我们一个App里必定会有很多地方都会用到异步消息机制去传递消息。如果我们每次都去new一个Message,那么会造成内存浪费。而message这个对象,其实只要传递到,handler执行了相应的操作就可以了。那么这些Message就可以缓存下来,以便后面去使用。
官方在Message类前有这样一句话:
- While the constructor of Message is public, the best way to get
one of these is to call {@link #obtain Message.obtain()} or one of the
{@link Handler#obtainMessage Handler.obtainMessage()} methods, which will pull
them from a pool of recycled objects.</p>
翻译一下就是,虽然Message的构造函数是公开的,但是获取一个Message最好的方式是通过Message.obtain()或者handler.obtainMessage()来获取,这会从缓存池里去获取。
那我们就去看一看Message.obtain()的源码。先来看一看相关的几个成员变量
@UnsupportedAppUsage
// Message可以被组成一个链表,而缓存池就是一个链表结构
/*package*/ Message next;
/** @hide */
public static final Object sPoolSync = new Object();
// 缓存池
private static Message sPool;
// 缓存池的大小
private static int sPoolSize = 0;
// 缓存池的最大长度
private static final int MAX_POOL_SIZE = 50;
// 该版本系统是否支持回收标志位
private static boolean gCheckRecycle = true;然后就可以看一下obtain()的源码了。
    public static Message obtain() {
        // 同步锁 保证线程安全
        synchronized (sPoolSync) {
            if (sPool != null) {
                Message m = sPool;
                sPool = m.next;
                m.next = null;
                m.flags = 0; // clear in-use flag
                sPoolSize--;
                return m;
            }
        }
        return new Message();
}源码也比较好读懂。首先缓存池其实就是一个链表结构,sPool这个变量就是链表的头结点。
如果缓存池不为空呢,那么就取出头结点返回;如果缓存池为空,那就new一个对象返回。

那么现在问题来了,Message是怎么加入缓存池的呢?继续阅读源码,找到了recycle()这个方法
     public void recycle() {
        if (isInUse()) {
            if (gCheckRecycle) {
                throw new IllegalStateException("This message cannot be recycled because it "
                        + "is still in use.");
            }
            return;
        }
        recycleUnchecked();
    }
首先他会进入isInUse()判断消息是否正在使用
    boolean isInUse() {
        return ((flags & FLAG_IN_USE) == FLAG_IN_USE);
}然后如果这条消息正在使用的话,就会抛出一个异常,这条消息不能被回收因为正在被使用。
如果不是正在使用,那么就会进入到recycleUnchecked()里面去。
void recycleUnchecked() {
flags = FLAG_IN_USE;
what = 0;
arg1 = 0;
arg2 = 0;
obj = null;
replyTo = null;
sendingUid = UID_NONE;
workSourceUid = UID_NONE;
when = 0;
target = null;
callback = null;
data = null;
synchronized (sPoolSync) {
if (sPoolSize < MAX_POOL_SIZE) {
next = sPool;
sPool = this;
sPoolSize++;
}
}
}可以看到这个函数里把成员变量里能置空的都赋值为null了。然后进入同步锁,如果缓存池的大小没有超过最大值,那么就把这条消息放在缓存池的头结点处。

整个缓存机制和流程还是比较好理解的。
为了方便使用呢,Message还提供了一系列有参的obtain()方法,来满足各种需求,去对一些成员变量赋值。
    // 基本上都是你传入什么参数,就帮你给相应的成员变量赋值
    public static Message obtain(Message orig)
    public static Message obtain(Handler h)
    public static Message obtain(Handler h, Runnable callback)
    public static Message obtain(Handler h, int what)
    public static Message obtain(Handler h, int what, Object obj)
    public static Message obtain(Handler h, int what, int arg1, int arg2)
    public static Message obtain(Handler h, int what, int arg1, int arg2, Object obj)
1.4.小结
这部分解析了Message的组成,如何携带数据传输,还有Message的缓存机制,利用链表做缓存池子。
这部分还没解决的问题:Message何时回收?成员变量callback有什么用。
2.Handler和Looper
因为这两个关系比较密切,所以我打算放在一起解析。
2.1.Handler里的Looper
我们先看一下Handler的构造函数
public Handler(@Nullable Callback callback, boolean async) {
if (FIND_POTENTIAL_LEAKS) {
final Class<? extends Handler> klass = getClass();
if ((klass.isAnonymousClass() || klass.isMemberClass() || klass.isLocalClass()) &&
(klass.getModifiers() & Modifier.STATIC) == 0) {
Log.w(TAG, "The following Handler class should be static or leaks might occur: " +
klass.getCanonicalName());
}
}
        mLooper = Looper.myLooper();
        if (mLooper == null) {
            throw new RuntimeException(
                "Can't create handler inside thread " + Thread.currentThread()
                        + " that has not called Looper.prepare()");
        }
mQueue = mLooper.mQueue;
mCallback = callback;
mAsynchronous = async;
}值得注意的地方是
mLooper = Looper.myLooper();
if (mLooper == null) {
throw new RuntimeException(
"Can't create handler inside thread " + Thread.currentThread()
+ " that has not called Looper.prepare()");
}这里handler要去获取一个自己的Looper,如果获取不到,则会抛出异常,
接着进入Looper.myLooper()看一看
    public static @Nullable Looper myLooper() {
        return sThreadLocal.get();
    }
sThreadLocal这个变量是一个ThreadLocal类型的。
static final ThreadLocal<Looper> sThreadLocal = new ThreadLocal<Looper>();ThreadLocal可以使我们创建变量后,每个线程访问的都是自己的变量。
Looper创建变量是在prepare
private static void prepare(boolean quitAllowed) {
    if (sThreadLocal.get() != null) {
        throw new RuntimeException("Only one Looper may be created per thread");
    }
    sThreadLocal.set(new Looper(quitAllowed));
}
这个方法里保证了每个线程里都只有一个Looper。
所以 这就是说 我们创建Handler之前,应该先调用Looper.prepare()去创建一个本线程的Looper,否则的话会抛出异常!这就是为什么我们在子线程里创建handler一定要调用Looper.prepare()。
有人说主线程里也没调用啊,这是因为在主程序启动时,系统已经帮我们调用过了,所以在主线程里才不需要再去调用。
public static void main(String[] args) {
    SamplingProfilerIntegration.start();
    CloseGuard.setEnabled(false);
    Environment.initForCurrentUser();
    EventLogger.setReporter(new EventLoggingReporter());
    Process.setArgV0("<pre-initialized>");
    Looper.prepareMainLooper();             //这一行!!!
    ActivityThread thread = new ActivityThread();
    thread.attach(false);
    if (sMainThreadHandler == null) {
        sMainThreadHandler = thread.getHandler();
    }
    AsyncTask.init();
    if (false) {
        Looper.myLooper().setMessageLogging(new LogPrinter(Log.DEBUG, "ActivityThread"));
    }
    Looper.loop();
    throw new RuntimeException("Main thread loop unexpectedly exited");
}
public static final void prepareMainLooper() {
    prepare();
    setMainLooper(myLooper());
    if (Process.supportsProcesses()) {
        myLooper().mQueue.mQuitAllowed = false;
    }
}
最终这里就会调用prepare().
不过,Handler的无参构造函数不建议使用了。
/**
     * Default constructor associates this handler with the {@link Looper} for the
     * current thread.
     *
     * If this thread does not have a looper, this handler won't be able to receive messages
     * so an exception is thrown.
     *
     * @deprecated Implicitly choosing a Looper during Handler construction can lead to bugs
     *   where operations are silently lost (if the Handler is not expecting new tasks and quits),
     *   crashes (if a handler is sometimes created on a thread without a Looper active), or race
     *   conditions, where the thread a handler is associated with is not what the author
     *   anticipated. Instead, use an {@link java.util.concurrent.Executor} or specify the Looper
     *   explicitly, using {@link Looper#getMainLooper}, {link android.view.View#getHandler}, or
     *   similar. If the implicit thread local behavior is required for compatibility, use
     *   {@code new Handler(Looper.myLooper())} to make it clear to readers.
     *
     */
    @Deprecated
    public Handler() {
        this(null, false);
}因为隐式的选择Looper可能会导致操作丢失、崩溃或出现竞争。所以更推荐指定Looper的方式去创建Handler。
    public Handler(@NonNull Looper looper) {
        this(looper, null, false);
    }

    public Handler(@NonNull Looper looper, @Nullable Callback callback, boolean async) {
        mLooper = looper;
        mQueue = looper.mQueue;
        mCallback = callback;
        mAsynchronous = async;
    }
所以在前面的例子中,创建Handler的方式是
val handler = object : Handler(Looper.getMainLooper())2.2.Handler发送消息
前面的入门例子中提到,handler发送消息是通过sendMessage()方法发送的,其实还有很多发送消息的方法,比如
sendMessageDelayed(@NonNull Message msg, long delayMillis) //在指定毫秒后发送消息不过这些方法最终都会走到sendMessageAtTime()这个方法里。
    public boolean sendMessageAtTime(@NonNull Message msg, long uptimeMillis) {
        MessageQueue queue = mQueue;
        if (queue == null) {
            RuntimeException e = new RuntimeException(
                    this + " sendMessageAtTime() called with no mQueue");
            Log.w("Looper", e.getMessage(), e);
            return false;
        }
        return enqueueMessage(queue, msg, uptimeMillis);
    }
首先,这里先获取了成员变量mQueue,也就是消息队列。如果为空,则会抛出异常;如果不为空,就会走到enqueueMessage()
private boolean enqueueMessage(@NonNull MessageQueue queue, @NonNull Message msg,
long uptimeMillis) {
msg.target = this;
msg.workSourceUid = ThreadLocalWorkSource.getUid();
if (mAsynchronous) {
msg.setAsynchronous(true);
}
return queue.enqueueMessage(msg, uptimeMillis);
}函数的参数都很好理解,第一个是消息队列,第二个msg是要传递的消息,第三个是延迟发送的时间。
这条消息就会通过queue.enqueueMessage()进入到队列中去。这里我们暂时不去分析MessageQueue的源码,只需要知道这条消息现在已经进入队列了。
2.3.Looper取出消息
前面说到,Looper是MessageQueue的管家,他自然是去消息队列中取出消息的。
而取出消息的方法在loop()里
    public static void loop() {
        final Looper me = myLooper();
        ...
        final MessageQueue queue = me.mQueue;
        ...
        for (;;) {
            Message msg = queue.next(); // might block
            if (msg == null) {
                return;
            }
            ...
            try {
                msg.target.dispatchMessage(msg);
                ...
            } catch (Exception exception) {
                ...
                throw exception;
            } finally {
                ...
            }
           ...
            msg.recycleUnchecked();
        }
    }
可以看到,这个方法里开了一个死循环,然后不断地从消息队列中取出消息。
如果取出的消息为空,或者取出的消息不知道该发给谁,就什么都不做。
否则,就会走到msg.target.dispatchMessage(msg); 这就是handler去处理消息的方法了。
方法的最后,我们还能见到msg.recycleUnchecked(); 也就是在处理完之后,在这里,msg被回收了。和前面分析的Message对应了起来。
分析到这里的时候我有一个问题,Looper.loop()是一个死循环,并且主线程会创建一个自己的Looper对象,说明Looper.loop()是在主线程里的一个死循环。这样的设计不会导致阻塞吗?答案在文末给出。
2.4.Handler处理消息
前面Looper取出消息后,会调用handler的dispatchMessage()这个方法。
    public void dispatchMessage(@NonNull Message msg) {
        if (msg.callback != null) {
            handleCallback(msg);
        } else {
            if (mCallback != null) {
                if (mCallback.handleMessage(msg)) {
                    return;
                }
            }
            handleMessage(msg);
        }
    }
前面在Message里提到一个Runnable callback的成员变量。在这里就能看出他的作用,如果在Message里设置了callback,那么最终会走到这里。
    private static void handleCallback(Message message) {
        message.callback.run();
    }
也就是说,Message是可以开启一个子线程去自己处理一些事情的,并不一定是handler来处理。
如果Message自己不处理呢,那就由Handler自己处理了。
首先Handler内部有一个接口
    public interface Callback {
        boolean handleMessage(@NonNull Message msg);
}这个接口只需要实现一个handleMessage的方法,也就是处理消息。不过这个是需要一个boolean返回值的。通过dispatchMessage()源码可以分析出,如果callback的handleMessage()返回false,那么handler本身也能继续处理这条消息;如果返回true,handler自己就不能处理了。
这个机制是不是很熟悉,在事件分发里也有这样的机制。
2.5.小结
这部分解析了为什么子线程创建handler需要先调用Looper.prepare(),Handler和Looper是怎样协作,使得消息传递并得到处理的。
这时候再去看这张图是不是就更清晰了

异步消息机制到此为止整个原理就比较清晰了,MessageQueue的源码因为篇幅原因就不在这里分析了。
四、解决疑问
为什么Hander在子进程里发消息,最后会由handler所在的进程处理消息?
首先因为Looper和MessageQueue是一个进程只有一个,Handler在哪个进程创建,则该进程应该有自己的Looper和MessageQueue。而Handler在发送消息时,是将消息放到了自己创建线程里的MessageQueue,最终由所在线程的Looper取出并发给Handler。
所以无论handler是在哪个线程发送消息,都会在创建它的线程里去处理消息。
Looper.loop()在主进程里死循环,不会造成阻塞吗?
首先为什么需要死循环。我们的App都是在运行时保持运行状态的,如果没有这个死循环,那么程序就会结束,就会退出。所以死循环是很有必要的。Android本身是基于事件驱动的,每一次点击事件或者Activity的声明周期都是在Looper的控制下的。所以其实我们的代码就是基于这个死循环执行的,如果它停了,应用也就停了。
所以在这样的基础下,也就不会造成阻塞。
五、总结
本文从入门到源码解析,分析了Android异步消息的机制。
Message的结构和缓存机制,Handler和Looper的协作。
希望能对读者的理解有一点帮助。
如果错误,恳请指出。