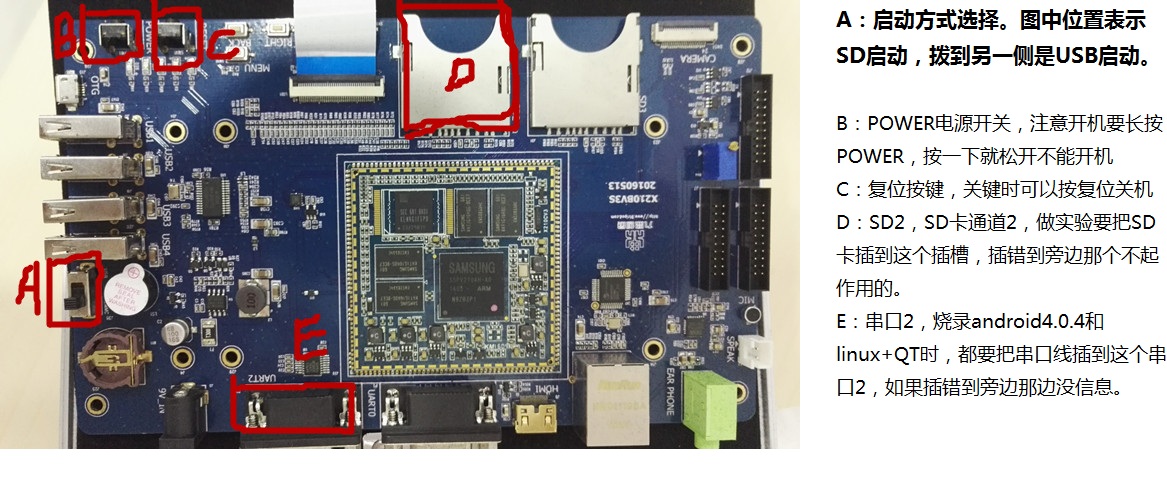
硬件图示:
1,破坏iNand中的bootloader以从SD2启动
如果是安卓:
busybox dd if=/dev/zero of=/dev/block/mmcblk0 bs=512 seek=1 count=1 conv=sync
sync
如果是linux:
busybox dd if=/dev/zero of=/dev/mmcblk0 bs=512 seek=1 count=1 conv=sync
sync
出现如下打印时成功:
onv=sync10v3 ~]# busybox dd if=/dev/zero of=/dev/mmcblk0 bs=512 seek=1 count=1 c
1+0 records in
1+0 records out
[root@x210v3 ~]# sync
SD checksum Error
2,制作启动SD卡与使用fastboot刷机:
(1)使用纸卡工具烧写uboot
注意:纸卡工具要用管理员身份运行,否则烧写uboot失败
(2)使用fastboot刷机
注意:要使用另外一根线作为链接fastboot的线,同时电脑要安装fastboot驱动,否则无法识别开发板
驱动位置:H:\朱老师大讲堂\开发版光盘资料\X210V3S_A\tools\USB驱动\x210_android_driver
然后PC端执行fastboot devices可以看见开发板的设备名
链接上fastboot后可以在串口终端看到开发板的分区信息:
x210 # fastboot
[Partition table on MoviNAND]
ptn 0 name='bootloader' start=0x0 len=N/A (use hard-coded info. (cmd: movi))
ptn 1 name='kernel' start=N/A len=N/A (use hard-coded info. (cmd: movi))
ptn 2 name='ramdisk' start=N/A len=0x300000(~3072KB) (use hard-coded info. (cmd: movi))
ptn 3 name='config' start=0xB11E00 len=0x1024BC00(~264495KB)
ptn 4 name='system' start=0x10D5DA00 len=0x1024BC00(~264495KB)
ptn 5 name='cache' start=0x20FA9600 len=0x6751800(~105798KB)
ptn 6 name='userdata' start=0x276FAE00 len=0xC3CC2A00(~3207946KB)
在PC端FASTBOOT 文件夹下建立image文件夹,将要烧写的镜像文件(安卓与linux)放入此文件家中,PC端执行如下指令:
E:\linux210_tools\fastboot>fastboot flash bootloader image\QT4.8\uboot.bin
sending 'bootloader' (384 KB)... OKAY
writing 'bootloader'... OKAY
E:\linux210_tools\fastboot>fastboot flash kernel image\QT4.8\zImage-qt
sending 'kernel' (3566 KB)... OKAY
writing 'kernel'... OKAY
E:\linux210_tools\fastboot>fastboot flash system image\QT4.8\rootfs_qt4.ext3
sending 'system' (262144 KB)... OKAY
writing 'system'... OKAY
烧写的过程中可以在开发板上看见进度条,同时开发板串口打印:
Received 17 bytes: download:00060000
Starting download of 393216 bytes
downloading of 393216 bytes finished
Received 16 bytes: flash:bootloader
flashing 'bootloader'
Writing BL1 to sector 1 (16 sectors).. checksum : 0xed75e
writing bootloader.. 49, 1024
MMC write: dev # 0, block # 49, count 1024 ... 1024 blocks written: OK
completed
partition 'bootloader' flashed
Received 17 bytes: download:0037b800
Starting download of 3651584 bytes
...
downloading of 3651584 bytes finished
Received 12 bytes: flash:kernel
flashing 'kernel'
writing kernel.. 1073, 8192
MMC write: dev # 0, block # 1073, count 8192 ... 8192 blocks written: OK
completed
partition 'kernel' flashed
Received 17 bytes: download:10000000
Starting download of 268435456 bytes
................................................................................
................................................................................
................................................................................
...............
downloading of 268435456 bytes finished
Received 12 bytes: flash:system
flashing 'system'
MMC write: dev # 0, block # 551661, count 528990 ... 528990 blocks written: OK
partition 'system' flashed
完成后,PC端执行,fastboot reboot,重启开发板,重启后开发板正常运行
进入系统后,用户名:root 密码:123456
(3)在ubuntu下对SD
3,安装交叉编译器:
1.4.3.4、交叉编译工具链的安装
步骤1:打开虚拟机,在/usr/local/下创建/usr/local/arm文件夹
步骤2:先将安装包从Windows中弄到linux中去。可以用共享文件夹,也可以用Samba,也可以cuteftp。
步骤3:解压。tar -jxvf arm-2009q3.tar.bz2
到此相当于程序已经安装完毕,真正的应用程序安装在/usr/local/arm/arm-2009q3/bin目录下
注意64微系统会出现:
使用 sudo apt-get install ia32-libs命令
这个库已经失效了,此时用另外的三个库替换,可以使用: sudo apt-get install lib32z1