1、ZXing简介
ZXing(“斑马线”)是一种开放源代码的多格式1D / 2D条码图像处理库,以Java实现,并带有其他语言的端口。
GitHub地址
https://github.com/zxing/zxing
官方API文档
https://zxing.github.io/zxing/apidocs/
2、创建项目
利用IDEA创建项目:


因为该代码被组织成几个子目录,对应于模块,如core/和javase/。所以我们要导入两个JAR包。在项目的pom.xml文件中添加一下依赖:
<dependency>
  <groupId>com.google.zxing</groupId>
  <artifactId>core</artifactId>
  <version>3.4.0</version>
</dependency>

<dependency>
  <groupId>com.google.zxing</groupId>
  <artifactId>javase</artifactId>
  <version>3.4.0</version>
</dependency>
因为需要生成二维码并展示,所以需要配置资源映射:
package com.heiban.springboot.config;

import org.springframework.context.annotation.Configuration;
import org.springframework.web.servlet.config.annotation.ResourceHandlerRegistry;
import org.springframework.web.servlet.config.annotation.WebMvcConfigurer;
import java.io.File;

/**
 * @author 鲁智深菜园子
 * @date 2020 3 22
 */
@Configuration
public class MyMvcConfig implements WebMvcConfigurer {

    //用于添加资源映射
    @Override
    public void addResourceHandlers(ResourceHandlerRegistry registry) {
        registry.addResourceHandler("/images/**")
                .addResourceLocations("file:"+new File("").getAbsolutePath()+File.separator+"uploads"+File.separator+"images"+File.separator);
    }
}
3、生成二维码
下面是生成二维码的核心代码,这个方法在生成二维码的同时直接将二维码写入磁盘,并返回二维码文件的名称:
/**
 * 生成二维码
 * @param filePath 需要存储到的位置
 * @param content 二维码中包含的内容
 * @param width 二维码的宽度
 * @param height 二维码的高度
 * @return fileName 返回文件的随机名称
 */
public String createQRcode(String filePath,String content,int width,int height) throws Exception{

    //如果文件夹不存在就创建文件夹
    File temp = new File(filePath);
    if (!temp.exists()){
        temp.mkdirs();
    }

    HashMap hints = new HashMap();
    hints.put(EncodeHintType.CHARACTER_SET, "utf-8");//设置字符的编码
    hints.put(EncodeHintType.MARGIN, 1);//设置外边距的距离
    BitMatrix bitMatrix = new QRCodeWriter().encode(content, BarcodeFormat.QR_CODE, width, height, hints);

    MatrixToImageConfig matrixToImageConfig = new MatrixToImageConfig(Color.BLACK.getRGB(), Color.WHITE.getRGB());

    BufferedImage bufferedImage = MatrixToImageWriter.toBufferedImage(bitMatrix,matrixToImageConfig);

    String fileName = UUID.randomUUID() + ".jpg";//随机生成二维码的名称
    ImageIO.write(bufferedImage, "jpg", new File(filePath + File.separator + fileName));//将图片写到磁盘

    return fileName;
}
核心方法讲解:
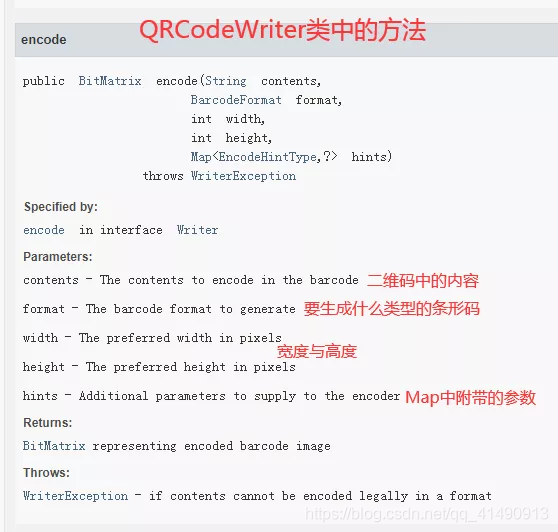
Map中附带的信息,主要有4个类:
-
BarcodeFormat 配置条形码格式如:二维码 BarcodeFormat.QR_CODE
-
DecodeHintType 封装一种提示,调用者可以将其传递给条形码阅读器,以帮助其更快或更准确地解码。
-
EncodeHintType 这些是一组提示,可以传递给编写器以指定其行为
-
ResultMetadataType 表示解码器希望与调用者通信的有关解码结果的某种类型的元数据。
4、解析二维码
下面是解析二维码的核心代码,这个方法传入二维码的磁盘地址,返回解析到的内容:
/**
 * 解析二维码
 * @param path 文件的路径
 * @return URL
 */
public String analysisQRcode(String path) throws Exception{

    File file = new File(path);
    if (!file.isFile()) return null;//判断该文件是否存在

    BinaryBitmap bitmap = new BinaryBitmap(new HybridBinarizer(new BufferedImageLuminanceSource(ImageIO.read(file))));

    HashMap hints = new HashMap();
    hints.put(DecodeHintType.CHARACTER_SET, "utf-8");//设置字符集

    //获取二维码的内容
    String result = new QRCodeReader().decode(bitmap, hints).getText();

    return result;
核心方法讲解:

测试生成二维码与解析二维码:

