一.案例概述
本案例需要一定的Python编程基础并掌握OpenCV基本使用。
时间仓促:初略编写文档
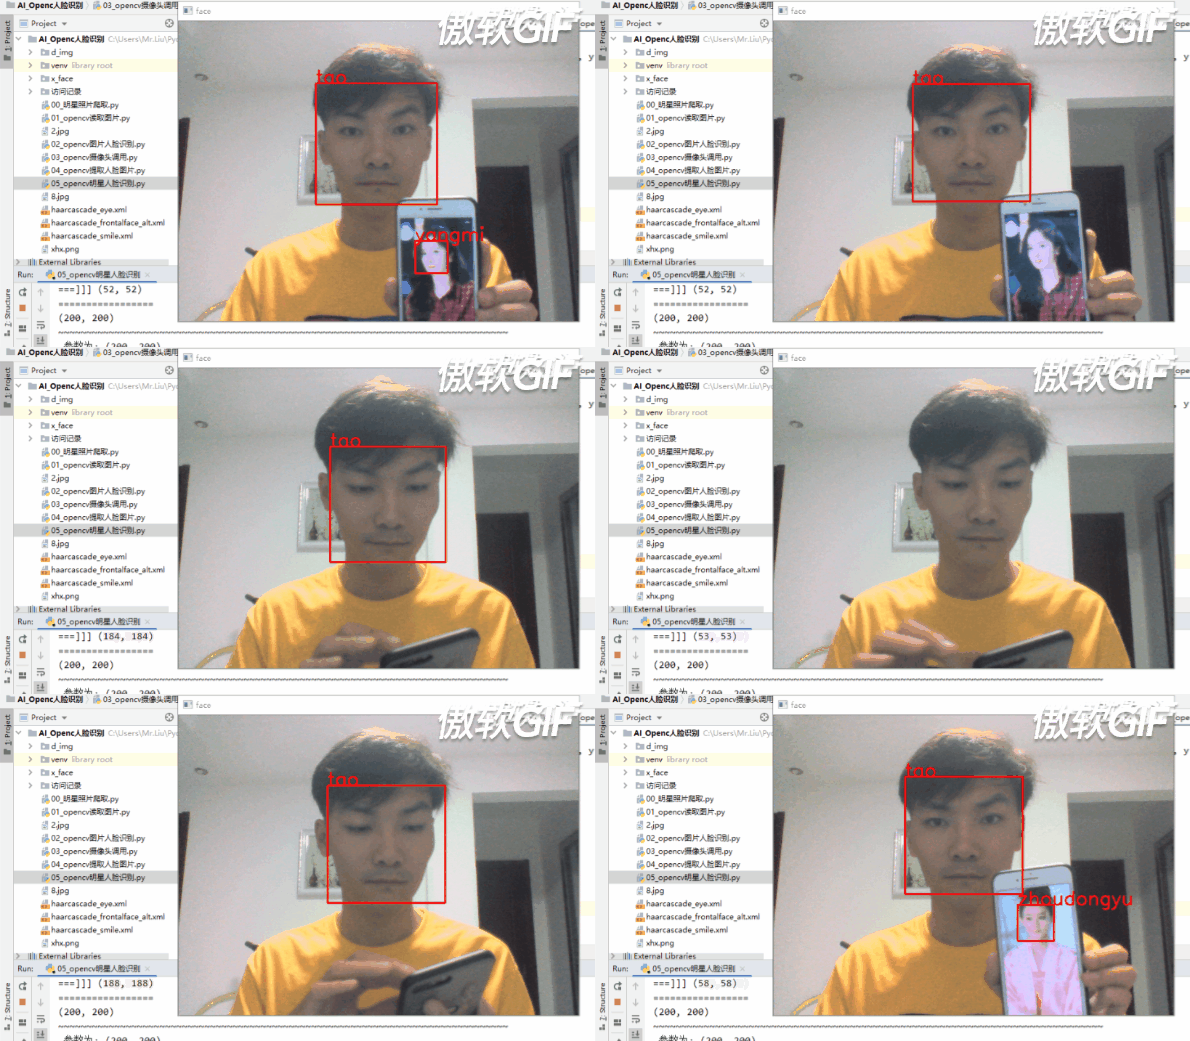
效果如下:

开发环境:
操作系统:Windows 10
开发工具:PyCharm 2019.2版本
python版本:3.6.7
计算机视频库包:opencv_contrib_python-4.1.0.25-cp36-cp36m-win_amd64.whl
算法支持包:numpy(安装opencv默认安装numpy)
下载地址:
Python3.6.7: https://www.python.org/downloads/
Pycharm工具: http://www.jetbrains.com/pycharm/download/#section=windows
第三方包下载:https://pypi.org/project/opencv-contrib-python/#files
二.编写案例准备资源:
准备工作:
 1.开发环境、开发工具及第三方包准备完善并创建空项目。
 2.准备一些个人的图片(或者通过代码保存个人面部存入本地)要求:图片名称有一定规律
 3.爬虫文件 - 爬取明星照片并存储本地
 4.将明星图片和个人图片通过opencv处理保存面部图片
 5.开始编写人脸识别的代码
三.代码编写顺序
一.爬虫代码直接下载运行:点击下载
链接: https://pan.baidu.com/s/1BNzSQ2Xk9GkYslhwKXLYSQ 提取码: qmy1
二.安装python爬虫需要的第三方包:
- requests(用户网络访问)
- beautifulsoup4(用户数据结构解析)
- pypinyin(用于中文转换为拼音)
三.运行python爬虫代码:

四.将图片转换为面部图片进行存储:
# 获取小头像信息
import cv2
import os
# 图片张数变量
def read_image():
    dirs = os.listdir("d_img")
    for j,dir in enumerate(dirs):
        print(dir)
        # 判断是否有存储头像的路径
        file_path = "x_face/%s"%str(dir);
        if not os.path.exists(file_path):
            os.makedirs(file_path);
            pass
        num = 0;
        for i in range(0,20):
            image = cv2.imread('d_img/%s/%d.jpg'%(dir,i))
            gray = cv2.cvtColor(image,code = cv2.COLOR_BGR2GRAY);
            # 数据参数
            face_detector = cv2.CascadeClassifier("haarcascade_frontalface_alt.xml");
            # [3]进行数据对比:minNeighbors = 每一个目标至少要被检测 -整数
            face_01 = face_detector.detectMultiScale(gray, minNeighbors=4);
            # 绘制矩形人脸检测
            print("第%d张图片===:"%i,face_01)
            print(type(face_01))
            if isinstance(face_01,tuple):
                print("没有检查的头像")
                pass
            else:
                print("****有检查的头像****")
                for x, y, w, h in face_01:
                    # time.sleep(10)
                    x_face = gray[y:y + h, x:x + w];
                    x_face = cv2.resize(x_face,dsize=(200,200));
                    bo_photo = cv2.imwrite("%s\%d.jpg" % (file_path, num), x_face);
                    print("保存成功:%d" % num)
                    pass
                num+=1;
                pass
            pass
    pass
if __name__ == '__main__':
    read_image();
    pass
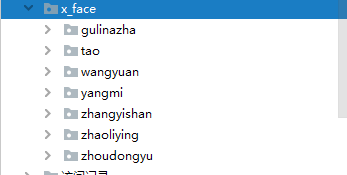
运行结果 - 生产以下文件:

五.人脸识别 - 主代码:
# 人脸识别 - 主代码
import cv2
import os
import time
import numpy as np;
# 图片张数变量
def Get_x_faces():
    dirs = os.listdir("x_face")
    print(dirs)
    X = []#
    Y = []#
    for j,dir in enumerate(dirs):
        for i in range(0,9):
            image = cv2.imread('x_face/%s/%d.jpg'%(dir,i))
            gray = cv2.cvtColor(image,code = cv2.COLOR_BGR2GRAY);
            print("读取",gray.shape)
            # NoneType  ndarray
            if len(str(image))!=0:
                print("加入。。。。")
                X.append(gray)
                Y.append(j)
                pass
    return [X,Y,dirs]
    pass

if __name__ == '__main__':
    X,Y,dirs = Get_x_faces();
    print("X=",X)
    print("Y=",Y)
    print("dirs=",dirs)
    #asarray都可以将结构数据转化为ndarray
    X = np.asarray(X);
    Y = np.asarray(Y);
    # 产生一个随机数 -
    index = [i for i in range(0,len(X))];
    print(index)
    #现场修改序列,改变自身内容。(类似洗牌,打乱顺序)
    np.random.shuffle(index);
    print("***********",index)
    # 打乱顺序 :相同规则打乱
    X = X[index]
    Y = Y[index]
    print("88888888",Y)
    # 训练数据
    print("训练数据为:",len(X),len(Y))
    X_train = X[:len(X)]
    Y_train = Y[:len(Y)];
    print("800000",Y_train)
    # 算法Eigen 特征的意思
    # 主成分分析(PCA)——Eigenfaces(特征脸)——函数:cv2.face.EigenFaceRecognizer_create
    model = cv2.face.EigenFaceRecognizer_create();
    print(model)
    # 算法学习
    print("算法学习", len(X_train), len(Y_train));
    model.train(X, Y);
    print("已经学会了数据。。。。")
	# 测试数据
    # X_test, Y_test = X[-5:], Y[-5:];
    # 开始验证
    # for data in X_test:
    #     # print(data)
    #     result = model.predict(data);
    #     print("=================")
    #     print(result)
    #     print(dirs[result[0]])
    #     pass

    Video_face = cv2.VideoCapture(0);
    face_detector = cv2.CascadeClassifier("haarcascade_frontalface_alt.xml")
    # while循环调取视频图形
    while True:
        flag,frame = Video_face.read();
        gray = cv2.cvtColor(frame,code=cv2.COLOR_BGR2GRAY);
        faces = face_detector.detectMultiScale(gray,1.3,5);

        if isinstance(faces, tuple):
            print("没有检查的头像")
            pass
        else:
            print("有头像了。。。。")
            # for循环遍历数据
            for x, y, w, h in faces:
                cv2.rectangle(frame, pt1=(x, y), pt2=(x + w, y + h), color=[0, 0, 255], thickness=2);
                face = gray[y:y + h, x:x+w];
                print("===]]]", face.shape)
                face_1 = cv2.resize(face, dsize=(200, 200));
                print("=================")
                print(face_1.shape)
                # 开始对比
                print("~~~~"*20)
                print(" 参数为:",face_1.shape);
                result = model.predict(face_1);
                print("对比返回结果:", result)
                print('该人脸是:', dirs[result[0]])
                a1 = dirs[result[0]]
                if result[1]<1600:
                    a1 = "NO"
                    pass
                cv2.putText(frame, a1, (x, y), cv2.FONT_ITALIC, 1, [0, 0, 255], 2);
                pass
            pass
        cv2.imshow('face', frame)
        cv2.waitKey(100)
        pass
    video.release()
    cv2.destroyAllWindows();
    pass
六.大功告成:
如有BUG或疑问以及需要完整代码的小伙伴:
加QQ群提问和下载源代码: 群号:485024315

