一.Redis回顾
一.Redis概念
1.什么是Redis
2.Redis的特点和优势
二.Redis的常用命令(5个数据结构)
1.String结构相关命令
2.list结构相关命令
3.set结构相关命令
4.zset结构相关命令
5.hash结构相关命令
四.使用Jedis操作Redis
1.Jedis的使用
2.JedisAPI
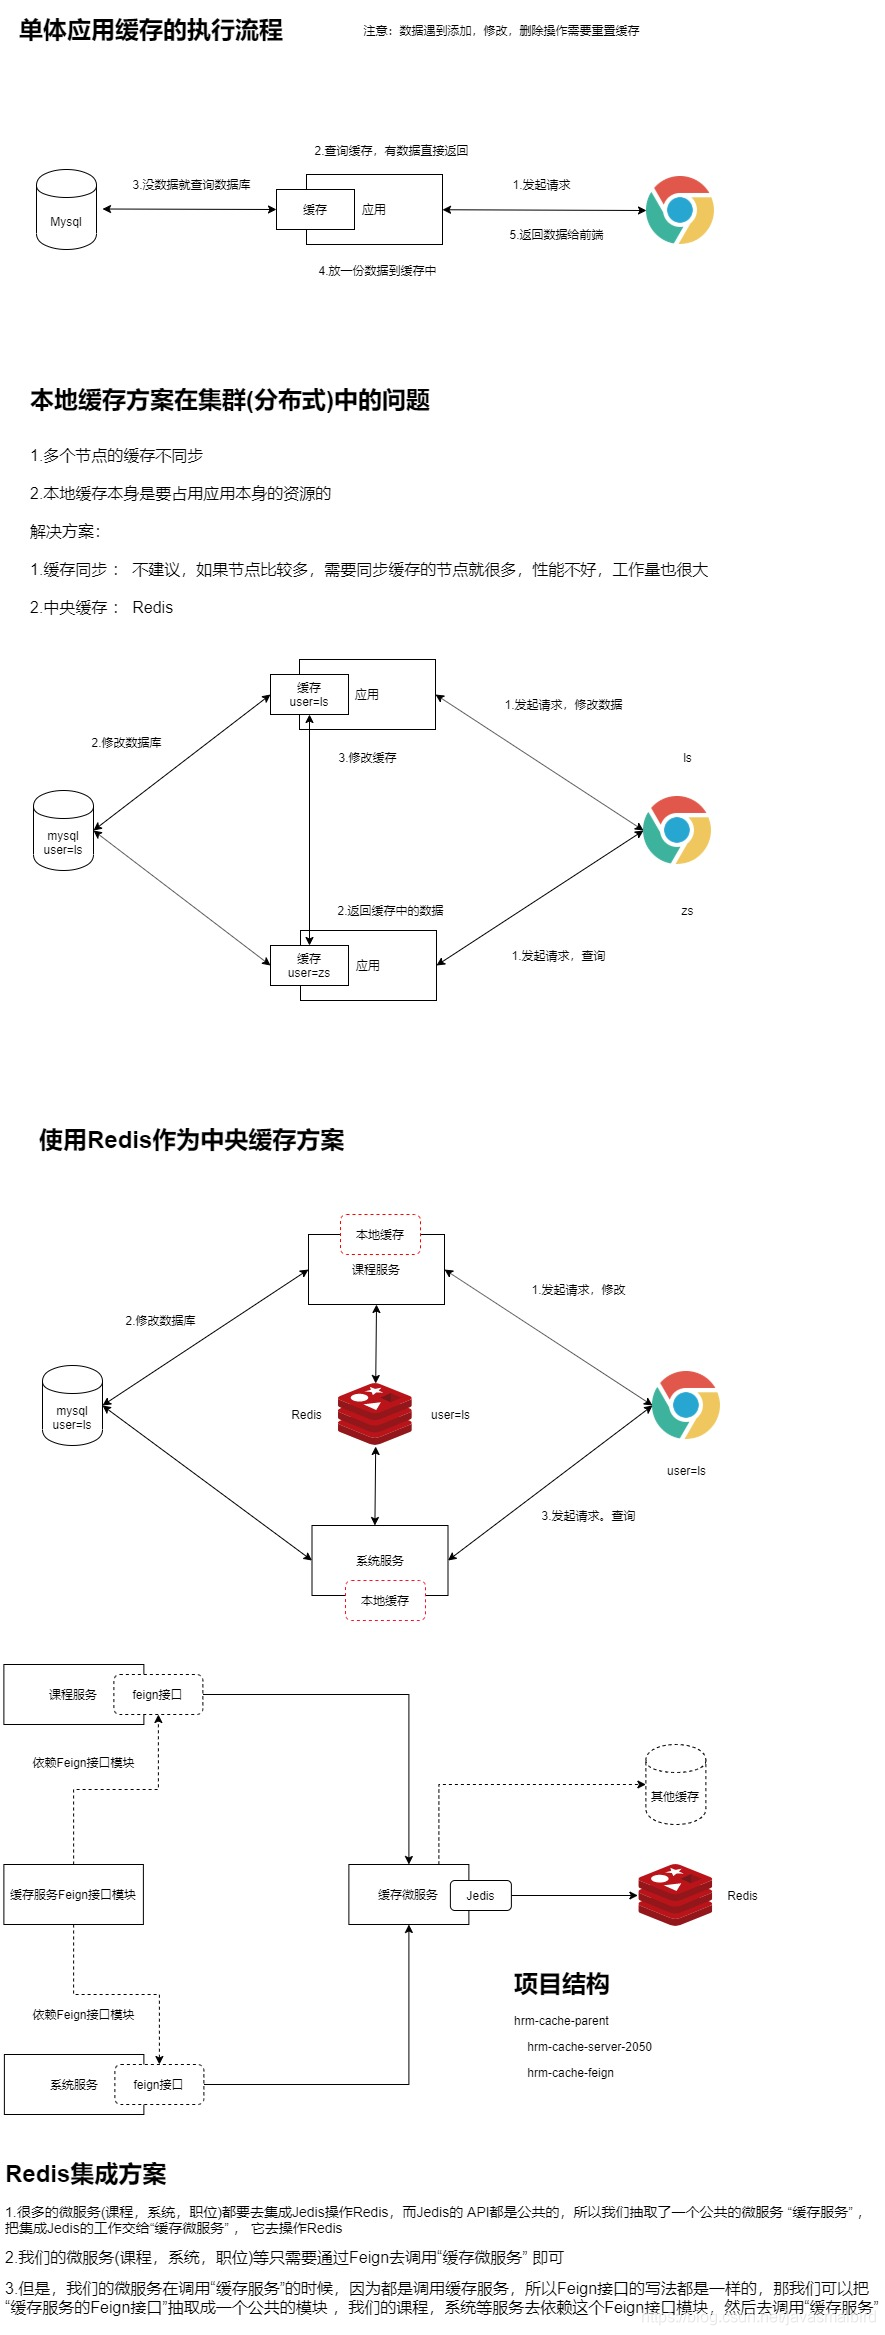
二. 缓存服务搭建
一.缓存原理分析
二.缓存服务搭建
搭建公共的Redis服务和公共的Redis调用模块(Feign)

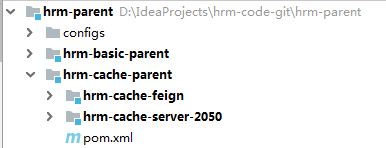
1.搭建项目结构
项目结构
hrm-cache-parent

    hrm-cache-server-2050

    hrm-cache-feign
2.搭建 hrm-cache-service-2050 导入依赖
<dependencies>
            <!--导入springcloud配置中心组建的客户端  表明这个组件需要远程从仓库下载配置文件-->
            <dependency>
                <groupId>org.springframework.cloud</groupId>
                <artifactId>spring-cloud-config-client</artifactId>
            </dependency>
            <!--导入eureka客户端的jar包-->
            <dependency>
                <groupId>org.springframework.cloud</groupId>
                <artifactId>spring-cloud-starter-netflix-eureka-client</artifactId>
            </dependency>
            <!--springbootWeb的支持-->
            <dependency>
                <groupId>org.springframework.boot</groupId>
                <artifactId>spring-boot-starter-web</artifactId>
            </dependency>
            <!--集成redis 通过jedisAPI操作缓存-->
            <dependency>
                <groupId>redis.clients</groupId>
                <artifactId>jedis</artifactId>
                <version>2.9.0</version>
            </dependency>
            <!--因为要返回ajax的对象所以需要引用公共的包-->
            <dependency>
                <groupId>cn.ql.hrm</groupId>
                <artifactId>hrm-basic-utils</artifactId>
                <version>1.0-SNAPSHOT</version>
            </dependency>
    </dependencies>
2.准备Redis工具类
配置文件 redis.properties
redis.host=127.0.0.1
redis.port=6379
redis.password=123456
redis.timeout=5000
RedisUtil
package cn.itsource.hrm.utils;

import redis.clients.jedis.Jedis;
import redis.clients.jedis.JedisPool;
import redis.clients.jedis.JedisPoolConfig;

import java.io.IOException;
import java.util.Properties;

/**
 * 获取连接池对象
 */
public enum RedisUtils {
    INSTANCE;
    static JedisPool jedisPool = null;

    static {
        //1 创建连接池配置对象
        JedisPoolConfig config = new JedisPoolConfig();
        //2 进行配置-四个配置
        config.setMaxIdle(1);//最小连接数
        config.setMaxTotal(11);//最大连接数
        config.setMaxWaitMillis(10 * 1000L);//最长等待时间
        config.setTestOnBorrow(true);//测试连接时是否畅通
        //3 通过配置对象创建连接池对象
        Properties properties = null;
        try {
            properties = new Properties();
            properties.load(RedisUtils.class.getClassLoader().getResourceAsStream("redis.properties"));
        } catch (IOException e) {
            e.printStackTrace();
        }
        String host = properties.getProperty("redis.host");
        String port = properties.getProperty("redis.port");
        String password = properties.getProperty("redis.password");
        String timeout = properties.getProperty("redis.timeout");

        jedisPool = new JedisPool(config, host, Integer.valueOf(port),Integer.valueOf(timeout), password);
    }

    //获取连接
    public Jedis getSource() {
        return jedisPool.getResource();
    }

    //关闭资源
    public void closeSource(Jedis jedis) {
        if (jedis != null) {
            jedis.close();
        }

    }

    /**
     * 设置字符值
     *
     * @param key
     * @param value
     */
    public void set(String key, String value) {
        Jedis jedis = getSource();
        jedis.set(key, value);
        closeSource(jedis);
    }

    /**
     * 设置
     * @param key
     * @param value
     */
    public void set(byte[] key, byte[] value) {
        Jedis jedis = getSource();
        jedis.set(key, value);
        closeSource(jedis);
    }

    /**
     *
     * @param key
     * @return
     */
    public byte[]  get(byte[] key) {
        Jedis jedis = getSource();
        try {
            return jedis.get(key);
        } catch (Exception e) {
            e.printStackTrace();
        } finally {
            closeSource(jedis);
        }
        return null;

    }

    /**
     * 设置字符值
     *
     * @param key
     */
    public String get(String key) {
        Jedis jedis = getSource();
        try {
            return jedis.get(key);
        } catch (Exception e) {
            e.printStackTrace();
        } finally {
            closeSource(jedis);
        }

        return null;

    }
}
3.编写RedisController
/**
 * redis的接口
 */
@RestController
@RequestMapping("/redis")
public class RedisController {

    @GetMapping("/get/{key}")
    public AjaxResult get(@PathVariable("key")String key){
        String result = RedisUtil.INSTANCE.get(key);
        return AjaxResult.me().setResultObj(result);
    }
    @RequestMapping("/del/{key}")
    public AjaxResult del(@PathVariable("key")String key){
        //删除数据的成功的结果值
        Long delKey = RedisUtil.INSTANCE.del(key);
        return AjaxResult.me().setResultObj(delKey);
    }
    @PostMapping("/set")
    public AjaxResult set(@RequestParam("key")String key, @RequestParam("value")String value){
        RedisUtil.INSTANCE.set(key,value);
        return AjaxResult.me();
    }

}
4.配置类
注意开启feign客户端功能 扫描的包路径一定要写@FeignClient这个标签的包路径 通过扫描包 找到这个服务调用里面的方法
- 主配置类
@SpringBootApplication
@EnableEurekaClient
//开启feign功能 需要用到扫描缓存的包路径
@EnableFeignClients(value = "cn.ql.hrm.FeignClient")
public class SpringCloudCourseServer2020
{
    public static void main( String[] args )
    {
        SpringApplication.run(SpringCloudCourseServer2020.class);
    }
}
- swagger配置类
5.配置文件
server:
  port: 2050 #客户端的端口号
spring:
  application:
    name: cache-server

eureka:
  client:
    service-url:
      defaultZone: http://localhost:1010/eureka/
  instance:
    prefer-ip-address: true #显示客户端真实ip
    instance-id:  cache-server:2050  #指定服务的id

feign:
  hystrix:
    enabled: true #开启熔断
  client:
    config:
      default:
        connectTimeout: 10300
        readTimeout: 10300
hystrix:
  command:
    default:
      execution:
        isolation:
          thread:
            timeoutInMilliseconds: 10300
6.修改zuul
- zuul路由
- 在zuul中加载一个配置文件使用swagger接口文档通过访问zuul端口号查看
- swagger
@Configuration
@EnableSwagger2//开启swagger功能支持
public class SwaggerConfig {

    @Bean
    public Docket createRestApi() {
        return new Docket(DocumentationType.SWAGGER_2)
                .apiInfo(apiInfo());
    }

    private ApiInfo apiInfo() {
        return new ApiInfoBuilder()
                .title("人力资源综合平台")
                .description("人力资源综合平台接口文档说明")
                .termsOfServiceUrl("http://localhost:1020")
                .contact(new Contact("ql", "", "[email protected]"))
                .version("1.0")
                .build();
    }
}
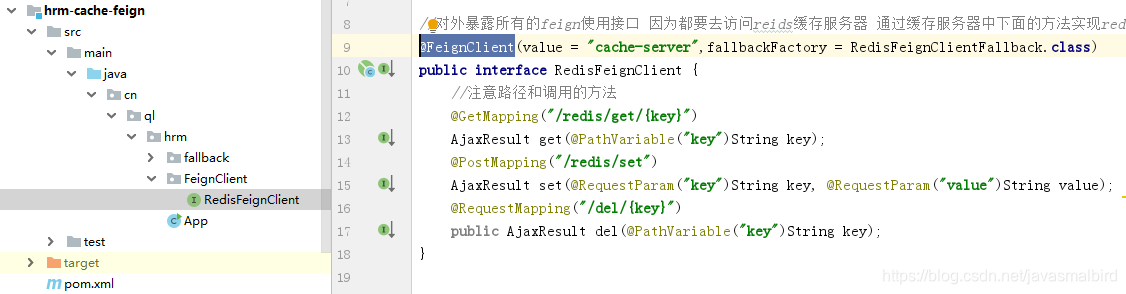
三.Feign接口模块
hrm-cache-feign
1.导入依赖
<dependencies>
        <dependency>
            <groupId>cn.itsource.hrm</groupId>
            <artifactId>hrm-basic-utils</artifactId>
        </dependency>
        <dependency>
            <groupId>org.springframework.cloud</groupId>
            <artifactId>spring-cloud-starter-openfeign</artifactId>
        </dependency>
    </dependencies>
2.编写接口 RedisClient
//对外暴露所有的feign使用接口 因为都要去访问reids缓存服务器 通过缓存服务器中下面的方法实现redis缓存
@FeignClient(value = "cache-server",fallbackFactory = RedisFeignClientFallback.class)
public interface RedisFeignClient {
    //注意路径和调用的方法
    @GetMapping("/redis/get/{key}")
    AjaxResult get(@PathVariable("key")String key);
    @PostMapping("/redis/set")
    AjaxResult set(@RequestParam("key")String key, @RequestParam("value")String value);
    @RequestMapping("/del/{key}")
    public AjaxResult del(@PathVariable("key")String key);
}
3.编写 RedisFeignClientFallback
//RedisFeignClient的托底方法必须要交给spring管理
@Component
public class RedisFeignClientFallback implements FallbackFactory<RedisFeignClient> {

    @Override
    public RedisFeignClient create(Throwable throwable) {
        return new RedisFeignClient() {
            @Override
            public AjaxResult get(String key) {
                throwable.printStackTrace();
                return AjaxResult.me().setSuccess(false).setMessage("Redis服务不可用["+throwable.getMessage()+"]");
            }

            @Override
            public AjaxResult set(String key, String value) {
                throwable.printStackTrace();
                return AjaxResult.me().setSuccess(false).setMessage("Redis服务不可用["+throwable.getMessage()+"]");
            }

            @Override
            public AjaxResult del(String key) {
                throwable.printStackTrace();
                return AjaxResult.me().setSuccess(false).setMessage("Redis服务不可用["+throwable.getMessage()+"]");
            }
        };
    }
}
四.缓存课程类型
调用流程图如下:
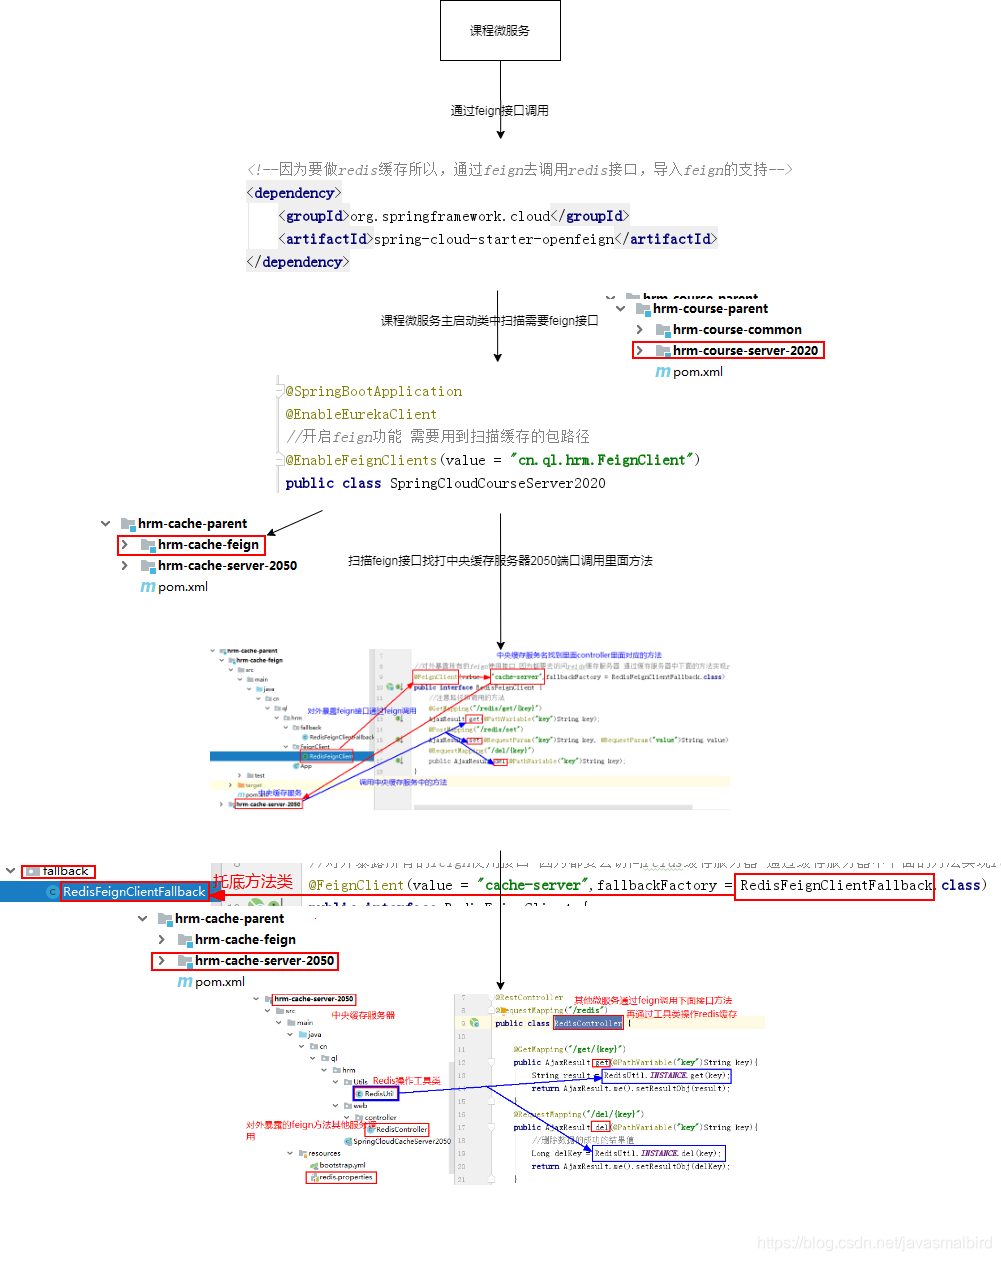
1.依赖 hrm-cache-feign模块
        <!--依赖公共redis的接口 需要扫描这个主角-->
        <dependency>
            <groupId>cn.ql.hrm</groupId>
            <artifactId>hrm-cache-feign</artifactId>
            <version>1.0-SNAPSHOT</version>
        </dependency>
2.开启Feign
@SpringBootApplication
@EnableEurekaClient
//开启feign功能 需要用到扫描缓存的包路径
@EnableFeignClients(value = "cn.ql.hrm.FeignClient")
public class SpringCloudCourseServer2020
{
    public static void main( String[] args )
    {
        SpringApplication.run(SpringCloudCourseServer2020.class);
    }
}
3.配置文件开启hystrix
...............
feign:
  hystrix:
    enabled: true #开启熔断支持
  client:
    config:
      default:           #服务名,填写default为所有服务
        connectTimeout: 30000
        readTimeout: 30000
hystrix:
  command:
    default:
      execution:
        isolation:
          thread:
            timeoutInMilliseconds: 30000
4.修改CourseTypeServiceImpl
package cn.ql.hrm.service.impl;

import cn.ql.hrm.FeignClient.RedisFeignClient;
import cn.ql.hrm.constants.CourseTypeConstant;
import cn.ql.hrm.domain.CourseType;
import cn.ql.hrm.mapper.CourseTypeMapper;
import cn.ql.hrm.query.CourseTypeQuery;
import cn.ql.hrm.service.ICourseTypeService;
import cn.ql.hrm.util.AjaxResult;
import com.alibaba.fastjson.JSON;
import com.baomidou.mybatisplus.service.impl.ServiceImpl;
import org.springframework.beans.factory.annotation.Autowired;
import org.springframework.stereotype.Service;

import java.io.Serializable;
import java.util.ArrayList;
import java.util.List;

/**
 * <p>
 * 课程目录 服务实现类
 * </p>
 *
 * @author ql
 * @since 2020-03-23
 */
@Service
public class CourseTypeServiceImpl extends ServiceImpl<CourseTypeMapper, CourseType> implements ICourseTypeService {

   //注入redis缓存对象
    @Autowired
    private RedisFeignClient redisFeignClient;
    //获取保存到缓存中的结果的方法
    public AjaxResult getallCourseType(){
        //先去数据库中查
        List<CourseType> allcourseTypes = baseMapper.selectList(null);
        //因为reids中保存需要的是一个json字符串 调用工具进行转换
        String mysqlJson = JSON.toJSONString(allcourseTypes);
        // 查到数据保存到缓存中 CourseTypeConstant.KEY_ALLCOURSETYPE 是定义存放在redis中的key值
        AjaxResult allCourseType = redisFeignClient.set(CourseTypeConstant.KEY_ALLCOURSETYPE, mysqlJson);
        //直接返回从数据库中查询出来的集合
        return allCourseType;
    };


    //缓存的业务逻辑方法
    public List<CourseType> selectCourseTypeFromCache(){
        //先reids中去查询
        AjaxResult allCourseTypeResult = redisFeignClient.get(CourseTypeConstant.KEY_ALLCOURSETYPE);
        //查询的结果是为真 并且有值
        if(allCourseTypeResult.isSuccess()&&allCourseTypeResult.getResultObj()!=null){
            //因为查出来的结果是一个Obejcet需要转成String
            String jsonString = allCourseTypeResult.getResultObj().toString();
            //通过fastjson工具 转成list集合 跟上泛型类
            List<CourseType> courseTypes = JSON.parseArray(jsonString, CourseType.class);
            //然后返回这个从redis中查询出的集合
            return courseTypes;
            // 看下是否有值 如果有值 就直接返回
            //如果没有 :
        }else {
            //先去数据库中查
            List<CourseType> allcourseTypes = baseMapper.selectList(null);
            //因为reids中保存需要的是一个json字符串 调用工具进行转换
            String mysqlJson = JSON.toJSONString(allcourseTypes);
            // 查到数据保存到缓存中
            AjaxResult allCourseType = redisFeignClient.set(CourseTypeConstant.KEY_ALLCOURSETYPE, mysqlJson);
            //直接返回从数据库中查询出来的集合
            return allcourseTypes;
        }


    }

    @Override
    public List<CourseType> treeData(Object o) {
        //先查询出所有的集合  加入了缓存的业务逻辑 这里直接调用上面的方法进行查询
        List<CourseType> allcourseTypes = selectCourseTypeFromCache();
        //定义一个父级目录的集合 装这个集合 最后返回这个父级目录就可以了
        List<CourseType> parentCourseTypes = new ArrayList<>();
       //遍历所有的类型  获得当前类型 包括一级和子级
        for (CourseType currentcourseType : allcourseTypes) {
            if(currentcourseType.getPid()==0){
                //表示 一级目录
                parentCourseTypes.add(currentcourseType);
            }else {
                //表示 这里的都是子目录 表示当前目录都是二级目录
                for (CourseType parentcourseType : allcourseTypes) {
                    //如果当前的分类的pid  等于所有类型的某一个id 那么这个类型就是当前类型的父分类
                    if(currentcourseType.getPid().equals(parentcourseType.getId())){
                        //父类就把自己包装的children集合 把当前属于它的子类装起来
                        parentcourseType.getChildren().add(currentcourseType);
                        //跳出当前循环继续 查找自己的父类
                        break;
                    }
                }
            }
        }

        return parentCourseTypes;
    }

    @Override
    public List<CourseType> slecetByQuery(CourseTypeQuery query) {
        return baseMapper.slecetByQuery(query);
    }


}
5.添加,删除,修改方法重置Redis
/**
 * <p>
 * 课程目录 服务实现类
 * </p>
 *
 * @author ql
 * @since 2020-03-23
 */
@Service
public class CourseTypeServiceImpl extends ServiceImpl<CourseTypeMapper, CourseType> implements ICourseTypeService {
   //注入redis缓存对象
    @Autowired
    private RedisFeignClient redisFeignClient;
    //获取保存到缓存中的结果的方法
    public AjaxResult getallCourseType(){
        //先去数据库中查
        List<CourseType> allcourseTypes = baseMapper.selectList(null);
        //因为reids中保存需要的是一个json字符串 调用工具进行转换
        String mysqlJson = JSON.toJSONString(allcourseTypes);
        // 查到数据保存到缓存中 CourseTypeConstant.KEY_ALLCOURSETYPE 是定义存放在redis中的key值
        AjaxResult allCourseType = redisFeignClient.set(CourseTypeConstant.KEY_ALLCOURSETYPE, mysqlJson);
        //直接返回从数据库中查询出来的集合
        return allCourseType;
    };
//每次更新修改了数据库的时候需要对缓存中进行同步处理
    @Override
    public boolean insert(CourseType entity) {
        //先去数据库中添加数据 再同步到数据库中处理
        boolean reuslt = super.insert(entity);
        if(reuslt){
            // 查到数据保存到缓存中 并且返回结果
            AjaxResult allCourseType = getallCourseType();
            //如果保存到缓存中失败那么就先清空这个key对应的数据
            if(!allCourseType.isSuccess()&&allCourseType.getResultObj()==null){
                //清空key对应的数据
                redisFeignClient.del(CourseTypeConstant.KEY_ALLCOURSETYPE);
            }
        }

        return  reuslt;
    }

    @Override
    public boolean deleteById(Serializable id) {
      boolean reuslt=  super.deleteById(id);
        if(reuslt){
            // 查到数据保存到缓存中 并且返回结果
            AjaxResult allCourseType = getallCourseType();
            //如果保存到缓存中失败那么就先清空这个key对应的数据
            if(!allCourseType.isSuccess()&&allCourseType.getResultObj()==null){
                //清空key对应的数据
                redisFeignClient.del(CourseTypeConstant.KEY_ALLCOURSETYPE);
            }
        }
        return reuslt;
    }

    @Override
    public boolean updateById(CourseType entity) {
        boolean reuslt= super.updateById(entity);
        if(reuslt){
            // 查到数据保存到缓存中 并且返回结果
            AjaxResult allCourseType = getallCourseType();
            //如果保存到缓存中失败那么就先清空这个key对应的数据
            if(!allCourseType.isSuccess()&&allCourseType.getResultObj()==null){
                //清空key对应的数据
                redisFeignClient.del(CourseTypeConstant.KEY_ALLCOURSETYPE);
            }
        }
        return reuslt;
    }
}
五.Redis高级
点击查看链接详情
https://blog.csdn.net/kongtiao5/article/details/82771694
1.缓存穿透

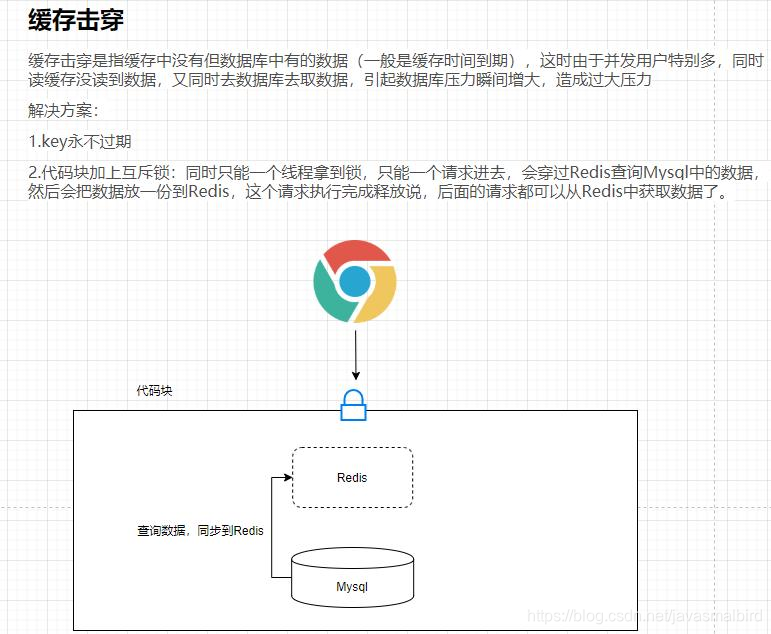
2.缓存击穿
3.缓存雪崩
  缓存雪崩是指缓存中数据大批量到过期时间,而查询数据量巨大,引起数据库压力过大甚至down机。和缓存击穿不同的是,        缓存击穿指并发查同一条数据,缓存雪崩是不同数据都过期了,很多数据都查不到从而查数据库。

 解决方案:
缓存数据的过期时间设置随机,防止同一时间大量数据过期现象发生。
如果缓存数据库是分布式部署,将热点数据均匀分布在不同搞得缓存数据库中。
设置热点数据永远不过期
