Redis 简介
Redis 是一个开源(BSD 许可)的、内存中的数据结构存储系统,它可以用作数据库、缓存和
消息中间件。
为什么要用 Redis
在高并发场景下,如果需要经常连接结果变动频繁的数据库,会导致数据库读取及存取的速
度变慢,数据库压力极大。
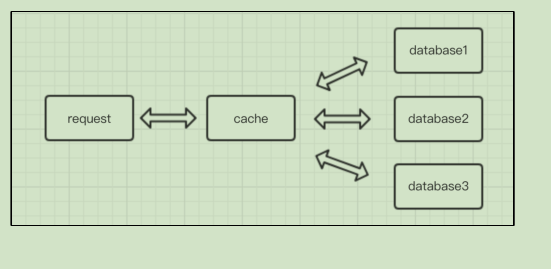
因此我们需要通过缓存来减少数据库的压力,使得大量的访问进来能够命中缓存,只有少量
的需要到数据库层。由于缓存基于内存,可支持的并发量远远大于基于硬盘的数据库。所以
对于高并发设计,缓存的设计是必不可少的一环。
而 Redis 作为比较热门的内存存储系统之一,由于其对数据持久化的支持,种类丰富的数据
结构,使其定位更倾向于内存数据库,适用于对读写效率要求都很高、数据处理业务复杂和
对安全性要求较高的系统。
Redis Cluster 架构
Redis 搭建方式有很多种,本章主要介绍 Redis Cluster 集群构建方式:
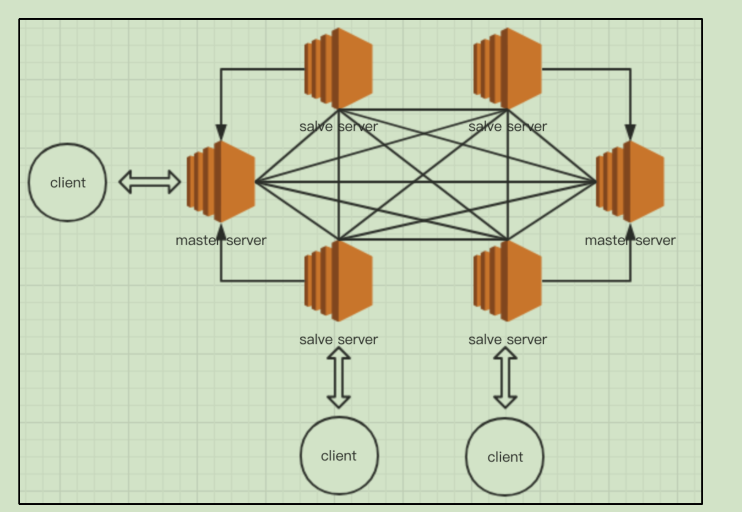
Redis 3.0 之后版本支持 Redis Cluster 集群,Redis Cluster 采用无中心结构,每个节点保存数据
和整个集群状态,每个节点都和其他所有节点连接。
Redis Cluster 为了保证数据的高可用性,加入了主从模式,一个主节点对应一个或多个从节
点,主节点提供数据存取,从节点则是从主节点拉取数据备份,当这个主节点挂掉后,就会
有这个从节点选取一个来充当主节点,从而保证集群不会挂掉。主从结构,一是为了纯粹的
冗余备份,二是为了提升读性能,比如很消耗性能的 SORT 就可以由从服务器来承担。
Redis 的主从同步是异步进行的,这意味着主从同步不会影响主逻辑,也不会降低 redis 的处
理性能。
主从架构中,可以考虑关闭主服务器的数据持久化功能,只让从服务器进行持久化,这样可
以提高主服务器的处理性能。在主从架构中,从服务器通常被设置为只读模式,这样可以避
免从服务器的数据被误修改。
Redis小测试
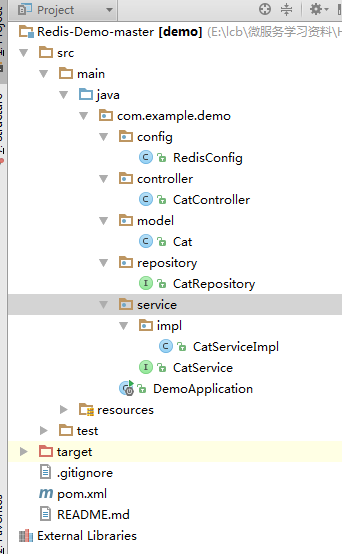
1.新建springboot项目,结构如下:
2 . pom文件如下:
<?xml version="1.0" encoding="UTF-8"?>
<project xmlns="http://maven.apache.org/POM/4.0.0" xmlns:xsi="http://www.w3.org/2001/XMLSchema-instance"
xsi:schemaLocation="http://maven.apache.org/POM/4.0.0 http://maven.apache.org/xsd/maven-4.0.0.xsd">
<modelVersion>4.0.0</modelVersion>
<groupId>com.example</groupId>
<artifactId>demo</artifactId>
<version>0.0.1-SNAPSHOT</version>
<packaging>jar</packaging>
<name>demo</name>
<description>Demo project for Spring Boot</description>
<!-- Spring Boot 启动父依赖 -->
<parent>
<groupId>org.springframework.boot</groupId>
<artifactId>spring-boot-starter-parent</artifactId>
<version>1.5.3.RELEASE</version>
<relativePath/>
</parent>
<properties>
<project.build.sourceEncoding>UTF-8</project.build.sourceEncoding>
<project.reporting.outputEncoding>UTF-8</project.reporting.outputEncoding>
<java.version>1.8</java.version>
</properties>
<dependencies>
<dependency>
<groupId>org.springframework.boot</groupId>
<artifactId>spring-boot-starter-web</artifactId>
</dependency>
<dependency>
<groupId>org.springframework.boot</groupId>
<artifactId>spring-boot-starter-test</artifactId>
<scope>test</scope>
</dependency>
<dependency>
<groupId>mysql</groupId>
<artifactId>mysql-connector-java</artifactId>
<version>5.1.44</version>
</dependency>
<dependency>
<groupId>org.springframework.boot</groupId>
<artifactId>spring-boot-starter-data-jpa</artifactId>
</dependency>
<dependency>
<groupId>org.springframework.boot</groupId>
<artifactId>spring-boot-starter-redis</artifactId>
<version>1.3.2.RELEASE</version>
</dependency>
</dependencies>
<build>
<plugins>
<plugin>
<groupId>org.springframework.boot</groupId>
<artifactId>spring-boot-maven-plugin</artifactId>
</plugin>
</plugins>
</build>
</project>
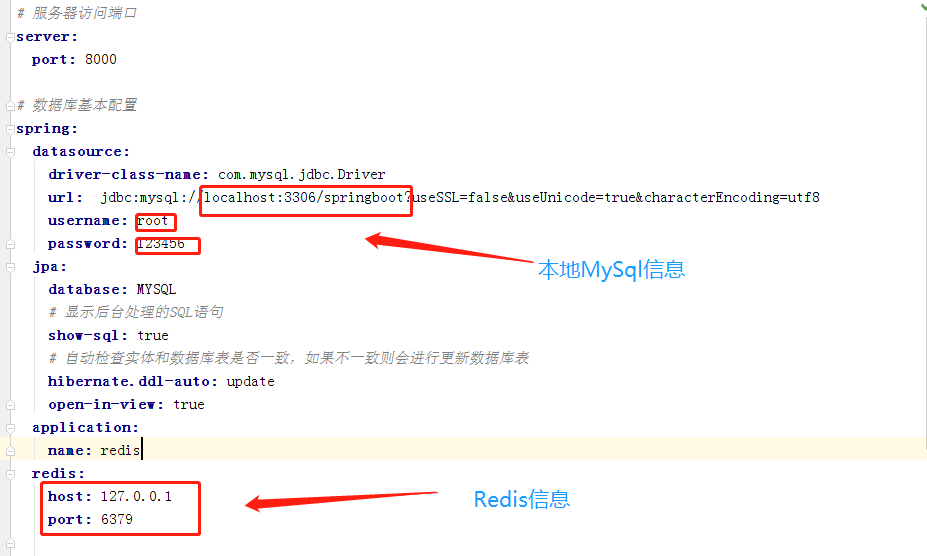
3.application.yml 文件如下
4. 在本地 mysql 中添加数据
insert into cat(id,cat_age,cat_name) values( , , );
5. 构建并运行本 demo,然后根据 yml 文件中配置的地址,访问生成的数据:
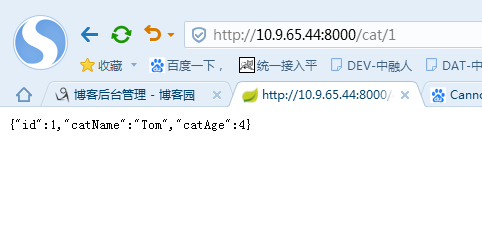
结果验证
查看日志,查询第一次访问数据所耗时间,返回的结果为 3183ms:

再次刷新页面访问数据,第二次并没有调用方法打印数据,并且查询所用时间仅为 5ms,查询速度提高

其他具体代码如下 :
package com.example.demo.config;

import org.springframework.cache.CacheManager;
import org.springframework.cache.annotation.EnableCaching;
import org.springframework.cache.interceptor.KeyGenerator;
import org.springframework.context.annotation.Bean;
import org.springframework.context.annotation.Configuration;
import org.springframework.data.redis.cache.RedisCacheManager;
import org.springframework.data.redis.connection.RedisConnectionFactory;
import org.springframework.data.redis.core.RedisTemplate;
import org.springframework.data.redis.serializer.StringRedisSerializer;

import java.lang.reflect.Method;

@Configuration
@EnableCaching//开启注解
public class RedisConfig {

   @Bean
   public RedisTemplate<Object, Object> redisTemplate(RedisConnectionFactory connectionFactory){

      RedisTemplate<Object, Object> template=new RedisTemplate<Object, Object>();

      template.setConnectionFactory(connectionFactory);
      //实现序列化和反序列化redis的key值
      template.setKeySerializer(new StringRedisSerializer());
      //实现序列化和反序列化redis的value值,默认使用JdkSerializationRedisSerializer
      //template.setValueSerializer(new RedisObjectSerializer());
      //template.setValueSerializer();
      return template;

   }


    @Bean
     public CacheManager cacheManager(RedisTemplate<Object, Object> redisTemplate) {
       RedisCacheManager cacheManager = new RedisCacheManager(redisTemplate);
       // cacheManager.setCacheNames(Arrays.asList("users", "emptyUsers"));
       cacheManager.setUsePrefix(true);
       // Number of seconds before expiration. Defaults to unlimited (0)
       cacheManager.setDefaultExpiration(1800L);
       return cacheManager;
     }

     @Bean
     public KeyGenerator accountKeyGenerator() {
           return new KeyGenerator(){
               @Override
               public Object generate(Object target, Method method, Object... params) {
                   //first parameter is caching object
                   //second paramter is the name of the method, we like the caching key has nothing to do with method name
                   //third parameter is the list of parameters in the method being called
                   return target.getClass().toString() + "accountId:" + params[0].toString();
               }
           };
       }
}
package com.example.demo.controller;

import com.example.demo.model.Cat;
import com.example.demo.service.CatService;
import org.springframework.beans.factory.annotation.Autowired;
import org.springframework.web.bind.annotation.*;

@RestController
public class CatController {

   @Autowired
   private CatService catService;

   @RequestMapping(value = "/cat/{id}", method = RequestMethod.GET)
    public Cat findOne(@PathVariable("id") Integer id) {
      long beginTime=System.currentTimeMillis();
      Cat cat=catService.findOneCat(id);
      long time=System.currentTimeMillis()-beginTime;
      System.out.println(time);
      return cat;
    }
   @RequestMapping(value = "/cat", method = RequestMethod.POST)
    public void createCat(@RequestBody Cat cat) {
      catService.saveCat(cat);
    }

// @RequestMapping(value = "/cat/{id}", method = RequestMethod.DELETE)
//    public void modifyCity(@PathVariable("id") Integer id) {
//    catService.deleteCat(id);
//    }

}
package com.example.demo.model;

import org.hibernate.annotations.GenericGenerator;

import javax.persistence.Entity;
import javax.persistence.GeneratedValue;
import javax.persistence.GenerationType;
import javax.persistence.Id;
import java.io.Serializable;

/**
 * 创建了一个实体类。
 *
 * 如何持久化呢?
 *
 * 1、使用@Entity进行实体类的持久化操作,当JPA检测到我们的实体类当中有
 *
 * @Entity 注解的时候,会在数据库中生成对应的表结构信息。
 *
 *
 * 如何指定主键以及主键的生成策略?
 *
 * 2、使用@Id指定主键.
 *
 *
 *
 */
@Entity
public class Cat implements Serializable{

   /**
    * 使用@Id指定主键.
    *
    * 使用代码@GeneratedValue(strategy=GenerationType.AUTO)
    * 指定主键的生成策略,mysql默认的是自增长。
    *
    */

   @Id @GeneratedValue(strategy=GenerationType.AUTO)
   private int id;//主键.

   private String catName;//姓名. cat_name

   private int catAge;//年龄. cat_age;

   public int getId() {
      return id;
   }

   public void setId(int id) {
      this.id = id;
   }

   public String getCatName() {
      return catName;
   }

   public void setCatName(String catName) {
      this.catName = catName;
   }

   public int getCatAge() {
      return catAge;
   }

   public void setCatAge(int catAge) {
      this.catAge = catAge;
   }


}
package com.example.demo.repository;


import com.example.demo.model.Cat;
import org.springframework.data.repository.CrudRepository;

/**
 * Repository -- 是接口 ,不是class.
 */
public interface CatRepository extends CrudRepository<Cat, Integer> {

}
package com.example.demo.service.impl;


import com.example.demo.model.Cat;
import com.example.demo.repository.CatRepository;
import com.example.demo.service.CatService;
import org.springframework.beans.factory.annotation.Autowired;
import org.springframework.cache.annotation.CacheEvict;
import org.springframework.cache.annotation.CachePut;
import org.springframework.cache.annotation.Cacheable;
import org.springframework.stereotype.Service;

import java.util.List;

@Service
public class CatServiceImpl implements CatService {

   @Autowired
   private CatRepository catRepository;
   //与@Cacheable不同的是使用@CachePut标注的方法在执行前不会去检查缓存中是否存在之前执行过的结果,而是每次都会执行该方法,并将执行结果以键值对的形式存入指定的缓存中。
   @CachePut(value="baseCatInfo")
   public void saveCat(Cat cat) {
      catRepository.save(cat);
   }

   @Override
   public int updateCat(Cat cat) {
      // TODO Auto-generated method stub
      return 0;
   }

   //@CacheEvict是用来标注在需要清除缓存元素的方法或类上的。当标记在一个类上时表示其中所有的方法的执行都会触发缓存的清除操作
   @CacheEvict(value="cat")
   public void deleteCat(int id) {
      System.out.println(id);

   }

   @Override
   public List<Cat> getCatAll() {
      return (List<Cat>) catRepository.findAll();
   }

   @Cacheable(value="cat", keyGenerator = "accountKeyGenerator")
   @Override
   public Cat findOneCat(Integer id) {
      System.out.println("开始查询.....");
        try {
            Thread.sleep(3 * 1000l);
        } catch (InterruptedException e) {
            e.printStackTrace();
        }
        System.out.println("查询结束......");
      Cat cat=catRepository.findOne(id);

      return cat;
   }

}
package com.example.demo.service;


import com.example.demo.model.Cat;

import java.util.List;

public interface CatService {


   public void saveCat(Cat cat);

   public int updateCat(Cat cat);

   public void deleteCat(int id);

   //查询数据.
   public List<Cat> getCatAll();

   public Cat findOneCat(Integer id);
}
package com.example.demo;

import org.springframework.boot.SpringApplication;
import org.springframework.boot.autoconfigure.SpringBootApplication;
import org.springframework.transaction.annotation.EnableTransactionManagement;

@EnableTransactionManagement
@SpringBootApplication
public class DemoApplication {

   public static void main(String[] args) {
      SpringApplication.run(DemoApplication.class, args);
   }
}