介绍
在分布式系统中,由于服务数量多,为了方便服务配置文件统一管理,实时更新,所以需要分布式配置中心。
github地址:https://github.com/erlieStar/spring-cloud-learning
搭建配置仓库
配置放在在https://github.com/erlieStar/spring-cloud-learning/仓库的conf-repo目录下
放一个javashitang服务的三个环境的配置文件
javashitang-dev.yaml
from: javashitang-git-dev
javashitang-test.yaml
from: javashitang-git-test
javashitang-prod.yaml
from: javashitang-git-prod
搭建配置中心
在https://github.com/erlieStar/spring-cloud-learning
示例项目:config-service(spring-cloud-config)
consumer-config-service(spring-cloud-config)
config-service
1.项目配置如下
pom.xml
<dependency>
    <groupId>org.springframework.cloud</groupId>
    <artifactId>spring-cloud-config-server</artifactId>
</dependency>
application.yaml
server:
  port: 8080

spring:
  application:
    name: config-service
  cloud:
    config:
      server:
        git:
          uri: https://github.com/erlieStar/spring-cloud-learning # 配置github地址
          search-paths: config-repo # 仓库的相对地址
          username: # github仓库的账号,公有仓库可以不用配置
          password: # github仓库的密码,公有仓库可以不用配置
      label: master # 配置仓库的分支
2.启动类加上注解@EnableConfigServer
@EnableConfigServer
@SpringBootApplication
public class ConfigService {

    public static void main(String[] args) {
        SpringApplication.run(ConfigService.class);
    }
}
consumer-config-service
1.项目配置如下
pom.xml
<dependency>
	<groupId>org.springframework.cloud</groupId>
	<artifactId>spring-cloud-starter-config</artifactId>
</dependency>
bootstrap.yaml
server:
  port: 8090

spring:
  application:
    name: javashitang # 要获取的配置的应用名
  cloud:
    config:
      uri: http://localhost:8080 # 配置中心config-server的地址
      profile: dev # 对应配置文件中的{profile}部分
      label: master # 对应配置文件中的{label}部分,git即分支名
启动config-service(spring-cloud-config)
consumer-config-service(spring-cloud-config)
仓库中的配置文件会被转换成 Web 接口,访问可以参照以下的规则:
- /{application}/{profile}[/{label}]
- /{application}-{profile}.yml
- /{label}/{application}-{profile}.yml
- /{application}-{profile}.properties
- /{label}/{application}-{profile}.properties
上面的 URL 会映射 {application}-{profile}.yml 对应的配置文件,其中 {label} 对应 Git 上不同的分支,默认为 master。以javashitang-dev.yml 为例子,它的 application 是 javashitang,profile 是 dev。
访问http://localhost:8080/javashitang/dev
结果如下,配置中心正常提供服务
{
    "name": "javashitang",
    "profiles": [
        "dev"
    ],
    "label": null,
    "version": "2040b0fe167c8641f1c0d8f5e8844e4f35f80896",
    "state": null,
    "propertySources": [
        {
            "name": "https://github.com/erlieStar/spring-cloud-learning/config-repo/javashitang-dev.yaml",
            "source": {
                "from": "javashitang-git-dev"
            }
        }
    ]
}
访问http://localhost:8090/from
结果如下
javashitang-git-dev
动态刷新配置
我们把javashitang-dev.yaml的内容改为如下,并提交到github
from: javashitang-git-dev-update
再次访问http://localhost:8090/from
结果如下
javashitang-git-dev
可以看到没有获取到最新的配置,如何让客户端获取到最新的配置呢?只需要在consumer-config-service(spring-cloud-config)的基础上进行改造。
1.新增依赖
pom.xml
<dependency>
    <groupId>org.springframework.boot</groupId>
    <artifactId>spring-boot-starter-actuator</artifactId>
</dependency>
2.需要给加载变量的类上面加 @RefreshScope注解,在客户端访问 /actuator/refresh 的时候就会更新此类下面的变量值。
@RefreshScope
@RestController
@SpringBootApplication
public class ConsumerConfigService {

    public static void main(String[] args) {
        SpringApplication.run(ConsumerConfigService.class);
    }

    @Value("${from}")
    private String from;

    @RequestMapping("from")
    public String from() {
        return this.from;
    }
}
3.bootstrap.yaml中增加如下配置
management:
  endpoints:
    web:
      exposure:
        include: refresh
4.使用postman用post方式调用http://localhost:8090/actuator/refresh
再次访问http://localhost:8090/from
结果如下
javashitang-git-dev-update
可以看到客户端已经拿到了最新的值。不过,每次手动刷新客户端也很麻烦,有没有什么办法只要提交代码就自动调用客户端来更新呢,Github 的 Webhook 是一个办法
Webhook
Webhook 是当某个事件发生时,通过发送 HTTP POST 请求的方式来通知信息接收方。Webhook 来监测你在 Github.com 上的各种事件,最常见的莫过于 push 事件。如果你设置了一个监测 push 事件的 Webhook,那么每当你的这个项目有了任何提交,这个 Webhook 都会被触发,这时 Github 就会发送一个 HTTP POST 请求到你配置好的地址。
如此一来,你就可以通过这种方式去自动完成一些重复性工作,比如,你可以用 Webhook 来自动触发一些持续集成(CI)工具的运作,比如 Travis CI;又或者是通过 Webhook 去部署你的线上服务器。下图就是 Github 上面的 Webhook 配置。
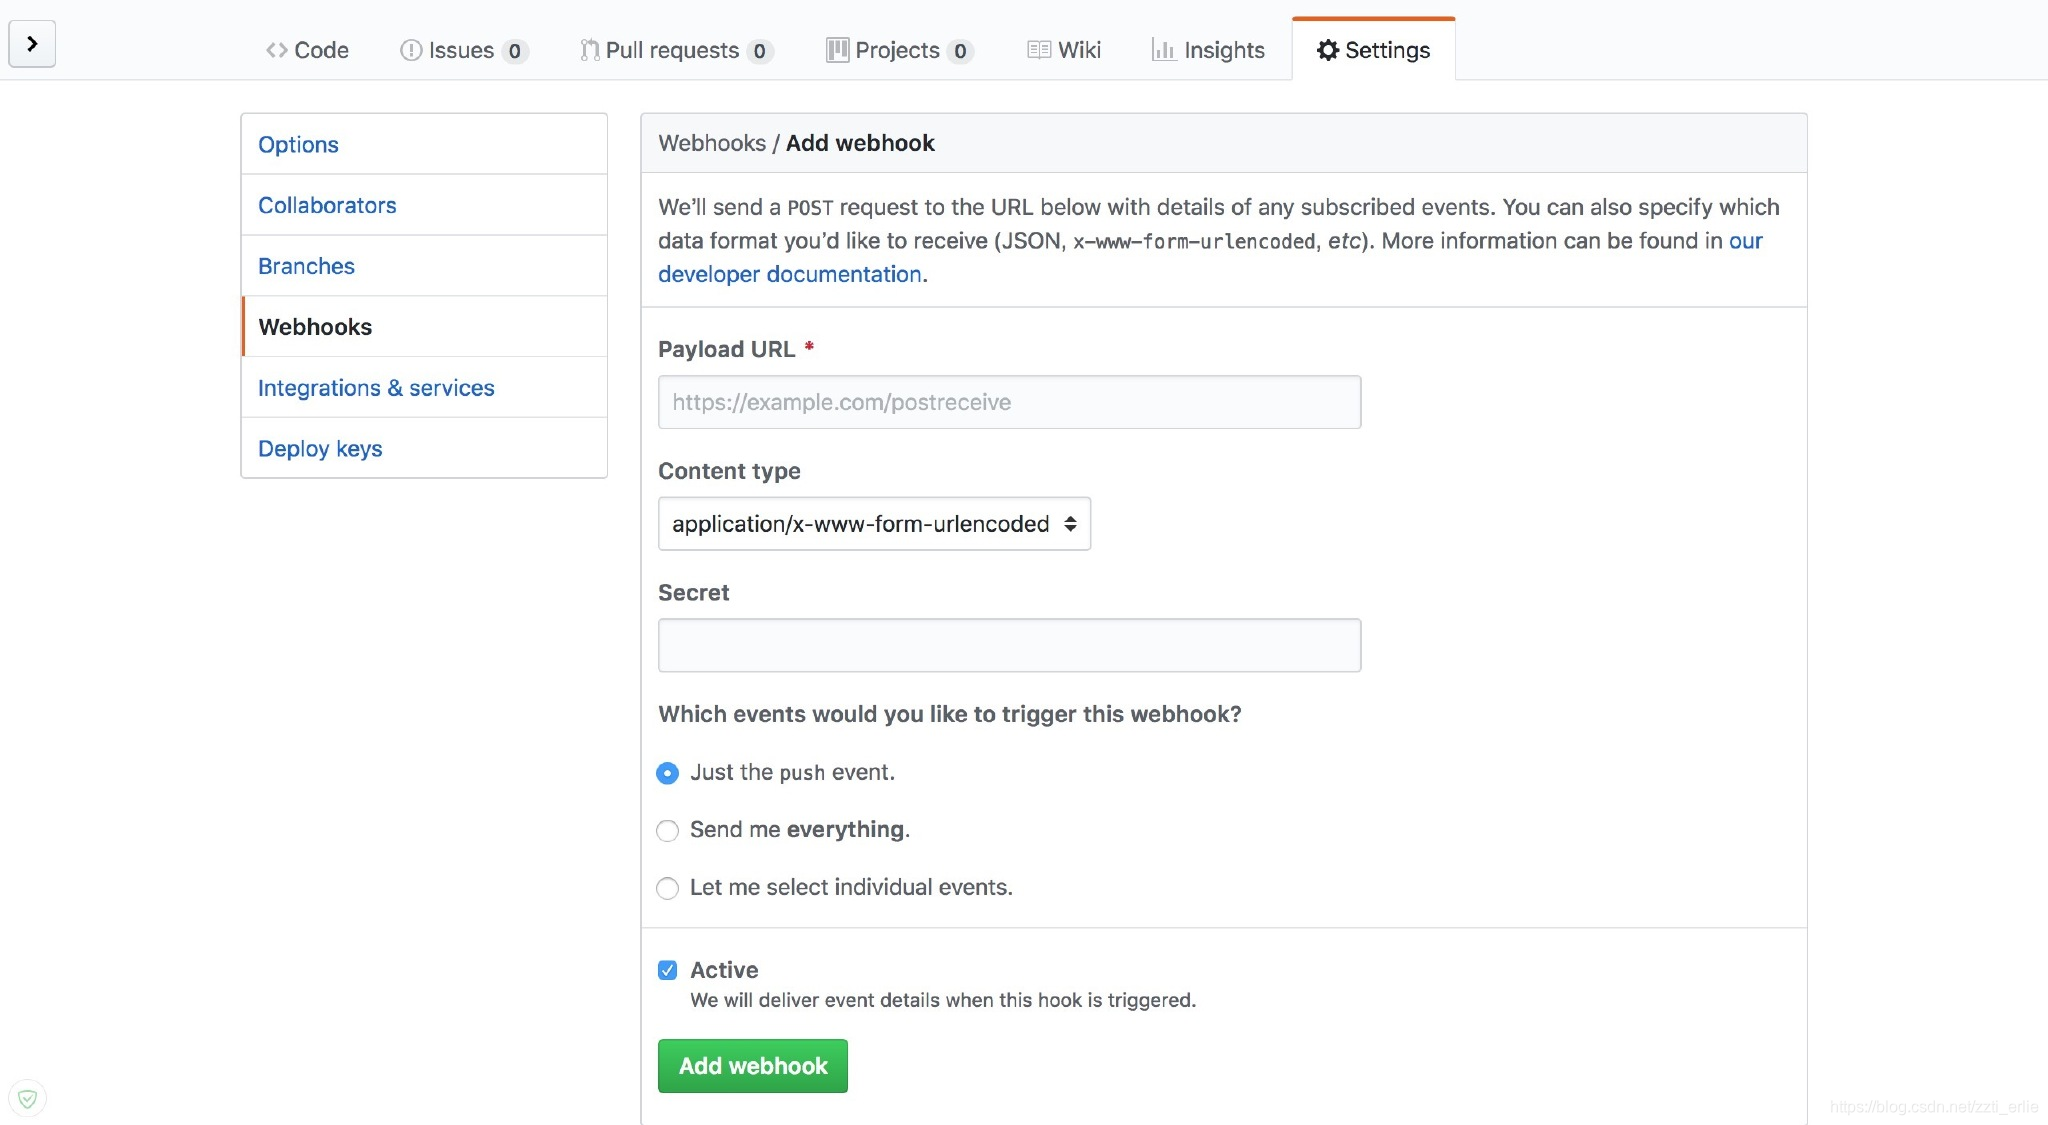
- Payload URL :触发后回调的 URL
- Content type :数据格式,两种一般使用 json
- Secret :用作给 POST 的 body 加密的字符串。采用 HMAC 算法
- events :触发的事件列表。
| events事件类型 | 描述 |
|---|---|
| push | 仓库有 push 时触发。默认事件 |
| create | 当有分支或标签被创建时触发 |
| delete | 当有分支或标签被删除时触发 |
这样我们就可以利用 hook 的机制去触发客户端的更新,但是当客户端越来越多的时候,hook 机制也不够优雅了,另外每次增加客户端都需要改动 hook 也是不现实的。其实,Spring Cloud 给了我们更好解决方案 ——Spring Cloud Bus。后续我们将继续学习如何通过 Spring Cloud Bus 来实现以消息总线的方式进行通知配置信息的变化,完成集群上的自动化更新。
搭建高可用配置中心
上面的例子中可以看到config-service存在单点问题,这时我们可以考虑将配置中心做成一个微服务,将其集群化。
示例项目:config-cluster(spring-cloud-config)
consumer-config-cluster(spring-cloud-config)
config-cluster
1.项目配置如下
pom.xml
<dependency>
    <groupId>org.springframework.cloud</groupId>
    <artifactId>spring-cloud-starter-netflix-eureka-client</artifactId>
</dependency>

<dependency>
    <groupId>org.springframework.cloud</groupId>
    <artifactId>spring-cloud-config-server</artifactId>
</dependency>
application.yaml
server:
  port: 9080

spring:
  application:
    name: config-service
  cloud:
    config:
      server:
        git:
          uri: https://github.com/erlieStar/spring-cloud-learning # 配置github地址
          search-paths: config-repo # 仓库的相对地址
          username: # github仓库的账号,公有仓库可以不用配置
          password: # github仓库的密码,公有仓库可以不用配置
      label: master # 配置仓库的分支

eureka:
  client:
    service-url:
      defaultZone: http://localhost:7001/eureka
2.启动类上加@EnableEurekaClient和@EnableConfigServer注解
@EnableEurekaClient
@EnableConfigServer
@SpringBootApplication
public class ConfigCluster {

    public static void main(String[] args) {
        SpringApplication.run(ConfigCluster.class);
    }
}
consumer-config-cluster
1.项目配置如下
pom.xml
<dependency>
    <groupId>org.springframework.cloud</groupId>
    <artifactId>spring-cloud-starter-netflix-eureka-client</artifactId>
</dependency>

<dependency>
    <groupId>org.springframework.cloud</groupId>
    <artifactId>spring-cloud-starter-config</artifactId>
</dependency>

<dependency>
    <groupId>org.springframework.boot</groupId>
    <artifactId>spring-boot-starter-actuator</artifactId>
</dependency>
bootstrap.yaml
server:
  port: 9090

spring:
  application:
    name: javashitang # 要获取的配置的应用名
  cloud:
    config:
      # uri: http://localhost:8080 # 配置中心config-server的地址
      profile: dev # 对应配置文件中的{profile}部分
      label: master # 对应配置文件中的{label}部分
      discovery:
        enabled: true
        service-id: config-cluster

eureka:
  client:
    service-url:
      defaultZone: http://localhost:7001/eureka

management:
  endpoints:
    web:
      exposure:
        include: refresh
2.启动类上加@EnableEurekaClient和@RefreshScope注解
@RefreshScope
@RestController
@EnableEurekaClient
@SpringBootApplication
public class ConsumerConfigCluster {

    public static void main(String[] args) {
        SpringApplication.run(ConsumerConfigCluster.class);
    }

    @Value("${from}")
    private String from;

    @RequestMapping("from")
    public String from() {
        return this.from;
    }
}
启动eureka-service(spring-cloud-eureka)
config-cluster(spring-cloud-config)
consumer-config-cluster(spring-cloud-config)
访问http://localhost:9080/javashitang/dev
结果如下,配置中心正常提供服务
{
    "name": "javashitang",
    "profiles": [
        "dev"
    ],
    "label": null,
    "version": "0760c0643488f25bfba1cf95b5af51006e0f312a",
    "state": null,
    "propertySources": [
        {
            "name": "https://github.com/erlieStar/spring-cloud-learning/config-repo/javashitang-dev.yaml",
            "source": {
                "from": "javashitang-git-dev-update"
            }
        }
    ]
}
访问http://localhost:9090/from
结果如下
javashitang-git-dev-update
欢迎关注