Article directory
- foreword
- 1. What is FlexCloud?
- 2. FlexCloud network structure
- Third, the actual combat of the example project
-
- Step 1 Apply for a free FlexCloud cloud platform
- Step 2 Configure FlexManager account
- Step 3 Create a configuration project
- Step 4 Data source configuration
- Step 5 Data table configuration
- Step 6 Configuration design
- Step 7 Publish
- Step 8 Create a new device
- Step 9 Bind BOX
- Step 10View Device Dashboard
- Step 11 Use of mobile APP
- Summarize
foreword
With the continuous development of industrial automation, the technology of equipment into the cloud is becoming more and more important, and many people have started learning equipment into the cloud. Combined with the actual project operation process of the FlexManager of the device entering the cloud in the previous article, this article follows the example project of the previous article and introduces the FlexCloud visual configuration operation of the device entering the cloud in detail.
提示:以下是本篇文章正文内容,下面案例可供参考
1. What is FlexCloud?
FlexCloud cloud configuration introduction
is a platform for comprehensive management of the entire life cycle of equipment, focusing on industrial equipment Web configuration, equipment management, equipment monitoring, fault warning, equipment maintenance, equipment data analysis and application. With the use of hardware gateway products, we are committed to creating the most innovative automation software products in the Internet era.
2. FlexCloud network structure
Cloud configuration is one of the data display terminal forms of the industrial Internet of Things platform. The device relies on the connection of intelligent gateway devices to push data to the cloud server, and the cloud configuration platform obtains data from the server for display. It can achieve millions of data concurrency, second-level real-time data changes, and 7*24 hours of uninterrupted operation.
1. Theoretical network structure
as the picture shows:
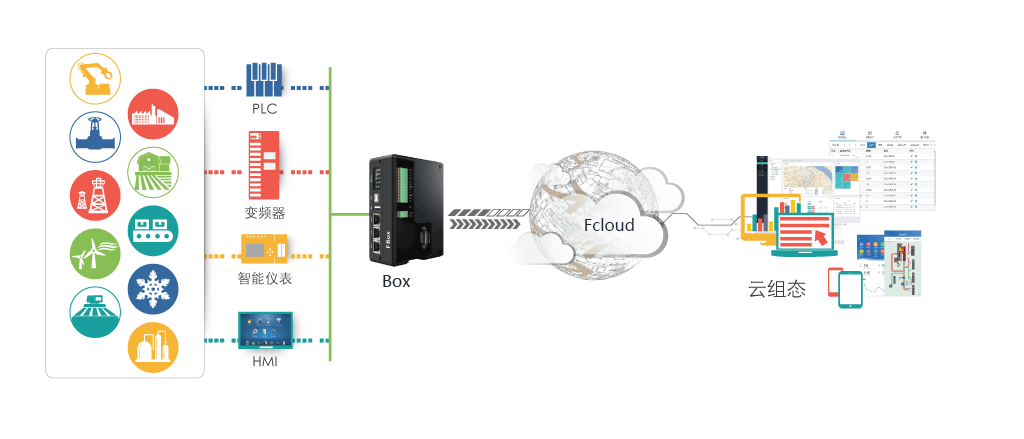
2. Device access
Device access is the first step for devices to realize cloud platform management. Cloud configuration can quickly obtain the data of the underlying devices by binding the configured hardware modules, and easily monitor the operation of the device through the cloud configuration, so that you do not need to. Focus on complex industrial communication protocols and the tedious setup required to access different devices. For details, please refer to the previous articles about the specific deployment of the FlexManager data channel for devices into the cloud.
Third, the actual combat of the example project
Immediately after the previous article, the XX250L double-reverse point created on the FlexManager console, as shown in the figure:


Although FlexManager can also realize the APP function, it is only equivalent to the front end of a cloud database, that is, it can only be viewed in the table. piece of data. In order to further realize the dynamic visualization of the device cloud, it is necessary to further realize the animation configuration. Here is an example project in the FlexCloud Visual Operation Center, giving students a detailed introduction and experience of the operation steps and detailed processing of a wave of equipment flow visualization configuration equivalent to zero-code state.
Step 1 Apply for a free FlexCloud cloud platform
First, enter the homepage of FAYI official website, click the cloud platform free trial in the upper right corner, as shown in the figure:

Then, enter the interface for filling in the application, and fill in the application according to various prompts, as shown in the figure:

After the application is approved, a Private cloud space URL, such as https://XXXX.yunzutai.com/.
Enter this website, open the private FlexCloud cloud platform, enter the private cloud configuration space applied for in FlexCloud, and proceed to the next step.
Step 2 Configure FlexManager account
Select [System Management] > [Third Party Account] > [Configure FlexManager Account], fill in the username and password of the FlexManager account, and complete the account binding.
After binding, as shown in the figure:

Step 3 Create a configuration project
Click [Device Center] > [Device Template] > [Add Device Template], enter the template name, industry, remarks, etc., to create a configuration project template, which can be used by multiple devices.
As shown in the figure:

After the addition is completed, click [Template Configuration] to configure the design, as shown in the figure:

Step 4 Data source configuration
Enter the newly created configuration project, click [Data Source Configuration], as shown in the figure:

Click [Add Data Source], as shown in the figure: 
Customize a data source name, select the data source type, and then click Save and import the configuration , as shown in the figure:

Enter the user name, password, box serial number of the FlexManager account, as shown in the figure:

Import variables, alarms, historical data, etc. from FBox, as shown in the figure: The


imported variables, alarms, historical data, etc. are all It is the equipment point data created under the FlexManager platform account.
Step 5 Data table configuration
Click [Data Table Configuration], you can customize the addition or import from FBox in the variable table, alarm table, event table, and historical data. The variables associated with the configuration design will be obtained from the data table, as shown in the figure:

Here, you can also make further modifications to the variables, as shown in the figure:

Step 6 Configuration design
Click [Configuration Design], drag and drop the required components, set associated variables and other properties, and complete the custom monitoring interface design, as shown in the figure.


For specific details, please click this link to go to the video tutorial guide.
Step 7 Publish
After the configuration is designed, click the [Publish] button in the upper right corner, the configuration screen and configuration information will be saved and distributed to the device using the template.

Step 8 Create a new device
Click [Device Center] > [Device Management] > [Add Device], check "Use Device Template", select a device template, fill in the basic information, pictures, and location to complete the device creation.
as the picture shows:

Step 9 Bind BOX
After the device is created, click [Details] > [Template Configuration] > [Data Source Binding] to bind the data source.
The data sources added in the configuration project are displayed in the list, and a device can be bound to multiple FBoxes, as shown in the figure:

If the box is already under the associated FlexManager account, the password can be entered with any value.
Step 10View Device Dashboard
Click the hyperlink of the device name or [Dashboard] to enter the [Device Dashboard] interface, and view the configuration screen, alarm, historical data and other information of the device, as shown in the figure:

You can also enter the full-screen mode, as shown in the figure:
Step 11 Use of mobile APP
Download the device cloud assistant APP, as shown in the figure:

After logging in, click to enter the device center interface, and click the device to enter, as shown in the figure:

Summarize
The above is what we will talk about today. This article only briefly introduces the use of FlexCloud, and FlexCloud provides a large number of specific deployments and methods that enable us to quickly and easily handle the visualization of device cloud configuration.