Table of contents
1. SSM project integrates Redis
2.Spring-redis related configuration
3.Spring context configuration
3. redis breakdown, penetration, avalanche
Preface
When integrating SSM projects with Redis and using Redis annotation development, it is crucial to avoid cache penetration, cache penetration and cache avalanche. I will write a detailed blog for you below covering these topics.
1. SSM project integrates Redis
In the SSM project, using Redis as a cache can greatly improve the performance and throughput of the system. The integration process mainly includes introducing dependencies, configuring Redis connections, etc. for operations.
1. Import pom dependencies
<redis.version>2.9.0</redis.version>
<redis.spring.version>1.7.1.RELEASE</redis.spring.version>

<dependency>
	<groupId>redis.clients</groupId>
	<artifactId>jedis</artifactId>
	<version>${redis.version}</version>
</dependency>
<dependency>
	<groupId>org.springframework.data</groupId>
	<artifactId>spring-data-redis</artifactId>
	<version>${redis.spring.version}</version>
</dependency>
2.Spring-redis related configuration
Configuration file redis.properties
redis.hostName=192.168.195.139
redis.port=6379
redis.password=123456
redis.timeout=10000
redis.maxIdle=300
redis.maxTotal=1000
redis.maxWaitMillis=1000
redis.minEvictableIdleTimeMillis=300000
redis.numTestsPerEvictionRun=1024
redis.timeBetweenEvictionRunsMillis=30000
redis.testOnBorrow=true
redis.testWhileIdle=true
redis.expiration=3600
Spring-redis.xml
- Register redis.properties
- Configure data source
- connection factory
- Configure serialization
- Configure redis key generation strategy
<?xml version="1.0" encoding="UTF-8"?>
<beans xmlns="http://www.springframework.org/schema/beans"
       xmlns:xsi="http://www.w3.org/2001/XMLSchema-instance"
       xmlns:context="http://www.springframework.org/schema/context"
       xmlns:cache="http://www.springframework.org/schema/cache"
       xsi:schemaLocation="http://www.springframework.org/schema/beans
       http://www.springframework.org/schema/beans/spring-beans.xsd
       http://www.springframework.org/schema/context
       http://www.springframework.org/schema/context/spring-context.xsd
       http://www.springframework.org/schema/cache
       http://www.springframework.org/schema/cache/spring-cache.xsd">

    <!-- 1. 引入properties配置文件 -->
    <!--<context:property-placeholder location="classpath:redis.properties" />-->

    <!-- 2. redis连接池配置-->
    <bean id="poolConfig" class="redis.clients.jedis.JedisPoolConfig">
        <!--最大空闲数-->
        <property name="maxIdle" value="${redis.maxIdle}"/>
        <!--连接池的最大数据库连接数  -->
        <property name="maxTotal" value="${redis.maxTotal}"/>
        <!--最大建立连接等待时间-->
        <property name="maxWaitMillis" value="${redis.maxWaitMillis}"/>
        <!--逐出连接的最小空闲时间 默认1800000毫秒(30分钟)-->
        <property name="minEvictableIdleTimeMillis" value="${redis.minEvictableIdleTimeMillis}"/>
        <!--每次逐出检查时 逐出的最大数目 如果为负数就是 : 1/abs(n), 默认3-->
        <property name="numTestsPerEvictionRun" value="${redis.numTestsPerEvictionRun}"/>
        <!--逐出扫描的时间间隔(毫秒) 如果为负数,则不运行逐出线程, 默认-1-->
        <property name="timeBetweenEvictionRunsMillis" value="${redis.timeBetweenEvictionRunsMillis}"/>
        <!--是否在从池中取出连接前进行检验,如果检验失败,则从池中去除连接并尝试取出另一个-->
        <property name="testOnBorrow" value="${redis.testOnBorrow}"/>
        <!--在空闲时检查有效性, 默认false  -->
        <property name="testWhileIdle" value="${redis.testWhileIdle}"/>
    </bean>

    <!-- 3. redis连接工厂 -->
    <bean id="connectionFactory" class="org.springframework.data.redis.connection.jedis.JedisConnectionFactory"
          destroy-method="destroy">
        <property name="poolConfig" ref="poolConfig"/>
        <!--IP地址 -->
        <property name="hostName" value="${redis.hostName}"/>
        <!--端口号  -->
        <property name="port" value="${redis.port}"/>
        <!--如果Redis设置有密码  -->
        <property name="password" value="${redis.password}"/>
        <!--客户端超时时间单位是毫秒  -->
        <property name="timeout" value="${redis.timeout}"/>
    </bean>

    <!-- 4. redis操作模板,使用该对象可以操作redis
        hibernate课程中hibernatetemplete,相当于session,专门操作数据库。
    -->
    <bean id="redisTemplate" class="org.springframework.data.redis.core.RedisTemplate">
        <property name="connectionFactory" ref="connectionFactory"/>
        <!--如果不配置Serializer,那么存储的时候缺省使用String,如果用User类型存储,那么会提示错误User can't cast to String!!  -->
        <property name="keySerializer">
            <bean class="org.springframework.data.redis.serializer.StringRedisSerializer"/>
        </property>
        <property name="valueSerializer">
            <bean class="org.springframework.data.redis.serializer.GenericJackson2JsonRedisSerializer"/>
        </property>
        <property name="hashKeySerializer">
            <bean class="org.springframework.data.redis.serializer.StringRedisSerializer"/>
        </property>
        <property name="hashValueSerializer">
            <bean class="org.springframework.data.redis.serializer.GenericJackson2JsonRedisSerializer"/>
        </property>
        <!--开启事务  -->
        <property name="enableTransactionSupport" value="true"/>
    </bean>

    <!--  5.配置缓存管理器  -->
    <bean id="redisCacheManager" class="org.springframework.data.redis.cache.RedisCacheManager">
        <constructor-arg name="redisOperations" ref="redisTemplate"/>
        <!--redis缓存数据过期时间单位秒-->
        <property name="defaultExpiration" value="${redis.expiration}"/>
        <!--是否使用缓存前缀,与cachePrefix相关-->
        <property name="usePrefix" value="true"/>
        <!--配置缓存前缀名称-->
        <property name="cachePrefix">
            <bean class="org.springframework.data.redis.cache.DefaultRedisCachePrefix">
                <constructor-arg index="0" value="-cache-"/>
            </bean>
        </property>
    </bean>

    <!--6.配置缓存生成键名的生成规则-->
    <bean id="cacheKeyGenerator" class="com.ctb.ssm.redis.CacheKeyGenerator"></bean>

    <!--7.启用缓存注解功能-->
    <cache:annotation-driven cache-manager="redisCacheManager" key-generator="cacheKeyGenerator"/>
</beans>
Note: redis.properties and jdbc.properties will conflict when integrating with Spring; therefore, the place where the configuration file is introduced must be placed in SpringContext.xml
3.Spring context configuration
SpringContext.xml
<?xml version="1.0" encoding="UTF-8"?>
<beans xmlns="http://www.springframework.org/schema/beans"
       xmlns:xsi="http://www.w3.org/2001/XMLSchema-instance"
       xsi:schemaLocation="http://www.springframework.org/schema/beans http://www.springframework.org/schema/beans/spring-beans.xsd">

    <!--1. 引入外部多文件方式 -->
    <bean id="propertyConfigurer"
          class="org.springframework.beans.factory.config.PropertyPlaceholderConfigurer">
        <property name="systemPropertiesModeName" value="SYSTEM_PROPERTIES_MODE_OVERRIDE" />
        <property name="ignoreResourceNotFound" value="true" />
        <property name="locations">
            <list>
                <value>classpath:jdbc.properties</value>
                <value>classpath:redis.properties</value>
            </list>
        </property>
    </bean>
    <!--引入mybatis的相关配置文件-->
    <import resource="applicationContext-mybatis.xml"></import>
    <!--spring管理ehcache对应配置文件-->
    <import resource="applicationContext-ehcache.xml"></import>
    <!--spring管理redis对应配置文件-->
    <import resource="applicationContext-redis.xml"></import>
    <import resource="applicationContext-shiro.xml"/>
</beans>
2. redis annotation cache
First you need a buffering strategy class to store information
package com.ctb.ssm.redis;

import lombok.extern.slf4j.Slf4j;
import org.springframework.cache.interceptor.KeyGenerator;
import org.springframework.util.ClassUtils;

import java.lang.reflect.Array;
import java.lang.reflect.Method;

@Slf4j
public class CacheKeyGenerator implements KeyGenerator {
    // custom cache key
    public static final int NO_PARAM_KEY = 0;
    public static final int NULL_PARAM_KEY = 53;

    @Override
    public Object generate(Object target, Method method, Object... params) {
        StringBuilder key = new StringBuilder();
        key.append(target.getClass().getSimpleName()).append(".").append(method.getName()).append(":");
        if (params.length == 0) {
            key.append(NO_PARAM_KEY);
        } else {
            int count = 0;
            for (Object param : params) {
                if (0 != count) {//参数之间用,进行分隔
                    key.append(',');
                }
                if (param == null) {
                    key.append(NULL_PARAM_KEY);
                } else if (ClassUtils.isPrimitiveArray(param.getClass())) {
                    int length = Array.getLength(param);
                    for (int i = 0; i < length; i++) {
                        key.append(Array.get(param, i));
                        key.append(',');
                    }
                } else if (ClassUtils.isPrimitiveOrWrapper(param.getClass()) || param instanceof String) {
                    key.append(param);
                } else {//Java一定要重写hashCode和eqauls
                    key.append(param.hashCode());
                }
                count++;
            }
        }

        String finalKey = key.toString();
//        IEDA要安装lombok插件
        log.debug("using cache key={}", finalKey);
        return finalKey;
    }
}
1.@Cacheable annotation
Configured on a method or class, the function is: after this method is executed, first go to the cache to see if there is any data. If not, find it from the database, save a copy in the cache, and return the result. The next time this method is executed, before the cache In the case of expiration, first search in the cache. If there is any, return it directly. If not, search from the database.
value: a name of the cache location, cannot be empty
 key: the cache key, the default is empty, which means using the parameter type and parameter value of the method as the key, supports SpEL
 condition: trigger condition, add the cache when the condition is met, the default is empty, Indicates that everything is added to the cache and supports SpEL.
@Cacheable test code
@Cacheable(value = "user-clz",key = "'clz:'+#cid",condition = "#cid < 4")
Clazz selectByPrimaryKey(Integer cid);
Test class
package com.ctb.shiro;

import com.ctb.ssm.biz.ClazzBiz;
import org.junit.Test;
import org.junit.runner.RunWith;
import org.springframework.beans.factory.annotation.Autowired;
import org.springframework.test.context.ContextConfiguration;
import org.springframework.test.context.junit4.SpringJUnit4ClassRunner;


@RunWith(SpringJUnit4ClassRunner.class)
@ContextConfiguration(locations={"classpath:applicationContext.xml"})
public class ClazzBizTest {
    @Autowired
    private ClazzBiz clazzBiz;

    @Test
    public void test1(){
        System.out.println(clazzBiz.selectByPrimaryKey(10));
        System.out.println(clazzBiz.selectByPrimaryKey(10));
    }

}
Result: If there is data in redis, access redis; if there is no data, access MySQL;
2.@CachePut annotation
Similar to the update operation, that is, each time regardless of whether there is a result in the cache, the result is found from the database, the result is updated to the cache, and the result is returned.
value: the name of the cache, defined in the spring configuration file, at least one
 key must be specified: the cache key, which can be empty. If specified, it should be written according to the SpEL expression. If not specified, it will be combined according to all parameters of the method by default.
 condition: cache condition, can be empty, written in SpEL, returns true or false, only cached if true
@CachePut test code
 @Cacheable(value = "clz",key = "'cid:'+#cid",condition = "#cid > 5")
    Clazz selectByPrimaryKey(Integer cid);
Test class
@Test
    public void test2(){
//        测试 Cacheput 中的 key
        System.out.println(clazzBiz.selectByPrimaryKey(4));
        System.out.println(clazzBiz.selectByPrimaryKey(4));
    }
Result: only deposit but no withdrawal
3.@CacheEvict annotation
Used to clear cached data used on this method or class (clear where used)
value: a name of the cache location, cannot be empty
 key: the cache key, the default is empty, which means using the parameter type and parameter value of the method as the key, supports SpEL
 condition: trigger condition, add the cache when the condition is met, the default is empty, Indicates that everything is added to the cache, and supports SpEL
 allEntries: true indicates that all caches in value are cleared, and the default is false.
@CacheEvict test code
 @CacheEvict(value = "user-clz-put",allEntries = true)   // 删除以 user-clz-put开头的 缓存
    int deleteByPrimaryKey(Integer cid);
Test class
 @Test
    public void test3(){
//        测试 CacheEvict 中的 key
        clazzBiz.deleteByPrimaryKey(4);
    }
Result: You can configure to delete specified cache data, or you can delete all cache data that matches the rules;
3. redis breakdown, penetration, avalanche
1. Cache breakdown
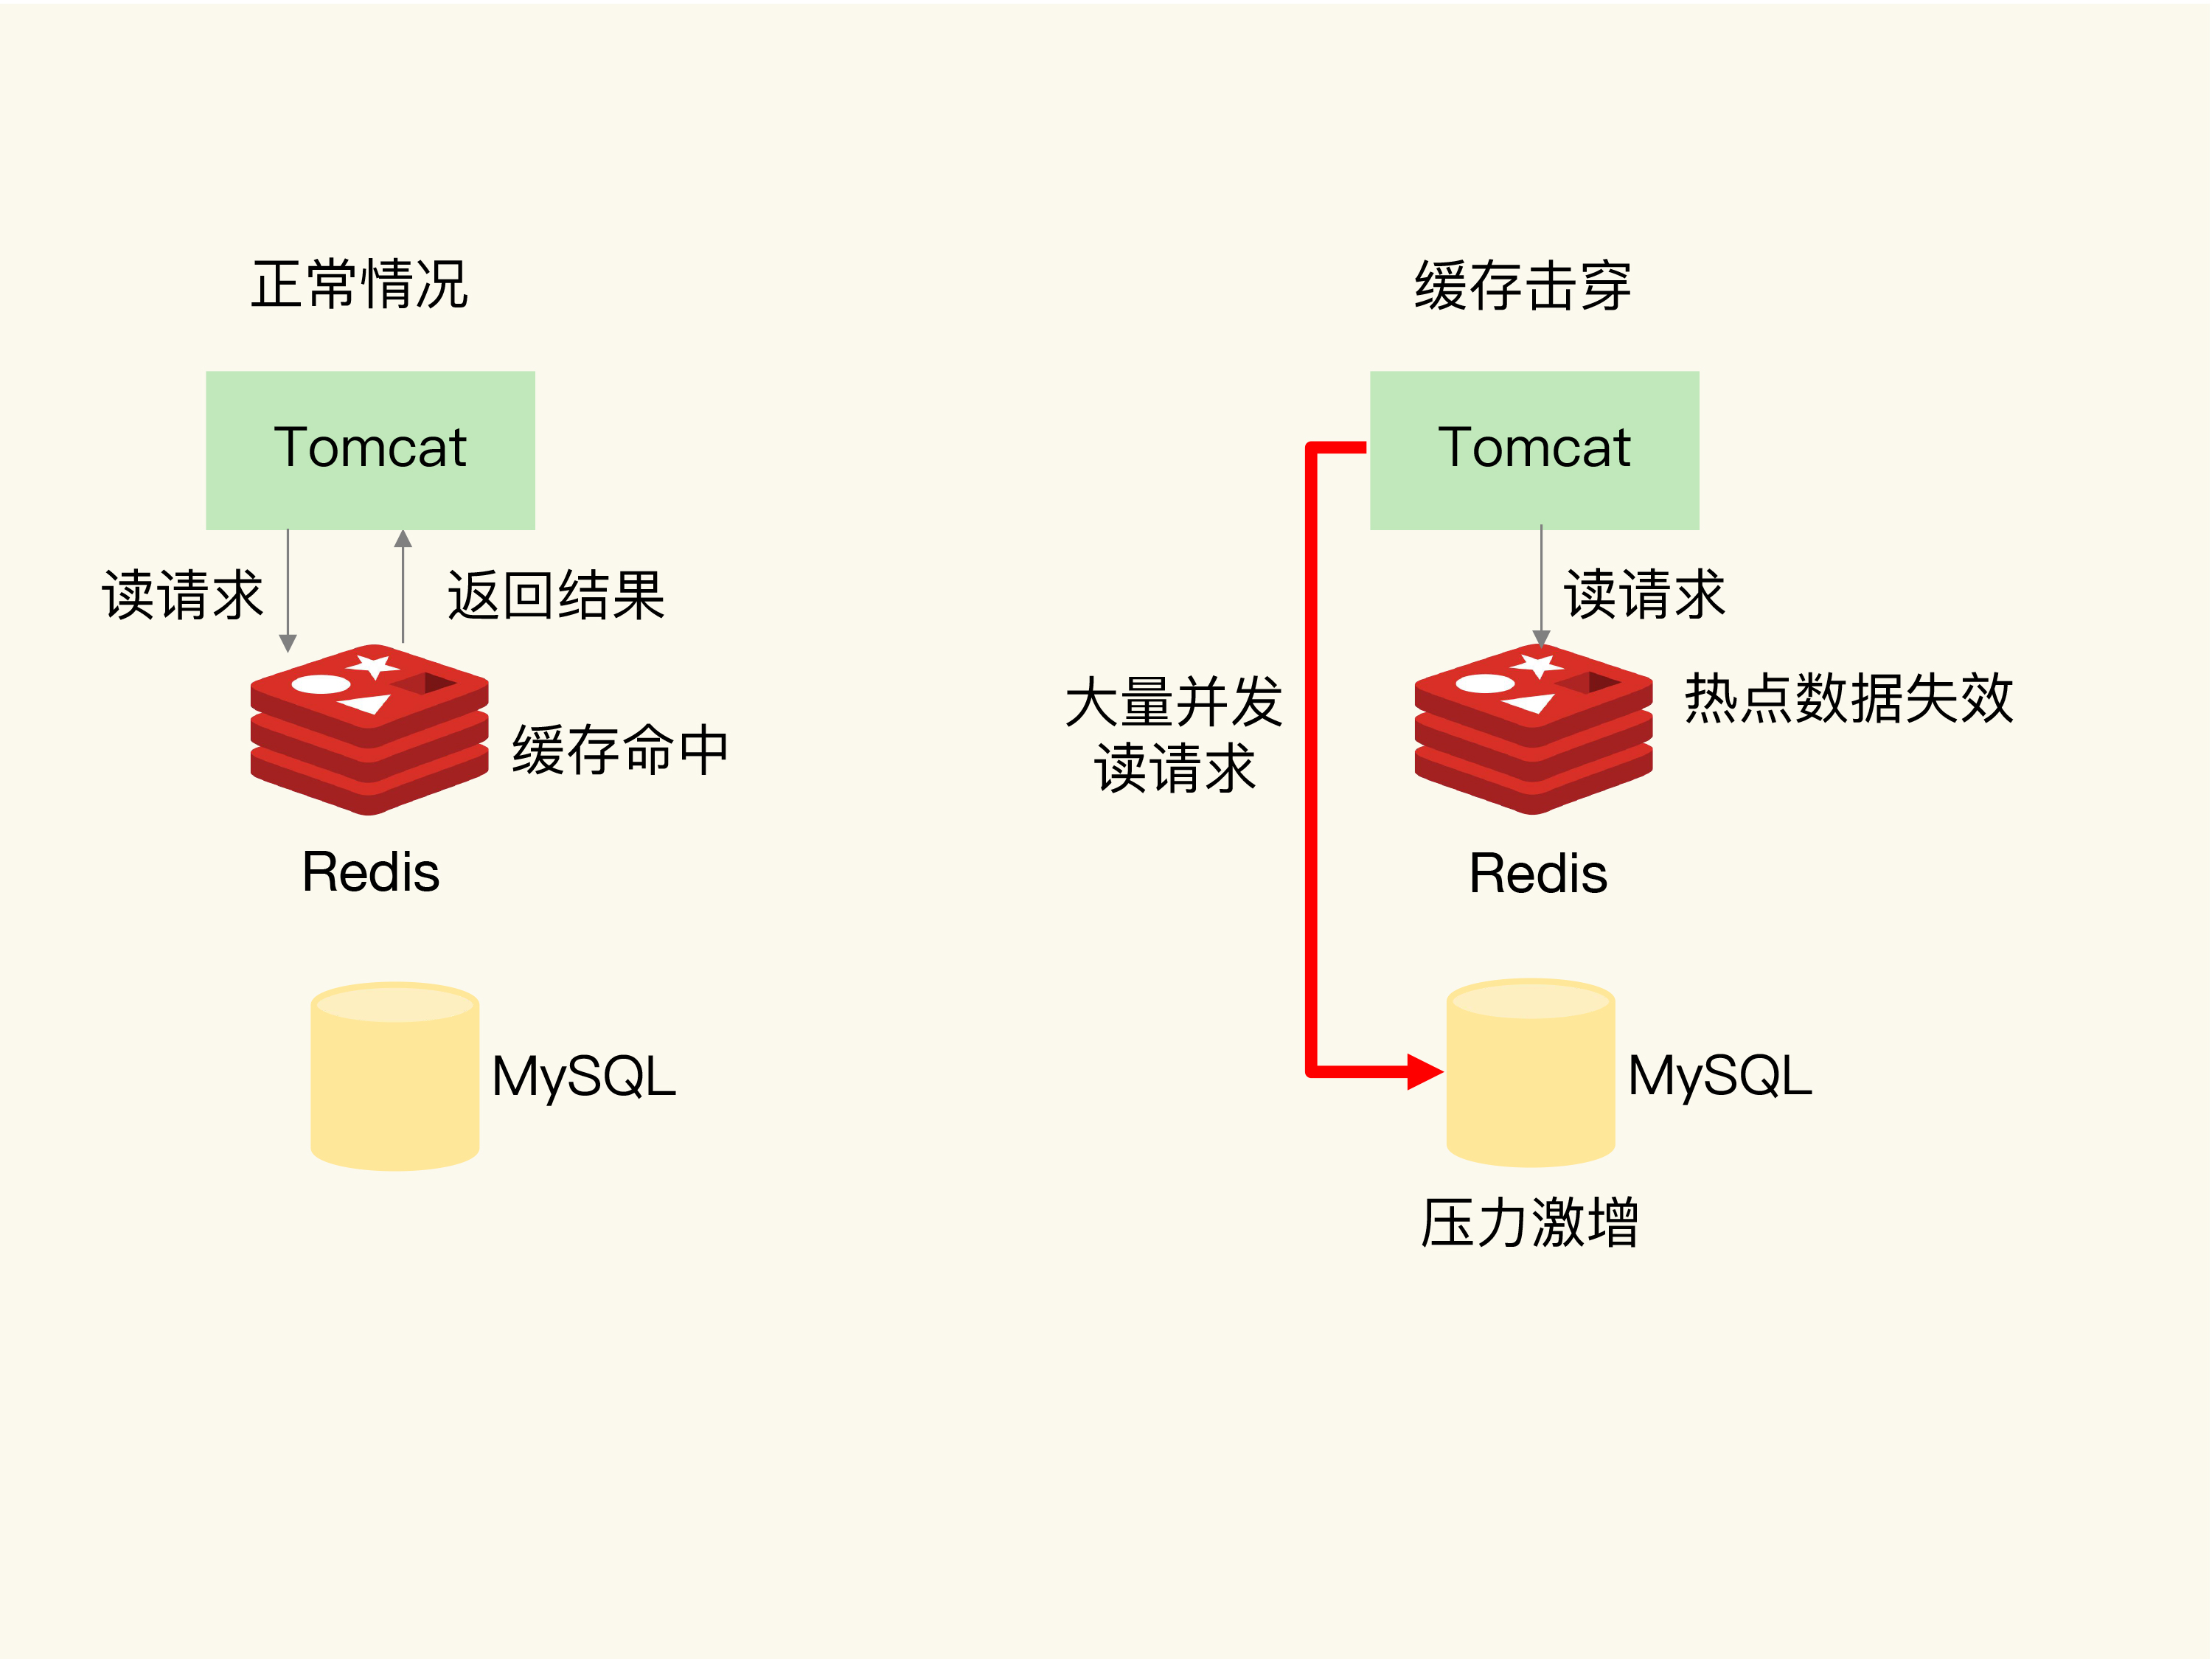
Problem description : Cache breakdown means that when a certain hot data fails, a large number of concurrent requests directly hit the database, causing a surge in database pressure.
solution :
- Use a mutex lock or distributed lock to protect access to the database and ensure that only one thread can perform database query operations.
- For hot data, set a cache policy that never expires, or use a preloading mechanism to refresh the cache in advance before the data expires.
2. Cache penetration
 Problem description : Cache penetration means that malicious or non-existent requests directly access the database through the cache. Since there is no relevant data in the cache, each request will directly query the database, resulting in excessive database load.
solution :
- Use techniques such as Bloom Filter to identify non-existent data and avoid putting pressure on the database.
- Data that does not exist is also cached, but a shorter expiration time is set to avoid invalid data being stored in the cache for a long time.
3. Cache avalanche
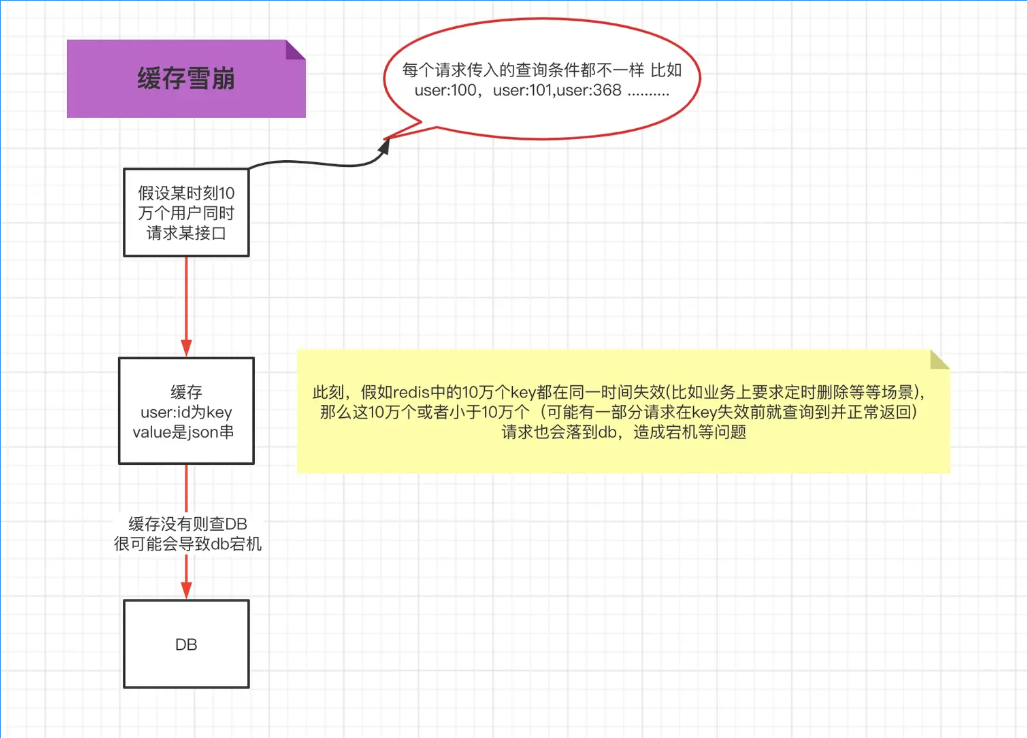
Problem description : Cache avalanche refers to when a large amount of data in the cache fails at the same time, causing a large number of requests to hit the database directly, causing a sudden increase in database pressure.
solution :
- Set the cache data expiration time to stagger, and set the expiration time for the cache in a random manner to avoid a large number of caches from invalidating at the same time.
- Use the method that hotspot data never expires, or set the cache expiration time of hotspot data in advance to ensure the stability of important data.