Reprint: How to register an Apple developer account
Before 2020, you could generate a certificate after registering for an Apple developer account.
But after 2020, because registering an Apple developer account requires using the Apple Developer app to register a developer account, you will need to pay a fee to create an ios certificate.
Therefore, after the new policy comes out, you must register an Apple developer account and pay to become an Apple developer before you can create a certificate manually. How to register for an Apple developer account is as follows:
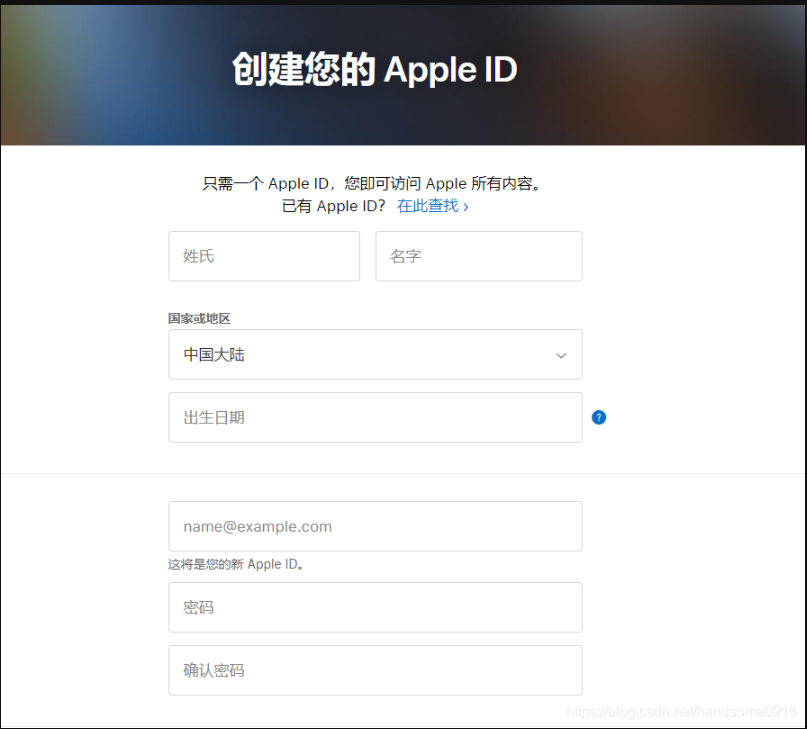
1. Click on the Apple ID registration address and enter relevant information to register. If you already have an Apple account, see the second step.
Create your Apple ID
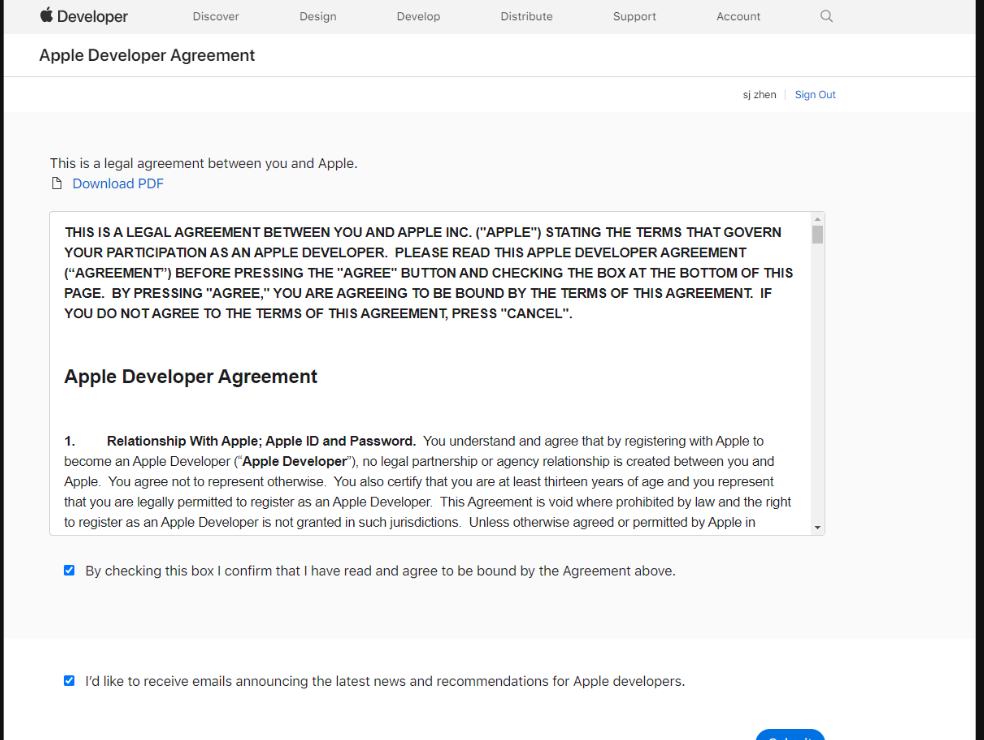
2. After successful registration, or if you have an Apple account, log in to the Apple Developer Center
If this is the first time you log in to your Apple developer account, you need to agree to the following agreement
3. Use your iPhone or iPad to search for Apple Developer app in the app store and install the app software. Then log in to this software to pay:
(1) The following are the process steps for registering for the Apple Developer Program as an individual given by Apple:
If you are an individual or sole proprietorship/one-person company in mainland China, please follow the steps below to register for the Apple Developer Program on your iPhone or iPad. Before you start, you need to prepare the following:
An iPhone running iOS 12.4, iOS 13.1 or later, or an iPad running iPadOS 13.1 or later, and make sure it has a passcode, Touch ID, or Face ID enabled.
Apple ID with two-factor authentication enabled.
The latest version of the Apple Developer app.
Sign in to iCloud on your device.
Start registration
Open the Apple Developer app.
Tap the Accounts tab.
Sign in with your Apple ID.
Tap Register Now.
Review the program benefits and requirements, then tap Continue Enrollment.
Enter your personal information
Enter your first name, last name, ID number and phone number. Your personal legal name will be listed on the App Store as the supplier. Do not enter an alias, nickname, or company name as your first or last name; incorrectly entering your legal name will cause delays in registration review.
To verify your identity, you will be asked to take a selfie:
Make sure your face is clearly in the frame, then tap Capture.
Review your selfie to make sure it's clear, then tap Confirm.
Follow the steps on the next few pages:
Enter your first name, last name, and address in English letters, then tap Continue.
Select "Personal" as the entity type.
Agree to the Apple Developer Program License Agreement (English).
complete purchase
(2) Process of registering the Apple Developer Program as an organization (choose one from the first step, if you register as an individual, you do not need to do the second step)
If you work for a company, non-profit organization, joint venture, partnership, or government organization in mainland China, you can follow the steps below to register for the Apple Developer Program on your iPhone or iPad. Please note that as an Apple Developer Program registrant for your organization, you must have the legal authority to bind your organization to legal agreements. You must be an owner/founder of the organization, a member of the executive team, a senior project lead, or an employee with legal authority granted by a senior employee. Before you start, you need to prepare the following:
An iPhone running iOS 12.4, iOS 13.1 or later, or an iPad running iPadOS 13.1 or later, and make sure it has a passcode, Touch ID, or Face ID enabled.
Apple ID with two-factor authentication enabled.
The latest version of the Apple Developer app is installed on the device.
Sign in to iCloud on your device.
Start registration
Open the Apple Developer app.
Tap the Accounts tab.
Sign in with your Apple ID.
Tap Register Now.
Review the program benefits and requirements, then tap Continue.
Enter your information as the account holder
Enter your first name, last name, ID number and phone number. Do not enter an alias, nickname, or company name as your first or last name; incorrectly entering your legal name will cause delays in registration review.
To verify your identity, you will be asked to take a selfie:
Make sure your face is clearly in the frame, then tap Capture.
Review your selfie to make sure it's clear, then tap Confirm.
Enter your organization information
Follow the steps on the next few screens to provide the following information:
Entity type.
Legal entity name. We do not accept DBAs, fictitious companies, trade names or branches. The legal entity name will appear as "Supplier" in the apps you distribute. Example: Supplier: ABC Company, Inc.
D‑U‑N‑S No. Your organization must have a D‑U‑N‑S number so that we can verify your organization's identity and legal entity status. These unique nine-digit numbers are assigned by Dun & Bradstreet and are widely used as standard corporate identifiers.
Head office address and telephone number.
website. Your organization's website must be public and the domain name must be associated with your organization.
Signature authority confirmed. Confirm that you have the authority to bind your organization to legal agreements and provide contact information for an employee who can certify that you have signing authority.
If your organization is a non-profit, educational, or government organization, you may choose to apply for a dues waiver.
After you submit your information, Apple will review it. You'll then receive an email with next steps.
Complete registration and purchase
Once your registration information is verified and approved, you will receive an email letting you know that you can complete your registration.
Open the Apple Developer app.
Tap the Accounts tab.
Sign in with your Apple ID.
Tap Continue Registration.
Agree to the Apple Developer Program License Agreement (English).
View your annual membership subscription details, then tap Renew at ¥688 per year.
Membership is offered as an annual auto-renewable subscription and will automatically renew unless you choose to cancel. Your purchases will be made using the payment method associated with your iTunes and App Store accounts. If you need to use your organization's credit card, add the credit card to the Apple ID you're signed in to in the iTunes & App Store section of your device settings (Media & Purchases in iOS 14). This Apple ID can be different from the one used when registering. You will receive a receipt via email that can be used for company accounting or reimbursement. This receipt can be resent via email at any time. You can cancel your subscription at any time in Settings, but at least one day before your annual renewal date. Annual fees paid in the year of membership cancellation will not be refunded.
(3) Verify identity
Certain processes require authentication within the app, including processes started and completed on the web (for example, renewing a membership, accepting an account holder transfer, or applying to join the Apple Developer Enterprise Program). Before you start, you need to prepare the following:
An iPhone running iOS 12.4, iOS 13.1 or later, or an iPad running iPadOS 13.1 or later, and make sure it has a passcode, Touch ID, or Face ID enabled.
Apple ID with two-factor authentication enabled.
The latest version of the Apple Developer app is installed on the device.
Sign in to iCloud on your device.
Verify identidy:
Open the Apple Developer app.
Tap the Accounts tab.
Sign in with the Apple ID associated with your application or Apple Developer account.
Tap Verify Identity.
Enter your first name, last name, ID number and phone number. Do not enter an alias, nickname, or company name as your first or last name; incorrectly entering your legal name will cause delays in registration review.
Take a selfie:
Make sure your face is clearly in the frame, then tap Capture.
Review your selfie to make sure it's clear, then tap Confirm.
Review the information you submitted, then tap Continue.
Complete the process:
After authentication, you'll see a confirmation screen.