The login of the WeChat applet is different from the login of the web terminal. The applet needs to communicate with the WeChat service for verification.
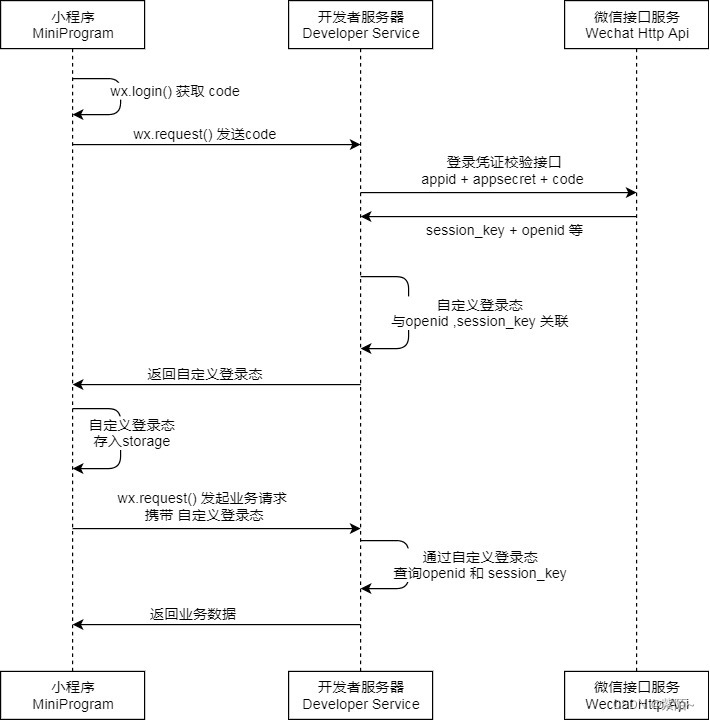
1. The official website diagram of the applet login process
2. Know openid , unionid and code
openid
openid is a string used to uniquely identify a user. In the WeChat applet, each user's openid is unique. Through openid , the applet can obtain the basic information of the user, such as avatar, nickname, etc.
Note: The same user has different openids in different applets . Therefore, when developing applets, openid cannot be used to judge the uniqueness of users.
unions
unionid is a string used to uniquely identify a user when the user binds multiple applications under the same WeChat open platform account. If the user uses the same WeChat account for login authorization in multiple applets, the unionid in these applets is the same.
Note: The user's unionid will only be generated when the user binds multiple applications to the same WeChat open platform account. Therefore, if the user is not bound to multiple applications, the applet will not be able to obtain the user's unionid .
code
code is the user login credential, which is issued to the applet by the WeChat server. After the user authorizes the login, the applet can obtain the user's code by calling the WeChat login interface . Then, request information such as the user's openid and session_key from the WeChat server through the code .
Note: Each code can only be used once and is valid for 5 minutes. Therefore, when using code to log in, it needs to be converted into information such as the user's openid and session_key in time to avoid code expiration
openid , unionid and code are three very important parameters in wechat applet login authorization. Understanding the function and usage of these parameters will help developers better design and develop the login authorization function of applets.
3. The login process of the text version (the interview will ask this, just answer this) to obtain the code
through wx.login() .
Send this code to the backend, and the backend will return a token , which will be used as your unique identity.
Save the token in local storage through wx.setStorageSync() .
When the user enters the page next time, the wx.getStorageSync() method will be used to determine whether the token has a value. If there is a value, other data can be requested. If there is no value, the login operation will be performed.
4. Graphical process (front-end process and back-end process)
front-end steps:
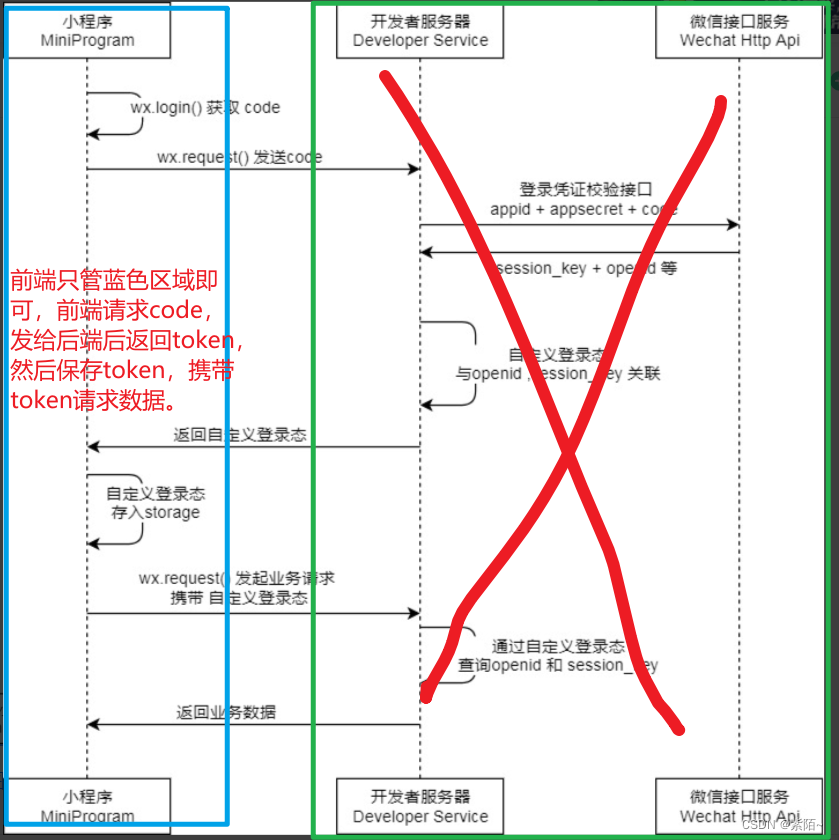
Backend steps:

5. Code to realize the login process
-
Simple implementation of the login process.
2. Further improvement: Encapsulate the login into a function, and then judge whether there is a token locally, so the login function does not need to be executed, otherwise, the login function is executed.
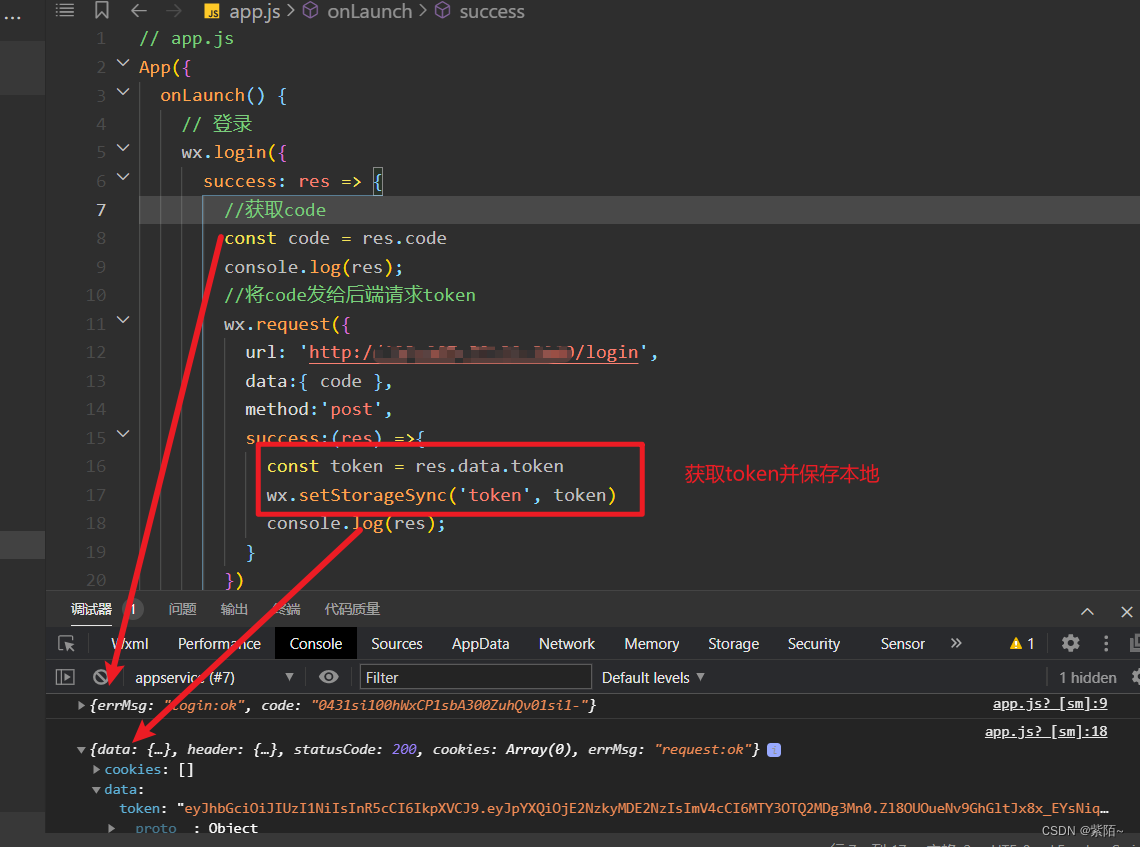
onLoad() { //获取token, 判断token是否有值 const token = wx.getStorageSync('token') || '' //如果有值 if(token) { console.log('请求其他数据'); }else{ this.handlerLogin() } }, //登录的回调函数 handlerLogin(){ wx.login({ success: res => { //获取code const code = res.code console.log(res); //将code发给后端请求token wx.request({ url: 'http://xxxxxxx/login', data:{ code }, method:'post', success:(res) =>{ const token = res.data.token //将token保存本地 wx.setStorageSync('token', token) console.log(res); } }) } }) }, -
Optimized code at once:
-
Look at the problem with the code you just wrote
-

So to optimize the code, split the above code.
-
First, declare a login.js under the service folder of the project to obtain the code. Use a promise to return a successful code
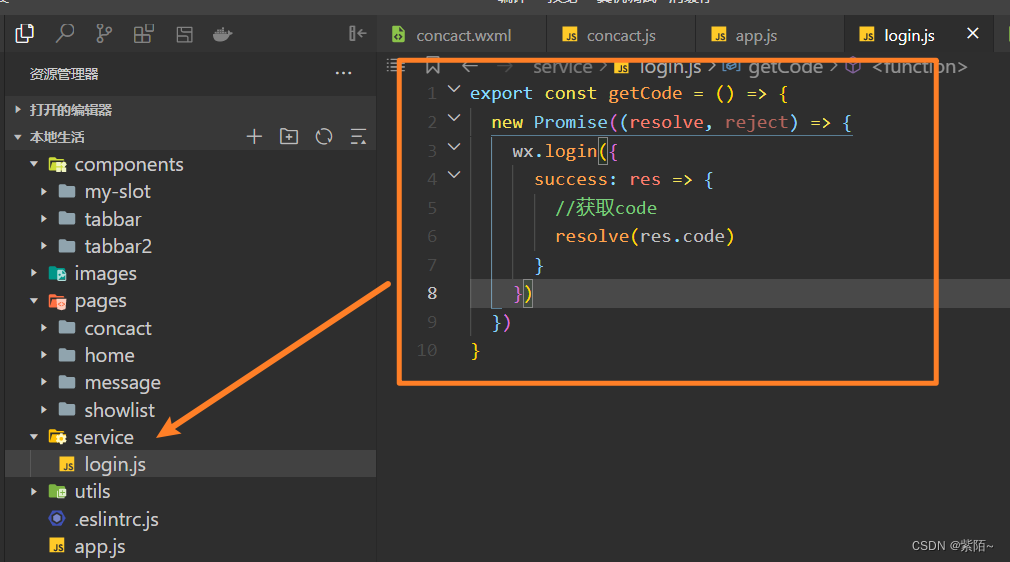
export const getCode = () => { new Promise((resolve, reject) => { wx.login({ success: res => { //获取code resolve(res.code) } }) }) } -
Encapsulate a Promise version of the request request method twice, and create an index.js under the service (an article on encapsulating requests will be published later)
-
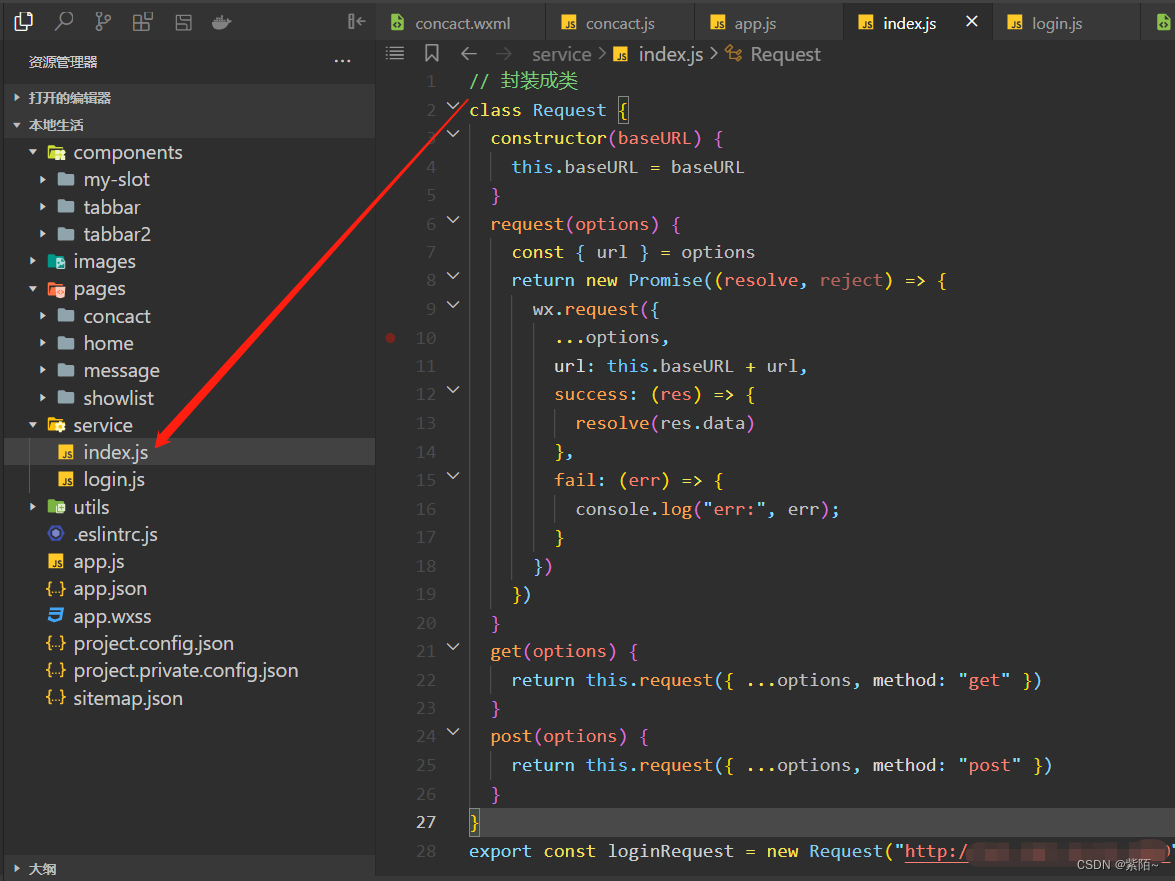
// 封装成类 class Request { constructor(baseURL) { this.baseURL = baseURL } request(options) { const { url } = options return new Promise((resolve, reject) => { wx.request({ ...options, url: this.baseURL + url, success: (res) => { resolve(res.data) }, fail: (err) => { console.log("err:", err); } }) }) } get(options) { return this.request({ ...options, method: "get" }) } post(options) { return this.request({ ...options, method: "post" }) } } export const loginRequest = new Request("http://xxxxxxx") -
Use your own encapsulated request method
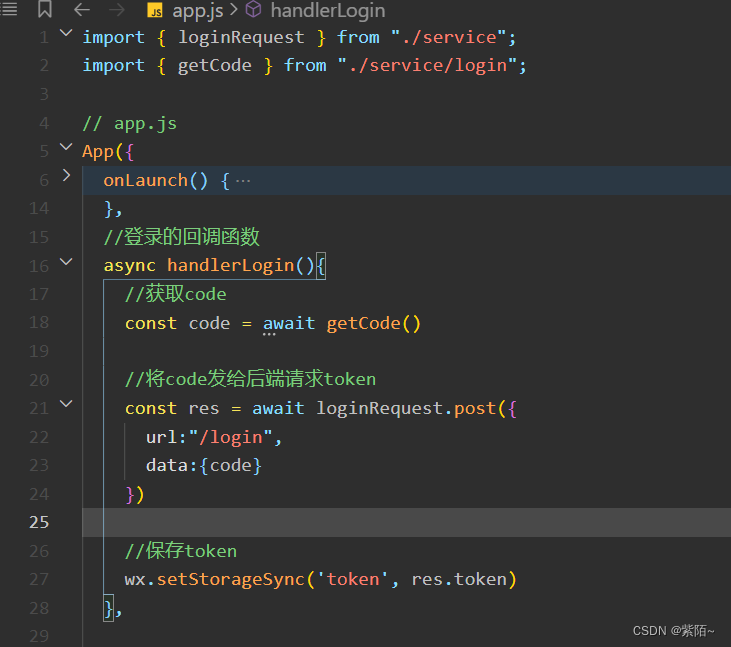
import { loginRequest } from "./service/index"; import { getCode } from "./service/login"; // app.js App({ onLaunch() { const token = wx.getStorageSync('token') || '' // 登录 if(token) { console.log('请求其他数据'); }else{ this.handlerLogin() } }, //登录的回调函数 async handlerLogin(){ //获取code const code = await getCode() //将code发给后端请求token const res = await loginRequest.post({ url:"/login", data:{code} }) //保存token wx.setStorageSync('token', res.token) }, } -
Comparison before and after optimization

-
Add a function to judge whether the token expires. The local token may not exist. If there is a token, the token may expire. The token is time-sensitive. The backend gives us an excuse to verify whether the token has expired.
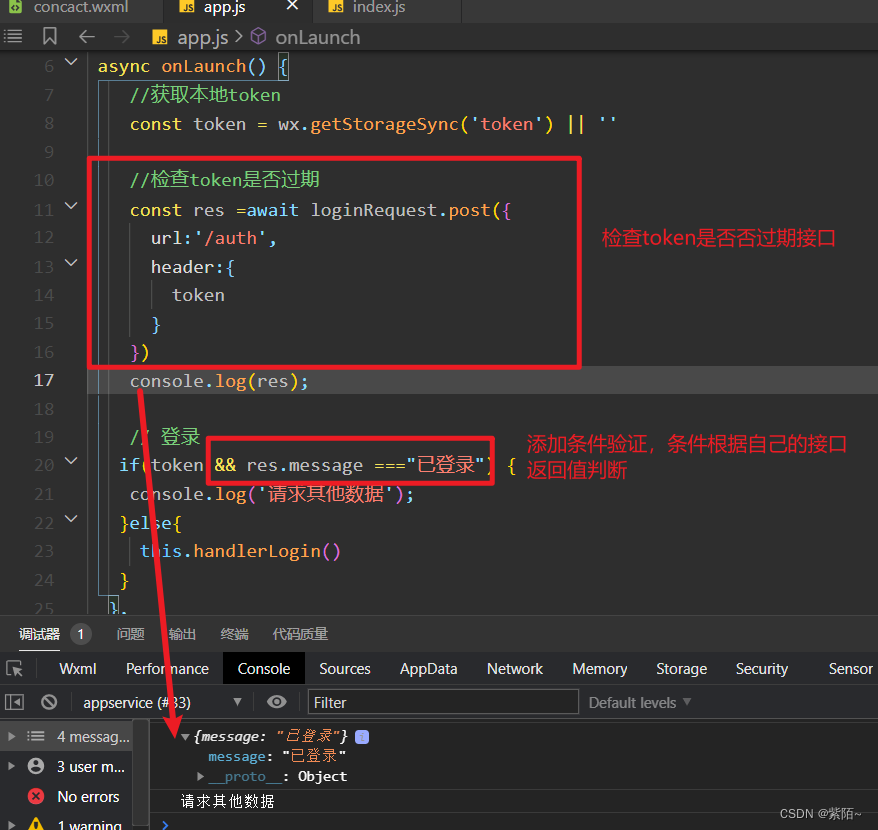
Finally: send an overall code: combined with actual code changes
import { loginRequest } from "./service/index"
import { getCode } from "./service/login"

// app.js
App({
  async onLaunch() {
    //获取本地token
    const token = wx.getStorageSync('token') || ''

    //检查token是否过期
    const res = await loginRequest.post({
      url: '/auth',
      header: {
        token
      }
    })
    console.log(res);

    // 登录
    if (token && res.message === "已登录") {
      console.log('请求其他数据');
    } else {
      this.handlerLogin()
    }
  },
  //登录的回调函数
  async handlerLogin() {
    //获取code
    const code = await getCode()

    //将code发给后端请求token
    const res = await loginRequest.post({
      url: "/login",
      data: { code }
    })

    //保存token
    wx.setStorageSync('token', res.token)
  },
})


//service/index.js代码
// 封装成类
class Request {
  constructor(baseURL) {
    this.baseURL = baseURL
  }
  request(options) {
    const { url } = options
    return new Promise((resolve, reject) => {
      wx.request({
        ...options,
        url: this.baseURL + url,
        success: (res) => {
          resolve(res.data)
        },
        fail: (err) => {
          console.log("err:", err);
        }
      })
    })
  }
  get(options) {
    return this.request({ ...options, method: "get" })
  }
  post(options) {
    return this.request({ ...options, method: "post" })
  }
}
export const loginRequest = new Request("http://xxxxx")


//service/login.js
export const getCode = () => {
  new Promise((resolve, reject) => {
    wx.login({
      success: res => {
        //获取code
        resolve(res.code)
      }
    })
  })
}