1. Summary
This article mainly introduces two points. For related documents, please refer to WeChat Open Platform Preparation | WeChat Open Documentation
- Login authorization related process of WeChat open platform
- How does vue3 access the WeChat authorization login function of the WeChat open platform
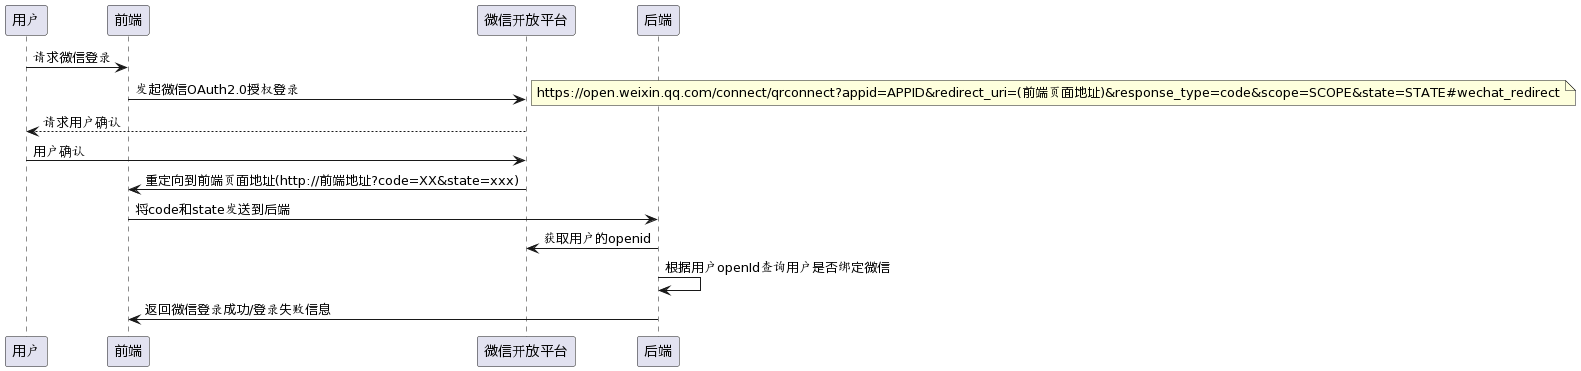
2. The login authorization process of the WeChat open platform
- The third party initiates a WeChat authorization login request. After the WeChat user allows the authorization of the third-party application, WeChat will launch the application or redirect to the third-party website, and bring the authorization temporary ticket code parameter;
- Add AppID and AppSecret through code parameters, etc., and exchange for access_token through API;
- Use access_token to make interface calls to obtain basic user data resources or help users implement basic operations
- Process one
- Process two

3. How does vue3 access the WeChat authorized login function of the WeChat open platform
The method of obtaining the QR code at the front end
- Ways to jump from outside the web page
- Web page embedded QR code method
1.1 Links on the web page to display QR code related code display
/**
 *
 * 页面跳转外链
 * 1. pc端直接点开链接 https://open.weixin.qq.com/connect/qrconnect?appid=APPID&redirect_uri=REDIRECT_URI&response_type=code&scope=SCOPE&state=STATE#wechat_redirect
 * 2. 前端发送请求给后端,后端返回二维码链接地址
 *
 * 以下的代码展示主要是介绍第二点,这边以vue3为例
 */
<script setup lang="ts">
import { reactive, onMounted } from 'vue'
import { api } from '/@/api/wechat/index.ts'
const state = reactive({
  wechat: {
    url: ''
  }
});

// 获取微信登录二维码
const getWechatCode = () => {
  api().then((res: any) => {
    if (res.code == 200) {
      state.wechat.url = res.data.url
    }
  });
}

// 页面挂载时
onMounted(() => {
  getWechatCode();
});
</script>
2.1 Relevant code display of QR code embedded in the webpage
/**
 *
 * 网页内嵌二维码
 * 在需要使用微信登录的地方实例以下js对象
 */
<script setup lang="ts">
import { onMounted } from 'vue'

// 页面挂载时
onMounted(() => {
  setWxerwma();
});

// 实例微信js对象
const setWxerwma = () => {
  const s = document.createElement('script')
  s.type = 'text/javascript'
  s.src = 'https://res.wx.qq.com/connect/zh_CN/htmledition/js/wxLogin.js'
  const wxElement = document.body.appendChild(s)
  wxElement.onload = function () {
    var obj = new WxLogin({
      id: '', // 需要显示的容器id
      appid: '', // 公众号appid wx*******
      scope: 'snsapi_login', // 网页默认即可
      redirect_uri: encodeURIComponent(''), // 授权成功后回调的url
      state: Math.ceil(Math.random() * 1000), // 可设置为简单的随机数加session用来校验
      style: 'black', // 提供"black"、"white"可选。二维码的样式
      href: '' // 外部css文件url,需要https
    })
  }
}
</script>
2.2 Use third-party plug-ins to embed QR codes in webpages
Project installation of third-party plug-ins
npm install vue-wxlogin --save-devEncapsulate the WeChat QR code component
<template>
  <div class="wxLogin">
    <span class="title">微信扫一扫登录</span>
    <div class="main_wx">
      <wxlogin
        v-if="state.weChat.appid && state.weChat.redirect_uri"
        :appid="state.weChat.appid"
        scope="snsapi_login"
        :redirect_uri="state.weChat.redirect_uri"
        :href="state.weChat.href"
        :state="state.weChat.state"
        :style="state.weChat.style"
      ></wxlogin>
    </div>
    <p>
      请使用微信扫描二维码登录
    </p>
  </div>
</template>

<script setup lang="ts">
import { reactive, onMounted } from 'vue'
import api from '@api/weChat/index'
interface State {
  weChat: {
    appid: string;
    redirect_uri: string;
    state: string;
    style: stirng;
    href: string;
  }
}
const state = reactive<State>({
  weChat: {
    appid: '', // 是开发者在微信开房平台提交申请后,获得appid和一个秘钥
    redirect_uri: '', // 这个是扫码后要跳转的页面,这个路径要urlEncode转码的,转码地址为  https://tool.chinaz.com/tools/urlencode.aspx 注意,要跳转的地址必须在申请的域名下面。
    state: Math.ceil(Math.random() * 1000),
    style: '' // 代表二维码的样式,有black和white可选,
    href: '' // 自定义样式链接
  }
});

// 获取微信appid和回调地址redirect_uri,指定内嵌的路由地址weChatLogin
const getWeChatUrl = () => {
  api.wachatQrUrl().then((res: any) => {
    if (res && res.code == 200) {
      state.weChat.appid = res.data.appId
      state.weChat.redirect_uri = res.data.wxCallbackUrl + 'weChatLogin'
    }
  })
}

// 页面挂载
onMounted(() => {
  getWeChatUrl();
})
</script>
When the user opens the above QR code and scans the code to authorize confirmation, the third-party application jumps to the intermediate route to get the code parameter returned by WeChat. At this time, it intercepts and judges through the router.beforeEach function, obtains the code in the url, and performs login verification according to the code call interface.
import api from '@api/index';

router.beforeEach((to, from, next) => {
  let code = null
  if (to.name === '指定你项目中微信登陆页面的当前路由名称') {
    code = to.query.code || null
  }
  // 微信授权登陆
  if (code) {
    let params = {
      code,
      state:'',
    }
    // 调用后端接口将参数code传给后端,让后端根据code,appid,AppSecret等相关参数去微信平台换取access_token
    api.wechatLogin(params).then(res => {
      if (res.code == 200) {
        //返回参数如果绑定微信返回token正常存储登录未绑定账号返回unionid绑定当然也可以以微信信息为主题自动生成账号
        // 登录成功,并提示,跳转到用户主页面
        Message({
          type: 'success',
          message: '登录成功'
        })
        router.push({ path: '跳转指定页面' })
      }
    })
  } else {
    next()
  }
})
User WeChat scan code to authorize login
- Use the redirect_uri user to scan the code to pull the redirect address to the WeChat platform and return it to the third-party application code parameter;
- After the user confirms the authorization, the code is passed to the backend through the backend API, and the backend uses the obtained code plus AppID and AppSecret to exchange for an access_token through WeChat-related APIs, and then the backend further performs WeChat binding operations, and finally returns the relevant user information and access_token to the frontend
Get access_token related code display
<script setup lang="ts">
import { reactive } from 'vue'
import { useRouter, useRoute } from 'vue-router'
import api from '/@/api/index.ts'

interface Params {
  code: string;
  state: string;
}
interface State {
  accessToken: string;
}

const router = useRouter();
const route = useRoute();
const state = reactive<State>({
  accessToken: ''
});

// 点击相关按钮向后端发起请求
const getAccessToken = () => {
  let params = <Params>{
    code: route.query.code,
    state: route.query.state
  }
  api.getAccessToken(params).then((res: any) => {
    if (res.code == 200) {
      state.accessToken = res.data.accessToken;
      // 登录成功,并提示,跳转到用户主页面
      Message({
        type: 'success',
        message: '登录成功'
      })
      router.push({ path: '跳转指定页面' })
    }
  })
}
</script>
Note: This involves the redirect_uri parameter. After the user scans the code, WeChat pulls the redirection address based on the redirect_uri parameter, so the front end must configure the final point of redirect_uri
In the end, the article is relatively casual. I hope that the passing gods will point out some places that are not good enough. I will continue to improve the article in the future! ! !