Zabbix introduction and installation deployment
In the current project, F5 equipment is used to briefly monitor some servers and nacos is used to check the status of services. There is a lack of a unified operation and maintenance tool that can completely monitor servers and services. Some colleagues and projects in the company are also researching and using zabbix , Therefore, under this premise, combined with relevant information, study the architecture of zabbix and the actual installation and deployment, and record the whole process here to lay the foundation for subsequent actual use and provide reference for later readers. , I hope readers can correct me, I am very grateful!
1. Introduction to zabbix
Zabbix is an enterprise-level open source solution that provides distributed system monitoring and network monitoring functions based on the WEB interface.
Zabbix can monitor various network parameters to ensure the safe operation of the server system; and provide a flexible notification mechanism to allow system administrators to quickly locate/solve various problems.
zabbix consists of 2 parts, zabbix server and optional component zabbix agent.
zabbix server can provide remote server/network status monitoring, data collection and other functions through SNMP, zabbix agent, ping, port monitoring and other methods. It can run on Linux, Solaris, HP-UX, AIX, Free BSD, Open BSD, OS X and other platforms.
2. zabbix architecture
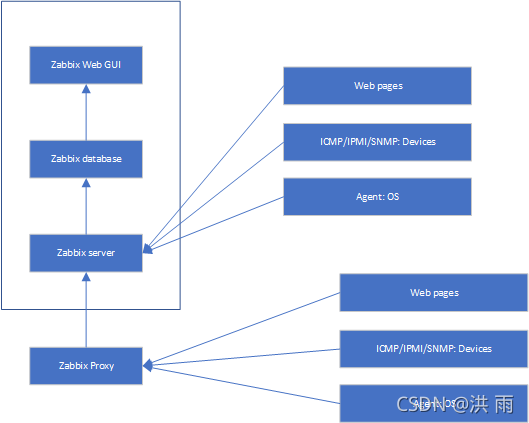
2.1 Functional components
Zabbix consists of several main functional components, whose functions are introduced as follows.
-
Server
The Zabbix server is the core component of the Zabbix software, to which the agent reports availability, system integrity information, and statistics. The server is also the core repository that stores all configuration information, statistics, and operational information. -
Database
All configuration information and data collected by Zabbix are stored in the database. -
Web Interface
For easy access to Zabbix from anywhere and on any platform, a web-based interface is provided. This interface is part of Zabbix server, usually (but not necessarily) running on the same physical machine as Zabbix server. -
Proxy
Zabbix proxy can collect performance and availability data instead of Zabbix server. The deployment of Zabbix proxy in Zabbix is an optional part; but the deployment of proxy can well share the load of a single Zabbix server. -
Agent
Zabbix agents are deployed on the monitored target to actively monitor local resources and applications, and send the collected data to the Zabbix server.
2.2 Monitoring method
Zabbix monitoring method
1. Passive mode
Passive detection: Compared with the agent; the server requests the agent to obtain the data related to the configured monitoring items, and the agent receives the request, obtains the data and responds to the server;
2. Active mode
Active detection: Compared with the agent; the agent requests the configuration of monitoring items related to itself from the server, and actively sends the data related to the monitoring items configured by the server to the server; active monitoring can greatly save the resources of the monitoring server
.
3. Zabbix installation and deployment
3.1 Installation environment
Linux版本:CentOS Linux release 7.2.1511 (Core)
zabbix版本:zabbix-5.0.17.tar.gz
php版本:php-7.4.23.tar.gz
mysql版本:mysql-8.0.26
zabbix版本要求参考:https://www.zabbix.com/documentation/5.0/zh/manual/installation/requirements
3.2 Installation process
3.2.1 Install nginx
- Refer to the introduction to the nginx architecture principle and deployment configuration . No more details here
- Pay attention to add the following modules when compiling
  --with-http_stub_status_module:支持nginx状态查询
  --with-http_ssl_module:支持https
  --with-http_v2_module:支持google的spdy,想了解请百度spdy,这个必须有ssl的支持,nginx-1.19以后使用v2
  --with-pcre:为了支持rewrite重写功能,必须制定pcre
- Profile tweaks
location ~ \.php$ {
        # root           html;
        root   /usr/local/nginx/html/zabbix;
        fastcgi_pass   127.0.0.1:9000;
        fastcgi_index  index.php;
        # fastcgi_param  SCRIPT_FILENAME  /scripts$fastcgi_script_name;
        fastcgi_param SCRIPT_FILENAME $document_root$fastcgi_script_name;
        include        fastcgi_params;
}
Note: You need to copy the js folder and assets folder under the zabbix file to the html, otherwise there will be a problem that js and some other static files cannot be obtained when accessing the browser.
3.2.2 Install PHP
1.安装依赖
yum install gcc make gcc-c++ glibc-headers gd-devel libjpeg-devel libpng-devel libxml2-devel bzip2-devel libcurl-devel sqlite-devel oniguruma oniguruma-devel openssl openssl-devel libwebp-devel libicu-devel openldap  openldap-devel epel-release oniguruma oniguruma-devel net-snmp net-snmp-devel  libxslt-devel libzip libzip-devel -y

2.安装php

wget https://www.php.net/distributions/php-7.4.23.tar.gz

 ./configure --prefix=/usr/local/php --with-config-file-path=/usr/local/php/etc --with-config-file-scan-dir=/usr/local/php/conf.d --enable-fpm --with-fpm-user=nginx --with-fpm-group=nginx --enable-mysqlnd --with-mysqli=mysqlnd --with-pdo-mysql=mysqlnd --with-iconv-dir=/usr/local/php --with-freetype --with-jpeg  --with-zlib  --enable-xml --disable-rpath --enable-bcmath --enable-shmop --enable-sysvsem --enable-inline-optimization --with-curl --enable-mbregex --enable-mbstring --enable-intl --enable-ftp --enable-gd --with-openssl --with-mhash --enable-pcntl --enable-sockets --with-xmlrpc --with-zip  --enable-soap --with-gettext --enable-opcache --with-xsl --with-webp --with-xpm --with-snmp --with-ldap

make && make install

php启动需要创建nginx用户:
useradd nginx

php启动命令:
/usr/local/php/sbin/php-fpm -c /usr/local/php/etc/php.ini -y /usr/local/php/etc/php-fpm.conf

3.配置php-fpm
cp php.ini-production /usr/local/php/etc/php.ini

修改php.ini文件,将对应参数做如下修改。
max_execution_time = 300
max_input_time = 300
post_max_size = 16M
date.timezone =Asia/Shanghai

cd sapi/fpm && cp php-fpm.conf /usr/local/php/etc/php-fpm.conf
cp /usr/local/php/etc/php-fpm.d/www.conf.default /usr/local/php/etc/php-fpm.d/www.conf

测试php-fpm配置
/usr/local/php/sbin/php-fpm -t
/usr/local/php/sbin/php-fpm -c /usr/local/php/etc/php.ini -y /usr/local/php/etc/php-fpm.conf -t
sudo chown -R nginx:nginx /usr/local/php/var

4.php-fpm开机自启动
vim /usr/lib/systemd/system/php-fpm.service
***********************************************
[Unit]
Description=PHP-FPM
After=network.target syslog.target2

[Install]
WantedBy=default.target
Alias=php-fpm.service

[Service]
User=nginx
Group=nginx
#User and Group can be set in the php-fpm configure file
Type=forking
#PIDFile=/usr/local/php/var/run/php-fpm.pid
#不需要在这里指定pid文件位置,需要到php-fpm.conf文件中指定
ExecStart=/usr/local/php/sbin/php-fpm -c /usr/local/php/etc/php.ini -y /usr/local/php/etc/php-fpm.conf
ExecStop=/bin/kill -INT $MAINPID
ExecReload=/bin/kill -USR2 $MAINPID
****************************************************************************

5.php-fpm相关系统命令
cp ./sapi/fpm/init.d.php-fpm /etc/init.d/php-fpm
systemctl daemon-reload
Systemctl enable php-fpm.service
Systemctl start php-fpm.service
3.2.3 Install MySQL
- Refer to MySQL related introduction and MySQL8.0 installation and deployment . No more details here
- Initialize data:
create zabbix database, database account and import zabbix sql statement on the mysql database server side, the operation command is as follows
1. 创建用户并指定密码:
create user 'zabbix'@'%' identified by 'zabbix123456.';
alter user 'zabbix'@'%' identified by 'zabbix123456.';

2. 修改密码plugin
alter user 'zabbix'@'%' identified with mysql_native_password by 'zabbix123456.';

3. 创建数据库
create database zabbix character set utf8 collate utf8_bin;

4. zabbix用户授权
grant all privileges on zabbix.* to zabbix@'%' ;
grant all privileges on *.* to 'zabbix'@'%' with grant option;
flush privileges;

5. 导入数据,sql脚本来源于zabbix安装包下database
use zabbix;
source schema.sql;
source images.sql;
source data.sql;
source double.sql;
quit
3.2.4 Source code installation zabbix
- Download the installation package
wget https://cdn.zabbix.com/zabbix/sources/stable/5.0/zabbix-5.0.17.tar.gz
tar -zvxf zabbix-5.0.17.tar.gz
- Install dependencies:
yum install unixODBC-devel ncurses-devel OpenIPMI libevent java-1.8.0-openjdk-devel openldap-devel gnutls-devel mysql-devel libevent-devel -y
- compile
./configure --prefix=/usr/local/zabbix --enable-server --enable-agent --with-mysql --enable-ipv6 --with-net-snmp --with-libcurl --with-libxml2
make install
注意:编译命令中,同时使用--enable-server 与 --enable-agent,
表示zabbix server和zabbix agent同时编译出来,此章节主要介绍zabbix server的安装过程,有关zabbix agent的安装配置放在后面的章节介绍。
- create user
groupadd --system zabbix
useradd --system -g zabbix -d /usr/lib/zabbix -s /sbin/nologin -c "Zabbix Monitoring System" zabbix
- Create a log directory
cd /usr/local/zabbix
mkdir logs
chown -R zabbix:zabbix /app/zabbix
systemctl restart nginx.service
chown -R zabbix:zabbix /usr/local/zabbix
- Modify the configuration file
Modify the /usr/local/zabbix/etc/zabbix_server.conf file and modify the corresponding parameters as follows
LogFile=/usr/local/zabbix/logs/zabbix_server.log
PidFile=/usr/local/zabbix/logs/zabbix_server.pid
DBHost=192.168.65.162
DBPort=3306
DBName=zabbix
DBUser=zabbix
DBPassword=zabbix123456.
- Configure the zabbix service to start automatically at boot
Create the /etc/systemd/system/zabbix-server.service file and enter the following content
[Unit]
Description=Zabbix Server
After=syslog.target
After=network.target

[Service]
Environment="CONFFILE=/usr/local/zabbix/etc/zabbix_server.conf"
EnvironmentFile=-/usr/local/zabbix/sbin/zabbix_server
Type=forking
Restart=on-failure
PIDFile=/usr/local/zabbix/logs/zabbix_server.pid
KillMode=control-group
ExecStart=/usr/local/zabbix/sbin/zabbix_server -c $CONFFILE
ExecStop=/bin/kill -SIGTERM $MAINPID
RestartSec=10s

[Install]
WantedBy=multi-user.target
- Overload system services
systemctl daemon-reload
- Set boot
systemctl enable zabbix-server.service
systemctl start zabbix-server.service
systemctl status zabbix-server.service
3.2.5 Configuring web pages
Browser access http://192.168.65.163/setup.php

Next

step

Next step, name is the host name, can be queried by hostname command

Next step

Next step

Error message: Unable to create the configuration file.
Execute the command
cd /usr/local/nginx/html/zabbix/conf
cp zabbix.conf.php.example zabbix.conf.php
vi  zabbix.conf.php
调整以下配置项
**********************************************************
$DB['TYPE']				= 'MYSQL';
$DB['SERVER']			= '192.168.65.162';
$DB['PORT']				= '3306';
$DB['DATABASE']			= 'zabbix';
$DB['USER']				= 'zabbix';
$DB['PASSWORD']			= 'zabbix123456.';

$ZBX_SERVER				= '192.168.65.163';
$ZBX_SERVER_PORT		= '10051';
$ZBX_SERVER_NAME		= 'localhost.localdomain';
*********************************************************************
Refresh the interface

and

complete the configuration of the web page. The initial account password is Admin/zabbix .

3.2.6 install zabbix proxy
- create user
groupadd -g 5007 zabbix
useradd -u 5007 -g zabbix -G zabbix zabbix
- To create a proxy database, the proxy library only needs to execute schema.sql
create database zabbixproxy01 character set utf8 collate utf8_bin;
grant all privileges on *.* to 'zabbix'@'%' with grant option;
flush privileges;

use zabbixproxy01;
source schema.sql;
quit
- Install dependencies
yum install gcc mysql-devel net-snmp-devel libssh2-devel libxml2-devel OpenIPMI-devel libevent-devel gnutls-devel java-1.8.0-openjdk-devel openldap-devel libcurl-devel unixODBC-devel
- Compile and install proxy
./configure --prefix=/usr/local/zabbix --enable-proxy  --enable-ipv6  --with-mysql --with-net-snmp --with-libcurl --with-libxml2 --with-openipmi --with-unixodbc --with-ssh2 --with-zlib --with-libpcre --enable-java --with-ldap --with-gnutls

make && make install
mkdir /usr/local/zabbix/logs
chown -R zabbix:zabbix /usr/local/zabbix
- Adjust configuration files
Server=10.0.0.10           #<===指定zabbix server的ip地址或主机名
Hostname=zabbix-proxy      #<===定义监控代理的主机名,需和zabbix server前端配置时指定的节点名相同
LogFile=/usr/local/zabbix/logs/zabbix_proxy.log       #<===指定日志文件的位置
PidFile=/usr/local/zabbix/logs/zabbix_proxy.pid       #<===pid文件的位置
DBHost=192.168.65.162
DBPort=3306
DBName=zabbixproxy01          #<===数据库名
DBUser=zabbix             #<===连接数据库的用户
DBPassword=zabbix123456.         #<===连接数据库用户的密码
ConfigFrequency=60         #<===zabbix proxy从zabbix server取得配置数据的频率
DataSenderFrequency=60       #<===zabbix proxy发送监控到的数据给zabbix server的频率
- Configure autostart
1、创建/etc/systemd/system/zabbix-proxy.service文件,并输入如下内容:
***************************************************************
[Unit]
Description=Zabbix Proxy
After=syslog.target
After=network.target

[Service]
Environment="CONFFILE=/usr/local/zabbix/etc/zabbix_proxy.conf"
EnvironmentFile=-/usr/local/zabbix/sbin/zabbix_proxy
Type=forking
Restart=on-failure
PIDFile=/usr/local/zabbix/logs/zabbix_proxy.pid
KillMode=control-group
ExecStart=/usr/local/zabbix/sbin/zabbix_proxy -c $CONFFILE
ExecStop=/bin/kill -SIGTERM $MAINPID
RestartSec=10s

[Install]
WantedBy=multi-user.target
*****************************************************************
2、重载系统服务:
systemctl daemon-reload

3、设置开机启动:
systemctl enable zabbix-proxy.service
3.2.7 install agent
- create user
groupadd -g 5007 zabbix
useradd -u 5007 -g zabbix -G zabbix zabbix
- Install dependencies, compile and install
yum install gcc pcre-devel -y
./configure --prefix=/usr/local/zabbix-agent --enable-agent
make && make install

mkdir /usr/local/zabbix-agent/logs
chown -R zabix:zabix /usr/local/zabbix-agent/
- Adjust the configuration file zabbix_agentd.conf
vi /usr/local/zabbix-agent/etc/zabbix_agentd.conf

Server=192.168.65.163        # zabbix-server或者zabbix-proxy的ip
ServerActive=192.168.65.163     # zabbix-server或者zabbix-proxy的ip
Hostname=mysql-agent        # 主机名
AllowKey=system.run[*]        # 允许zabbix使用system.run监控项执行命令
PidFile=/usr/local/zabbix-agent/logs/zabbix_agentd.pid
LogFile=/usr/local/zabbix-agent/logs/zabbix_agentd.log

主机名与系统hostname保持一致,可通过命令修改
hostname
hostnamectl set-hostname mysql-agent
- Configure autostart
1、创建/etc/systemd/system/zabbix-agent.service文件,并输入如下内容:
***************************************************************
[Unit]
Description=Zabbix Agent
After=syslog.target
After=network.target

[Service]
Environment="CONFFILE=/usr/local/zabbix-agent/etc/zabbix_agentd.conf"
EnvironmentFile=-/usr/local/zabbix-agent/sbin/zabbix_agentd
Type=forking
Restart=on-failure
PIDFile=/usr/local/zabbix-agent/logs/zabbix_agentd.pid
KillMode=control-group
ExecStart=-/usr/local/zabbix-agent/sbin/zabbix_agentd -c $CONFFILE
ExecStop=/bin/kill -SIGTERM $MAINPID
RestartSec=10s

[Install]
WantedBy=multi-user.target
*****************************************************************
2、重载系统服务:
systemctl daemon-reload

3、设置开机启动:
systemctl enable zabbix-agent.service
systemctl start zabbix-agent.service
- Web configuration agent
to create a host: Configuration – Hosts – Create host

Note: Check the centso host dns command cat /etc/resolv.conf
association template

Check the Hosts situation: Monitoring – Hosts

After zabbix is installed and deployed, the subsequent specific usage methods, etc., will be implemented later After practical application, continue to organize and summarize.
4. References
[1] https://www.zabbix.com/
[2] https://www.cnblogs.com/huss2016/p/14717512.html
[3] https://blog.csdn.net/weixin_30191947/article/details/115948002
[4] https://blog.csdn.net/sqlquan/article/details/101123205
[5] https://www.cnblogs.com/kaishirenshi/p/9879249.html
[6] https://www.cnblogs.com/chenppp/p/13430932.html