1. What is Phoenix?
Phoenix, Chinese translated as "Phoenix", beautiful name. Phoenix is saleforce.com open source project, and then donated to the Apache Foundation. It corresponds to a Java middleware provides jdbc connection, operation hbase data tables. Phoenix is an open-source HBase SQL engine. You can use the standard JDBC API instead of HBase Client API to create tables, insert data, query your HBase data. Phoenix team with the sentence Phoenix: "We put the SQL backmeans: we SQL and NoSQL to go back! Here say NoSQL refers specifically to HBase, which means you can use SQL statements to query Hbase, you might say: "Hive and Impala can ah!." But the Hive and Impala can also query the text file, Phoenix feature is that it can only check Hbase, other types do not support! But also because of this single-minded attitude, so that performance Phoenix on Hbase query exceeds the Hive and Impala!
2. Phoenix Properties
Phoenix SQL engine is built on top of HBase. You might exist "whether Phoenix would reduce the efficiency of the HBase?" Or "Are Phoenix efficiency is very low?" Such qualms, and in fact will not, Phoenix achieved in the following ways than your own handwriting same way or may be more good performance (not to mention less can write a lot of code):
compile your SQL query is native to HBase scan statement.
Best start and end of key detection scan statement.
Choreographed scan your statements to make them execute in parallel.
Push your WHERE clause predicate to the server filter processing.
Performed by the server-side hook aggregate queries (referred to as a coprocessor).
In addition, Phoenix has done some interesting enhancements to optimize performance even more:
to achieve a secondary index to improve the performance of non-primary key field queries.
Statistical data level parallelism to improve and help choose the best optimization.
Skip scan filter to optimize IN, LIKE, OR query.
Optimization of the main keys to write evenly distributed pressure.
3. Phoenix installation to deploy
3.1, the preparatory work
ahead of installed ZK cluster, hadoop cluster, Hbase cluster
3.2, the installation package
downloaded from the corresponding address: http: //mirrors.cnnic.cn/apache/phoenix/
here we are using:
Phoenix-4.8.2-HBase-1.2-bin.tar.gz
3.3, uploading, decompressing
the corresponding installation package uploaded to the corresponding cluster Hbase wherein a directory server, a
decompression: tar -zxvf phoenix-4.8.2-HBase
rename: mv phoenix- HBase-1.2--4.8.2 bin phoenix
3.4, configuration
(1) in the directory phoenix-4.8.2-HBase-phoenix-server.jar 1.2,
phoenix-Core-4.8.2-copied to HBase-1.2.jar under each hbase lib directory.
(2) the profile hbase hbase-site.xml, core-site.xml under hadoop / etc / hadoop, hdfs-into the phoenix / bin / under, phoenix replacing the original profile.
(3) Restart hbase cluster, the Phoenix jar package to take effect.
3.5, whether authentication is successful
(1) entering commands phoenix / bin:
ports may be omitted
[root @ gec01 bin] # ./sqlline.py
the following interface description appears successful start
(2) Input! Tables to see what are the tables. The red frame part is to build a user table, the other for the Phoenix system tables, system tables maintains user information metadata table.
+------------+--------------+----------------+---------------+----------+------------+-----------------+
| TABLE_CAT | TABLE_SCHEM | TABLE_NAME | TABLE_TYPE | REMARKS | TYPE_NAME | SELF_REFERENCIN |
+------------+--------------+----------------+---------------+----------+------------+-----------------+
| | SYSTEM | CATALOG | SYSTEM TABLE | | | |
| | SYSTEM | FUNCTION | SYSTEM TABLE | | | |
| | SYSTEM | SEQUENCE | SYSTEM TABLE | | | |
| | SYSTEM | STATS | SYSTEM TABLE | | | | |
+------------+--------------+----------------+---------------+----------+------------+-----------------+
(3) 退出Phoenix。输入!quit
4. Phoenix使用
Phoenix可以有4种方式调用:
批处理方式
命令行方式
GUI方式
JDBC调用方式
4.1 批处理方式
4.1.1 创建user_phoenix.sql文件
内容如下
CREATE TABLE IF NOT EXISTS user_phoenix ( state CHAR(2) NOT NULL, city VARCHAR NOT NULL, population BIGINT CONSTRAINT my_pk PRIMARY KEY (state, city));
4.1.2 创建user_phoenix.csv数据文件
NY,New York,8143197
CA,Los Angeles,3844829
IL,Chicago,2842518
TX,Houston,2016582
PA,Philadelphia,1463281
AZ,Phoenix,1461575
TX,San Antonio,1256509
CA,San Diego,1255540
TX,Dallas,1213825
CA,San Jose,912332
4.1.3 创建user_phoenix_query.sql文件
内容为:
SELECT state as "State",count(city) as "City Count",sum(population) as "Population Sum" FROM user_phoenix GROUP BY state ORDER BY sum(population) DESC;
4.1.4 执行
/phoenix/bin/psql.py gec01:2181 user_phoenix.sql user_phoenix.csv user_phoenix_query.sql
这条命令同时做了三件事:创建表、插入数据、查询结果
用Hbase shell 看下会发现多出来一个 USER_PHOENIX 表,用scan 命令查看一下这个表的数据
hbase(main):054:0> scan 'USER_PHOENIX'
ROW COLUMN+CELL
AZPhoenix column=0:POPULATION, timestamp=1484736243467, value=\x80\x00\x00\x00\x00\x16
MG
AZPhoenix column=0:_0, timestamp=1484736243467, value=x
CALos Angeles column=0:POPULATION, timestamp=1484736243467, value=\x80\x00\x00\x00\x00:\xA
A\xDD
CALos Angeles column=0:_0, timestamp=1484736243467, value=x
CASan Diego column=0:POPULATION, timestamp=1484736243467, value=\x80\x00\x00\x00\x00\x13
(t
CASan Diego column=0:_0, timestamp=1484736243467, value=x
CASan Jose column=0:POPULATION, timestamp=1484736243467, value=\x80\x00\x00\x00\x00\x0D
\xEB\xCC
CASan Jose column=0:_0, timestamp=1484736243467, value=x
ILChicago column=0:POPULATION, timestamp=1484736243467, value=\x80\x00\x00\x00\x00+_\x
96
ILChicago column=0:_0, timestamp=1484736243467, value=x
PAPhiladelphia column=0:POPULATION, timestamp=1484736243467, value=\x80\x00\x00\x00\x00\x16
S\xF1
PAPhiladelphia column=0:_0, timestamp=1484736243467, value=x
TXDallas column=0:POPULATION, timestamp=1484736243467, value=\x80\x00\x00\x00\x00\x12
\x85\x81
TXDallas column=0:_0, timestamp=1484736243467, value=x
TXHouston column=0:POPULATION, timestamp=1484736243467, value=\x80\x00\x00\x00\x00\x1E
\xC5F
TXHouston column=0:_0, timestamp=1484736243467, value=x
TXSan Antonio column=0:POPULATION, timestamp=1484736243467, value=\x80\x00\x00\x00\x00\x13
,=
TXSan Antonio column=0:_0, timestamp=1484736243467, value=x
结论:
之前定义的Primary key 为state,city, 于是Phoenix就把输入的state,city的值拼起来成为rowkey
其他的字段还是按照列名去保存,默认的列族为0
还有一个0:_0这个列是没有值的,这个是Phoenix处于性能方面考虑增加的一个列,不用管这个列
4.2 命令行方式
4.2.1 执行命令
./sqlline.py gec01:2181
4.2.2 可以进入命令行模式
0: jdbc:phoenix:gec01>
然后执行相关的命令
4.2.3 退出命令行方式
执行 !quit
4.2.4 命令开头需要一个感叹号
使用help可以打印出所有命令
0: jdbc:phoenix:gec01> help
!all Execute the specified SQL against all the current connections
!autocommit Set autocommit mode on or off
!batch Start or execute a batch of statements
!brief Set verbose mode off
!call Execute a callable statement
!close Close the current connection to the database
!closeall Close all current open connections
!columns List all the columns for the specified table
!commit Commit the current transaction (if autocommit is off)
!connect Open a new connection to the database.
!dbinfo Give metadata information about the database
!describe Describe a table
!dropall Drop all tables in the current database
!exportedkeys List all the exported keys for the specified table
!go Select the current connection
!help Print a summary of command usage
!history Display the command history
!importedkeys List all the imported keys for the specified table
!indexes List all the indexes for the specified table
!isolation Set the transaction isolation for this connection
!list List the current connections
!manual Display the SQLLine manual
!metadata Obtain metadata information
!nativesql Show the native SQL for the specified statement
!outputformat Set the output format for displaying results
(table,vertical,csv,tsv,xmlattrs,xmlelements)
!primarykeys List all the primary keys for the specified table
!procedures List all the procedures
!properties Connect to the database specified in the properties file(s)
!quit Exits the program
!reconnect Reconnect to the database
!record Record all output to the specified file
!rehash Fetch table and column names for command completion
!rollback Roll back the current transaction (if autocommit is off)
!run Run a script from the specified file
!save Save the current variabes and aliases
!scan Scan for installed JDBC drivers
!script Start saving a script to a file
!set Set a sqlline variable
4.2.5 建立employee的映射表---数据准备
数据准备然后我们来建立一个映射表,映射我之前建立过的一个hbase表 employee.有2个列族 company、family
create 'employee','company','family'
put 'employee','row1','company:name','ted'
put 'employee','row1','company:position','worker'
put 'employee','row1','family:tel','13600912345'
put 'employee','row2','company:name','michael'
put 'employee','row2','company:position','manager'
put 'employee','row2','family:tel','1894225698'
scan 'employee'
在建立映射表之前要说明的是,Phoenix是大小写敏感的,并且所有命令都是大写,如果你建的表名没有用双引号括起来,那么无论你输入的是大写还是小写,建立出来的表名都是大写的,如果你需要建立出同时包含大写和小写的表名和字段名,请把表名或者字段名用双引号括起来。
你可以建立读写的表或者只读的表,他们的区别如下
• 读写表:如果你定义的列簇不存在,会被自动建立出来,并且赋以空值
• 只读表:你定义的列簇必须事先存在
4.2.6 建立映射表
0: jdbc:phoenix:gec01>CREATE TABLE IF NOT EXISTS "employee" ("no" VARCHAR(10) NOT NULL PRIMARY KEY, "company"."name" VARCHAR(30),"company"."position" VARCHAR(20), "family"."tel" VARCHAR(20), "family"."age" INTEGER);
这个语句有几个注意点
• IF NOT EXISTS可以保证如果已经有建立过这个表,配置不会被覆盖
• 作为rowkey的字段用 PRIMARY KEY标定
• 列簇用 columnFamily.columnName 来表示
• family.age 是新增的字段,我之前建立测试数据的时候没有建立这个字段的原因是在hbase shell下无法直接写入数字型,使用UPSERT 命令插入数据的时候你就可以看到真正的数字型在hbase 下是如何显示的
建立好后,查询一下数据
4.2.7 查询映射表数据
0: jdbc:phoenix:gec01> SELECT * FROM "employee";
+-------+----------+-----------+--------------+-------+
| no | name | position | tel | age |
+-------+----------+-----------+--------------+-------+
| row1 | ted | worker | 13600912345 | null |
| row2 | michael | manager | 1894225698 | null |
+-------+----------+-----------+--------------+-------+
4.2.8 插入数据、更改数据
插入或者更改数据在phoenix中使用upsert关键字,
如果表中不存在该数据则插入,否则更新
插入:
0:jdbc:phoenix:gec01>
upsert into "employee" values('row3','billy','worker','16974681345',33);
修改数据:
0: jdbc:phoenix:gec01:2181>
upsert into "employee" ("no","tel") VALUES ('row2','13588888888');
查询:
0: jdbc:phoenix:gec01:2181> select * from "employee";
+-------+----------+-----------+--------------+-------+
| no | name | position | tel | age |
+-------+----------+-----------+--------------+-------+
| row1 | ted | worker | 13600912345 | null |
| row2 | michael | manager | 13588888888 | null |
| row3 | billy | worker | 16974681345 | 33 |
+-------+----------+-----------+--------------+-------+
3 rows selected (0.06 seconds)
4.2.9 查询Hbase数据
hbase(main):056:0> scan 'employee'
ROW COLUMN+CELL
row1 column=company:_0, timestamp=1484730892661, value=
row1 column=company:name, timestamp=1484730892527, value=ted
row1 column=company:position, timestamp=1484730892565, value=worker
row1 column=family:tel, timestamp=1484730892661, value=13600912345
row2 column=company:_0, timestamp=1484730892762, value=
row2 column=company:name, timestamp=1484730892702, value=michael
row2 column=company:position, timestamp=1484730892730, value=manager
row2 column=family:tel, timestamp=1484730892762, value=13588888888
row3 column=company:_0, timestamp=1484809036587, value=x
row3 column=company:name, timestamp=1484809036587, value=billy
row3 column=company:position, timestamp=1484809036587, value=worker
row3 column=family:age, timestamp=1484809036587, value=\x80\x00\x00!
row3 column=family:tel, timestamp=1484809036587, value=16974681345
company:_0这个列是没有值的,这个是Phoenix处于性能方面考虑增加的一个列,不用管这个列。
4.3 GUI方式
4.3.1 squirrel下载
从网址http://www.squirrelsql.org/下载相应版本的squirrel的安装jar包,比如下载squirrel-sql-3.7-standard.jar window版本。
4.3.2 squirrel安装
Window下:通过cmd进入window控制台,
输入 java -jar squirrel-sql-3.7-standard.jar
显示安装界面。

4.3.3 squirrel配置连接Phoenix
(1)配置squirrel
解压的phoenix-4.7.0-HBase-1.1-bin.tar.gz包的主目录下将如下几个jar包拷贝到squirrel安装目录的lib下

在安装目录下双击squirrel-sql.bat、点击左侧的Drivers,添加图标
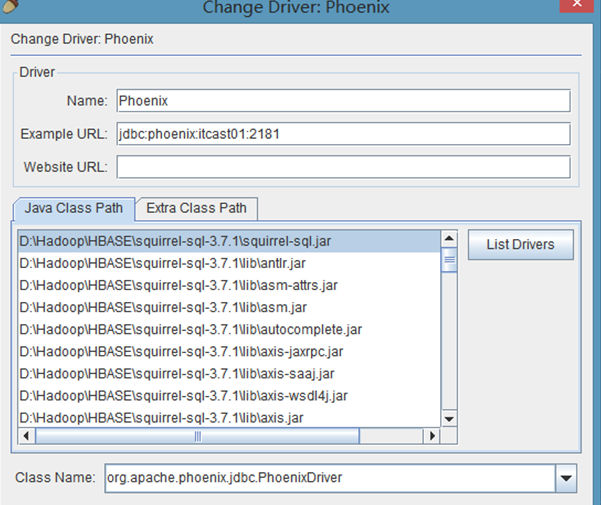
配置说明:
在出现的窗口中填写如下项
Name:就是个名字任意取就可以,这里使用phoenix
Example URL :jdbc:phoenix:gec01:2181(这里是你的phonenix的jdbc地址,注意端口也可以不写,多个用逗号隔开)
Class Name:org.apache.phoenix.jdbc.PhoenixDriver
4.3.4 连接Phoenix
点击Aiiasses,点击右边的添加图标
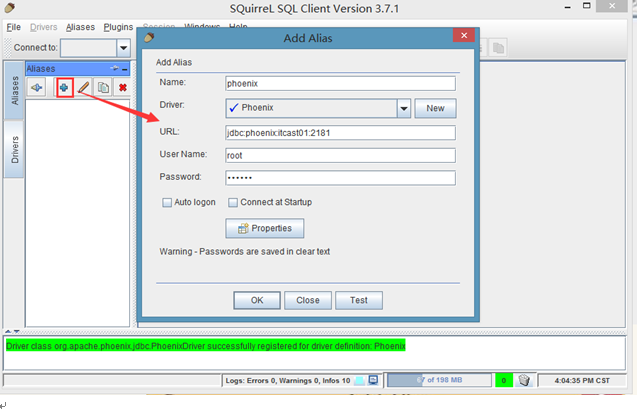
配置说明:
这里还是名字随意写(这里使用phoenix),driver要选择刚才配置的可用的driver,我们刚才配置的是phoenix
url这里就是连接phonex的url选择了phoenix的driver以后自动出现也可以改,user name就是phoenix连接的主机的用户名,密码就是该机器的密码,点击自动登录
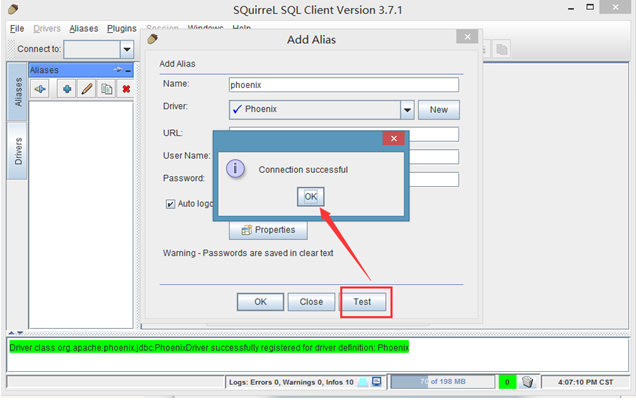
然后点击test,显示连接成功即可(在这里最好不要直接点OK,先点Test,连接成功了再OK)
点击OK按钮
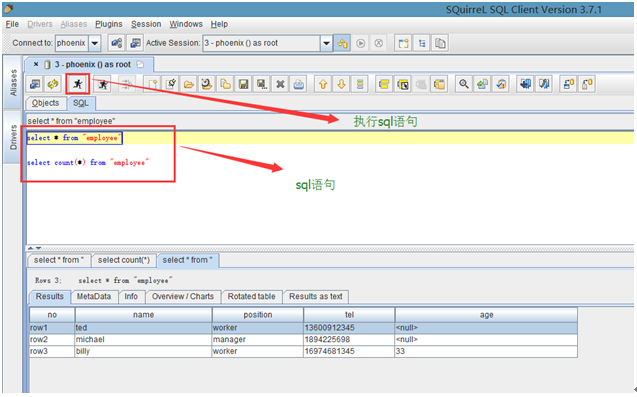
查看对应的表

通过sql语句查询数据
3.5 JDBC调用方式
打开Eclipse建立一个简单的Maven项目 phoenix
pom.xml文件内容:
<project xmlns="http://maven.apache.org/POM/4.0.0" xmlns:xsi="http://www.w3.org/2001/XMLSchema-instance"
xsi:schemaLocation="http://maven.apache.org/POM/4.0.0 http://maven.apache.org/xsd/maven-4.0.0.xsd">
<modelVersion>4.0.0</modelVersion>

<groupId>cn.gec</groupId>
<artifactId>phoenix</artifactId>
<version>0.0.1-SNAPSHOT</version>
<packaging>jar</packaging>

<name>phoenix</name>
<url>http://maven.apache.org</url>

<properties>
<project.build.sourceEncoding>UTF-8</project.build.sourceEncoding>
</properties>

<dependencies>
<dependency>
<groupId>junit</groupId>
<artifactId>junit</artifactId>
<version>3.8.1</version>
</dependency>
<dependency>
<groupId>org.apache.phoenix</groupId>
<artifactId>phoenix-core</artifactId>
<version>4.7.0-HBase-1.1</version>
</dependency>
</dependencies>
</project>
建立一个类 PhoenixManager
package cn.gec.phoenix;

import java.sql.Connection;
import java.sql.DriverManager;
import java.sql.ResultSet;
import java.sql.SQLException;
import java.sql.Statement;

/**
* @author lishas
*/
public class PhoenixManager {
public static void main(String[] args) throws SQLException {
Connection conn=null;
Statement state=null;
ResultSet rs=null;
try {
Class.forName("org.apache.phoenix.jdbc.PhoenixDriver");
conn = DriverManager.getConnection("jdbc:phoenix:gec01:2181");
state=conn.createStatement();
rs= state.executeQuery("select * from \"employee\"");

while(rs.next()){
System.out.println("no:"+rs.getString("no"));
System.out.println("name:"+rs.getString("name"));
System.out.println("position:"+rs.getString("position"));
System.out.println("age:"+rs.getInt("age"));
System.out.println("-------------------------");
}

} catch (Exception e) {
e.printStackTrace();

}finally{

if(rs!=null)rs.close();

if(state!=null) state.close();

if(conn!=null) conn.close();

}

}
}
运行结果展现:
no:row1
name:ted
position:worker
age:0
-------------------------
no:row2
name:michael
position:manager
age:0
-------------------------
no:row3
name:billy
position:worker
age:33
-----------------------