STM32F103ZET6 serial communication
Article Directory
Preface
The learning of STM32 can be divided into 3 versions.
1. Register version
2. Library function version
3. HAL library version
Due to personal reasons, I choose the library function version to learn STM32.
Tip: Problems such as software installation will not be explained! ! !
1. Kushiguchi communication
1 Introduction


2. Related parameters

3. Schematic

2. General steps for serial port configuration

Three, relevant source code
1.uart_init function
code show as below:
{


  //GPIO端口设置
  GPIO_InitTypeDef GPIO_InitStructure;
	USART_InitTypeDef USART_InitStructure;
	NVIC_InitTypeDef NVIC_InitStructure;

	RCC_APB2PeriphClockCmd(RCC_APB2Periph_USART1|RCC_APB2Periph_GPIOA, ENABLE);	//使能USART1,GPIOA时钟

	//USART1_TX   GPIOA.9
  GPIO_InitStructure.GPIO_Pin = GPIO_Pin_9; //PA.9
  GPIO_InitStructure.GPIO_Speed = GPIO_Speed_50MHz;
  GPIO_InitStructure.GPIO_Mode = GPIO_Mode_AF_PP;	//复用推挽输出
  GPIO_Init(GPIOA, &GPIO_InitStructure);//初始化GPIOA.9

  //USART1_RX	  GPIOA.10初始化
  GPIO_InitStructure.GPIO_Pin = GPIO_Pin_10;//PA10
  GPIO_InitStructure.GPIO_Mode = GPIO_Mode_IN_FLOATING;//浮空输入
  GPIO_Init(GPIOA, &GPIO_InitStructure);//初始化GPIOA.10

  //Usart1 NVIC 配置
  NVIC_InitStructure.NVIC_IRQChannel = USART1_IRQn;
	NVIC_InitStructure.NVIC_IRQChannelPreemptionPriority=3 ;//抢占优先级3
	NVIC_InitStructure.NVIC_IRQChannelSubPriority = 3;		//子优先级3
	NVIC_InitStructure.NVIC_IRQChannelCmd = ENABLE;			//IRQ通道使能
	NVIC_Init(&NVIC_InitStructure);	//根据指定的参数初始化VIC寄存器

   //USART 初始化设置

	USART_InitStructure.USART_BaudRate = bound;//串口波特率
	USART_InitStructure.USART_WordLength = USART_WordLength_8b;//字长为8位数据格式
	USART_InitStructure.USART_StopBits = USART_StopBits_1;//一个停止位
	USART_InitStructure.USART_Parity = USART_Parity_No;//无奇偶校验位
	USART_InitStructure.USART_HardwareFlowControl = USART_HardwareFlowControl_None;//无硬件数据流控制
	USART_InitStructure.USART_Mode = USART_Mode_Rx | USART_Mode_Tx;	//收发模式

  USART_Init(USART1, &USART_InitStructure); //初始化串口1
  USART_ITConfig(USART1, USART_IT_RXNE, ENABLE);//开启串口接受中断
  USART_Cmd(USART1, ENABLE);                    //使能串口1

}
2. USART1_IRQHandler function
code show as below:
{


	u8 Res;
#if SYSTEM_SUPPORT_OS 		//如果SYSTEM_SUPPORT_OS为真,则需要支持OS.
	OSIntEnter();
#endif
	if(USART_GetITStatus(USART1, USART_IT_RXNE) != RESET)  //接收中断(接收到的数据必须是0x0d 0x0a结尾)
		{


		Res =USART_ReceiveData(USART1);	//读取接收到的数据

		if((USART_RX_STA&0x8000)==0)//接收未完成
			{


			if(USART_RX_STA&0x4000)//接收到了0x0d
				{


				if(Res!=0x0a)USART_RX_STA=0;//接收错误,重新开始
				else USART_RX_STA|=0x8000;	//接收完成了
				}
			else //还没收到0X0D
				{


				if(Res==0x0d)USART_RX_STA|=0x4000;
				else
					{


					USART_RX_BUF[USART_RX_STA&0X3FFF]=Res ;
					USART_RX_STA++;
					if(USART_RX_STA>(USART_REC_LEN-1))USART_RX_STA=0;//接收数据错误,重新开始接收
					}
				}
			}
     }
#if SYSTEM_SUPPORT_OS 	//如果SYSTEM_SUPPORT_OS为真,则需要支持OS.
	OSIntExit();
#endif
}

3.main.c function
code show as below:
#include "stm32f10x.h"
#include "led.h"
#include "delay.h"
#include "beep.h"
#include "key.h"
#include "usart.h"

#define LED1 PBout(5)
#define LED2 PEout(5)
#define Beep PBout(8)

int main(void)
{


	u16 t;
	u16 len;
	u16 times=0;
	//u8 key;
	NVIC_PriorityGroupConfig(NVIC_PriorityGroup_2);
	delay_init();
  LED_Init();
	Beep_Init();
	KEY_Init();
	uart_init(115200);
	while(1)
	{


		if(USART_RX_STA&0x8000)
		{


			len=USART_RX_STA&0x3fff;//得到此次接收到的数据长度
			printf("\r\n您发送的消息为:\r\n\r\n");
			for(t=0;t<len;t++)
			{


				USART_SendData(USART1, USART_RX_BUF[t]);//向串口1发送数据
				while(USART_GetFlagStatus(USART1,USART_FLAG_TC)!=SET);//等待发送结束
			}
			printf("\r\n\r\n");//插入换行
			USART_RX_STA=0;
		}else
		{


			times++;
			if(times%5000==0)
			{


				printf("\r\n精英STM32开发板 串口实验\r\n");
				printf("正点原子@ALIENTEK\r\n\r\n");
			}
			if(times%200==0)printf("请输入数据,以回车键结束\n");
			if(times%30==0)LED1=!LED1;//闪烁LED,提示系统正在运行.
			delay_ms(10);
		}
	}
}
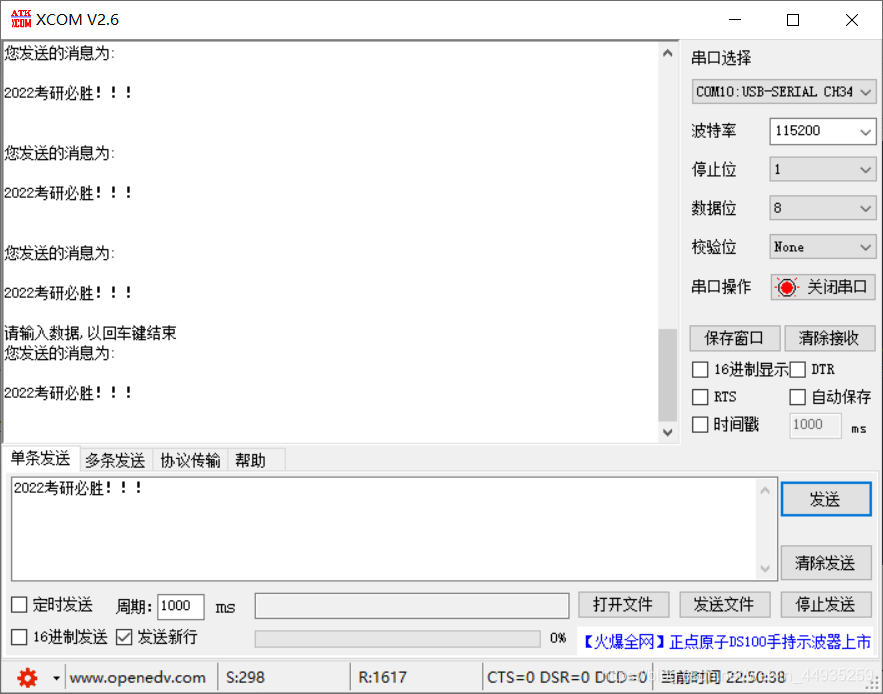
4. Experimental results
to sum up
I hope everyone can carefully understand the source code and the meaning of the function entry parameters involved! ! !
This part contains a lot of content, I hope you can take some time to understand