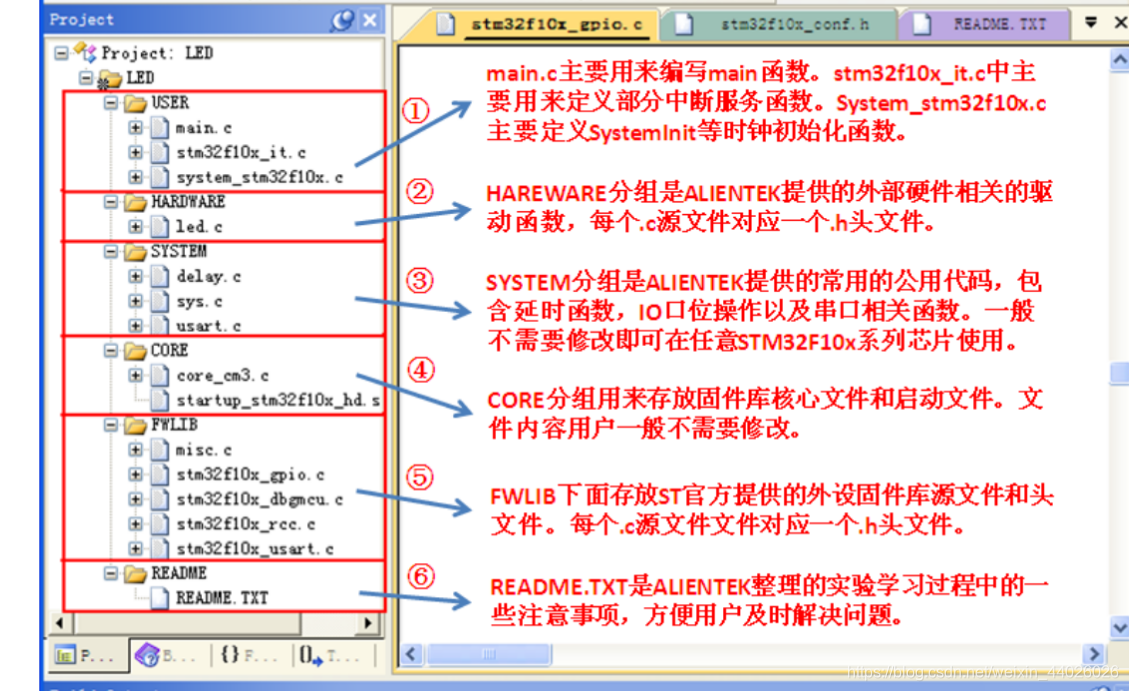
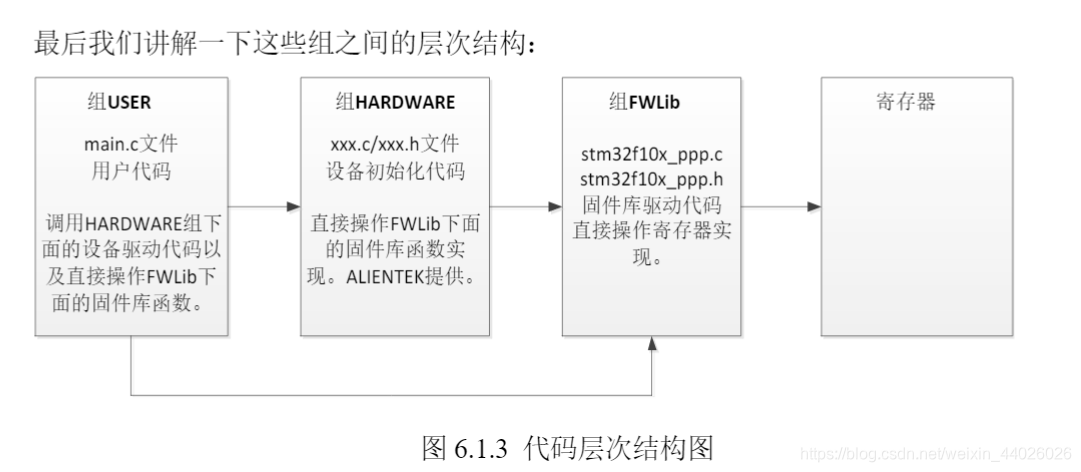
Introduction to STM32 (3)
1. Water lamp experiment
IO operation steps:
1) Enable the IO port clock. The calling function is RCC_APB2PeriphClockCmd().
2) Initialize IO parameters. Call function GPIO_Init();
3) Operate IO. The method of operating IO is the method we explained above.
**led.c file: **
#include "led.h"
//初始化PB5和PE5为输出口.并使能这两个口的时钟
//LED IO初始化
void LED_Init(void)
{


 GPIO_InitTypeDef  GPIO_InitStructure;

 RCC_APB2PeriphClockCmd(RCC_APB2Periph_GPIOB|RCC_APB2Periph_GPIOE, ENABLE);	 //使能PB,PE端口时钟

 GPIO_InitStructure.GPIO_Pin = GPIO_Pin_5;				 //LED0-->PB.5 端口配置
 GPIO_InitStructure.GPIO_Mode = GPIO_Mode_Out_PP; 		 //推挽输出
 GPIO_InitStructure.GPIO_Speed = GPIO_Speed_50MHz;		 //IO口速度为50MHz
 GPIO_Init(GPIOB, &GPIO_InitStructure);					 //根据设定参数初始化GPIOB.5
 GPIO_SetBits(GPIOB,GPIO_Pin_5);						 //PB.5 输出高

 GPIO_InitStructure.GPIO_Pin = GPIO_Pin_5;	    		 //LED1-->PE.5 端口配置, 推挽输出
 GPIO_Init(GPIOE, &GPIO_InitStructure);	  				 //推挽输出 ,IO口速度为50MHz
 GPIO_SetBits(GPIOE,GPIO_Pin_5); 						 //PE.5 输出高
}
The common format for initializing GPIO through the initialization structure is:
 GPIO_InitStructure.GPIO_Pin = GPIO_Pin_5;				 //LED0-->PB.5 端口配置
 GPIO_InitStructure.GPIO_Mode = GPIO_Mode_Out_PP; 		 //推挽输出
 GPIO_InitStructure.GPIO_Speed = GPIO_Speed_50MHz;		 //IO口速度为50MHz
 GPIO_Init(GPIOB, &GPIO_InitStructure);					 //根据设定参数初始化GPIOB.5
 GPIO_SetBits(GPIOB,GPIO_Pin_5);						 //PB.5 输出高
The above code means to set the fifth port of GPIOB to push-pull output mode, and the speed is 50M. It can be seen from the above initialization code that the first member variable GPIO_Pin of the structure GPIO_InitStructure is used to set which IO port or ports are to be initialized; the second member variable GPIO_Mode is used to set the output and input modes of the corresponding IO ports. These modes These are the 8 modes we explained above, which are defined by an enumerated type in MDK:
typedef enum{


GPIO_Mode_AIN = 0x0,//模拟输入
GPIO_Mode_IN_FLOATING = 0x04,//浮空输入
GPIO_Mode_IPD = 0x28,//下拉输入
GPIO_Mode_IPU = 0x48,//上拉输入
GPIO_Mode_Out_OD = 0x14,//开漏输出
GPIO_Mode_Out_PP = 0x10,//通用推挽输出
GPIO_Mode_AF_OD = 0x1C,//复用开漏输出
GPIO_Mode_AF_PP = 0x18//复用推挽
}GPIOMode_TypeDef;
The third parameter is the IO port speed setting. There are three optional values, which are also defined by enumerated types in MDK:
typedef enum
{

     GPIO_Speed_10MHz = 1,
  GPIO_Speed_2MHz,
  GPIO_Speed_50MHz
}GPIOSpeed_TypeDef;
In the firmware library development, operating the registers CRH and CRL to configure the mode and speed of the IO port is done through the GPIO initialization function:
void GPIO_Init(GPIO_TypeDef* GPIOx, GPIO_InitTypeDef* GPIO_InitStruct);
In the STM32 firmware library, setting the GPIO port output through the BSRR and BRR registers is done through the function GPIO_SetBits() and function GPIO_ResetBits().
void GPIO_SetBits(GPIO_TypeDef* GPIOx, uint16_t GPIO_Pin);
void GPIO_ResetBits(GPIO_TypeDef* GPIOx, uint16_t GPIO_Pin)
In most cases, we use these two functions to set the input and output status of the GPIO port. For example, if we want to set GPIOB.5 to output 1, the method is:
GPIO_SetBits(GPIOB, GPIO_Pin_5);
On the contrary, if you want to set the output bit 0 of GPIOB.5, the method is:
GPIO_ResetBits(GPIOB, GPIO_Pin_5);
led.h file:
#ifndef __LED_H
#define __LED_H
#include "sys.h"

#define LED0 PBout(5)// PB5
#define LED1 PEout(5)// PE5

void LED_Init(void);//初始化


#endif
main file:
#include "sys.h"
#include "delay.h"
#include "usart.h"
#include "led.h"

 int main(void)
 {


	delay_init();	    //延时函数初始化
	LED_Init();		  	//初始化与LED连接的硬件接口
	while(1)
	{


		LED0=0;
		LED1=1;
		delay_ms(300);	 //延时300ms
		LED0=1;
		LED1=0;
		delay_ms(300);	//延时300ms
	}
 }


 /**
 *****************下面注视的代码是通过调用库函数来实现IO控制的方法*****************************************
int main(void)
{

	delay_init();		  //初始化延时函数
	LED_Init();		        //初始化LED端口
	while(1)
	{
			GPIO_ResetBits(GPIOB,GPIO_Pin_5);  //LED0对应引脚GPIOB.5拉低,亮  等同LED0=0;
			GPIO_SetBits(GPIOE,GPIO_Pin_5);   //LED1对应引脚GPIOE.5拉高,灭 等同LED1=1;
			delay_ms(300);  		   //延时300ms
			GPIO_SetBits(GPIOB,GPIO_Pin_5);	   //LED0对应引脚GPIOB.5拉高,灭  等同LED0=1;
			GPIO_ResetBits(GPIOE,GPIO_Pin_5); //LED1对应引脚GPIOE.5拉低,亮 等同LED1=0;
			delay_ms(300);                     //延时300ms
	}
}

 ****************************************************************************************************
 ***/


/**
*******************下面注释掉的代码是通过 直接操作寄存器 方式实现IO口控制**************************************
int main(void)
{

	delay_init();		  //初始化延时函数
	LED_Init();		        //初始化LED端口
	while(1)
	{
     GPIOB->BRR=GPIO_Pin_5;//LED0亮
	   GPIOE->BSRR=GPIO_Pin_5;//LED1灭
		 delay_ms(300);
     GPIOB->BSRR=GPIO_Pin_5;//LED0灭
	   GPIOE->BRR=GPIO_Pin_5;//LED1亮
		 delay_ms(300);

	 }
 }
**************************************************************************************************
**/
Three, key input experiment
key.c file
#include "stm32f10x.h"
#include "key.h"
#include "sys.h"
#include "delay.h"

//按键初始化函数
void KEY_Init(void) //IO初始化
{


 	GPIO_InitTypeDef GPIO_InitStructure;

 	RCC_APB2PeriphClockCmd(RCC_APB2Periph_GPIOA|RCC_APB2Periph_GPIOE,ENABLE);//使能PORTA,PORTE时钟

	GPIO_InitStructure.GPIO_Pin  = GPIO_Pin_2|GPIO_Pin_3|GPIO_Pin_4;//KEY0-KEY2
	GPIO_InitStructure.GPIO_Mode = GPIO_Mode_IPU; //设置成上拉输入
 	GPIO_Init(GPIOE, &GPIO_InitStructure);//初始化GPIOE2,3,4

	//初始化 WK_UP-->GPIOA.0	  下拉输入
	GPIO_InitStructure.GPIO_Pin  = GPIO_Pin_0;
	GPIO_InitStructure.GPIO_Mode = GPIO_Mode_IPD; //PA0设置成输入,默认下拉
	GPIO_Init(GPIOA, &GPIO_InitStructure);//初始化GPIOA.0

}
//按键处理函数
//返回按键值
//mode:0,不支持连续按;1,支持连续按;
//0,没有任何按键按下
//1,KEY0按下
//2,KEY1按下
//3,KEY2按下
//4,KEY3按下 WK_UP
//注意此函数有响应优先级,KEY0>KEY1>KEY2>KEY3!!
u8 KEY_Scan(u8 mode)
{


	static u8 key_up=1;//按键按松开标志
	if(mode)key_up=1;  //支持连按
	if(key_up&&(KEY0==0||KEY1==0||KEY2==0||WK_UP==1))
	{


		delay_ms(10);//去抖动
		key_up=0;
		if(KEY0==0)return KEY0_PRES;
		else if(KEY1==0)return KEY1_PRES;
		else if(KEY2==0)return KEY2_PRES;
		else if(WK_UP==1)return WKUP_PRES;
	}else if(KEY0==1&&KEY1==1&&KEY2==1&&WK_UP==0)key_up=1;
 	return 0;// 无按键按下
}
This code contains 2 functions, void KEY_Init(void) and u8 KEY_Scan(u8 mode). KEY_Init() is used to initialize the IO port of the key input. First enable the GPIOA and GPIOE clocks, and then implement the input settings of PA0 and PE2~4. This is similar to the output configuration in Chapter 6, except that it is set to input and Chapter 6 is output.
The KEY_Scan() function is used to scan the 4 IO ports for key presses. The KEY_Scan() function supports two scanning methods, which are set by the mode parameter.
When the mode is 0, the KEY_Scan() function will not support continuous pressing and scanning a certain key. After the key is pressed, it must be released before it can be triggered for the second time, otherwise it will not respond to this key again. The advantage of this is It can prevent multiple triggers by pressing once, but the disadvantage is that it is not suitable when you need to long press.
When the mode is 1, the KEY_Scan() function will support continuous pressing. If a certain key is kept pressed, it will always return to the key value of this key, which can facilitate the long-press detection.
With the mode parameter, you can choose different methods according to your needs. I want to remind everyone here that because there are static variables in the function, the function is not a reentrant function. In the case of OS, you should pay attention to this. At the same time, one more thing to note is that the key scan of this function has priority, the first priority is KEY0, the second priority is KEY1, then KEY2, and finally the WK_UP key. This function has a return value. If a key is pressed, it returns a non-zero value, if there is no key or the key is incorrect, it returns 0
key.h file
#ifndef __KEY_H
#define __KEY_H
#include "sys.h"

//#define KEY0 PEin(4)   	//PE4
//#define KEY1 PEin(3)	//PE3
//#define KEY2 PEin(2)	//PE2
//#define WK_UP PAin(0)	//PA0  WK_UP
#define KEY0  GPIO_ReadInputDataBit(GPIOE,GPIO_Pin_4)//读取按键0
#define KEY1  GPIO_ReadInputDataBit(GPIOE,GPIO_Pin_3)//读取按键1
#define KEY2  GPIO_ReadInputDataBit(GPIOE,GPIO_Pin_2)//读取按键2
#define WK_UP   GPIO_ReadInputDataBit(GPIOA,GPIO_Pin_0)//读取按键3(WK_UP)

#define KEY0_PRES 	1	//KEY0按下
#define KEY1_PRES	2	//KEY1按下
#define KEY2_PRES	3	//KEY2按下
#define WKUP_PRES   4	//KEY_UP按下(即WK_UP/KEY_UP)

void KEY_Init(void);//IO初始化
u8 KEY_Scan(u8);  	//按键扫描函数
#endif
main file
#include "led.h"
#include "delay.h"
#include "key.h"
#include "sys.h"
#include "beep.h"

 int main(void)
 {


 	vu8 key=0;
	delay_init();	    	 //延时函数初始化
 	LED_Init();			     //LED端口初始化
	KEY_Init();          //初始化与按键连接的硬件接口
	BEEP_Init();         	//初始化蜂鸣器端口
	LED0=0;					//先点亮红灯
	while(1)
	{


 		key=KEY_Scan(0);	//得到键值
	   	if(key)
		{


			switch(key)
			{


				case WKUP_PRES:	//控制蜂鸣器
					BEEP=!BEEP;
					break;
				case KEY2_PRES:	//控制LED0翻转
					LED0=!LED0;
					break;
				case KEY1_PRES:	//控制LED1翻转
					LED1=!LED1;
					break;
				case KEY0_PRES:	//同时控制LED0,LED1翻转
					LED0=!LED0;
					LED1=!LED1;
					break;
			}
		}else delay_ms(10);
	}
}