SpringBoot项目入门(Eclipse创建项目)
最近公司项目不急,所以有大把的时间来学习新的知识,最近在网上发现springBoot非常火,于是试着自己搭建一个springboot项目出来,将其中的一些疑惑和解决方案分享出来,方便后续查看,也方便新学习者,减少痛苦。
第一次写博客,有问题的地方请指正。(本教程需要你对spring依赖注入,springMVC,web开发有一定的知识)
springBoot简介
spring官方为了方便开发人员开发业务代码,而不用重复的定义样板化的配置,从而加速项目框架的搭建。
插件安装
因为spring官方提供了STS这个插件可以非常方便的进行springBoot项目的开发,所以先安装STS插件。
打开Eclipse选择 Help/EclipseMarketspace 打开插件市场,输入STS搜索插件如图:
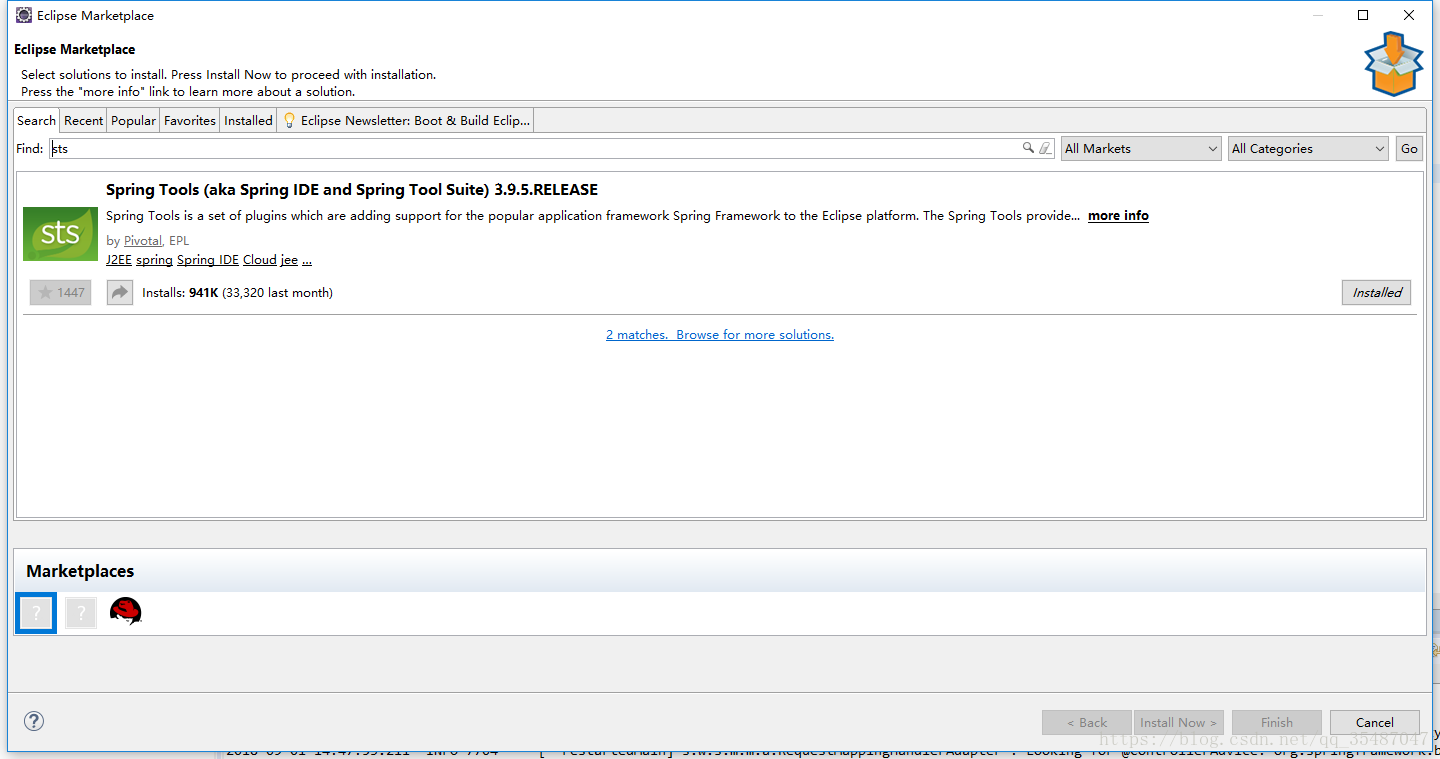
点击install安装,安装完成后需要重启,然后我们就可以通过插件创建springboot项目了
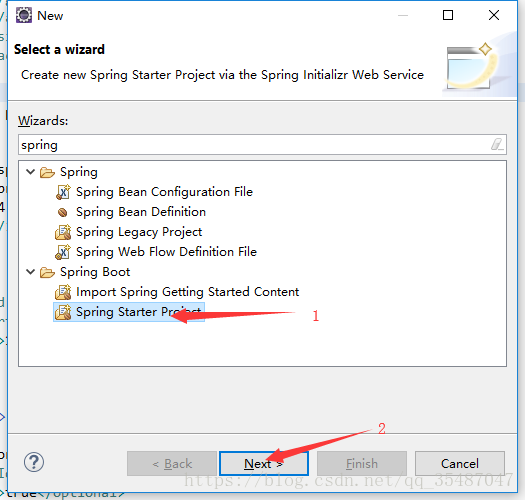
创建项目
Eclipse中 File/New/Other 输入框搜索sping就可以看到:
输入项目一些信息:
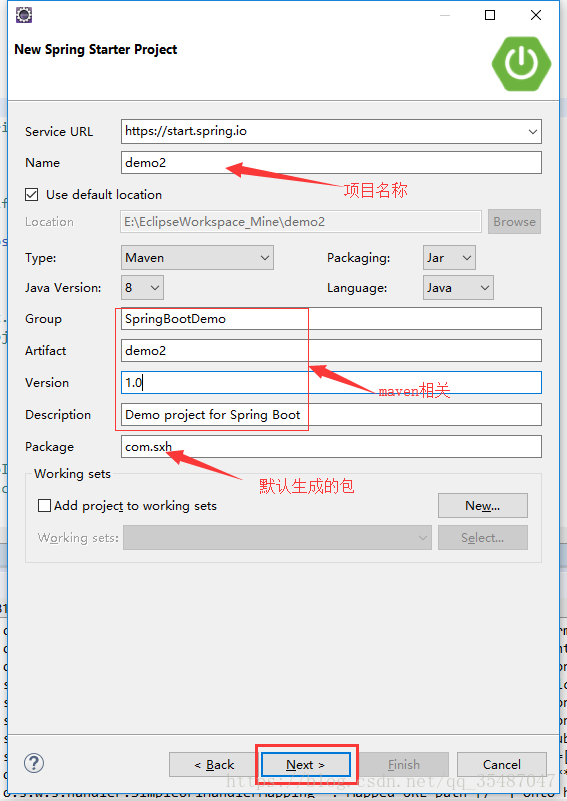
点击Next:
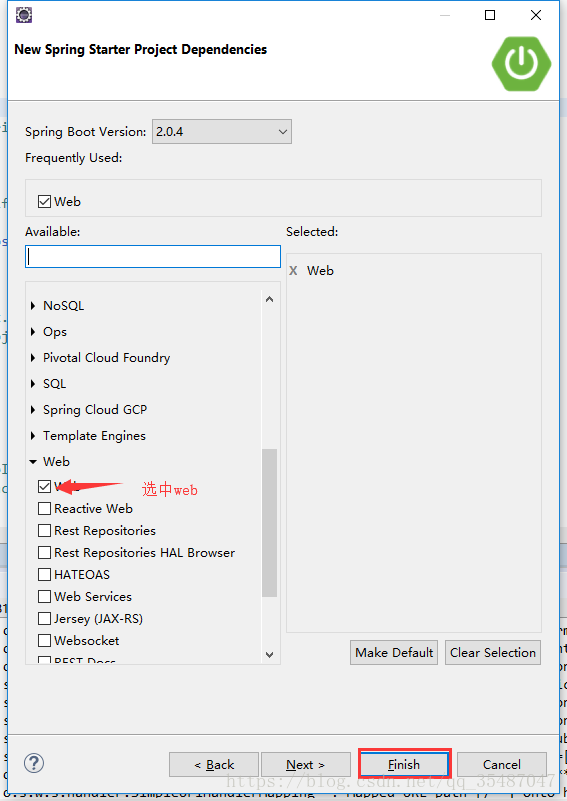
选择springboot版本,我选的2.0.4。选中web依赖,点击finish,这样我们一个springboot就创建好了:
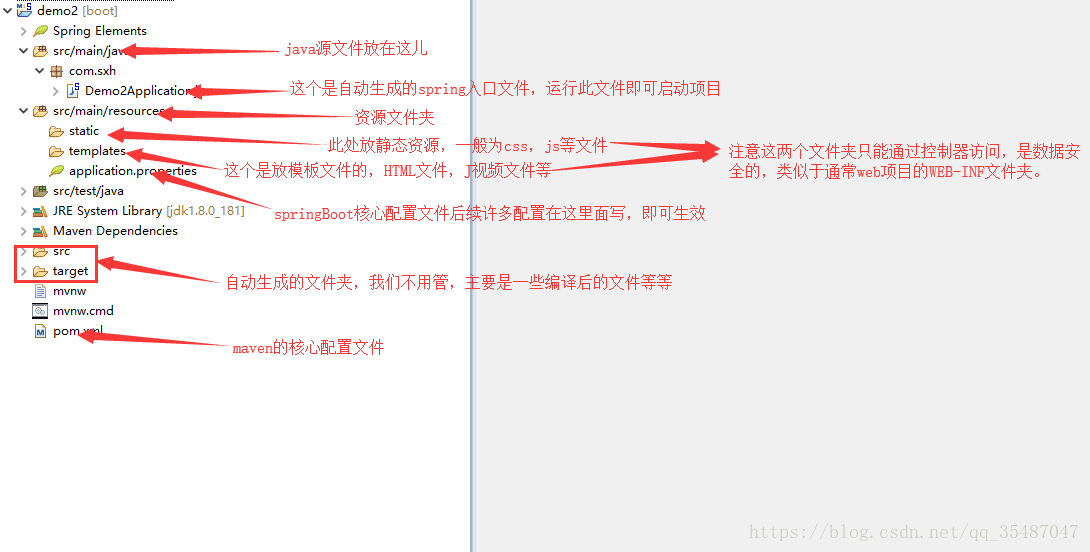
项目的目录结构已经在上图说明,再来看看pom.xml文件的依赖:
    <dependencies>
        <dependency>
            <groupId>org.springframework.boot</groupId>
            <artifactId>spring-boot-starter-web</artifactId>
        </dependency>

        <dependency>
            <groupId>org.springframework.boot</groupId>
            <artifactId>spring-boot-starter-test</artifactId>
            <scope>test</scope>
        </dependency>
    </dependencies>
发现两个依赖:spring-boot-starter-web ,spring-boot-starter-test,到这里就知道前面我们在创建项目是选中的web是在这里自动添加了web依赖,还有个是单元测试默认添加的。
项目创建好了,下面我们来测试项目能否成功运行,spring官方不推荐使用JSP,默认thymeleaf作为模板,所以下面页面也是用thymeleaf。
首先需要在pom.xml文件中加入thymeleaf依赖
<!-- Thymeleaf组件 -->
<dependency>
    <groupId>org.springframework.boot</groupId>
    <artifactId>spring-boot-starter-thymeleaf</artifactId>
</dependency>
springBoot会默认扫描入口启动类所在包和下面包的注解注入bean,当然,也可以通过在入口类添加注解指定包:
@ComponentScan(basePackages = {"com.yss.common"})我这边没有指定其他包,所以我的包结构这样:
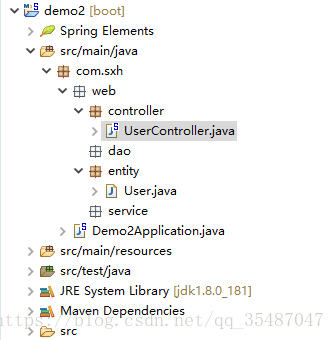
新建User.java实体类
public class User {
    private String name;
    private String sex;
    private String hobby;

    public User() {
        super();
    }
    public User(String name, String sex, String hobby) {
        super();
        this.name = name;
        this.sex = sex;
        this.hobby = hobby;
    }
    public String getName() {
        return name;
    }
    public void setName(String name) {
        this.name = name;
    }
    public String getSex() {
        return sex;
    }
    public void setSex(String sex) {
        this.sex = sex;
    }
    public String getHobby() {
        return hobby;
    }
    public void setHobby(String hobby) {
        this.hobby = hobby;
    }
}
新建UserController.java
@Controller
public class UserController {
@RequestMapping(value="/user")
public String index(Model model) {
List<User> users = new ArrayList<User>();
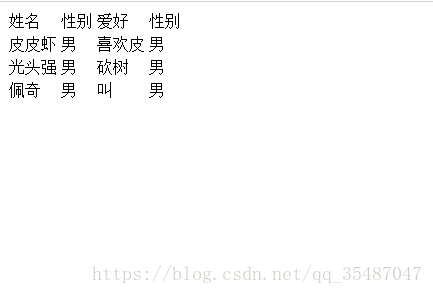
users.add(new User("皮皮虾", "男", "喜欢皮"));
users.add(new User("光头强", "男", "砍树"));
users.add(new User("佩奇", "男", "叫"));
model.addAttribute("users",users);
return "user";
}
}这里是用@Controller注入spring成为一个控制器,在SpringBoot中还有个注解是@ResController其实就是@ResponseBody和@Controller的结合体,该控制器所有方法不返回视图,只返回数据,和你在方法上添加@ResponseBody一样。
SpringBoot默认返回thymeleaf模板视图,所以这里方法返回user默认是去templates下去找user.html,当然,JSP也是可以配置的,我们就不配置了,再说springboot官方也不推荐JSP,代码耦合度太高。
template文件夹下新建user.html文件:
<!DOCTYPE html>
<html xmlns:th="http://www.thymeleaf.org">
<head>
    <meta charset="UTF-8">
    <title >Title</title>
</head>
<body>
    <table>
        <tr>
            <td>姓名</td>
            <td>性别</td>
            <td>爱好</td>
            <td>性别</td>
        </tr>
        <tr th:each="user:${users}" th:object="${user}">
            <td th:text="${user.name}"></td>
            <td th:text="${user.sex}"></td>
            <td th:text="${user.hobby}"></td>
            <td th:text="*{sex}"></td>
        </tr>
    </table>
</body>
</html>
注意这里需要加上 thymeleaf命名空间,不然不能使用th:each等,这个是thymeleaf语法,有兴趣的同学可以自己学习,使用起来和EL,JSTL很像。
好了所以文件都创建完成了。
右击springBoot入口文件,启动项目,这样我们就可以通过http://localhost:8080/user访问了:
后续:
我们可以在springBoot文件中修改一些默认配置,当前我修改的一些:
#项目访问根路径
server.servlet.context-path=/demo_sxh
#端口
server.port=8888
server.tomcat.uri-encoding=UTF-8

#thymeleaf缓存
spring.thymeleaf.cache=false

#热编译
spring.devtools.restart.enabled=true
#热编译监听目录
spring.devtools.restart.additional-paths=src/main/java

#国际化配置
spring.messages.basename=i18n/messages
spring.messages.encoding=UTF-8

#logging.level.com.bonc = info

#springmvc视图解析器
spring.mvc.view.prefix=/templates/
spring.mvc.view.suffix=.html
后续还会写一些springBoot配置 国际化,读取配置文件,配置shiro,myBatis,redis等等一些的博客。
自己也在学习中,共勉。
原创不易-转载请注明出处。
