最近学习了jQuery的内容,做一个小型购物车来练习巩固一下。
基本样式搭建
首先进行基本样式的搭建,在页面里添加几个div用来布局一些购物车所需要的模块。
<!DOCTYPE html>
<html>
<head lang="en">
    <meta charset="UTF-8">
    <title>购物车</title>
</head>
<body>
<div>
    <div>
        <div>全选</div>
        <div>序号</div>
        <div>图片</div>
        <div>名称</div>
        <div>单价</div>
        <div>数量</div>
        <div>小计</div>
        <div>操作</div>
    </div>
</div>
</body>
</html>
效果如下:
 然后加入一些按钮和一些css样式:
<!DOCTYPE html>
<html>
<head lang="en">
    <meta charset="UTF-8">
    <title>购物车</title>
    <style>
        * {
            margin: 0;
            padding: 0;
        }
        .cart {
            margin: auto;
            width: 1000px;
            min-height: 30px;
        }
        .title {
            width: auto;
            height: 30px;
            border-bottom: 1px solid #c0c0c0;
        }
        .title > div {
            height: 30px;
            line-height: 30px;
            float: left;
            text-align: center;
            font-size: 13px;
        }
        .allck {
            position: relative;
            top: 2px;
        }
        .title_small {
            width: 100px;
        }
        .title_big {
            width: 200px;
        }
        .bot {
            overflow: hidden;
            background-color: #fefff3;
        }
        .bot_div {
            width: 150px;
            text-align: center;
            line-height: 40px;
            font-size: 13px;
            float: left;
        }
        .bot_div > input {
            position: relative;
            top: 2px;
        }
        .btn {
            float: right;
            width: 120px;
            line-height: 40px;
            background-color: red;
            color: #fff;
            text-align: center;
            font-size: 13px;
        }

    </style>
</head>
<body>
<div class="cart">
    <div class="title">
        <div class="title_small"><input class="allck" type="checkbox"/>全选</div>
        <div class="title_small">序号</div>
        <div class="title_small">图片</div>
        <div class="title_big">名称</div>
        <div class="title_small">单价</div>
        <div class="title_big">数量</div>
        <div class="title_small">小计</div>
        <div class="title_small">操作</div>
    </div>
    <div class="cartlist">
        <!--购物车的数据显示到这个容器里面-->
    </div>
    <div class="bot">
        <div class="bot_div">
            <input class="fckbtn" type="checkbox"/>反选
        </div>
        <div class="bot_div">
            总计:<span class="allprice">0.00</span>¥
        </div>
        <div class="btn">
            去结算>
        </div>
    </div>
</div>
</body>
</html>
效果如下:
 到这里,就开始用JS和jQuery来完成后面的工作。
首先写一些json对象来模拟从数据库中调取数据。
<script src="jquery/jquery.js"></script>
<script>
    $(function(){
        var cartData = [
            {
                "id": "1",
                "name": "电饭煲",
                "img": "./image/img1.jpg",
                "price": "128.3",
                "num": "1",
                "smalltotle": "128.3"
            },
            {
                "id": "2",
                "name": "电插板",
                "img": "./image/img2.jpg",
                "price": "98",
                "num": "1",
                "smalltotle": "98"
            },
            {
                "id": "3",
                "name": "太阳能",
                "img": "./image/img3.jpg",
                "price": "2499",
                "num": "1",
                "smalltotle": "2499"
            },
            {
                "id": "4",
                "name": "电路开关",
                "img": "./image/img4.jpg",
                "price": "58",
                "num": "1",
                "smalltotle": "58"
            },
            {
                "id": "5",
                "name": "全自动洗衣机",
                "img": "./image/img5.jpg",
                "price": "4899",
                "num": "1",
                "smalltotle": "4899"
            }
        ];
    });
</script>
注意:写jQuery代码前记得调用jQuery库,否则代码是不起作用的。
接下来是导入数据并且布局。操作代码如下所示:
<style>
        .cartsmall {
            height: 100px;
            line-height: 100px;
            float: left;
            text-align: center;
            font-size: 13px;
            border-bottom: 1px solid #c0c0c0;
        }
        .cartimg {
            width: 80px;
            height: 80px;
            border: 0;
            vertical-align: middle;
        }
        .cartpar {
            overflow: hidden;
        }
        .num_cart > button {
            display: inline-block;
            width: 25px;
            height: 25px;
            outline: none;
            border: 1px solid #c0c0c0;
            font-size: 14px;
        }
        .num_cart > input {
            width: 40px;
            height: 25px;
            line-height: 25px;
            display: inline-block;
            text-align: center;
            border: 1px solid #c0c0c0;
            outline: none;
            box-sizing: border-box;
        }
        .btn_remove {
            font-size: 13px;
            color: red;
            border-style: none;
            background-color: transparent;
            outline: none;
            cursor: pointer;
        }
        .cartbg {
            background-color: #fff1e3;
        }
    </style>

$(function(){
cartData.map(function (val) {
            //创建父容器
            var par = $("<div></div>");
            par.addClass("cartpar");
            //创建子容器
            var child1 = $("<div></div>");
            var input = $("<input type='checkbox'/>");
            input.addClass("iptck");
            child1.append(input);

            var child2 = $("<div></div>");
            child2.html(val.id);

            var child3 = $("<div></div>");
            var img = $("<img/>");
            img.addClass("cartimg");
            img.attr("src", val.img);
            child3.append(img);

            var child4 = $("<div></div>");
            child4.html(val.name);

            var child5 = $("<div></div>");
            child5.html("¥"+val.price)

            //造数量
            var child6 = $("<div></div>");
            child6.addClass("num_cart");
            var btn_left = $("<button class='btnleft'>-</button>");
            var num_txt = $("<input class='number' type='text' value='1'/>");
            var btn_right = $("<button class='btnright'>+</button>");
            child6.append(btn_left);
            child6.append(num_txt);
            child6.append(btn_right);

            var child7 = $("<div class='smallprice'></div>");
            child7.html("¥"+val.smalltotle);

            var child8 = $("<div></div>");
            var btn_a = $("<button class='btn_remove'>删除</button>");
            child8.append(btn_a);

            par.append(child1);
            par.append(child2);
            par.append(child3);
            par.append(child4);
            par.append(child5);
            par.append(child6);
            par.append(child7);
            par.append(child8);
            $(".cartlist").append(par);
            //添加css样式
            par.children().addClass("cartsmall title_small");
            par.children().eq(3).toggleClass("title_small title_big");
            par.children().eq(5).toggleClass("title_small title_big");
        });
});
效果如下所示:
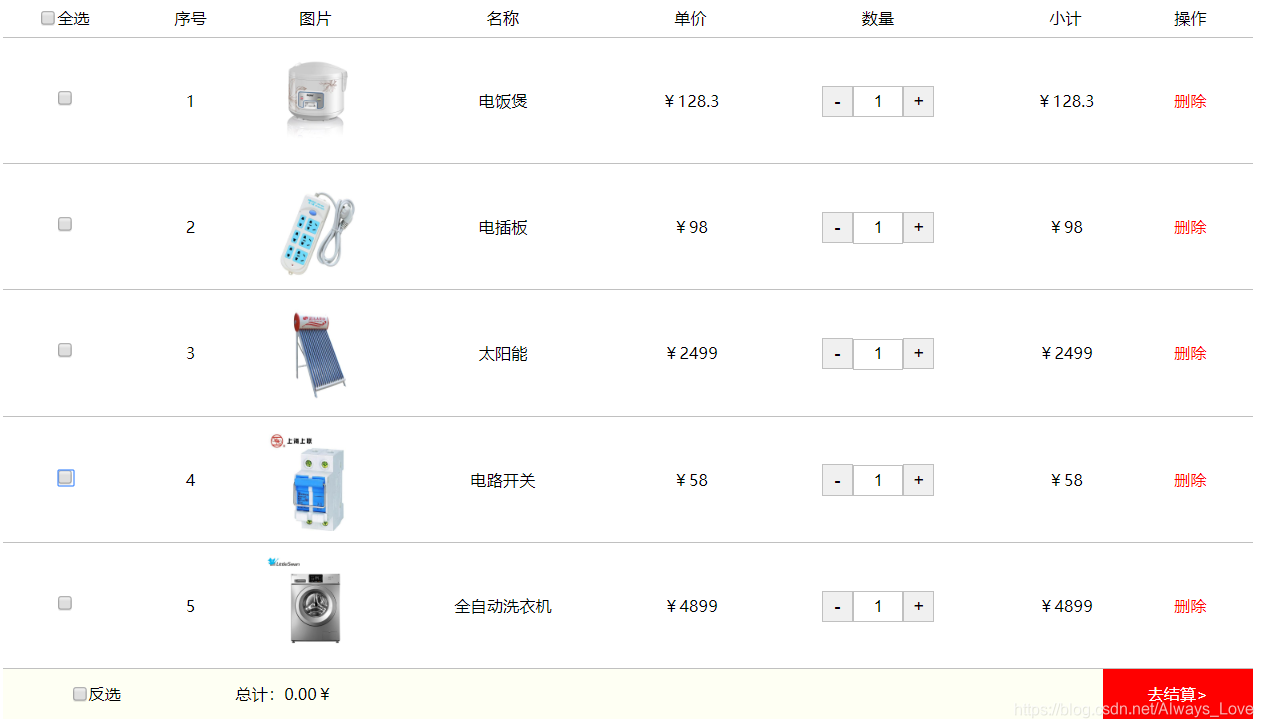 到这一步,基本的布局已经完成了,数据也导入完毕,接下来就是按钮和计算这些功能的实现。
逻辑功能实现:
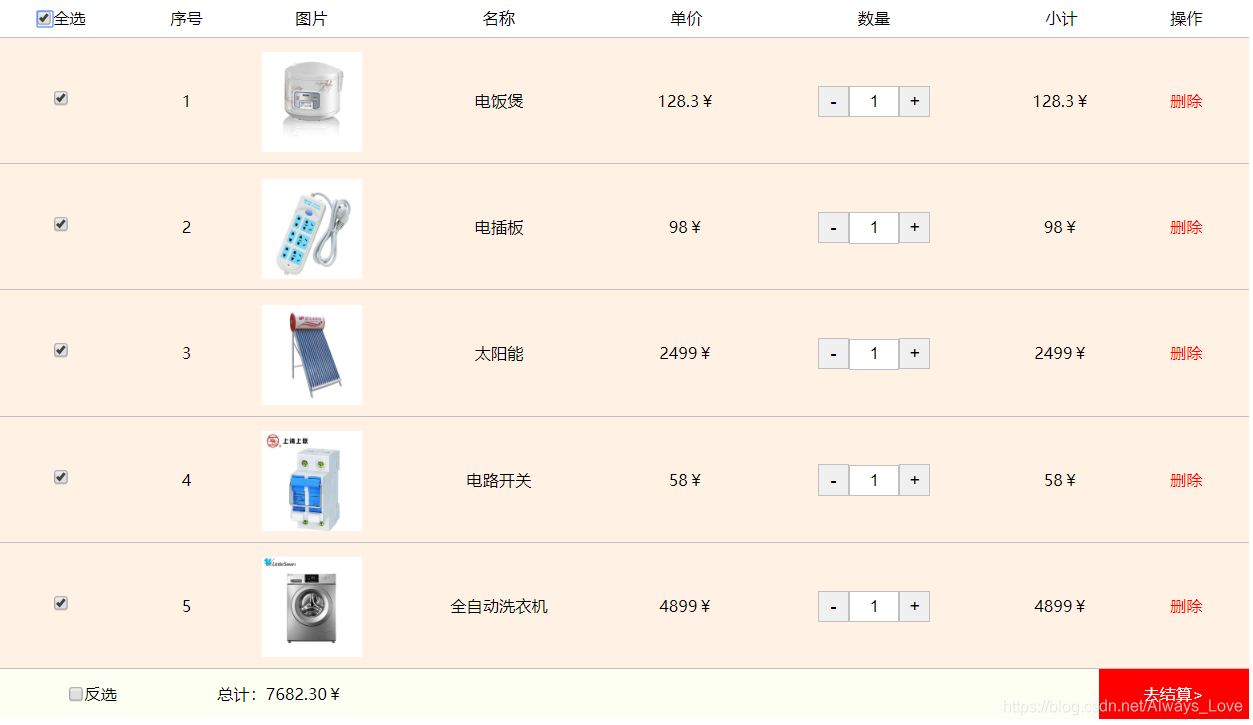
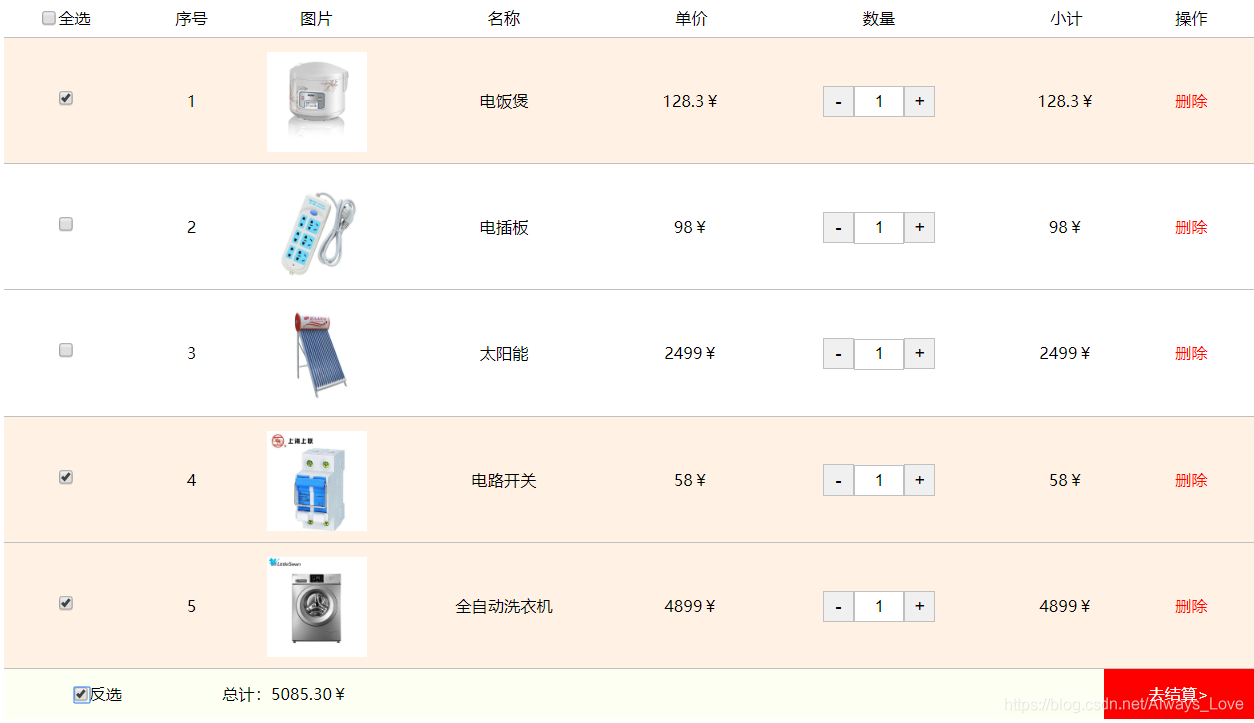
实现全选、反选以及单选的功能:
$(".allck").click(function () {
            //判断当前复选框的状态
            if ($(this).prop("checked")) //true
            {
                $(".iptck").prop("checked", true);
                $(".cartpar").addClass("cartbg");//每行全部添加颜色
            }
            else {
                $(".iptck").prop("checked", false);
                $(".cartpar").toggleClass("cartbg");
            }
            addallprice();//计算总价
        });
        function ckallbox(obj) {
            //记录是否该让全选选择
            if (obj.prop("checked")) {
                ckcount++;
            }
            else {
                ckcount--;
            }
            if (ckcount == $(".iptck").length) {
                $(".allck").prop("checked", true);
            }
            else {
                //状态监测
                $(".allck").prop("checked", false);
            }
        }
        var ckcount = 0;
        $(".iptck").click(function () {
            ckallbox($(this));
            //判断当前的状态
            $(this).parents(".cartpar").toggleClass("cartbg");
            //点击单个的时候  判断当前的状态是否计算总价
            addallprice();
        });
        //反选功能
        $(".fckbtn").click(function () {
            $(".iptck").map(function (index, ele) {
                //检测当前元素的状态$(ele)
                if ($(ele).prop("checked")) {
                    $(ele).prop("checked", false);
                }
                else {
                    $(ele).prop("checked", true);
                }
                //当前的行变色
                $(".cartpar").eq(index).toggleClass("cartbg");
                ckallbox($(ele));
                addallprice();//计算总价
            });
        });
效果如下:
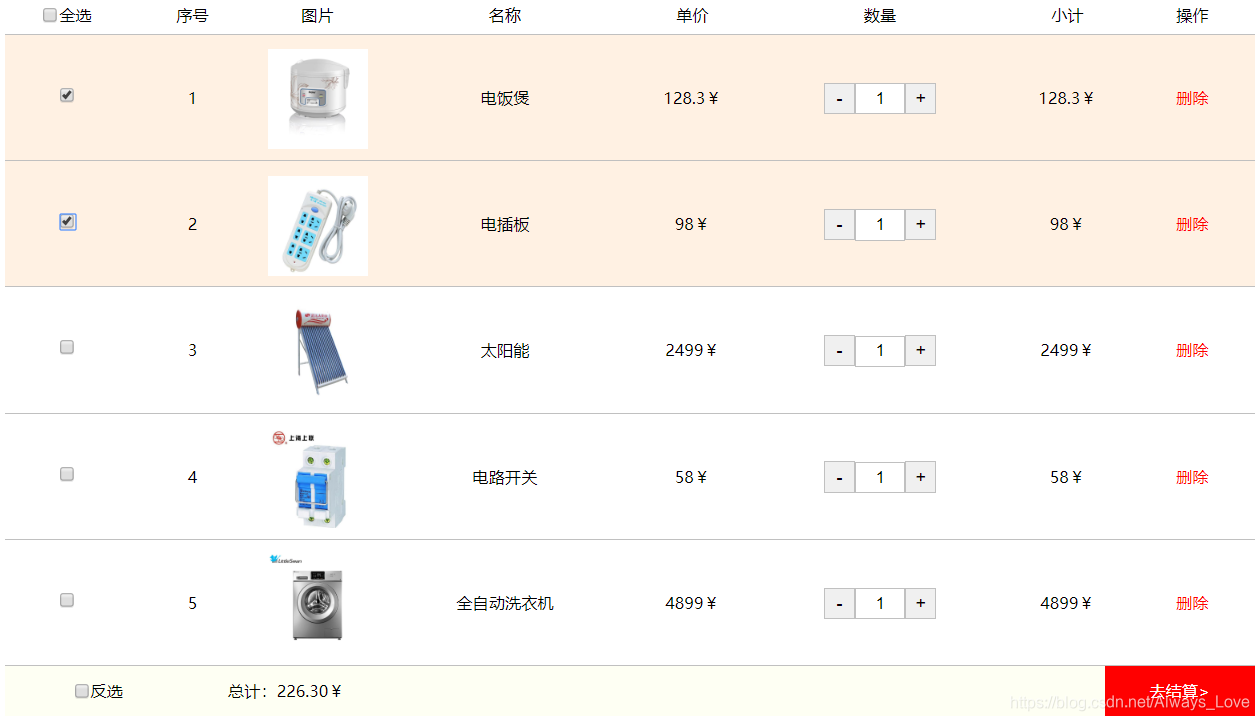
 下面是小计和总计功能的实现:
$(".btnleft").click(function () {
            var num = $(this).next().val();
            num--;
            if (num <= 1) {
                num = 1;
            }
            $(this).next().val(num);
            smallTottle($(this).parent(), num);//计算小计的方法
            addallprice();//计算总价
        });
        $(".btnright").click(function () {
            var num = $(this).prev().val();
            num++;
            $(this).prev().val(num);
            smallTottle($(this).parent(), num);//计算小计的方法
            addallprice();//计算总价
        });
        //计算小计的方法
        function smallTottle(par, number) {
            var price = parseFloat(par.prev().html().replace("¥", ""));
            par.next().html((price * number).toFixed(2) + "¥");
        }
        //计算总价的方法   根据当前行有没有被选择
        function addallprice() {
            //定义总价
            var allprice = 0;
            $(".iptck").each(function (index) {
                if ($(this).prop("checked"))//true  //计算当前行的总价
                {
                    var smallprice = parseFloat($(this).parent().siblings(".smallprice").html().replace("¥", ""));
                    allprice += smallprice;
                }
            });
            //直接给总计赋值
            $(".allprice").html(allprice.toFixed(2));
        }
效果如下:
 现在到这一步就剩删除操作了。
//删除操作
        $(".btn_remove").each(function () {
            $(this).click(function () {
                //这里在删除之后索引直接错位
                $(this).parents(".cartpar").remove();
                addallprice();//删除之后重新累计
            });
        });
如图:
 删掉了序号二的商品。
还有在数量框自定义输入数量的功能。
//用户的文本框输入功能
        $(".number").keydown(function (e) {
            //不能出现除数字以外的字母
            //不处理汉字
            if (e.key == "Backspace") {
                //检测值
                if ($(this).val().length == 1) {
                    $(this).val(1);
                    return false;
                }
            }
            if (isNaN(e.key) && e.key != "Backspace") {
                return false;
            }
        });
效果:
 到这里购物车就基本完成了。
总结: 在这个购物车的实践中,我深深的感觉到了jQuery的魅力。它可以很方便的实现一些功能,相比js更加的简洁和方便。主要运用的还是对jQuery对dom元素的获取修改样式赋予功能等等,需要多练才能自由运用,这样编程效率将会大大提升。
