学成在线 第6天 讲义-页面发布 课程管理


最完成得最后阶段是根据页面ID保存物理路径到gridFs,中,先根据页面ID,查询页面信息,在根据页面信息,获取到Hmtl得页面ID得到页面Id就可以获取文件输入流,也就是可以从GridFs中查询文件得对象,获取文件得输入流,得到在根据页面信息,获取到站点信息,最后由站点信息,获取到站点得物理路径,根据站点得物理路径+页面得物理路径+页面得页面得名称,拼成要给绝对路径,最后将这个路径写入到硬盘中
//根据页面ID保存物理路径
    //保存html页面到服务器物理路径
    public void savePageToServerPath(String pageId){
        //根据pageId查询cmsPage
        CmsPage cmsPage = this.findCmsPageById(pageId);
        //得到html的文件id,从cmsPage中获取htmlFileId内容
        String htmlFileId = cmsPage.getHtmlFileId();

        //从gridFS中查询html文件
        InputStream inputStream = this.getFileById(htmlFileId);
        if(inputStream == null){
            LOGGER.error("getFileById InputStream is null ,htmlFileId:{}",htmlFileId);
            return ;
        }
        //得到站点id
        String siteId = cmsPage.getSiteId();
        //得到站点的信息
        CmsSite cmsSite = this.findCmsSiteById(siteId);
        //得到站点的物理路径
        String sitePhysicalPath = cmsSite.getSitePhysicalPath();
        //得到页面的物理路径
        String pagePath = sitePhysicalPath + cmsPage.getPagePhysicalPath() + cmsPage.getPageName();
        //将html文件保存到服务器物理路径上
        FileOutputStream fileOutputStream = null;
        try {
            fileOutputStream = new FileOutputStream(new File(pagePath));
            IOUtils.copy(inputStream,fileOutputStream);
        } catch (Exception e) {
            e.printStackTrace();
        }finally {
            try {
                inputStream.close();
            } catch (IOException e) {
                e.printStackTrace();
            }
            try {
                fileOutputStream.close();
            } catch (IOException e) {
                e.printStackTrace();
            }
        }


    }

    //根据文件id从GridFS中查询文件内容
    public InputStream getFileById(String fileId){
        //文件对象
        GridFSFile gridFSFile = gridFsTemplate.findOne(Query.query(Criteria.where("_id").is(fileId)));
        //打开下载流
        GridFSDownloadStream gridFSDownloadStream = gridFSBucket.openDownloadStream(gridFSFile.getObjectId());
        //定义GridFsResource
        GridFsResource gridFsResource = new GridFsResource(gridFSFile,gridFSDownloadStream);
        try {
            return gridFsResource.getInputStream();
        } catch (IOException e) {
            e.printStackTrace();
        }
        return null;
    }

    //根据页面id查询页面信息
    public CmsPage findCmsPageById(String pageId){
        Optional<CmsPage> optional = cmsPageRepository.findById(pageId);
        if(optional.isPresent()){
            return optional.get();
        }
        return null;
    }
    //根据站点id查询站点信息
    public CmsSite findCmsSiteById(String siteId){
        Optional<CmsSite> optional = cmsSiteRepository.findById(siteId);
        if(optional.isPresent()){
            return optional.get();
        }
        return null;
    }
下来是编写消费者得监听方法
@RabbitListener(queues = {"${xuecheng.mq.queue}"})
public void postPage(String msg){
//解析消息
Map map = JSON.parseObject(msg, Map.class);
//得到消息中的页面id
String pageId = (String) map.get("pageId");
//校验页面是否合法
CmsPage cmsPage = pageService.findCmsPageById(pageId);
if(cmsPage == null){
LOGGER.error("receive postpage msg,cmsPage is null,pageId:{}",pageId);
return ;
}
//调用service方法将页面从GridFs中下载到服务器
pageService.savePageToServerPath(pageId);
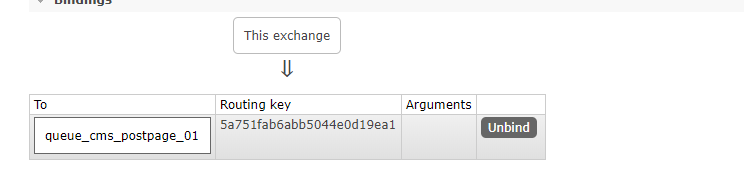
}启动程序,监听成功,交换机成功生成


1.3 页面发布生产方
1.3.1 需求分析
管理员通过 cms系统发布“页面发布”的消费,cms系统作为页面发布的生产方。
需求如下:
1、管理员进入管理界面点击“页面发布”,前端请求cms页面发布接口。
2、cms页面发布接口执行页面静态化,并将静态化页面存储至GridFS中。
3、静态化成功后,向消息队列发送页面发布的消息。 1) 获取页面的信息及页面所属站点ID。 2) 设置消息内容为页面ID。(采用json格式,方便日后扩展)
3) 发送消息给ex_cms_postpage交换机,并将站点ID作为routingKey。
这个思路有点绕,其实思路是,先将模板得信息保存到gridFs,中,然后获取gridfs得文件得ID,最后在把GridFs得ID 配置到CMSpage中,消息队列监听到CMSPAGE有做出变化,立马做出处理,进行页面得发布
    //页面发布
    public ResponseResult post(String pageId){
        //执行页面静态化
        String pageHtml = this.getTemplateByPageId(pageId);
        //将页面静态化文件存储到GridFs中
        CmsPage cmsPage = saveHtml(pageId, pageHtml);
        //向MQ发消息
        sendPostPage(pageId);
        return new ResponseResult(CommonCode.SUCCESS);
    }
    //向mq 发送消息
    private void sendPostPage(String pageId){
        //得到页面信息
        CmsPage cmsPage = this.findById(pageId);
        if(cmsPage == null){
            ExceptionCast.cast(CommonCode.FAIL);
        }
        //创建消息对象
        Map<String,String> msg = new HashMap<>();
        msg.put("pageId",pageId);
        //转成json串
        String jsonString = JSON.toJSONString(msg);
        //发送给mq
        //站点id
        String siteId = cmsPage.getSiteId();
        rabbitTemplate.convertAndSend(RabbitmqConfig.EX_ROUTING_CMS_POSTPAGE,siteId,jsonString);
    }
    //保存html到GridFS
    private CmsPage saveHtml(String pageId,String htmlContent){
        //先得到页面信息
        CmsPage cmsPage = this.findById(pageId);
        if(cmsPage == null){
            ExceptionCast.cast(CommonCode.FAIL);
        }
        ObjectId objectId = null;
        try {
            //将htmlContent内容转成输入流
            InputStream inputStream = IOUtils.toInputStream(htmlContent, "utf-8");
            //将html文件内容保存到GridFS
            objectId = gridFsTemplate.store(inputStream, cmsPage.getPageName());
        } catch (IOException e) {
            e.printStackTrace();
        }

        //将html文件id更新到cmsPage中
        cmsPage.setHtmlFileId(objectId.toHexString());
        cmsPageRepository.save(cmsPage);
        return cmsPage;
    }
成功监听到消息


前端页面得中发布方得请求处理得,前端对接得接口和之前得一样,基本也是老样子加个按钮之后在加上请求得连接就可以了
    postPage (pageId) {
         this.$confirm('确认发布该页面吗?', '提示', {}).then(() => {
             page_postPage(pageId).then((res) => {
                if(res.success){
               console.log('发布页面id='+pageId);
                   this.$message.success('发布成功,请稍后查看结果');
                  }else{
                 this.$message.error('发布失败');
                }
             });
          }).catch(() => { }); },
    },
生产方监听到页面发布得请求

消费方开始处理生产请求

执行下载方法

文件已经修改成功


 、
、
导入项目进行测试后端得工程可以正常进行运行,接下来就是导入前端得工程,进行测试:注意直接导入这个前端得工程执行npm run dev是会有大问题得,建议出现问题得时候,前往项目根目录删除node_modules文件夹,然后在项目根目录路径下的终端运行"npm install"等待安装完之后,再次运行“npm run dev”,有些人的是马上就可以了,然而往往还会有人(譬如我)仍然报类似的错误,这个时候你只需要再次重复相同的操作即可,“一次不成再删再安装”!!!

 3 课程计划
3.1 需求分析


添加Api接口得
@Api(value="课程管理接口",description = "课程管理接口,提供课程的增、删、改、查")
public interface CourseControllerApi {
    @ApiOperation("课程计划查询")
    public TeachplanNode findTeachplanList(String courseId);

    @ApiOperation("添加课程计划")
    public ResponseResult addTeachplan(Teachplan teachplan);
}
课程查询的Mapper的编写
<resultMap id="teachplanMap" type="com.xuecheng.framework.domain.course.ext.TeachplanNode">
        <id column="one_id" property="id"></id>
        <result column="one_pname" property="pname"></result>
        <collection property="children" ofType="com.xuecheng.framework.domain.course.ext.TeachplanNode">
            <id column="two_id" property="id"></id>
            <result column="two_pname" property="pname"></result>
            <collection property="children" ofType="com.xuecheng.framework.domain.course.ext.TeachplanNode">
                <id column="three_id" property="id"></id>
                <result column="three_pname" property="pname"></result>
            </collection>
        </collection>

    </resultMap>

    <select id="selectList" parameterType="java.lang.String"
            resultMap="teachplanMap">
  SELECT
  a.id one_id,
  a.pname one_pname,
  b.id two_id,
  b.pname two_pname,
  c.id three_id,
  c.pname three_pname
FROM
  teachplan a
  LEFT JOIN teachplan b
    ON b.parentid = a.id
  LEFT JOIN teachplan c
    ON c.parentid = b.id
WHERE a.parentid = '0'
<if test="_parameter !=null and _parameter!=''">
    AND a.courseid = #{courseId}
</if>

ORDER BY a.orderby,
  b.orderby,
  c.orderby
    </select>
Servce &Controller
public TeachplanNode findTeacherplanList(String courseId){
TeachplanNode teachplanNode = teachplanMapper.selectList(courseId);
return teachplanNode;
}
====================Controller==========================
@Override
@GetMapping("/teachplan/list/{courseId}")
public TeachplanNode findTeachplanList(@PathVariable("courseId") String courseId) {
return courserService.findTeacherplanList(courseId);
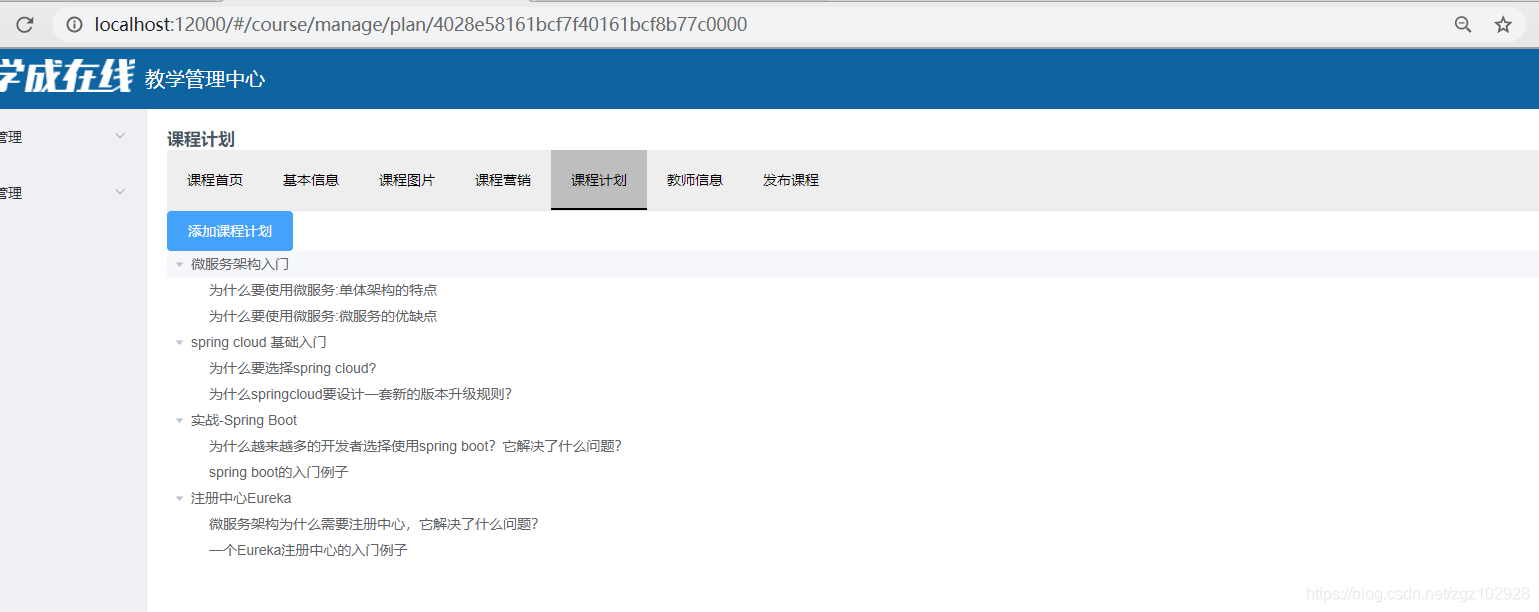
}Test测试Mapper编写没有任何问题

接下来就行Swgger的测试,返回的是JSON,的时候Controller的注解一定是RestController

前端页面调试
添加ID刷新前端页面的
添加课程信息
 @Transactional
    public ResponseResult addTeachplan(Teachplan teachplan) {

        if(teachplan == null ||
                StringUtils.isEmpty(teachplan.getPname()) ||
                StringUtils.isEmpty(teachplan.getCourseid())){
            ExceptionCast.cast(CommonCode.FAIL);
        }
        //课程id
        String courseid = teachplan.getCourseid();
        //父结点的id
        String parentid = teachplan.getParentid();
        if(StringUtils.isEmpty(parentid)){
            //获取课程的根结点
            parentid = getTeachplanRoot(courseid);
        }
        //查询根结点信息
        Optional<Teachplan> optional = teachplanRepository.findById(parentid);
        Teachplan teachplan1 = optional.get();
        //父结点的级别
        String parent_grade = teachplan1.getGrade();
        //创建一个新结点准备添加
        Teachplan teachplanNew = new Teachplan();
        //将teachplan的属性拷贝到teachplanNew中
        BeanUtils.copyProperties(teachplan,teachplanNew);
        //要设置必要的属性
        teachplanNew.setParentid(parentid);
        if(parent_grade.equals("1")){
            teachplanNew.setGrade("2");
        }else{
            teachplanNew.setGrade("3");
        }
        teachplanNew.setStatus("0");//未发布
        teachplanRepository.save(teachplanNew);
        return new ResponseResult(CommonCode.SUCCESS);
    }


    //获取课程的根结点
    public String getTeachplanRoot(String courseId){
        Optional<CourseBase> optional = courseBaseRepository.findById(courseId);
        if(!optional.isPresent()){
            return null;
        }
        CourseBase courseBase = optional.get();
        //调用dao查询teachplan表得到该课程的根结点(一级结点)
        List<Teachplan> teachplanList = teachplanRepository.findByCourseidAndParentid(courseId, "0");
        if(teachplanList == null || teachplanList.size()<=0){
            //新添加一个课程的根结点
            Teachplan teachplan = new Teachplan();
            teachplan.setCourseid(courseId);
            teachplan.setParentid("0");
            teachplan.setGrade("1");//一级结点
            teachplan.setStatus("0");
            teachplan.setPname(courseBase.getName());
            teachplanRepository.save(teachplan);
            return teachplan.getId();

        }
        //返回根结点的id
        return teachplanList.get(0).getId();

    }
成功添加

