官方参考:https://kubernetes.io/zh/docs/tasks/configure-pod-container/configure-pod-configmap/
创建ConfigMap
可以在 kustomization.yaml 中使用 kubectl create configmap 或 ConfigMap 生成器来创建ConfigMap。注意,从 1.14 版本开始, kubectl 开始支持 kustomization.yaml。
使用kubectl创建ConfigMap
在目录,文件或文字值中使用kubelet create configmap命令创建configmap
kubectl create configmap <map-name> <data-source>
其中, <map-name> 是要分配给 ConfigMap 的名称,<data-source> 是要从中提取数据的目录,文件或者文字值。
数据源对应于 ConfigMap 中的 key-value (键值对)
- key=在命令行上题库的文件名或者秘钥
- value=在命令行上提供的文件内容或者文字值
可以使用 kubelet describe或者kubelet get检索有关ConfigMap的信息
根据目录创建ConfigMap
你可以使用 kubectl create configmap 从同一目录中的多个文件创建 ConfigMap。
#创建本地目录
mkdir -p configure-pod-container/configmap/
#将样板文件下载到创建的目录
wget https://kubernetes.io/examples/configmap/game.properties -O configure-pod-container/configmap/game.properties
wget https://kubernetes.io/examples/configmap/ui.properties -O configure-pod-container/configmap/ui.properties
#创建configmap
kubectl create configmap game-config --from-file=configure-pod-container/configmap/
合并了以下两个文件的内容
# cat configure-pod-container/configmap/game.properties
enemies=aliens
lives=3
enemies.cheat=true
enemies.cheat.level=noGoodRotten
secret.code.passphrase=UUDDLRLRBABAS
secret.code.allowed=true

# cat configure-pod-container/configmap/ui.properties
color.good=purple
color.bad=yellow
allow.textmode=true
how.nice.to.look=fairlyNice
进入以下ConfigMap中
kubectl describe configmaps game-config
输出类似以下内容
Name:         game-config
Namespace:    default
Labels:       <none>
Annotations:  <none>

Data
====
game.properties:
----
enemies=aliens
lives=3
enemies.cheat=true
enemies.cheat.level=noGoodRotten
secret.code.passphrase=UUDDLRLRBABAS
secret.code.allowed=true
secret.code.lives=30
ui.properties:
----
color.good=purple
color.bad=yellow
allow.textmode=true
how.nice.to.look=fairlyNice

Events:  <none>
kubectl get configmap game-config -o yaml
输出以下内容
apiVersion: v1
data:
  game.properties: |-
    enemies=aliens
    lives=3
    enemies.cheat=true
    enemies.cheat.level=noGoodRotten
    secret.code.passphrase=UUDDLRLRBABAS
    secret.code.allowed=true
    secret.code.lives=30
  ui.properties: |
    color.good=purple
    color.bad=yellow
    allow.textmode=true
    how.nice.to.look=fairlyNice
kind: ConfigMap
metadata:
  creationTimestamp: "2020-03-17T08:12:49Z"
  name: game-config
  namespace: default
  resourceVersion: "505452"
  selfLink: /api/v1/namespaces/default/configmaps/game-config
  uid: 1f3868e4-7a6b-4bf3-9317-00911ebc6e91
根据文件创建ConfigMap
可以使用kubelet create configmap从单个文件或多个文件创建ConfigMap
例如
kubectl create configmap game-config-2 --from-file=configure-pod-container/configmap/game.properties
将产生以下ConfigMap
kubectl describe configmaps game-config-2
输出类似以下内容
Name:         game-config-2
Namespace:    default
Labels:       <none>
Annotations:  <none>

Data
====
game.properties:
----
enemies=aliens
lives=3
enemies.cheat=true
enemies.cheat.level=noGoodRotten
secret.code.passphrase=UUDDLRLRBABAS
secret.code.allowed=true
secret.code.lives=30
Events:  <none>
可以传入多个 --from-file 参数,从多个数据源创建 ConfigMap
kubectl create configmap game-config-2 --from-file=configure-pod-container/configmap/game.properties --from-file=configure-pod-container/configmap/ui.properties
描述什么创建的game-config-2 configmap
kubectl describe configmaps game-config-2
输出类似以下内容
Name:         game-config-2
Namespace:    default
Labels:       <none>
Annotations:  <none>

Data
====
game.properties:
----
enemies=aliens
lives=3
enemies.cheat=true
enemies.cheat.level=noGoodRotten
secret.code.passphrase=UUDDLRLRBABAS
secret.code.allowed=true
secret.code.lives=30
ui.properties:
----
color.good=purple
color.bad=yellow
allow.textmode=true
how.nice.to.look=fairlyNice

Events:  <none>
使用 --from-env-file 选项从环境文件创建 ConfigMap,例如:
# 环境文件包含环境变量列表。
# 语法规则:
#   env 文件中的每一行必须为 VAR = VAL 格式。
#   以#开头的行(即注释)将被忽略。
#   空行将被忽略。
#   引号没有特殊处理(即它们将成为 ConfigMap 值的一部分)。

# 将样本文件下载到 `configure-pod-container/configmap/` 目录
wget https://kubernetes.io/examples/configmap/game-env-file.properties -O configure-pod-container/configmap/game-env-file.properties

# env文件 `game-env-file.properties` 如下所示
cat configure-pod-container/configmap/game-env-file.properties
enemies=aliens
lives=3
allowed="true"

# 注释及其上方的空行将被忽略
kubectl create configmap game-config-env-file --from-env-file=configure-pod-container/configmap/game
-env-file.properties
将产生以下ConfigMap
kubectl get configmap game-config-env-file -o yaml
输出类似以下内容
apiVersion: v1
data:
  allowed: '"true"'
  enemies: aliens
  lives: "3"
kind: ConfigMap
metadata:
  creationTimestamp: "2020-03-17T08:25:11Z"
  name: game-config-env-file
  namespace: default
  resourceVersion: "507620"
  selfLink: /api/v1/namespaces/default/configmaps/game-config-env-file
  uid: f22b64e7-2232-4c6a-aa85-afbbafb6bcac
当使用多个 --from-env-file 来从多个数据源创建 ConfigMap 时,仅仅最后一个 env 文件有效:
# 将样本文件下载到 `configure-pod-container/configmap/` 目录
wget https://k8s.io/examples/configmap/ui-env-file.properties -O configure-pod-container/configmap/ui-env-file.properties

# 创建 configmap
kubectl create configmap config-multi-env-files \
    --from-env-file=configure-pod-container/configmap/game-env-file.properties \
    --from-env-file=configure-pod-container/configmap/ui-env-file.properties
将产生以下ConfigMap
kubectl get configmap config-multi-env-files -o yaml
输出类似以下内容
apiVersion: v1
data:
  color: purple
  how: fairlyNice
  textmode: "true"
kind: ConfigMap
metadata:
  creationTimestamp: "2020-03-17T08:31:36Z"
  name: config-multi-env-files
  namespace: default
  resourceVersion: "508738"
  selfLink: /api/v1/namespaces/default/configmaps/config-multi-env-files
  uid: d09564b2-b683-455c-8360-423edd3dbbbf
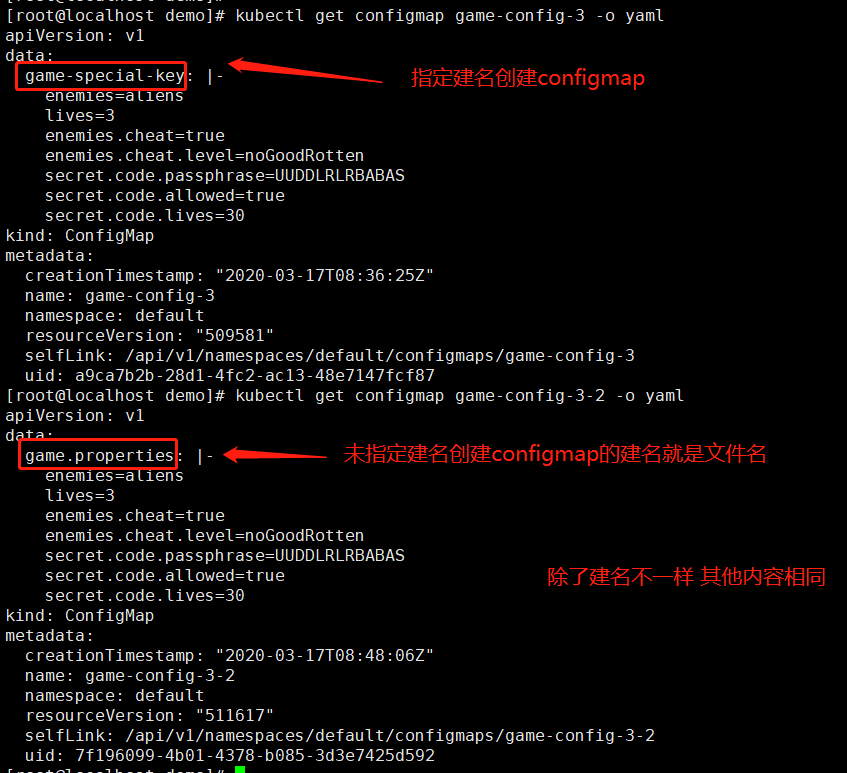
定义从文件创建 ConfigMap时要使用自定义建名
您可以在使用 --from-file 参数时,在 ConfigMap 的 data 部分中定义除文件名以外的其他键:
kubectl create configmap game-config-3 --from-file=<my-key-name>=<path-to-file>
<my-key-name> 是您要在 ConfigMap 中使用的建名, <path-to-file> 是您想要键表示数据源文件的位置。
例如
kubectl create configmap game-config-3 --from-file=game-special-key=configure-pod-container/configmap/game.properties
将产生以下ConfigMap
apiVersion: v1
data:
  game-special-key: |-
    enemies=aliens
    lives=3
    enemies.cheat=true
    enemies.cheat.level=noGoodRotten
    secret.code.passphrase=UUDDLRLRBABAS
    secret.code.allowed=true
    secret.code.lives=30
kind: ConfigMap
metadata:
  creationTimestamp: "2020-03-17T08:36:25Z"
  name: game-config-3
  namespace: default
  resourceVersion: "509581"
  selfLink: /api/v1/namespaces/default/configmaps/game-config-3
  uid: a9ca7b2b-28d1-4fc2-ac13-48e7147fcf87
PS:使用文件创建的configmap默认的建名是文件名,以上自定义了其他建名不指定建名创建做对比
kubectl create configmap game-config-3-2 --from-file=configure-pod-container/configmap/game.properties
根据文字值生成ConfigMap
您可以将 kubectl create configmap 与 --from-literal 参数一起使用,从命令行定义文字值:
kubectl create configmap special-config --from-literal=special.how=very --from-literal=special.type=charm
您可以传入多个键值对。命令行中提供的每对在 ConfigMap 的 data 部分中均表示为单独的条目。
kubectl get configmaps special-config -o yaml
输出类似以下内容
apiVersion: v1
data:
  special.how: very
  special.type: charm
kind: ConfigMap
metadata:
  creationTimestamp: "2020-03-17T08:54:43Z"
  name: special-config
  namespace: default
  resourceVersion: "512776"
  selfLink: /api/v1/namespaces/default/configmaps/special-config
  uid: b7f972bf-1eef-4c74-b496-8b90cf3476d2
根据生成器创建ConfigMap
自 1.14 开始, kubectl 开始支持 kustomization.yaml。 您还可以从生成器创建 ConfigMap,然后将其应用于 Apiserver 创建对象。生成器应在目录内的 kustomization.yaml 中指定。
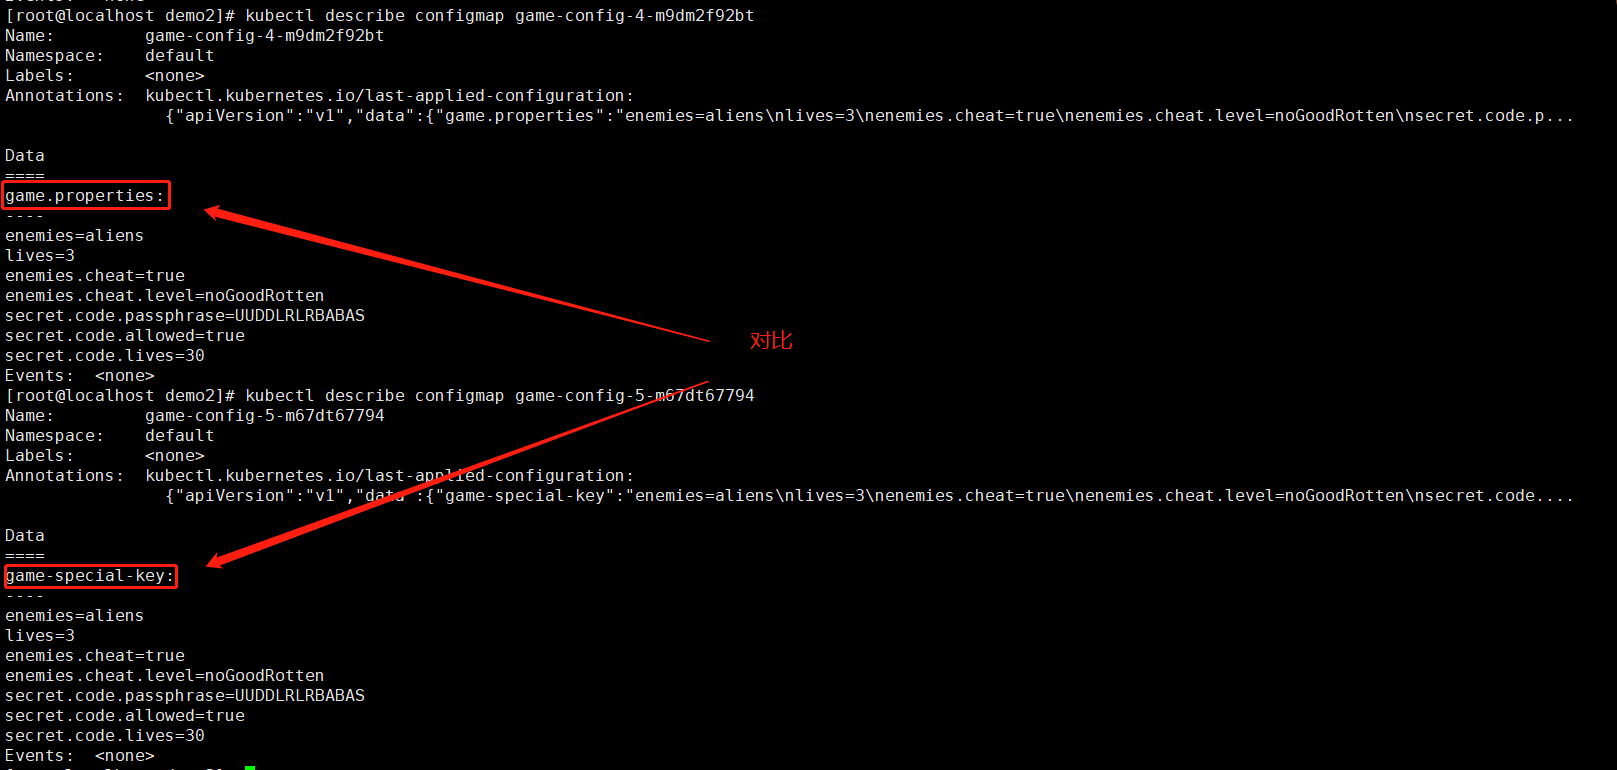
# 使用 ConfigMapGenerator 创建 kustomization.yaml 文件
cat <<EOF >./kustomization.yaml
configMapGenerator:
- name: game-config-4
  files:
  - configure-pod-container/configmap/kubectl/game.properties
EOF
使用 kustomization 目录创建 ConfigMap 对象
# kubectl apply -k .
configmap/game-config-4-m9dm2f92bt created
PS:文件kustomization.yaml需要与文件夹configure-pod-container在同一个目录并且该文件夹下面没有其他文件

可以检查ConfigMap是这样创建的
# kubectl describe configmaps/game-config-4-m9dm2f92bt
Name:         game-config-4-m9dm2f92bt
Namespace:    default
Labels:       <none>
Annotations:  kubectl.kubernetes.io/last-applied-configuration:
                {"apiVersion":"v1","data":{"game.properties":"enemies=aliens\nlives=3\nenemies.cheat=true\nenemies.cheat.level=noGoodRotten\nsecret.code.p...

Data
====
game.properties:
----
enemies=aliens
lives=3
enemies.cheat=true
enemies.cheat.level=noGoodRotten
secret.code.passphrase=UUDDLRLRBABAS
secret.code.allowed=true
secret.code.lives=30
Events:  <none>
请注意,生成的 ConfigMap 名称具有通过对内容进行散列而附加的后缀,这样可以确保每次修改内容时都会生成新的 ConfigMap。
定义从文件生成ConfigMap是要使用建名
# cat kustomization.yaml
configMapGenerator:
- name: game-config-5
  files:
  - game-special-key=configure-pod-container/configmap/kubectl/game.properties
使用 Kustomization 目录创建 ConfigMap 对象
kubectl apply -k .
configmap/game-config-5-m67dt67794 created
对比
从文字生成CofigMap
#cat kustomization.yaml
configMapGenerator:
- name: special-config-2
  literals:
  - special.how=very
  - special.type=charm
使用 Kustomization 目录创建 ConfigMap 对象。
kubectl apply -k .
kubectl describe configmap special-config-2-c92b5mmcf2
输出类似以下内容
Name:         special-config-2-c92b5mmcf2
Namespace:    default
Labels:       <none>
Annotations:  kubectl.kubernetes.io/last-applied-configuration:
                {"apiVersion":"v1","data":{"special.how":"very","special.type":"charm"},"kind":"ConfigMap","metadata":{"annotations":{},"name":"special-co...

Data
====
special.how:
----
very
special.type:
----
charm
Events:  <none>
使用 ConfigMap 数据定义容器环境变量