- 摄像头校正
import numpy as np
import cv2 as cv
import glob
# termination criteria
criteria = (cv.TERM_CRITERIA_EPS + cv.TERM_CRITERIA_MAX_ITER, 30, 0.001)
# prepare object points, like (0,0,0), (1,0,0), (2,0,0) ....,(6,5,0)
objp = np.zeros((6*7,3), np.float32)
objp[:,:2] = np.mgrid[0:7,0:6].T.reshape(-1,2)
# Arrays to store object points and image points from all the images.
objpoints = [] # 3d point in real world space
imgpoints = [] # 2d points in image plane.
images = glob.glob('*.jpg')
for fname in images:
    img = cv.imread(fname)
    gray = cv.cvtColor(img, cv.COLOR_BGR2GRAY)
    # Find the chess board corners
    ret, corners = cv.findChessboardCorners(gray, (7,6), None)
    # If found, add object points, image points (after refining them)
    if ret == True:
        objpoints.append(objp)
        corners2 = cv.cornerSubPix(gray,corners, (11,11), (-1,-1), criteria)
        imgpoints.append(corners)
        # Draw and display the corners
        cv.drawChessboardCorners(img, (7,6), corners2, ret)
        cv.imshow('img', img)
        cv.waitKey(500)
cv.destroyAllWindows()
校正
img = cv.imread('left12.jpg')
h,  w = img.shape[:2]
newcameramtx, roi = cv.getOptimalNewCameraMatrix(mtx, dist, (w,h), 1, (w,h))
不失真
img = cv.imread('left12.jpg')
h,  w = img.shape[:2]
newcameramtx, roi = cv.getOptimalNewCameraMatrix(mtx, dist, (w,h), 1, (w,h))
使用cv.undistort()
# undistort
dst = cv.undistort(img, mtx, dist, None, newcameramtx)
# crop the image
x, y, w, h = roi
dst = dst[y:y+h, x:x+w]
cv.imwrite('calibresult.png', dst)
重新画图
# undistort
mapx, mapy = cv.initUndistortRectifyMap(mtx, dist, None, newcameramtx, (w,h), 5)
dst = cv.remap(img, mapx, mapy, cv.INTER_LINEAR)
# crop the image
x, y, w, h = roi
dst = dst[y:y+h, x:x+w]
cv.imwrite('calibresult.png', dst)

重新投影误差
cv.projectPoints().
mean_error = 0
for i in xrange(len(objpoints)):
    imgpoints2, _ = cv.projectPoints(objpoints[i], rvecs[i], tvecs[i], mtx, dist)
    error = cv.norm(imgpoints[i], imgpoints2, cv.NORM_L2)/len(imgpoints2)
    mean_error += error
print( "total error: {}".format(mean_error/len(objpoints)) )
https://docs.opencv.org/3.4/dc/dbb/tutorial_py_calibration.html
- 状态评估
对图片进行3D 构图
import numpy as np
import cv2 as cv
import glob
# Load previously saved data
with np.load('B.npz') as X:
    mtx, dist, _, _ = [X[i] for i in ('mtx','dist','rvecs','tvecs')]
cv.findChessboardCorners()
def draw(img, corners, imgpts):
    corner = tuple(corners[0].ravel())
    img = cv.line(img, corner, tuple(imgpts[0].ravel()), (255,0,0), 5)
    img = cv.line(img, corner, tuple(imgpts[1].ravel()), (0,255,0), 5)
    img = cv.line(img, corner, tuple(imgpts[2].ravel()), (0,0,255), 5)
    return img
criteria = (cv.TERM_CRITERIA_EPS + cv.TERM_CRITERIA_MAX_ITER, 30, 0.001)
objp = np.zeros((6*7,3), np.float32)
objp[:,:2] = np.mgrid[0:7,0:6].T.reshape(-1,2)
axis = np.float32([[3,0,0], [0,3,0], [0,0,-3]]).reshape(-1,3)
cv.solvePnPRansac().
for fname in glob.glob('left*.jpg'):
    img = cv.imread(fname)
    gray = cv.cvtColor(img,cv.COLOR_BGR2GRAY)
    ret, corners = cv.findChessboardCorners(gray, (7,6),None)
    if ret == True:
        corners2 = cv.cornerSubPix(gray,corners,(11,11),(-1,-1),criteria)
        # Find the rotation and translation vectors.
        ret,rvecs, tvecs = cv.solvePnP(objp, corners2, mtx, dist)
        # project 3D points to image plane
        imgpts, jac = cv.projectPoints(axis, rvecs, tvecs, mtx, dist)
        img = draw(img,corners2,imgpts)
        cv.imshow('img',img)
        k = cv.waitKey(0) & 0xFF
        if k == ord('s'):
            cv.imwrite(fname[:6]+'.png', img)
cv.destroyAllWindows()

在图片画出一个立方
def draw(img, corners, imgpts):
    imgpts = np.int32(imgpts).reshape(-1,2)
    # draw ground floor in green
    img = cv.drawContours(img, [imgpts[:4]],-1,(0,255,0),-3)
    # draw pillars in blue color
    for i,j in zip(range(4),range(4,8)):
        img = cv.line(img, tuple(imgpts[i]), tuple(imgpts[j]),(255),3)
    # draw top layer in red color
    img = cv.drawContours(img, [imgpts[4:]],-1,(0,0,255),3)
    return img
修改8个坐标角
axis = np.float32([[0,0,0], [0,3,0], [3,3,0], [3,0,0],
                   [0,0,-3],[0,3,-3],[3,3,-3],[3,0,-3] ])

https://docs.opencv.org/3.4/d7/d53/tutorial_py_pose.html
- 对极几何构建(使用两个摄像头)
基本概念
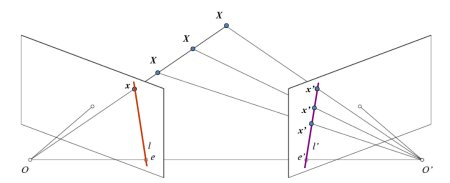
使用 SIFT找到多个可能匹配模型的矩阵
扫描二维码关注公众号,回复:
9865968 查看本文章

import numpy as np
import cv2 as cv
from matplotlib import pyplot as plt
img1 = cv.imread('myleft.jpg',0)  #queryimage # left image
img2 = cv.imread('myright.jpg',0) #trainimage # right image
sift = cv.SIFT()
# find the keypoints and descriptors with SIFT
kp1, des1 = sift.detectAndCompute(img1,None)
kp2, des2 = sift.detectAndCompute(img2,None)
# FLANN parameters
FLANN_INDEX_KDTREE = 1
index_params = dict(algorithm = FLANN_INDEX_KDTREE, trees = 5)
search_params = dict(checks=50)
flann = cv.FlannBasedMatcher(index_params,search_params)
matches = flann.knnMatch(des1,des2,k=2)
good = []
pts1 = []
pts2 = []
# ratio test as per Lowe's paper
for i,(m,n) in enumerate(matches):
    if m.distance < 0.8*n.distance:
        good.append(m)
        pts2.append(kp2[m.trainIdx].pt)
        pts1.append(kp1[m.queryIdx].pt)
再从中找出最好的
pts1 = np.int32(pts1)
pts2 = np.int32(pts2)
F, mask = cv.findFundamentalMat(pts1,pts2,cv.FM_LMEDS)
# We select only inlier points
pts1 = pts1[mask.ravel()==1]
pts2 = pts2[mask.ravel()==1]
对极投影线,在第一张图片基础上画出另一张
def drawlines(img1,img2,lines,pts1,pts2):
    ''' img1 - image on which we draw the epilines for the points in img2
        lines - corresponding epilines '''
    r,c = img1.shape
    img1 = cv.cvtColor(img1,cv.COLOR_GRAY2BGR)
    img2 = cv.cvtColor(img2,cv.COLOR_GRAY2BGR)
    for r,pt1,pt2 in zip(lines,pts1,pts2):
        color = tuple(np.random.randint(0,255,3).tolist())
        x0,y0 = map(int, [0, -r[2]/r[1] ])
        x1,y1 = map(int, [c, -(r[2]+r[0]*c)/r[1] ])
        img1 = cv.line(img1, (x0,y0), (x1,y1), color,1)
        img1 = cv.circle(img1,tuple(pt1),5,color,-1)
        img2 = cv.circle(img2,tuple(pt2),5,color,-1)
    return img1,img2
绘画出两张对极图片
# Find epilines corresponding to points in right image (second image) and
# drawing its lines on left image
lines1 = cv.computeCorrespondEpilines(pts2.reshape(-1,1,2), 2,F)
lines1 = lines1.reshape(-1,3)
img5,img6 = drawlines(img1,img2,lines1,pts1,pts2)
# Find epilines corresponding to points in left image (first image) and
# drawing its lines on right image
lines2 = cv.computeCorrespondEpilines(pts1.reshape(-1,1,2), 1,F)
lines2 = lines2.reshape(-1,3)
img3,img4 = drawlines(img2,img1,lines2,pts2,pts1)
plt.subplot(121),plt.imshow(img5)
plt.subplot(122),plt.imshow(img3)
plt.show()

https://docs.opencv.org/3.4/da/de9/tutorial_py_epipolar_geometry.html
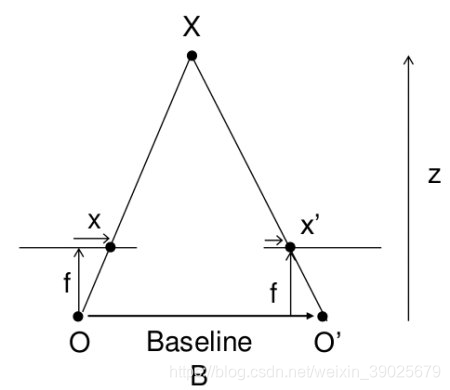
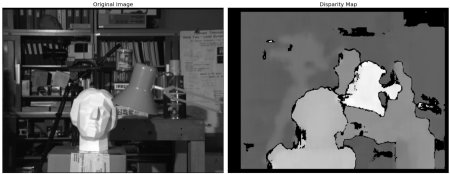
- 对立体图绘画海拔高度图
import numpy as np
import cv2 as cv
from matplotlib import pyplot as plt
imgL = cv.imread('tsukuba_l.png',0)
imgR = cv.imread('tsukuba_r.png',0)
stereo = cv.StereoBM_create(numDisparities=16, blockSize=15)
disparity = stereo.compute(imgL,imgR)
plt.imshow(disparity,'gray')
plt.show()
https://docs.opencv.org/3.4/dd/d53/tutorial_py_depthmap.html
