3.Thymeleaf基本语法
(1)th:action
定义后台控制器路径,类似 标签的action属性。
例如:
<form th:action="@{/test/hello}" >
	<input th:type="text" th:name="id">
	<button>提交</button>
</form>
(2)th:each
对象遍历,功能类似jstl中的 <c:forEach> 标签。
创建com.itheima.model.User,代码如下:
public class User {
	private Integer id;
	private String name;
	private String address;
	//..get..set
}
Controller添加数据
package com.piziwang.thymeleaf.controller;

import com.piziwang.thymeleaf.pojo.User;
import org.springframework.stereotype.Controller;
import org.springframework.ui.Model;
import org.springframework.web.bind.annotation.GetMapping;
import org.springframework.web.bind.annotation.RequestMapping;

import java.util.*;

@Controller
@RequestMapping("/demo")
public class TestController {

    @GetMapping("/test")
    public String test(Model model,String id){
        System.out.println(id);

        List<User> userList = new ArrayList<>();
        userList.add(new User(1,"zs","bj"));
        userList.add(new User(2,"ls","hlj"));
        userList.add(new User(3,"ww","haerbin"));
        model.addAttribute("userList",userList);

        return "demo";
    }
}
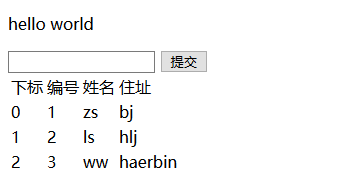
页面输出
<!DOCTYPE html>
<html xmlns:th="http://www.thymeleaf.org">
<head>
    <meta charset="UTF-8">
    <title>Title</title>
</head>
<body>
<p th:text="${hello}"></p>
<form th:action="@{/demo/test}">
    <input th:type="text" th:name="id">
    <button>提交</button>
</form>
<table>
    <tr>
        <td>下标</td>
        <td>编号</td>
        <td>姓名</td>
        <td>住址</td>
    </tr>
    <tr th:each="user,userStat:${userList}">
        <td>
            <span th:text="${userStat.index}"></span>
        </td>
        <td th:text="${user.id}"></td>
        <td th:text="${user.name}"></td>
        <td th:text="${user.address}"></td>
    </tr>
</table>
</body>
</html>
测试效果
(3)Map输出
后台添加map
Map<String,Object> dataMap = new HashMap<String,Object>();
dataMap.put("No","123");
dataMap.put("address","深圳");
model.addAttribute("dataMap",dataMap);
<div th:each="map,mapStat:${dataMap}">
    <div th:text="${map}"></div>
    key:<span th:text="${mapStat.current.key}"></span><br/>
    value:<span th:text="${mapStat.current.value}"></span><br/>
    ==============================================
</div>
测试效果:
![[外链图片转存失败,源站可能有防盗链机制,建议将图片保存下来直接上传(img-lQsFtDkN-1581432169109)(C:\Users\yuwendeng\AppData\Roaming\Typora\typora-user-images\1581424658724.png)]](https://img-blog.csdnimg.cn/20200211224507969.png)
(4)数组输出
后台添加数组
String[] names={"张三","里斯","王麻子"};
model.addAttribute("names",names);
页面输出 :
<div th:each="nm,nmStat:${names}">
    <span th:text="${nmStat.count}"></span><span th:text="${nm}"></span>
    ==============================================
</div>
测试效果:

(6)th:if条件
//if条件
model.addAttribute("age",20);
页面输出
<div>
    <span th:if="${(age>=18)}">终于长大了!</span>
</div>
测试效果:
(7)th:fragment 定义一个模块
可以定义一个独立的模块,创建一个footer.html代码如下
<!DOCTYPE html>
<html xmlns:th="http://www.thymeleaf.org">
<head>
    <meta charset="UTF-8">
    <title>fragment</title>
</head>
<body>
<div id="C" th:fragment="copy">
    关于我们<br/>
</div>
</body>
</html>
(8)th:include
可以直接引入 th:fragment ,在demo1.html中引入如下代码:
<div id="A" th:include="footer::copy"></div>
效果如下:
opy">
关于我们
(8)th:include
可以直接引入 th:fragment ,在demo1.html中引入如下代码:
<div id="A" th:include="footer::copy"></div>
效果如下:

