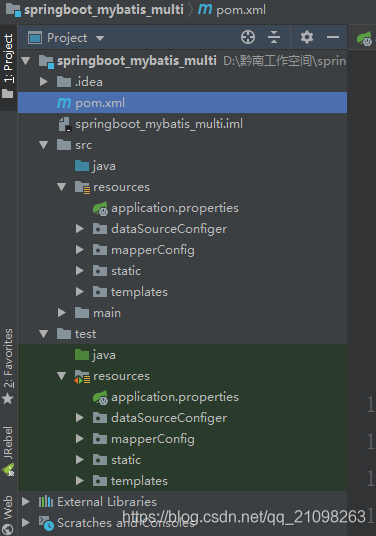
1. 创建Maven工程,项目结构如下:
2. 导入依赖配置文件:
    <?xml version="1.0" encoding="UTF-8"?>

<project xmlns="http://maven.apache.org/POM/4.0.0" xmlns:xsi="http://www.w3.org/2001/XMLSchema-instance"
  xsi:schemaLocation="http://maven.apache.org/POM/4.0.0 http://maven.apache.org/xsd/maven-4.0.0.xsd">
  <modelVersion>4.0.0</modelVersion>

  <groupId>com.tedu.cn</groupId>
  <artifactId>springboot_mybatis_multi</artifactId>
  <version>1.0-SNAPSHOT</version>
  <packaging>war</packaging>

  <name>springboot_mybatis_multi Maven Webapp</name>
  <!-- FIXME change it to the project's website -->
  <url>http://www.example.com</url>
  <parent>
    <groupId>org.springframework.boot</groupId>
    <artifactId>spring-boot-parent</artifactId>
    <version>2.1.3.RELEASE</version>
  </parent>
  <properties>
    <project.build.sourceEncoding>UTF-8</project.build.sourceEncoding>
    <maven.compiler.source>1.7</maven.compiler.source>
    <maven.compiler.target>1.7</maven.compiler.target>
  </properties>

  <dependencies>
    <dependency>
      <groupId>junit</groupId>
      <artifactId>junit</artifactId>
      <version>4.12</version>
      <scope>test</scope>
    </dependency>
    <!--引入springboot web开发模块-->
    <dependency>
      <groupId>org.springframework.boot</groupId>
      <artifactId>spring-boot-starter-web</artifactId>
    </dependency>
    <!--添加springboot thymeleaf模块-->
    <dependency>
      <groupId>org.springframework.boot</groupId>
      <artifactId>spring-boot-starter-thymeleaf</artifactId>
    </dependency>
    <!--引入springboot对jdbc的依赖-->
    <dependency>
      <groupId>org.springframework.boot</groupId>
      <artifactId>spring-boot-starter-jdbc</artifactId>
    </dependency>
    <!--引入mybatis-springboot整合模块-->
    <dependency>
      <groupId>org.mybatis.spring.boot</groupId>
      <artifactId>mybatis-spring-boot-starter</artifactId>
      <version>1.1.1</version>
    </dependency>
    <!-- 引入mysql驱动-->
    <dependency>
      <groupId>mysql</groupId>
      <artifactId>mysql-connector-java</artifactId>
      <version>5.1.35</version>
    </dependency>
    <!--引入阿里巴巴druid连接池-->
    <dependency>
      <groupId>com.alibaba</groupId>
      <artifactId>druid</artifactId>
      <version>0.2.9</version>
    </dependency>
    <!-- 分页插件pagehelper -->
    <dependency>
      <groupId>com.github.pagehelper</groupId>
      <artifactId>pagehelper</artifactId>
      <version>5.0.0</version>
    </dependency>
    <dependency>
      <groupId>com.github.pagehelper</groupId>
      <artifactId>pagehelper-spring-boot-autoconfigure</artifactId>
      <version>1.2.3</version>
    </dependency>
    <dependency>
      <groupId>com.github.pagehelper</groupId>
      <artifactId>pagehelper-spring-boot-starter</artifactId>
      <version>1.2.3</version>
    </dependency>
  </dependencies>

  <build>
    <finalName>springboot_mybatis_multi</finalName>
    <pluginManagement><!-- lock down plugins versions to avoid using Maven defaults (may be moved to parent pom) -->
      <plugins>
        <plugin>
          <artifactId>maven-clean-plugin</artifactId>
          <version>3.1.0</version>
        </plugin>
        <!-- see http://maven.apache.org/ref/current/maven-core/default-bindings.html#Plugin_bindings_for_war_packaging -->
        <plugin>
          <artifactId>maven-resources-plugin</artifactId>
          <version>3.0.2</version>
        </plugin>
        <plugin>
          <artifactId>maven-compiler-plugin</artifactId>
          <version>3.8.0</version>
        </plugin>
        <plugin>
          <artifactId>maven-surefire-plugin</artifactId>
          <version>2.22.1</version>
        </plugin>
        <plugin>
          <artifactId>maven-war-plugin</artifactId>
          <version>3.2.2</version>
        </plugin>
        <plugin>
          <artifactId>maven-install-plugin</artifactId>
          <version>2.5.2</version>
        </plugin>
        <plugin>
          <artifactId>maven-deploy-plugin</artifactId>
          <version>2.8.2</version>
        </plugin>
      </plugins>
    </pluginManagement>
  </build>
</project>
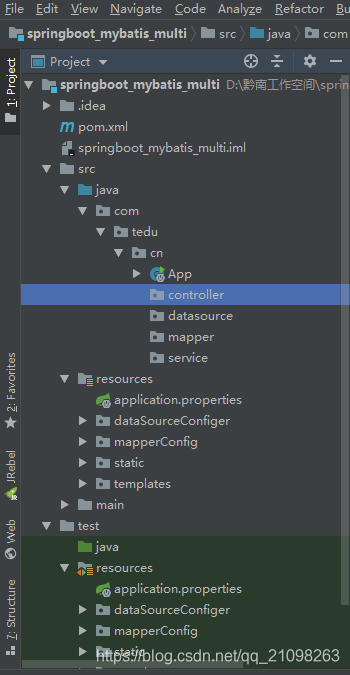
3.在src/main/Java目录下创建如下包,和类
App.java代码如下:
package com.tedu.cn;

import org.springframework.boot.SpringApplication;
import org.springframework.boot.autoconfigure.SpringBootApplication;

/**
 * @phone:13595672347
 * @qq:1441826270
 * @作者:雷玉荣
 * @company: 贵州达内科技有限公司
 * @program 程序 = 数据结构 + 算法 (构成元素 + 运行机理)
 * @comment 达内教育专注于做技术人的指路明灯,
 * 职场生涯的精神导师
 * @date 2019/5/16 11:23
 */
@SpringBootApplication
public class App {
    public static void main(String[] args) {
        //启动主程序入口
        SpringApplication.run(App.class,args);
    }
}
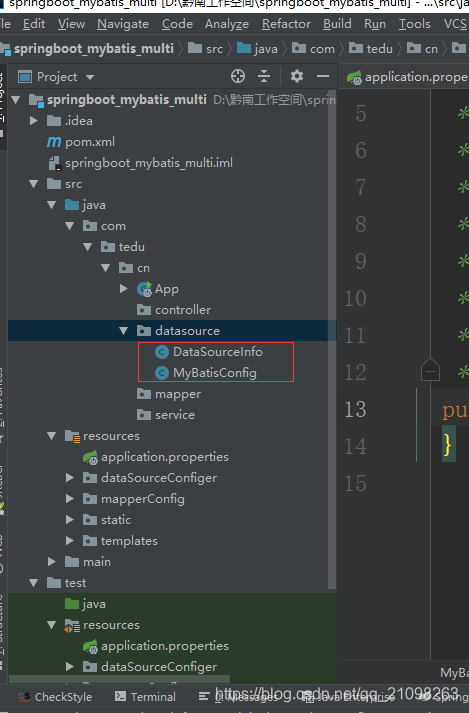
4.在datasource包下创建如下类
DataSourceInfo代码:
    package com.tedu.cn.datasource;

import com.alibaba.druid.pool.DruidDataSource;
import org.springframework.boot.SpringBootConfiguration;
import org.springframework.boot.context.properties.ConfigurationProperties;
import org.springframework.context.annotation.Bean;
import org.springframework.context.annotation.PropertySource;

import javax.sql.DataSource;

/**
 * @phone:13595672347
 * @qq:1441826270
 * @作者:雷玉荣
 * @company: 贵州达内科技有限公司
 * @program 程序 = 数据结构 + 算法 (构成元素 + 运行机理)
 * @comment 达内教育专注于做技术人的指路明灯,
 * 职场生涯的精神导师
 * @date 2019/5/16 11:26
 */
@SpringBootConfiguration
@PropertySource(value = "classpath:/dataSourceConfiger/Durid.properties")
public class DataSourceInfo {
    /**
     * 向容器添加第一个数据源
     * @return
     */
    @ConfigurationProperties(prefix = "spring.datasource.local")
    @Bean(name="local")
    public DataSource getDataSourceLocal(){
       return new DruidDataSource();
    }

    /**
     * 向容器添加第二个数据源
     * @return
     */
    @ConfigurationProperties(prefix = "spring.datasource.remove")
    @Bean(name="remove")
    public DataSource getDataSourceRemove(){
        return new DruidDataSource();
    }
}
MyBatisConfig代码:
    package com.tedu.cn.datasource;

import com.alibaba.druid.pool.DruidDataSource;
import org.springframework.boot.SpringBootConfiguration;
import org.springframework.boot.context.properties.ConfigurationProperties;
import org.springframework.context.annotation.Bean;
import org.springframework.context.annotation.PropertySource;

import javax.sql.DataSource;

/**
 * @phone:13595672347
 * @qq:1441826270
 * @作者:雷玉荣
 * @company: 贵州达内科技有限公司
 * @program 程序 = 数据结构 + 算法 (构成元素 + 运行机理)
 * @comment 达内教育专注于做技术人的指路明灯,
 * 职场生涯的精神导师
 * @date 2019/5/16 11:26
 */
@SpringBootConfiguration
@PropertySource(value = "classpath:/dataSourceConfiger/Durid.properties")
public class DataSourceInfo {
    /**
     * 向容器添加第一个数据源
     * @return
     */
    @ConfigurationProperties(prefix = "spring.datasource.local")
    @Bean(name="local")
    public DataSource getDataSourceLocal(){
       return new DruidDataSource();
    }

    /**
     * 向容器添加第二个数据源
     * @return
     */
    @ConfigurationProperties(prefix = "spring.datasource.remove")
    @Bean(name="remove")
    public DataSource getDataSourceRemove(){
        return new DruidDataSource();
    }
}
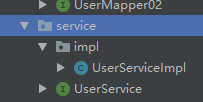
5.mapper包下创建如下接口
    package com.tedu.cn.localmapper;

import com.tedu.cn.entity.User;
import org.apache.ibatis.annotations.Insert;

/**
 * @phone:13595672347
 * @qq:1441826270
 * @作者:雷玉荣
 * @company: 贵州达内科技有限公司
 * @program 程序 = 数据结构 + 算法 (构成元素 + 运行机理)
 * @comment 达内教育专注于做技术人的指路明灯,
 * 职场生涯的精神导师
 * @date 2019/5/16 12:20
 */
public interface UserMapper01 {
    @Insert(value = {
            "insert into cn_user(cn_user_id,cn_user_name,cn_user_password) values(#{cn_user_id},#{cn_user_name},#{cn_user_password})"
    })
    void insertUserFromLocal(User user);
}
service包下创建如下接口和自包
UserService代码如下:
package com.tedu.cn.service;
import com.tedu.cn.entity.User;
public interface UserService {

    User addUserLocal(User user);
    User addUserRemove(User user);
}
UserServiceImpl代码如下:
    package com.tedu.cn.service.impl;

import com.tedu.cn.entity.User;
import com.tedu.cn.localmapper.UserMapper01;
import com.tedu.cn.removemapper.UserMapper02;
import com.tedu.cn.service.UserService;
import org.mybatis.spring.SqlSessionTemplate;
import org.springframework.beans.factory.annotation.Autowired;
import org.springframework.beans.factory.annotation.Qualifier;
import org.springframework.stereotype.Service;
import org.springframework.transaction.annotation.Transactional;

import java.util.UUID;

/**
 * @phone:13595672347
 * @qq:1441826270
 * @作者:雷玉荣
 * @company: 贵州达内科技有限公司
 * @program 程序 = 数据结构 + 算法 (构成元素 + 运行机理)
 * @comment 达内教育专注于做技术人的指路明灯,
 * 职场生涯的精神导师
 * @date 2019/5/17 17:01
 */
@Service
public class UserServiceImpl implements UserService {
    @Autowired
    @Qualifier("localSessionTemplate")
    private SqlSessionTemplate local;
    @Autowired
    @Qualifier("removeSessionTemplate")
    private SqlSessionTemplate remove;
    @Override
    @Transactional(transactionManager = "test_manager01")
    public User addUserLocal(User user) {
        user.setCn_user_id(UUID.randomUUID().toString());
        UserMapper01 mapper1=local.getMapper(UserMapper01.class);
        UserMapper02 mapper2=remove.getMapper(UserMapper02.class);
        mapper1.insertUserFromLocal(user);
        mapper2.insertUserFromRemove(user);
        return user;

    }
    @Override
    public User addUserRemove(User user) {
        return null;
    }
}
编写测试Controller
代码如下:
    package com.tedu.cn.controller;

import com.tedu.cn.entity.User;
import com.tedu.cn.service.UserService;
import org.springframework.beans.factory.annotation.Autowired;
import org.springframework.web.bind.annotation.RequestMapping;
import org.springframework.web.bind.annotation.RestController;

/**
 * @phone:13595672347
 * @qq:1441826270
 * @作者:雷玉荣
 * @company: 贵州达内科技有限公司
 * @program 程序 = 数据结构 + 算法 (构成元素 + 运行机理)
 * @comment 达内教育专注于做技术人的指路明灯,
 * 职场生涯的精神导师
 * @date 2019/5/17 17:13
 */
@RestController
public class TestController {
    @Autowired
    private UserService userService;
    @RequestMapping("/insert.action")
    public User testInsertUser(User user){
        return userService.addUserLocal(user);
    }
}
