前言:在上一篇文章里面我们进行了spring boot 和 mybatis 的整合 《springboot整合mybatis使用druid数据源》, 文中是使用的单数据源,因为项目中有很多需要用到多数据源的场景,比如主从同步(读写分离), 或者业务库拆分等,这样就需要操作不同的数据库,所以,集成多数据源就很有必要了。
网上关于 spring boot mybatis druid 多数据源的文章很多,我这里也借鉴了不少,不过也踩过各种坑,所以我在这里会将详细步骤和注意事项尽量描述清楚,希望能给需要的朋友提供一点思路和帮助。
一:开发环境: spring boot 1.5.7.RELEASE springboot-mybatis 1.3.2 druid-spring-boot-starter 1.1.5 mysql 5.7 系列
二:spring boot 和 mybatis 、druid整合我这里不再赘述,参考我上一篇文章,下面直接开始多数据源的整合。
2.1:首先配置文件 application.yml 需要更改内容,增加多数据源 one 和 two
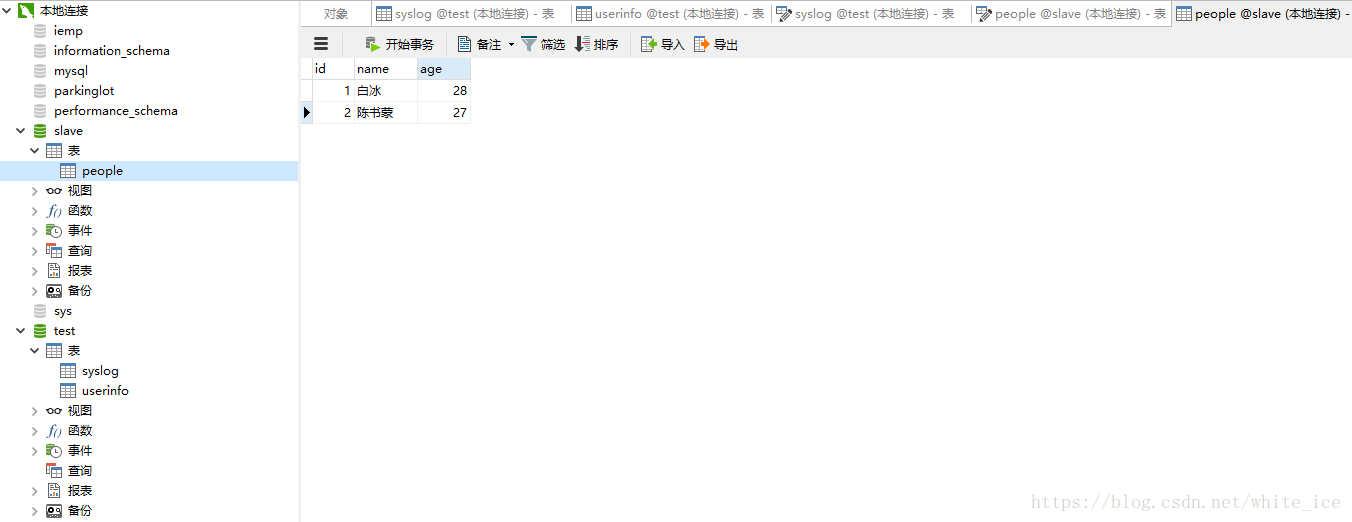
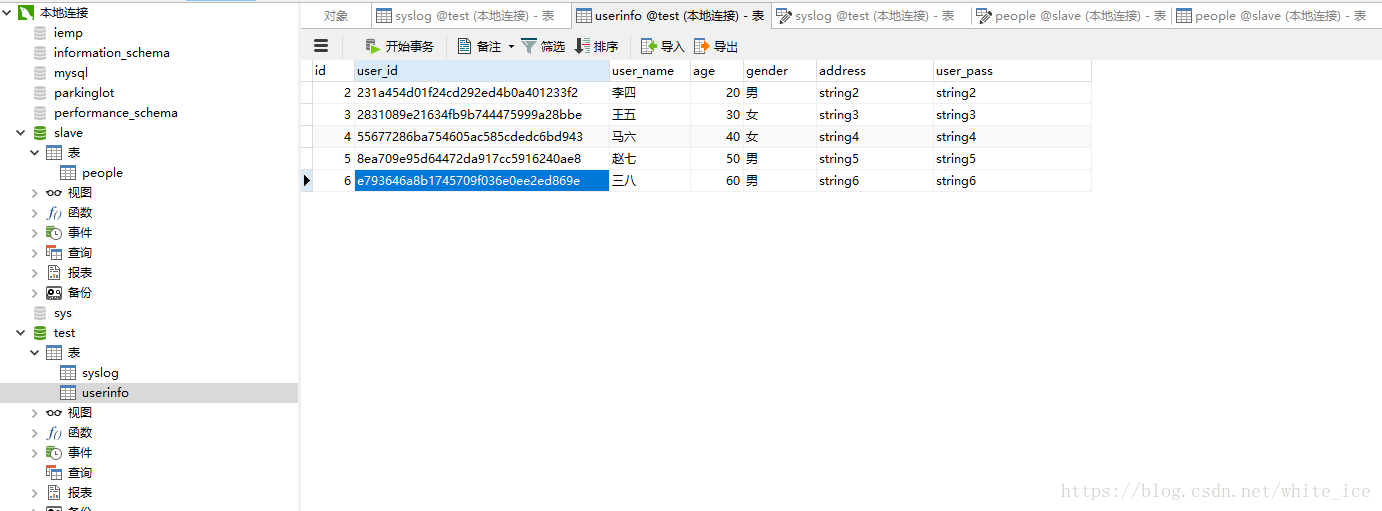
server:
  port: 8088
  context-path: /yjbj

## 配置数据源相关信息
spring:
  datasource:
    type: com.alibaba.druid.pool.DruidDataSource
    druid:
      ## 连接池配置
      filters: stat
      maxActive: 20
      initialSize: 1
      maxWait: 60000
      minIdle: 1
      timeBetweenEvictionRunsMillis: 60000
      minEvictableIdleTimeMillis: 300000
      validationQuery: select 'x'
      testWhileIdle: true
      testOnBorrow: false
      testOnReturn: false
      poolPreparedStatements: true
      maxOpenPreparedStatements: 20
      one:
        ## 数据源one配置
        name: DBconfig1
        url: jdbc:mysql://127.0.0.1:3306/test?useUnicode=true&characterEncoding=utf8&useSSL=false
        username: ***
        password: ******
        driver-class-name: com.mysql.jdbc.Driver
      two:
        ## 数据源two配置
        name: DBconfig2
        url: jdbc:mysql://127.0.0.1:3306/slave?useUnicode=true&characterEncoding=utf8&useSSL=false
        username: ***
        password: ******
        driver-class-name: com.mysql.jdbc.Driver
  redis:
    host: 127.0.0.1  # redis服务所在的地址
    port: 6379
    password:   # redis的密码默认为空
    pool:
      max-active: 8  #连接池最大连接数(使用负值表示没有限制)
      max-idle: 8  #连接池最大空闲数
      min-idle: 1  #连接池最小空闲数
      max-wait: 60000  #获取连接的超时等待事件
    timeout: 30000  #连接redis服务器的最大等待时间
  druid: #druid监控页面用户名和密码
    name: admin
    pass: sailing123

## 该配置节点为独立的节点
mybatis:
  mapper-locations: classpath:mapperXML/*.xml  # 注意:一定要对应mapper映射xml文件的所在路径
  config-location: classpath:MybatisConfig.xml # 注意: mybatis的配置文件
  type-aliases-package: com.sailing.springbootmybatis.bean # 注意:对应实体类的路径

## 配置mybatis分页插件
pagehelper:
  helperDialect: mysql
  reasonable: true
  support-methods-arguments: true
  params: count=conutSql
2.2:编写数据源的配置类,这里有两个数据源,所以需要两个配置类,DataSourceOneConifg 和 DataSourceTwoConifg,内容分别如下:
package com.sailing.springbootmybatis.config;

import com.alibaba.druid.spring.boot.autoconfigure.DruidDataSourceBuilder;
import org.apache.ibatis.session.SqlSessionFactory;
import org.mybatis.spring.SqlSessionFactoryBean;
import org.mybatis.spring.SqlSessionTemplate;
import org.mybatis.spring.annotation.MapperScan;
import org.slf4j.Logger;
import org.slf4j.LoggerFactory;
import org.springframework.beans.factory.annotation.Qualifier;
import org.springframework.beans.factory.annotation.Value;
import org.springframework.boot.context.properties.ConfigurationProperties;
import org.springframework.context.annotation.Bean;
import org.springframework.context.annotation.Configuration;
import org.springframework.context.annotation.Primary;
import org.springframework.core.io.support.PathMatchingResourcePatternResolver;

import javax.sql.DataSource;

/**
 * @author baibing
 * @project: springboot-mybatis
 * @package: com.sailing.springbootmybatis.config
 * @Description: one数据源配置类
 * @date 2018/10/18 17:05
 */
@Configuration
//下面的sqlSessionTemplateRef 值需要和生成的SqlSessionTemplate bean name相同,如果没有指定name,那么就是方法名
@MapperScan(basePackages = {"com.sailing.springbootmybatis.mapper.one"}, sqlSessionTemplateRef = "sqlSessionTemplateOne")
public class DataSourceOneConfig {

    @Value("${mybatis.mapper-locations}")
    private String mapper_location;

    @Value("${mybatis.config-location}")
    private String mybatis_config;

    private Logger logger = LoggerFactory.getLogger(DataSourceOneConfig.class);

    @Primary
    @Bean(name = "datasourceOne")
    @ConfigurationProperties(prefix = "spring.datasource.druid.one")
    public DataSource datasourceOne() {
        return DruidDataSourceBuilder.create().build();
    }

    @Bean
    public SqlSessionFactory sqlSessionFactoryOne(@Qualifier("datasourceOne") DataSource dataSource) throws Exception {
        logger.info("mapper文件地址:" + mapper_location);
        logger.info("mybatis配置文件地址:" + mybatis_config);
        //在基本的 MyBatis 中,session 工厂可以使用 SqlSessionFactoryBuilder 来创建。
        // 而在 MyBatis-spring 中,则使用SqlSessionFactoryBean 来替代:
        SqlSessionFactoryBean bean = new SqlSessionFactoryBean();
        bean.setDataSource(dataSource);
        //如果重写了 SqlSessionFactory 需要在初始化的时候手动将 mapper 地址 set到 factory 中,否则会报错:
        //org.apache.ibatis.binding.BindingException: Invalid bound statement (not found)
        bean.setMapperLocations(new PathMatchingResourcePatternResolver().getResources(mapper_location));
        bean.setConfigLocation(new PathMatchingResourcePatternResolver().getResource(mybatis_config));
        return bean.getObject();
    }

    /**
     * SqlSessionTemplate 是 SqlSession接口的实现类,是spring-mybatis中的,实现了SqlSession线程安全
     *
     * @param sqlSessionFactory
     * @return
     */
    @Bean
    public SqlSessionTemplate sqlSessionTemplateOne(@Qualifier("sqlSessionFactoryOne") SqlSessionFactory sqlSessionFactory) {
        SqlSessionTemplate template = new SqlSessionTemplate(sqlSessionFactory);
        return template;
    }
}
package com.sailing.springbootmybatis.config;

import com.alibaba.druid.spring.boot.autoconfigure.DruidDataSourceBuilder;
import org.apache.ibatis.session.SqlSessionFactory;
import org.mybatis.spring.SqlSessionFactoryBean;
import org.mybatis.spring.SqlSessionTemplate;
import org.mybatis.spring.annotation.MapperScan;
import org.springframework.beans.factory.annotation.Qualifier;
import org.springframework.beans.factory.annotation.Value;
import org.springframework.boot.context.properties.ConfigurationProperties;
import org.springframework.context.annotation.Bean;
import org.springframework.context.annotation.Configuration;
import org.springframework.core.io.support.PathMatchingResourcePatternResolver;

import javax.sql.DataSource;

/**
 * @author baibing
 * @project: springboot-mybatis
 * @package: com.sailing.springbootmybatis.config
 * @Description: two数据源配置类
 * @date 2018/10/18 17:28
 */
@Configuration
@MapperScan(basePackages = {"com.sailing.springbootmybatis.mapper.two"}, sqlSessionTemplateRef = "sqlSessionTemplateTwo")
public class DataSourceTwoConfig {

    @Value("${mybatis.mapper-locations}")
    private String mapper_location;

    @Bean(name = "dataSourceTwo")
    @ConfigurationProperties(prefix = "spring.datasource.druid.two")
    public DataSource dataSourceTwo() {
        return DruidDataSourceBuilder.create().build();
    }

    @Bean
    public SqlSessionFactory sqlSessionFactoryTwo(@Qualifier("dataSourceTwo") DataSource dataSource) throws Exception {
        SqlSessionFactoryBean bean = new SqlSessionFactoryBean();
        bean.setDataSource(dataSource);
        //如果重写了 SqlSessionFactory 需要在初始化的时候手动将 mapper 地址 set到 factory 中,否则会报错:
        //org.apache.ibatis.binding.BindingException: Invalid bound statement (not found)
        bean.setMapperLocations(new PathMatchingResourcePatternResolver().getResources(mapper_location));
        return bean.getObject();
    }

    @Bean
    public SqlSessionTemplate sqlSessionTemplateTwo(@Qualifier("sqlSessionFactoryTwo") SqlSessionFactory sqlSessionFactory) {
        SqlSessionTemplate template = new SqlSessionTemplate(sqlSessionFactory);
        return template;
    }
}
注意事项:
- 两个数据源各自的 @ConfigurationProperties 中的 prefix 需要和配置文件中的一致。
- mapperScan 中扫描 mapper 接口的路径需要和各自接口的路径一致,sqlSessionTemplateRef 的值需要和各自配置类中实例化的 sqlSessionTemplate 实例名一样,如果没有指定实例名,那么默认就是方法名
- 多数据源必须要使用 @Primary 指定一个主数据源
- 因为我们手动创建了 SqlSessionFactory实例,所以需要将 mapper 文件的地址和 mybatis 配置文件的地址手动添加到 sqlSessionFactory 实例中去,这点是特别需要注意的,要不后面访问数据库的时候会报错:Invalid bound statement (not found),另外:mapper文件必须在各自数据源中都要配置,但是mybatis配置文件只需要在一个里面配置就可以。
- 多数据源访问的时候,访问主数据源只会初始化主数据源,访问非主数据源的话,会将主数据源一并初始化。
三:编写代码
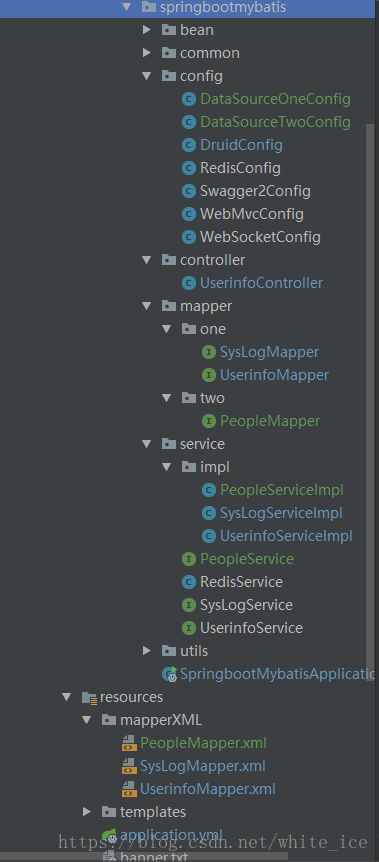
在 mapper 文件夹 one 和 two 包下创建个各自的mapper接口,注意和 mapper.xml中 namespace 对应起来,编写各自的service 和 serviceImpl 以及controller,最终目录如下:
四:启动项目进行测试:

@SpringBootApplication
public class SpringbootMybatisApplication implements CommandLineRunner{

	@Autowired
	@Qualifier("datasourceOne")
	private DataSource dataSource;

	public static void main(String[] args) {
		SpringApplication.run(SpringbootMybatisApplication.class, args);
	}

	@Override
	public void run(String... strings) throws Exception {
		System.out.println(dataSource);
	}
}

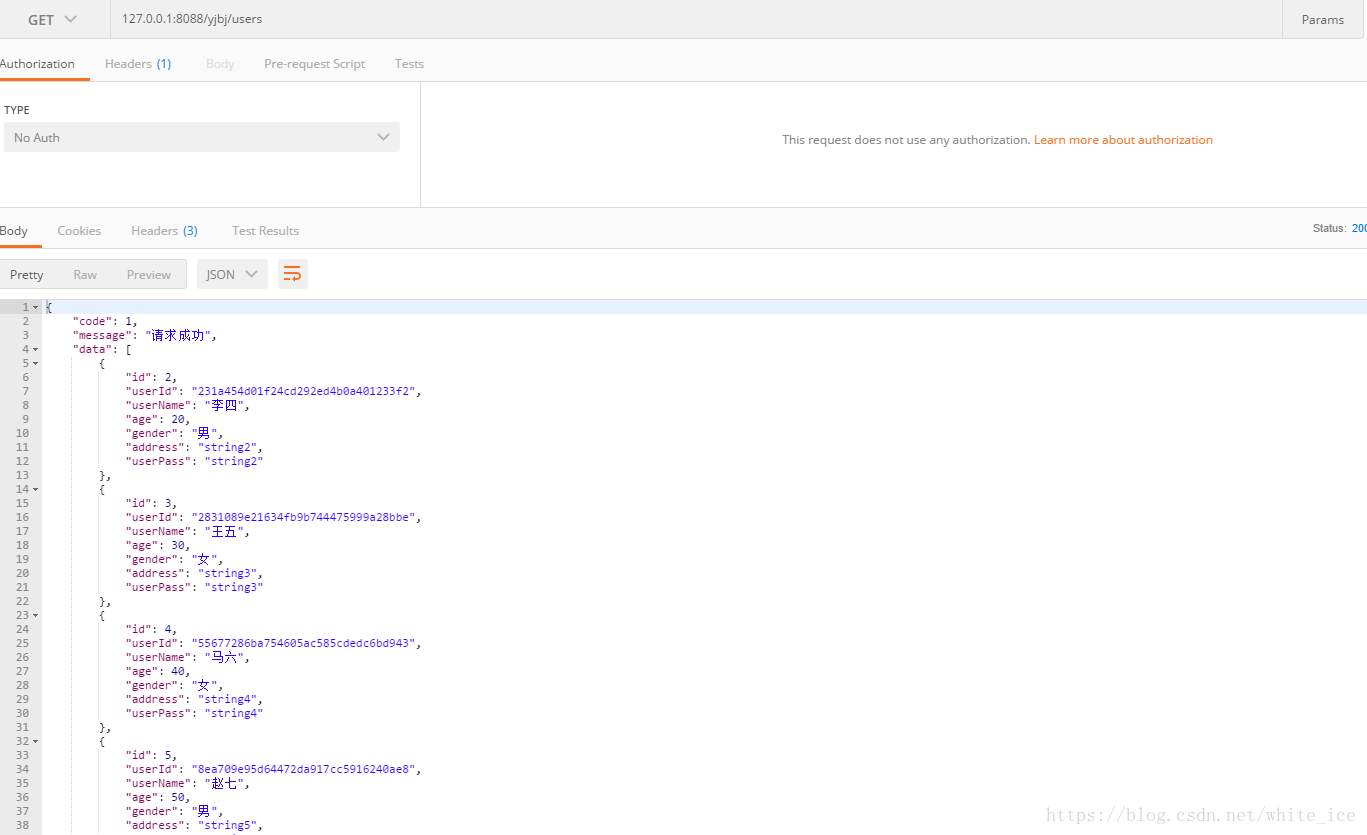
访问不同的mapper接口,自动调用相应的数据源。
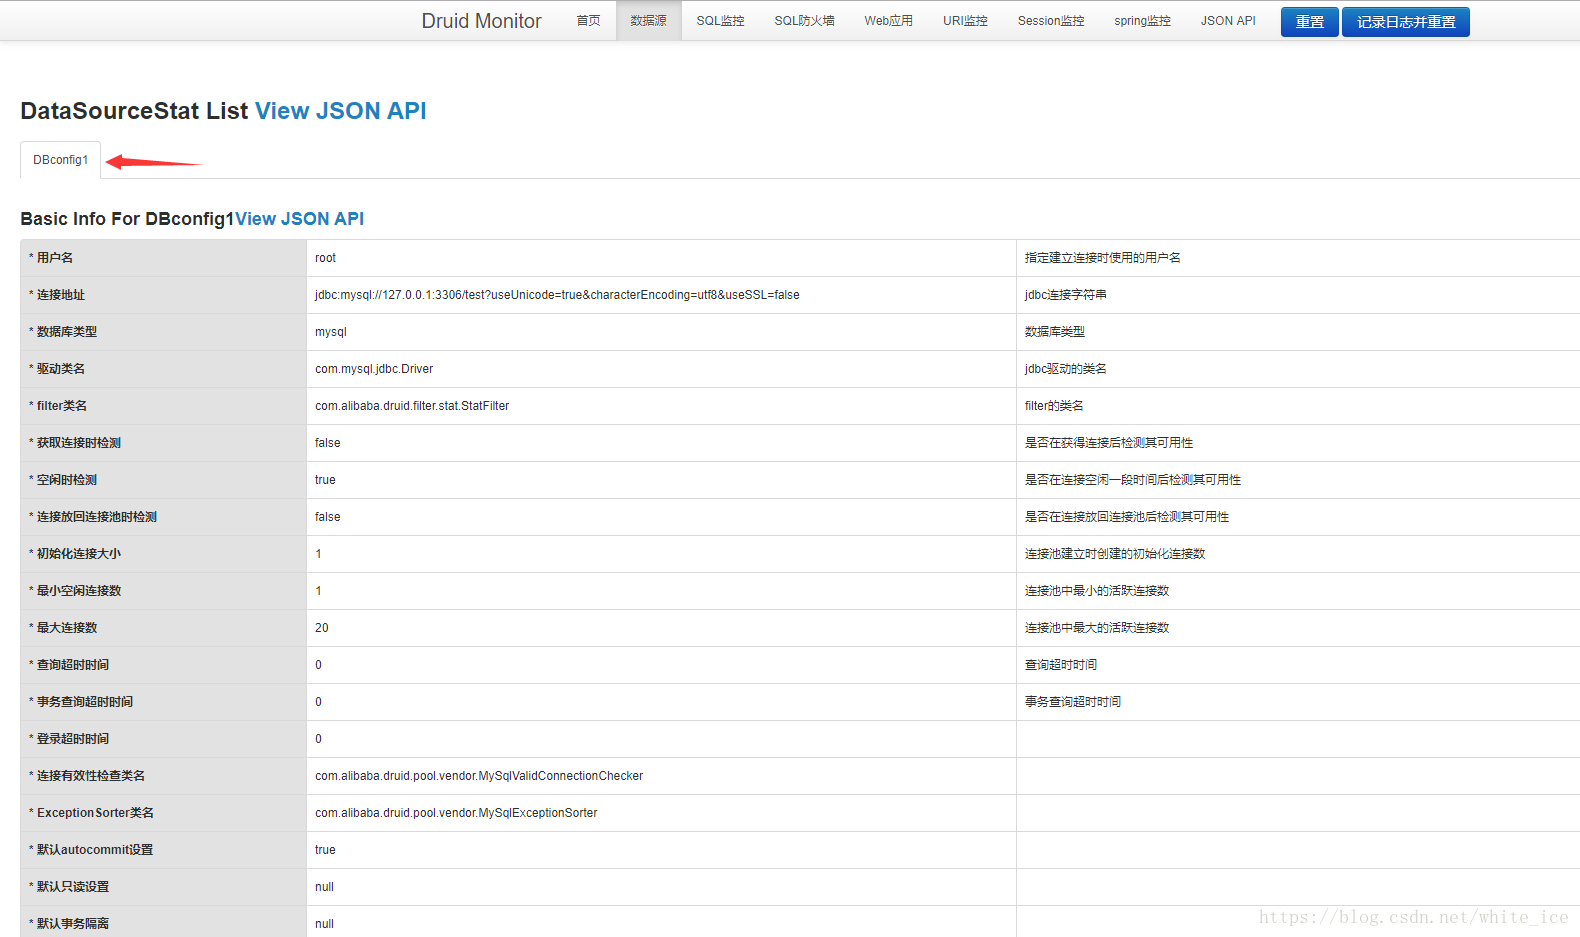
五:最后我们登陆到druid监控系统查看,可以看到确实创建了两个数据源:

结束:项目已经托管到 github:并且已经集成 redis + swagger2 + websocket + 自定义注解实现log日志,这次加上多数据源,以后有时间再加上分布式事务,喜欢的朋友给个star ===》 https://github.com/KingOfMonkey/springboot-mybatis
csdn土豪朋友请从此处下载:https://download.csdn.net/download/white_ice/10732352
不对之处,希望大家指正。