- 源码地址:https://github.com/HX-IoT/ESP32-Developer-Guide
- ESP32开发指南QQ群:824870185,内有pdf版,排版整洁。
学习目的及目标
- 掌握OTA工作过程
- 掌握ESP32的OTA程序设计
OTA工作过程讲解
在实际产品开发过程中,在线升级(OTA)可以远程解决产品软件开发引入的问题,更好地满足用户需求。
ESP32的OTA简介(原文)
OTA(空中)更新是使用 WiFi 连接而不是串行端口将固件加载到 ESP 模块的过程。
ESP32 的 OTA 升级有三种方式:
- Arduino IDE:主要用于软件开发阶段,实现不接线固件烧写
- Web Browser:通过 Web 浏览器手动提供应用程序更新模块
- HTTP Server:自动使用http服务器 - 针对产品应用
在三种升级情况下,必须通过串行端口完成第一个固件上传。
OTA 进程没有强加的安全性,需要确保开发人员只能从合法/受信任的来源获得更新。更新完成后,模块将重新启动,并执行新的代码。开发人员应确保在模块上运行的应用程序以安全的方式关闭并重新启动。
ESP32 Flash空间分区配置
目前使用的ESP-WROOM-32集成4MB SPI Flash。在编译esp32程序时,通过make menuconfig -> PartitionTable 可以有三种分区选择:工厂程序(无OTA分区)/工厂程序(双OTA分区)/用户自定义分区。如下图:

menuconfig中的配置只是修改配置文件中的宏,实际上ESP32 SDK对应Flash分区配置的源码路径是:\esp-idf-v3.0\components\partition_table该路径下有以下.csv文件都是用来对Flash分区进行配置的。
- 无OTA分区:partitions_singleapp.csv、partitions_singleapp_coredump.csv
- 双OTA分区:partitions_two_ota.csv、partitions_two_ota_coredump.csv
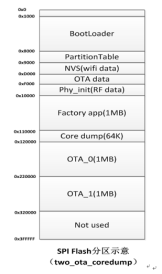
双OTA分区时,4M SPI Flash的分区情况:
OTA 升级策略(HTTP)
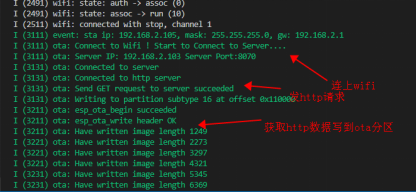
ESP32 连接 HTTP 服务器(可以使本地也可以是云,OTA demo使用本地服务器),发送请求 Get 升级固件;每次读取1KB固件数据,写入Flash。
ESP32 SPI Flash 内有与升级相关的(至少)四个分区:
- OTA data区:决定运行哪个区的App
- Factory App区:有出厂时的默认App
- OTA_0区:OTA_0 App
- OTA_1区:OTA_1 App
首次进行 OTA 升级时,OTA Demo 向 OTA_0 分区烧录目标App,并在烧录完成后,更新 OTA data 分区数据并重启。
系统重启时获取 OTA data 分区数据进行计算,决定此后加载 OTA_0 分区的App执行(而不是默认的 Factory App 分区内的App),从而实现升级。
同理,若某次升级后 ESP32 已经在执行 OTA_0 内的App,此时再升级时,OTA Demo 就会向 OTA_1 分区写入目标App。再次启动后,执行 OTA_1 分区实现升级。以此类推,升级的目标App始终在 OTA_0、OTA_1 两个分区之间交互烧录,不会影响到出厂时的 Factory App 固件,如下图状态。

保密性 Security
模块必须以无线方式联网获取新的固件, 这使得模块被强行入侵并加载了其他代码。 为了减少被黑客入侵的可能性,请考虑使用密码保护您的上传,选择某些OTA端口,也可以给bin文件加密等。
ESP32 OTA Demo升级流程和说明
升级流程
- 电脑连上路由器(AP)
- 电脑运行HTTP服务器(本地)
- 下载OTA Demo到ESP32开发板
- ESP32连上路由器(AP)后就会访问HTTP下载新的APP到OTA区

ESP32的OTA详细过程逻辑

ESP32 OTA 接口简略说明
ota源码路径:\esp-idf-v3.0\examples\system\ota\main\ota_example_main.c
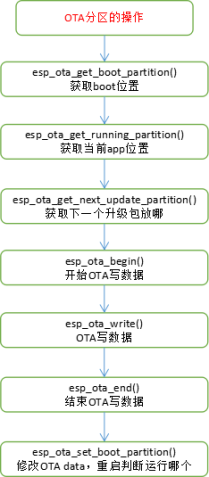
| 1 |
esp_ota_get_boot_partition |
boot |
| 2 |
esp_ota_get_running_partition |
获取当前系统执行的固件所在的Flash分区 |
| 3 |
esp_ota_get_next_update_partition |
获取当前系统下一个(紧邻当前使用的OTA_X分区)可用于烧录升级固件的Flash分区 |
| 4 |
esp_ota_begin esp_ota_write esp_ota_end |
向可用的Flash分区(一般是OTA_X分区)刷入升级目标固件 |
| 5 |
esp_ota_set_boot_partition |
升级完成更新OTA data区数据,重启时根据OTA data区数据到Flash分区加载执行目标(新)固件 |
boot源码路径:\esp-idf-v3.0\components\bootloader\subproject\main\bootloader_start.c
| 1 |
load_partition_table |
加载Flash分区表(从分区表找到OTA data区地址) |
| 2 |
get_selected_boot_partition |
获取Flash启动分区(计算OTA data区数据得到) |
| 3 |
load_boot_imageunpack_load_app: |
从Flash启动分区加载解压固件并执行 |
OTA分区操作流程
软件设计
ESP32的HTTP接口介绍,同TCP接口
OTA任务编写
和HTTP获取城市温度基本相同,这里是将HTTP应答包中的数据存放到OTA分区。
| 1 2 3 4 5 6 7 8 9 10 11 12 13 14 15 16 17 18 19 20 21 22 23 24 25 26 27 28 29 30 31 32 33 34 35 36 37 38 39 40 41 42 43 44 45 46 47 48 49 50 51 52 53 54 55 56 57 58 59 60 61 62 63 64 65 66 67 68 69 70 71 72 73 74 75 76 77 78 79 80 81 82 83 84 85 86 87 88 89 90 91 92 93 94 95 96 97 98 99 100 101 102 103 104 105 106 107 108 109 110 111 112 113 114 115 116 117 118 |
static void ota_example_task(void *pvParameter) { esp_err_t err; /* update handle : set by esp_ota_begin(), must be freed via esp_ota_end() */ esp_ota_handle_t update_handle = 0 ; const esp_partition_t *update_partition = NULL; ESP_LOGI(TAG, "Starting OTA example..."); //获取OTA app存放的位置 const esp_partition_t *configured = esp_ota_get_boot_partition(); //获取当前系统执行的固件所在的Flash分区 const esp_partition_t *running = esp_ota_get_running_partition(); if (configured != running) { ESP_LOGW(TAG, "Configured OTA boot partition at offset 0x%08x, but running from offset 0x%08x", configured->address, running->address); ESP_LOGW(TAG, "(This can happen if either the OTA boot data or preferred boot image become corrupted somehow.)"); } ESP_LOGI(TAG, "Running partition type %d subtype %d (offset 0x%08x)", running->type, running->subtype, running->address); //等待wifi连上后进行OTA,项目中可以使升级命令进入OTA xEventGroupWaitBits(wifi_event_group, CONNECTED_BIT, false, true, portMAX_DELAY); ESP_LOGI(TAG, "Connect to Wifi ! Start to Connect to Server...."); //连http服务器 if (connect_to_http_server()) { ESP_LOGI(TAG, "Connected to http server"); } else { ESP_LOGE(TAG, "Connect to http server failed!"); task_fatal_error(); } //组http包发送 const char *GET_FORMAT = "GET %s HTTP/1.0\r\n" "Host: %s:%s\r\n" "User-Agent: esp-idf/1.0 esp32\r\n\r\n"; char *http_request = NULL; int get_len = asprintf(&http_request, GET_FORMAT, EXAMPLE_FILENAME, EXAMPLE_SERVER_IP, EXAMPLE_SERVER_PORT); if (get_len < 0) { ESP_LOGE(TAG, "Failed to allocate memory for GET request buffer"); task_fatal_error(); } int res = send(socket_id, http_request, get_len, 0); free(http_request); if (res < 0) { ESP_LOGE(TAG, "Send GET request to server failed"); task_fatal_error(); } else { ESP_LOGI(TAG, "Send GET request to server succeeded"); } //获取当前系统下一个(紧邻当前使用的OTA_X分区)可用于烧录升级固件的Flash分区 update_partition = esp_ota_get_next_update_partition(NULL); ESP_LOGI(TAG, "Writing to partition subtype %d at offset 0x%x", update_partition->subtype, update_partition->address); assert(update_partition != NULL); //OTA写开始 err = esp_ota_begin(update_partition, OTA_SIZE_UNKNOWN, &update_handle); if (err != ESP_OK) { ESP_LOGE(TAG, "esp_ota_begin failed, error=%d", err); task_fatal_error(); } ESP_LOGI(TAG, "esp_ota_begin succeeded"); bool resp_body_start = false, flag = true; //接收完成 while (flag) { memset(text, 0, TEXT_BUFFSIZE); memset(ota_write_data, 0, BUFFSIZE); //接收http包 int buff_len = recv(socket_id, text, TEXT_BUFFSIZE, 0); if (buff_len < 0) { //包异常 ESP_LOGE(TAG, "Error: receive data error! errno=%d", errno); task_fatal_error(); } else if (buff_len > 0 && !resp_body_start) { //包头 memcpy(ota_write_data, text, buff_len); resp_body_start = read_past_http_header(text, buff_len, update_handle); } else if (buff_len > 0 && resp_body_start) { //数据段包 memcpy(ota_write_data, text, buff_len); //写flash err = esp_ota_write( update_handle, (const void *)ota_write_data, buff_len); if (err != ESP_OK) { ESP_LOGE(TAG, "Error: esp_ota_write failed! err=0x%x", err); task_fatal_error(); } binary_file_length += buff_len; ESP_LOGI(TAG, "Have written image length %d", binary_file_length); } else if (buff_len == 0) { //结束包 flag = false; ESP_LOGI(TAG, "Connection closed, all packets received"); close(socket_id); } else {//未知错误 ESP_LOGE(TAG, "Unexpected recv result"); } } ESP_LOGI(TAG, "Total Write binary data length : %d", binary_file_length); //OTA写结束 if (esp_ota_end(update_handle) != ESP_OK) { ESP_LOGE(TAG, "esp_ota_end failed!"); task_fatal_error(); } //升级完成更新OTA data区数据,重启时根据OTA data区数据到Flash分区加载执行目标(新)固件 err = esp_ota_set_boot_partition(update_partition); if (err != ESP_OK) { ESP_LOGE(TAG, "esp_ota_set_boot_partition failed! err=0x%x", err); task_fatal_error(); } ESP_LOGI(TAG, "Prepare to restart system!"); esp_restart(); return ; } |
效果展示
测试流程(原文)
启动服务器
编译链内Python 有一个内置的 HTTP 服务器,我们这里可以直接使用它。我们将会使用示例 get-started/hello_world 作为需要更新的固件。
打开一个终端,输入如下的命令来编译示例并启动服务器:
| 1 2 3 4 |
cd $IDF_PATH/examples/get-started/hello_world //进入helloworld路径 make //编译 cd build //进入编译文件.bin目录 python -m SimpleHTTPServer 8070 //运行http服务器(本地) |

服务器运行后,构建目录的内容可以通过网址 http://localhost:8070/ 浏览到。
NB: 在某些系统中,命令可能是 python2 -m SimpleHTTPServer。
NB: 你可能已经注意到,用于更新的 “hello world” 没有任何特殊之处,这是因为由 esp-idf 编译的任何 .bin 应用程序都可以作为 OTA 的应用程序。唯一的区别是它是会被写到工厂分区还是 OTA 分区。
如果你的防火墙阻止了对端口 8070 的访问,请在本示例运行期间打开它。
If you have any firewall software running that will block incoming access to port 8070, configure it to allow access while running the example.
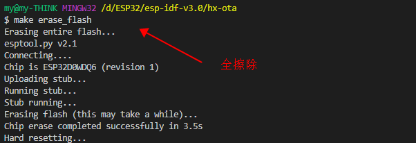
在烧写时,需要先用目标 erase_flash 来擦除整个 flash(这会删除之前在 ota_data 分区留下的所有数据),然后通过串口烧写工厂进行:
| 1 |
make erase_flash flash //擦除整个 flash |
修改WiFi账号密码,HTTP服务器的IP(电脑IP)和Port,编译、下载OTA Demo代码到ESP32
ESP32连上WiFi后自动OTA,成功后运行HelloWorld程序
效果展示


OTA总结
此处OTA方式的优点与可能的问题
从ESP32 SDKOTA Demo升级策略看,应该是比较稳妥的,无论升级期间出现任何异常,只要OTA data区数据未被修改,设备还可以加载原有的固件执行。
目前看来可能需要考虑的地方有:
- 是否存在可能,OTA data数据指向了一个升级失败的区,导致设备加载损坏的固件;
- 因为OTA需要三个升级相关区,因此固件大小被限制在小于SPI Flash Size/3
- 获取升级目标固件还应当加入防错/重传/校验的机制;出现异常时也应当有相应处理。
- 留出后台控制接口,用于修改OTA data区,便于远程控制程序运行。
OTA完全使用了官方的源码,项目中建议使用HTTPS。
源码地址:https://github.com/xiaolongba/wireless-tech
