我们在很多情况下,程序的运行都需要做日志或者某些记录,这就需要用到logging模块来自动记录;同样的,配置文件也是程序运行时做记录的,但它记录的是相关配置
logging模块
- logging.basicConfig方式
import logging

#修改日志参数,注意:每个参数之间用,分割开
logging.basicConfig(
    level = logging.DEBUG,  #level参数,设置级别
    filename = "logger.log",  #filename参数,将内容写入logger.log日志文件
    filemode = 'w',  #修改模式为只写,默认模式为追加
    format = "%(asctime)s %(filename)s[%(lineno)d]  %(message)s"
    #输出自定义的格式内容,分别是时间、执行文件名、日志在代码内的行号、日志信息
)

#几个longging方法,参数内容可以自己设置
logging.debug('debug message')  #执行信息
logging.info('info message')  #普通信息记录(最常用)
logging.warning('warning message')  #警告信息
logging.error('error message')  #错误信息
logging.critical('critical message')  #逻辑问题
运行结果:

- Logger对象的方式
import logging

def logger_get():
    #创建对象
    logger = logging.getLogger()  #创建一个Logging对象
    fh = logging.FileHandler('log_test.log')  #创建向文件发送日志的对象
    ch = logging.StreamHandler()  #创建向屏幕端发送日志的对象
    fm = logging.Formatter("%(asctime)s  %(message)s")  #修改日志的格式

    #调用对象
    fh.setFormatter(fm)  #将对象fh和ch的日志格式设置为fm样式
    ch.setFormatter(fm)
    logger.setLevel('DEBUG')  #设置级别为DEBUG
    logger.addHandler(fh)
    logger.addHandler(ch)

    return logger  #返回一个logger对象

logger = logger_get()

#打印信息(执行调用对象)
logger.debug('hello python')
logger.info('this is from info')
logger.warning('this warning')
logger.error('this is error')
logger.critical('this critical')
运行结果:

configparser模块
用来配置文件的模块;
配置文件:文件对分为一块一块的内容,每一块都是由多个键值对来组成
- 创建配置文件:
import configparser
#创建一个configparser对象,相当于有了一个空字典
con_fig = configparser.ConfigParser()
#定义要写入的内容,此处为创建一个"DEFAULT"块
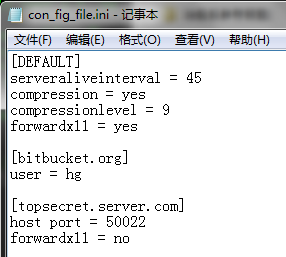
con_fig["DEFAULT"] = {'ServerAliveInterval': '45', #参数间用逗号隔开
'Compression': 'yes',
'CompressionLevel': '9'}
#添加其他的块,并定义写入的内容
con_fig['bitbucket.org'] = {} #定义一个新块['bitbucket.org'],在新块内再定义一块['User']的键值对
con_fig['bitbucket.org']['User'] = 'hg'
con_fig['topsecret.server.com'] = {} #再定义一个新块
topsecret = con_fig['topsecret.server.com'] #用一个变量topsecret接收这个新块
topsecret['Host Port'] = '50022'
topsecret['ForwardX11'] = 'no'
con_fig['DEFAULT']['ForwardX11'] = 'yes' #在['DEFAULT']块下又定义块键值对
#写入到配置文件中
with open('con_fig_file.ini', 'w') as f:
con_fig.write(f) #把con_fig对象写入到f所指的文件中
运行结果:
- 查询配置文件(和字典的操作类似):
import configparser

#配置文件内容的查询,要先获取文件
config = configparser.ConfigParser()  #建立一个configparser对象
config.read('con_fig_file.ini')  #用对象来直接读取文件

#打印除了DEFAULT外的块名,['bitbucket.org', 'topsecret.server.com']
print(config.sections())
#用in来判断是否存在'bytebong.com'块,返回布尔值
print('bytebong.com' in config)

#类似字典一样,一层一层访问key下的值
print(config['topsecret.server.com']['ForwardX11'])

#用for转可迭代对象后遍历配置文件中的所有value,传入参数为'bitbucket.org'
for value in config['bitbucket.org']:
    print(value)

#option取所有的键,参数为'bitbucket.org'
print(config.options('bitbucket.org'))
#items取所有键值对,参数为'bitbucket.org'
print(config.items('bitbucket.org'))
#取'bitbucket.org'块中的'compression'这个键对应的值
print(config.get('bitbucket.org','compression'))
运行结果:

- 配置文件的增、改、删:
import configparser

#创建对象并读取文件内容
config = configparser.ConfigParser()
config.read('con_fig_file.ini')  #用对象来直接读取文件

#增、删、改
config.add_section('NewBlock')  #指定要添加进文件的内容,这里是增加一个块'NewBlock'
config.set('bitbucket.org','7k7k','4399')  #给配置文件的块加入value(值)
#第一个参数为块名,后面两个参数为键值对

config.remove_section('topsecret.server.com')  #删除块
config.remove_option('bitbucket.org','user')  #删除键值对

#执行写入操作(增、改、删都是写入),写入到new_i文件
config.write(open('new_i.cfg', "w"))  #配置文件后缀为ini何cfg都可以
运行结果:

hashlib模块
hashlib是用于加密操作的,3.x里代替了md5模块和sha模块,主要提供了SHA1, SHA224, SHA256, SHA384, SHA512,MD5 等算法;但是hashlib加密是单向的,只能加密不能解密
import hashlib

obj = hashlib.md5()  #建立一个用md5加密的对象obj
obj.update('hello'.encode('utf-8'))
#将字符串加密,updata参数必须是字节类型,所以encode编码一下
#因为加密算法、加密后位数是固定的,所以每一个加密对象与结果加密结果都是唯一对应的

#带参数的加密方式,有了参数之后别人就算用md5解密工具也解不了,因为参数你自定义的
upobj = hashlib.md5('world'.encode('utf8'))
upobj.update('hello'.encode('utf-8'))

#256加密(更复杂,但时间效率也更低)
obj_256 = hashlib.sha256()
obj_256.update('shine'.encode('utf-8'))

#输出加密后的内容
print(obj.hexdigest())
print(upobj.hexdigest())
print(obj_256.hexdigest())
运行结果:

